
4. How to Edit a Client
Once a client exists in Wifox, you can fine-tune their profile, track interactions, upload documents, and manage accounts—all from the Edit window. Follow these numbered steps to ensure nothing is overlooked.
After creating a client, the Edit window will open automatically.
In the Edit window, you can:
-
-
Edit the client’s information that you entered during the creation stage (except for type and project). This also includes reassigning clients to another desk or status.
-
Add or edit Actions: comments, notes, and other relevant information within the CRM.
-
Add or edit Requests: for instance, support tickets, call requests, etc.
-
Upload Documents: passport or ID, and bank card (front and back).
-
Check the client’s Transactions.
-
Add or edit client’s Accounts with Assets (currency and balance on this account).
-
Note: Information about current client’s Requests, Transactions and Accounts pull up automatically from relevant modules.
-
Open the Client’s Record
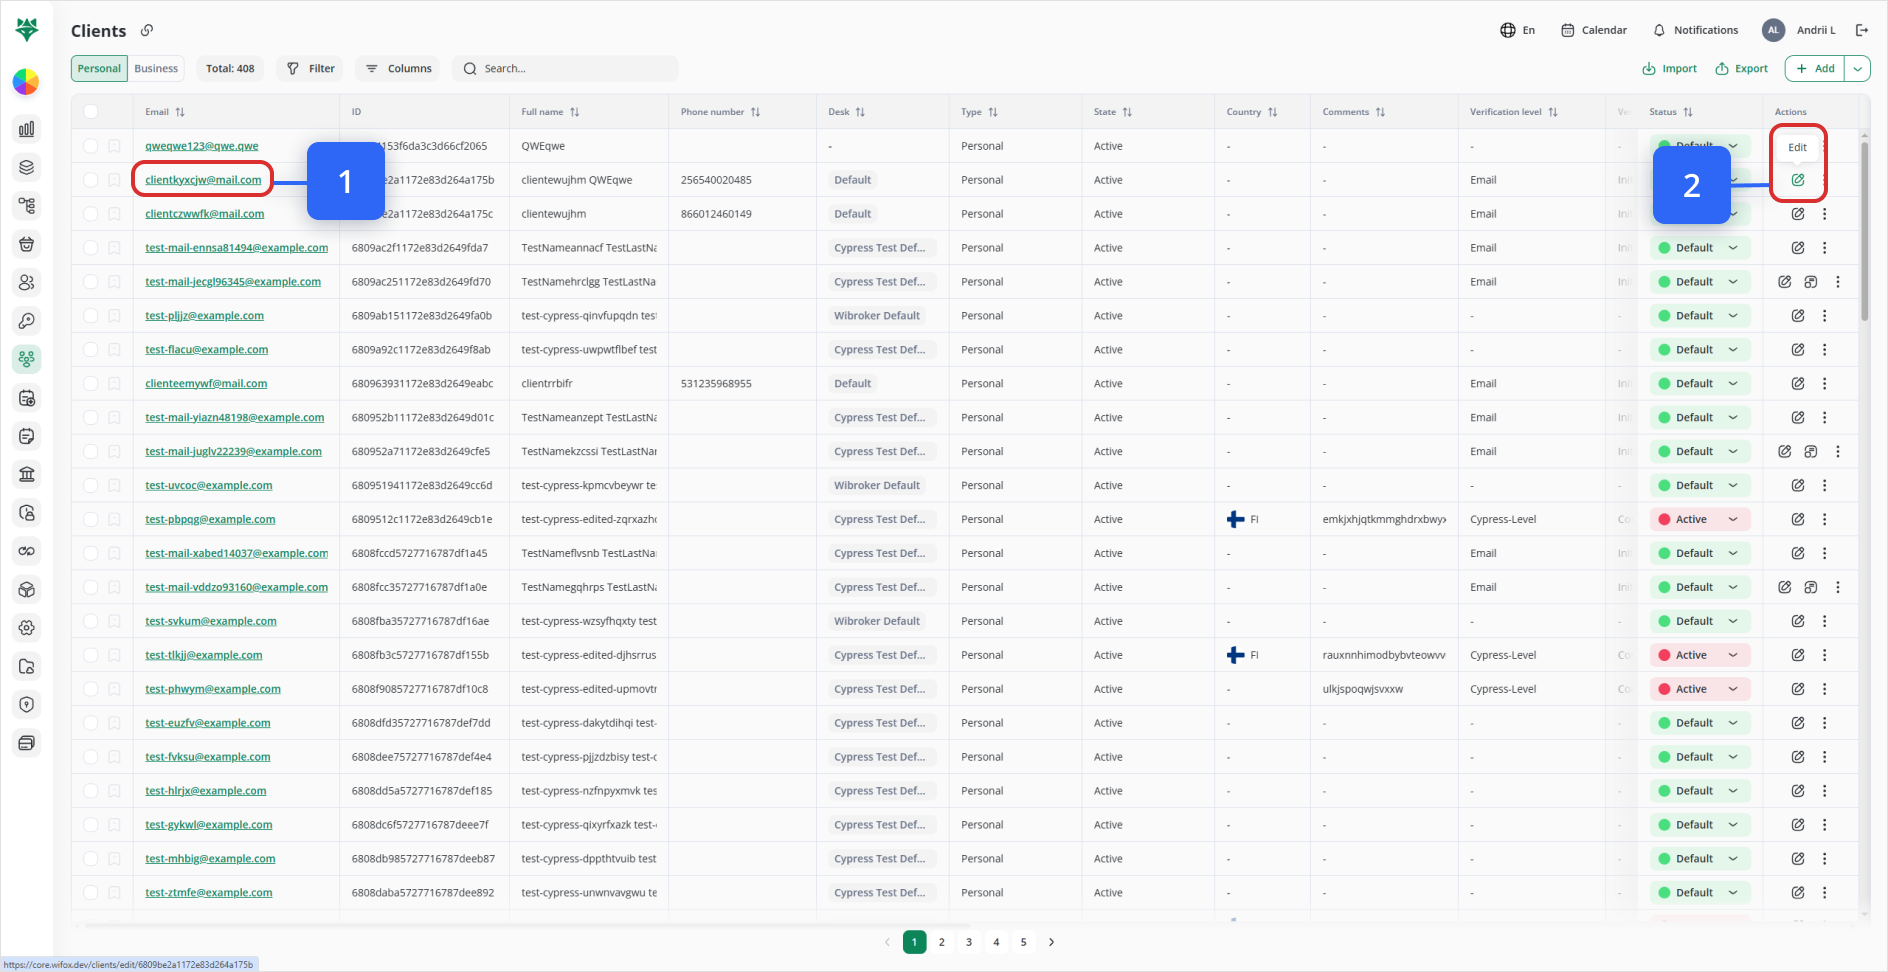
In the Clients list, locate the row for the client you want to edit (Look at #1 on the image below).
-
Locate your client (Step #1)
-
Use the Search… box at top of the Clients list to type any part of their Email, Full name, or ID. (Instant filtering, partial matches allowed.)
-
Or click Filter ► Desk, Project, or Created date to narrow by scope.
-
Pro Tip: Bookmark heavy-use filters (e.g. “All Personal clients in Acme Project”) via the URL link icon next to the page title.
-
-
Enter Edit mode
-
Click the
Edit(pencil)pencil icon in the Actions column for that row (LookStepat#2).#2 -
The right-hand drawer slides out, pre‐loaded on the
imageGeneralbelow).tab. -
-
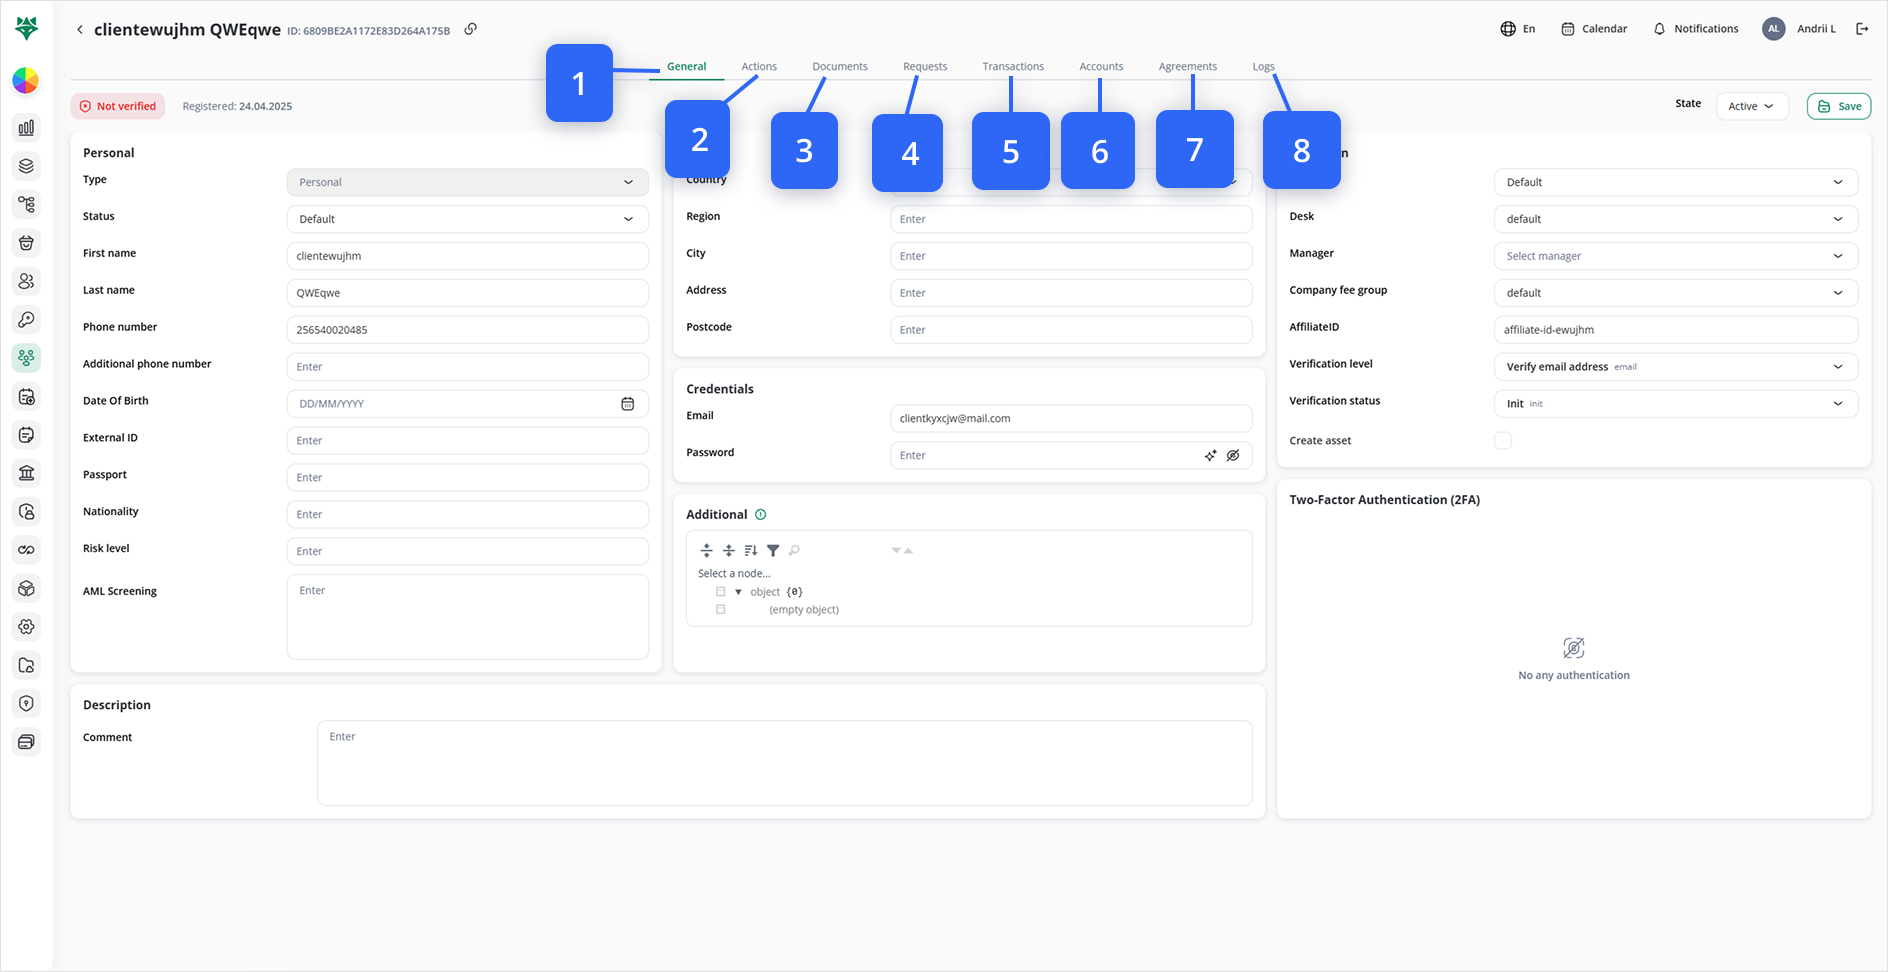
At the top of the client’s detail view you’ll see these tabs:
-
General
(default)(1): Core profile fields you can edit -
Actions (2): Log calls, notes & follow-ups
-
Documents (3): KYC uploads (IDs, bank cards, proof of funds)
-
Requests (4): Client-generated tickets and ad hoc data requests
-
Transactions (5): All ledger entries for this client (read-only)
-
Accounts (6): Create/manage asset or bank accounts linked to this client
-
Agreements (7): View signed contracts, NDAs, service agreements
-
Logs (8): Complete audit trail of every field change with user/timestamp details
Pro Tip: Press Ctrl + F inside the drawer to quickly find any field or label.
General Tab
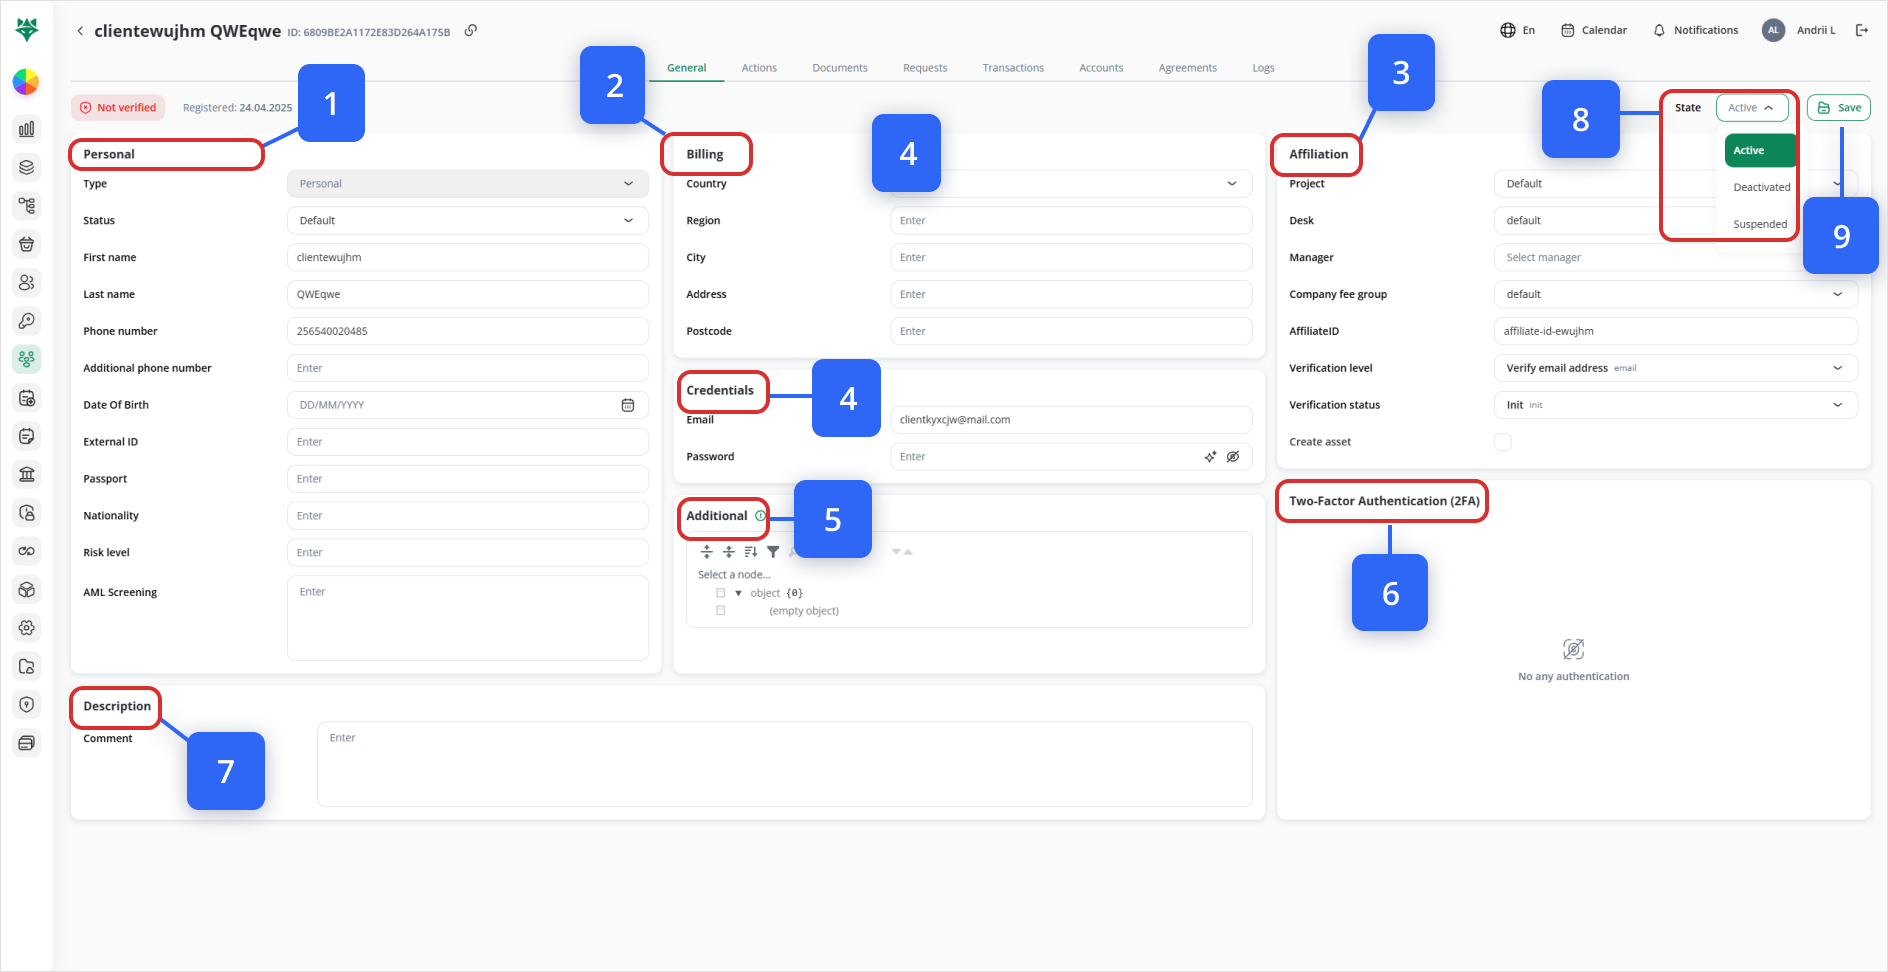
1. Personal (Step #1)
-
Personal (1)Type:Edit▶︎ Personal vs Business.-
Personal clients have first/last
name,names,phone,DOB, risk fields. -
Business clients use the 3-step wizard (company profile + UBO + members).
-
-
Status: Default or any custom statuses you’ve configured (e.g. “VIP”, “High-Risk”).
-
Name & Contact
-
First name, Last name: Displayed on statements, emails, and internal lists.
-
Phone number (required) & Additional phone number (optional): Used for SMS alerts or 2FA.
-
-
Date of Birth:
-
Opens a date
ofpicker;birth,usedpassport,fornationality,ageriskverification.level, AML notes, etc. -
Example: You might block accounts under age 18.
-
-
External ID: Your own CRM or partner reference number (e.g. “Zendesk User #1234”).
-
Passport: Enter passport number if you collect it for KYC.
-
Nationality: Impacts tax or compliance rules.
-
Risk level: Your internal scale (e.g. Low, Medium, High)—drives transaction limits.
-
AML Screening: Free-form field to paste screening summary or pass/fail status.
Warning: Changing Type from Business→Personal is not allowed after initial creation.
Billing (2)Step #2)
-
Country:
UpdateDropdowncountry,ofregion,ISOcity,countryaddress,codes.postcode. -
Region: State/province field (free text).
-
City, Address, Postcode: Standard postal fields.
Use case: Some payment rails require exact match between billing address and card on file.
Affiliation (3)Step #3)
Controls where the client “lives” in your operational hierarchy:
-
Project:
ChangeRequiredProject,forDesk,scoping data and routing workflows. -
Desk: Optional sub-group within a Project (e.g. “LOAN desk” vs “ONBOARDING desk”).
-
Manager:
orThe internal employee accountable for this client. -
Company fee
group;group:updateAssignsverificationtieredlevel/status.pricing or service-level agreements. -
AffiliateID: Partner or campaign code for revenue sharing.
-
Verification level: KYC method requested (Email, Video, In-person).
-
Verification status: Init, Pending, Approved, Rejected.
-
Create asset: Checking this auto-provisions an asset ledger entry when saving.
Example: Jane Doe is in Project = “Acme USA,” Desk = “Sales,” Manager = “Bob.”
4. Credentials (4)Step #4)
-
Email:
ModifyLoginemail or passwordID (useread-only here). -
Password:
-
Must meet complexity: ≥8 chars, uppercase, lowercase, digit, special char.
-
✨ Sparkle auto-generates a random secure password.
-
👁️ Eye toggles show/hide.
-
Pro Tip: Rotate client passwords quarterly by clicking ✨ and emailing the
sparklenewiconcredentials.to generate and the eye icon to show/hide).
-
5. Additional (5)Step #5):
-
JSONA JSON-style tree picker for arbitrarily structured metadata:
-
Click the + to
addappend a new key/value. -
Rearrange, filter, or
removedeletecustomentries.metadata
fields. -
Use cases:
Store third-party IDs (e.g. “StripeCustomerID”:“cus_ABC123”).
Attach ad-hoc flags (e.g. “VIP: true”).
6. Two-Factor Authentication (2FA) (6)Step #6):
-
methods;Displays
hoveranyovermethods already set up (Email, SMS, TOTP). -
Hover on a non-default method to reveal Make default or
deleteDelete.non-default
Note: You cannot add 2FA methods here—clients configure those on first login.
7. Description (Step #7)
-
Comment: Unlimited text. Good for case notes or behavioral observations.
8. State (Step #8) & Save (Step #9)
-
State dropdown (top-right) toggles among Active, Deactivated, Suspended.
-
Deactivated preserves the record but blocks login/assignment.
Description(7):Suspended
Addcanorbeeditusedfree-formforcomments.temporary holds pending review.
-
State(8): Use the dropdown at top-right of the form to change the client’s status (e.g. Active, Deactivated, Suspended).ClickSave
whencommitsyou’realldonechanges(9).on the General tab.
Actions Tab
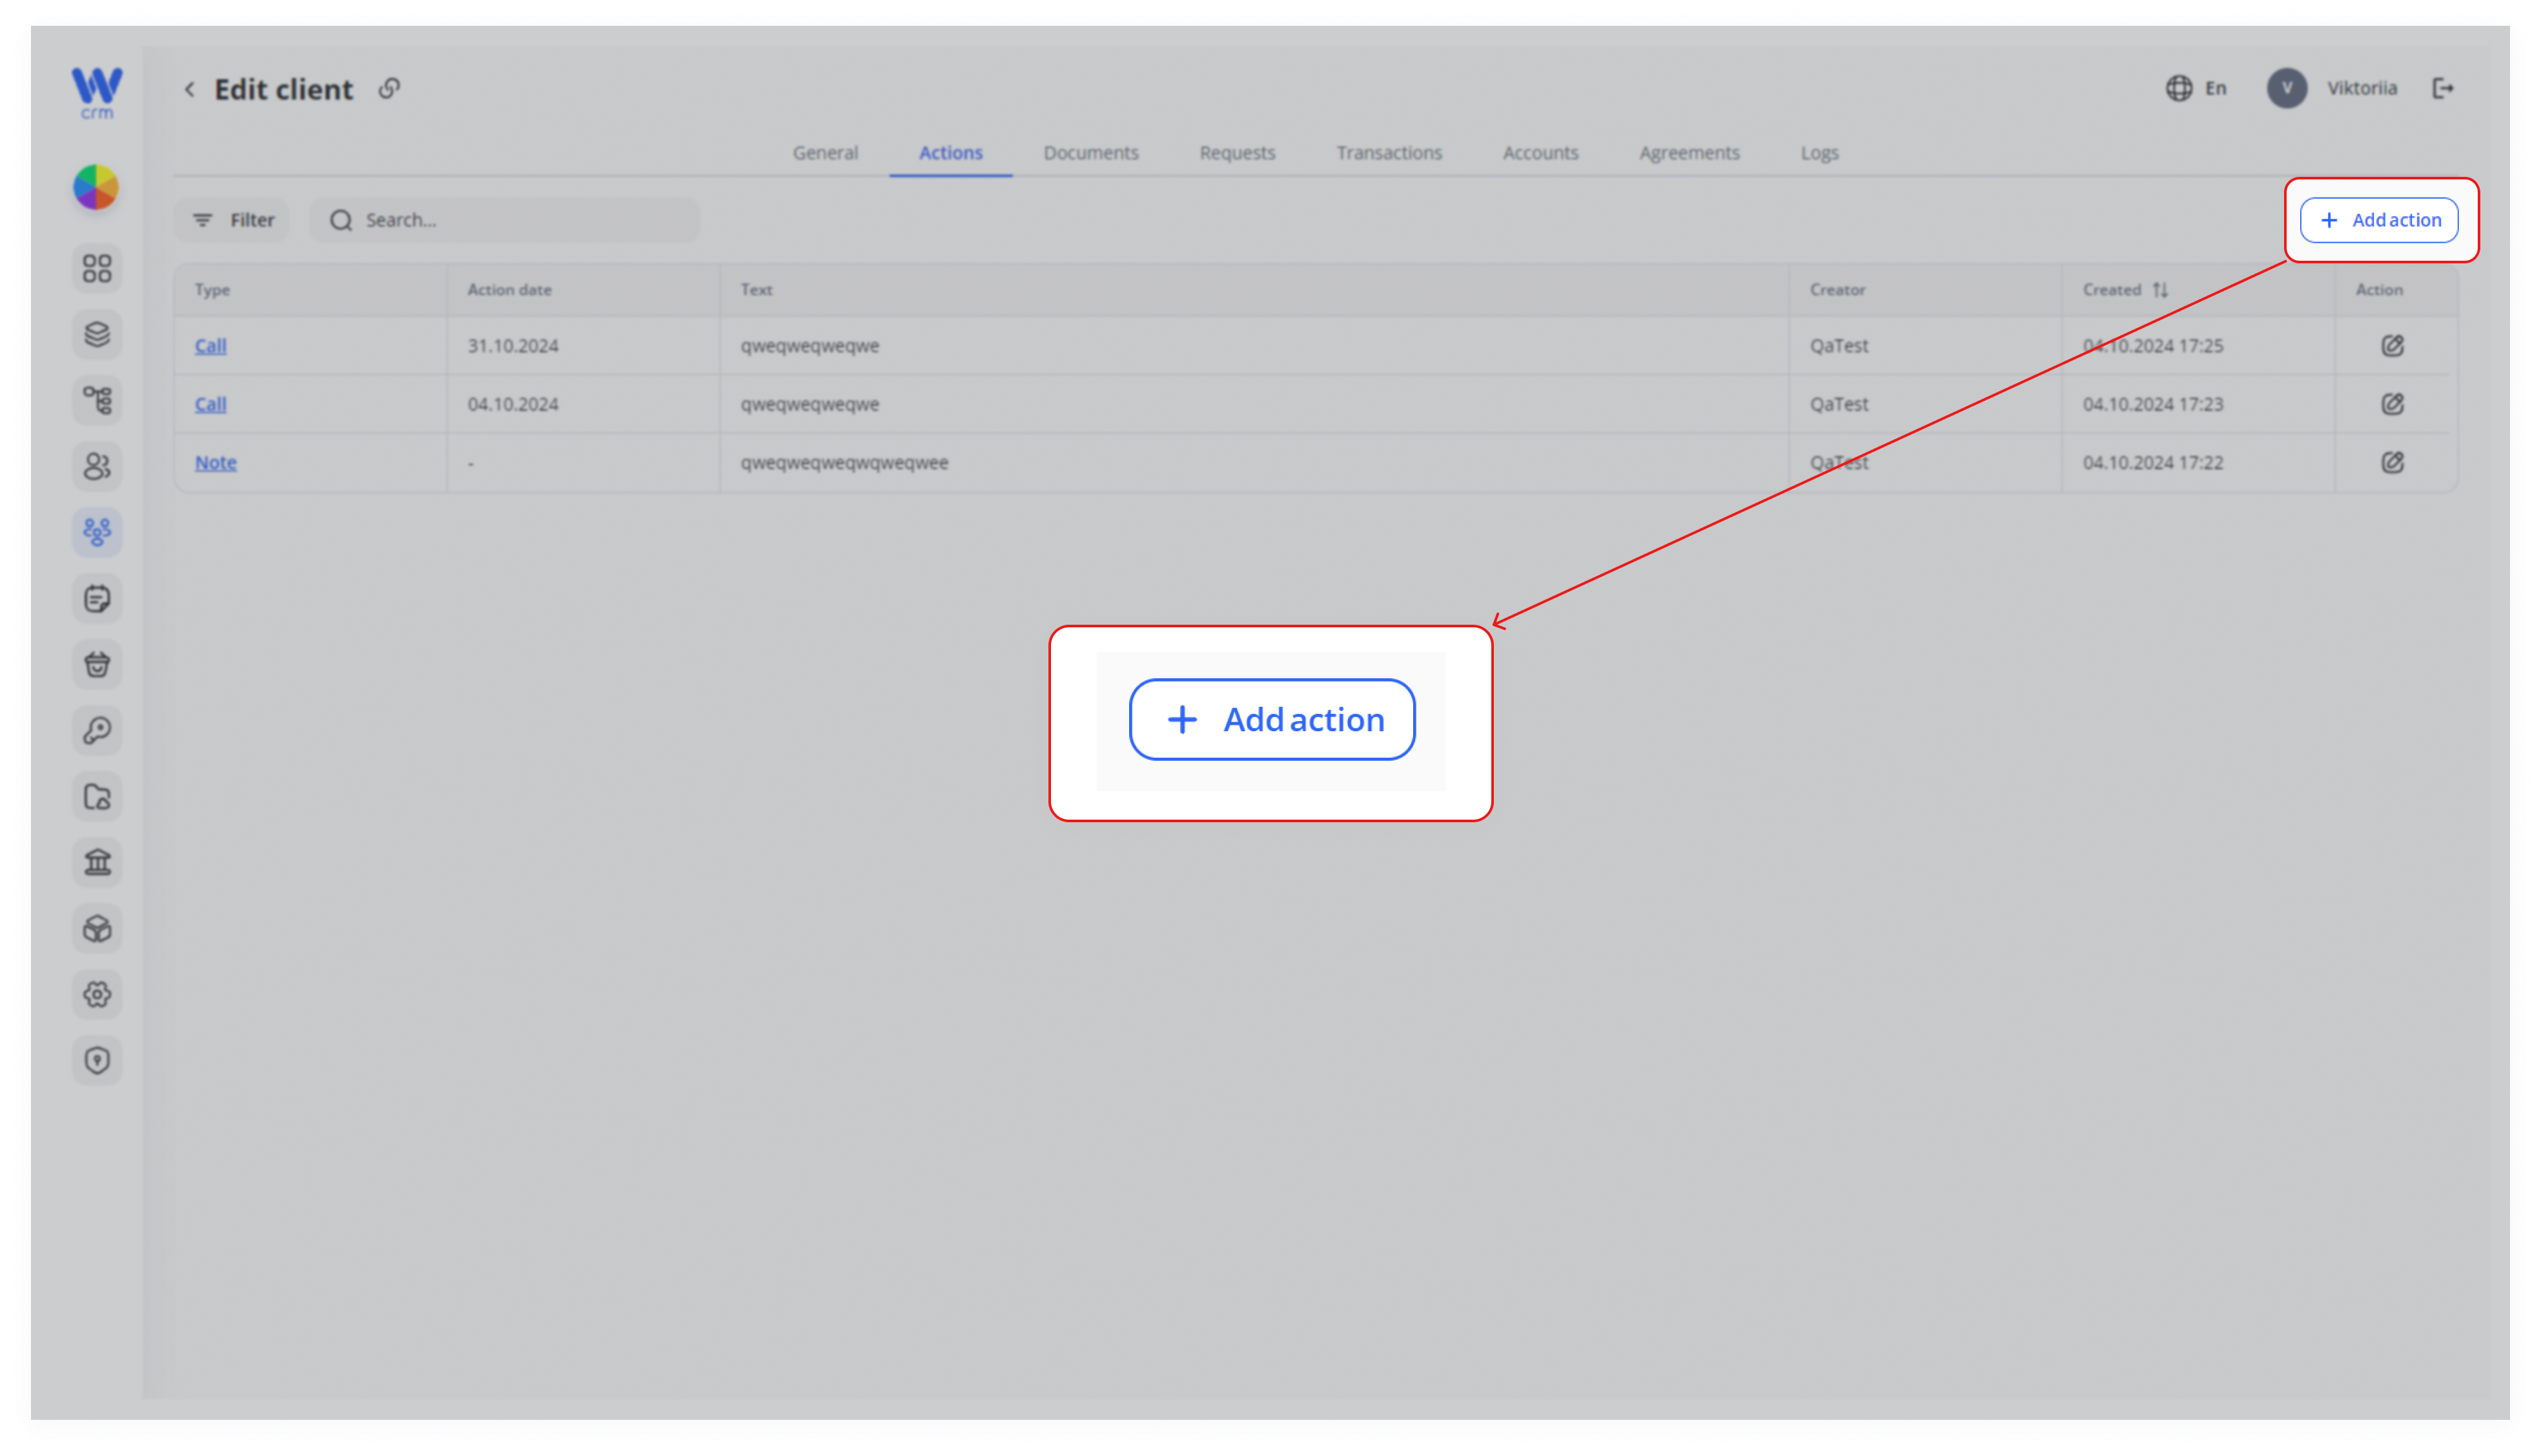
1. Click Add action in the top-right.
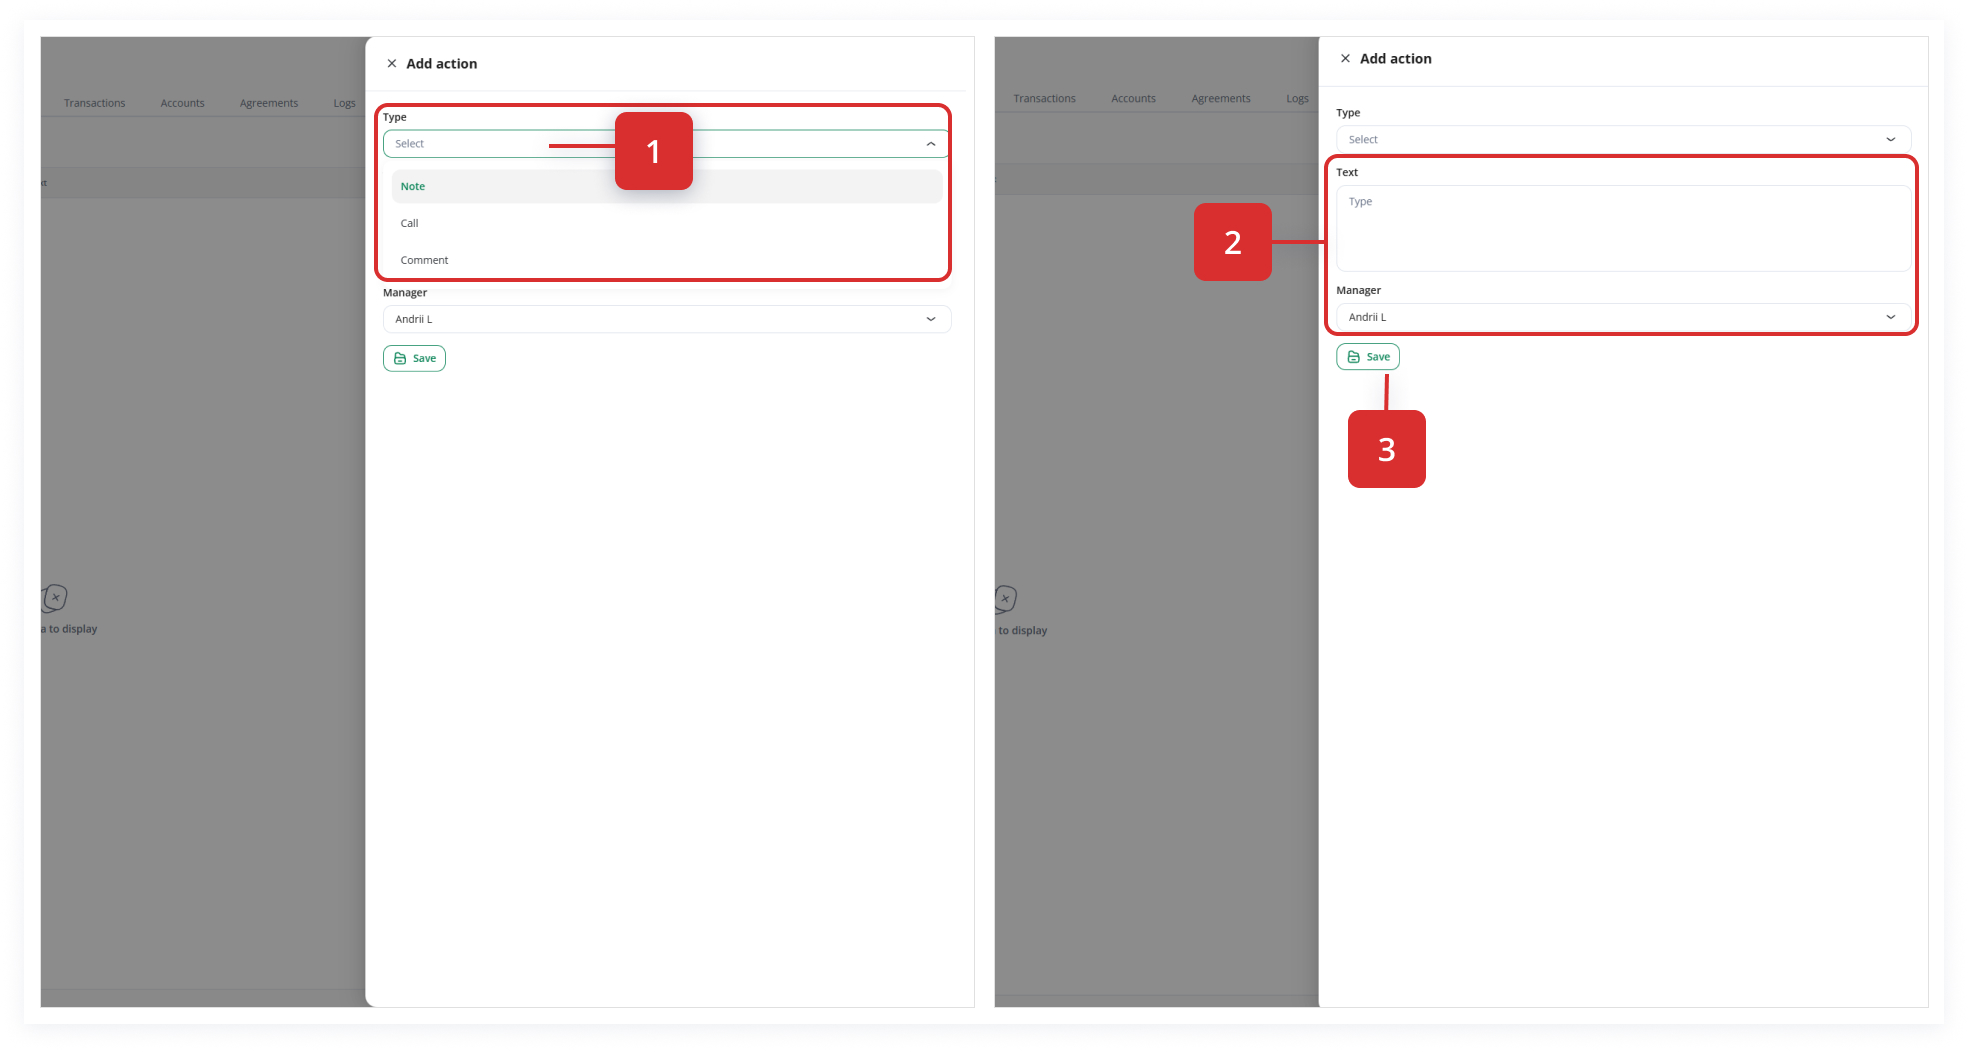
2. Choose a Type (Note / Call / Comment). (Step 1)
If Call, set an Action Date.
3. Enter the Text of your action.
For Call or Comment, select a Manager. (Step 2)
6. Click Save. (Step 3)
Note: You can edit any action later, but you cannot delete it or change its Type.
Documents Tab
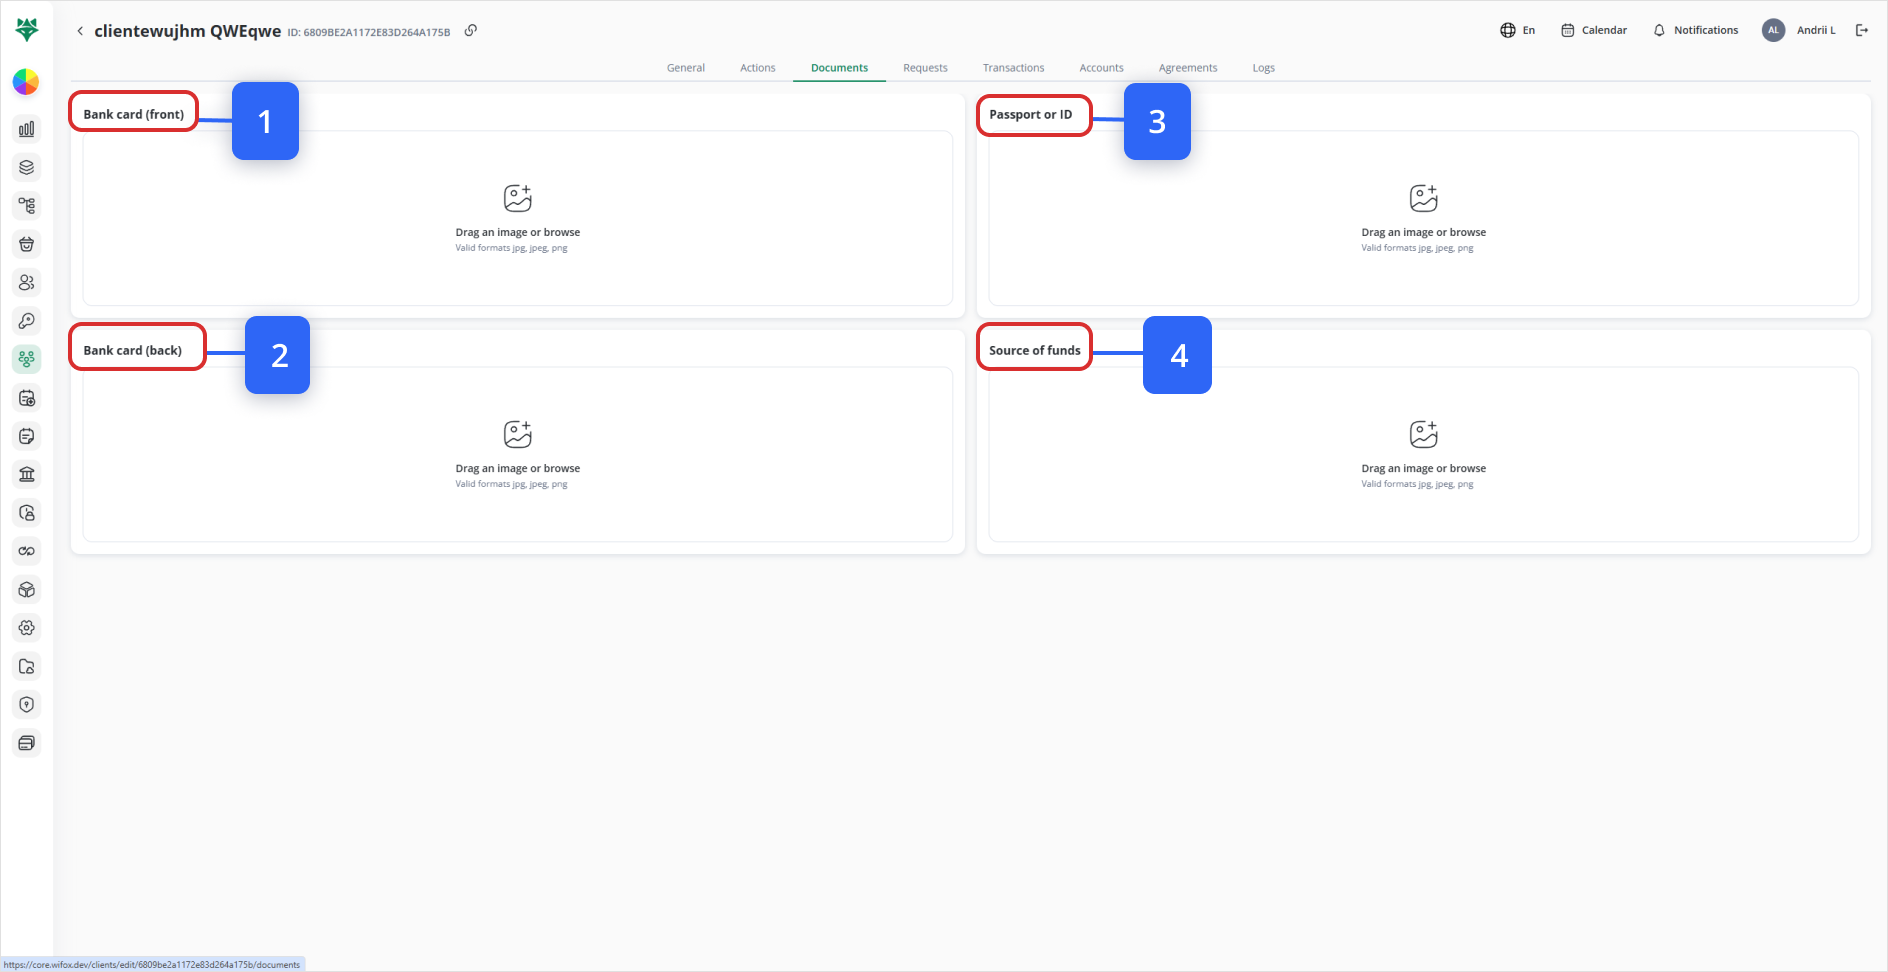
Upload or replace verification documents by dragging or browsing to add images for:
- Bank card (front) (1)
- Bank card (back) (2)
- Passport or ID (3)
- Source of funds (4)
Files save automatically.
Requests Tab
1. Click Add in the top-right.
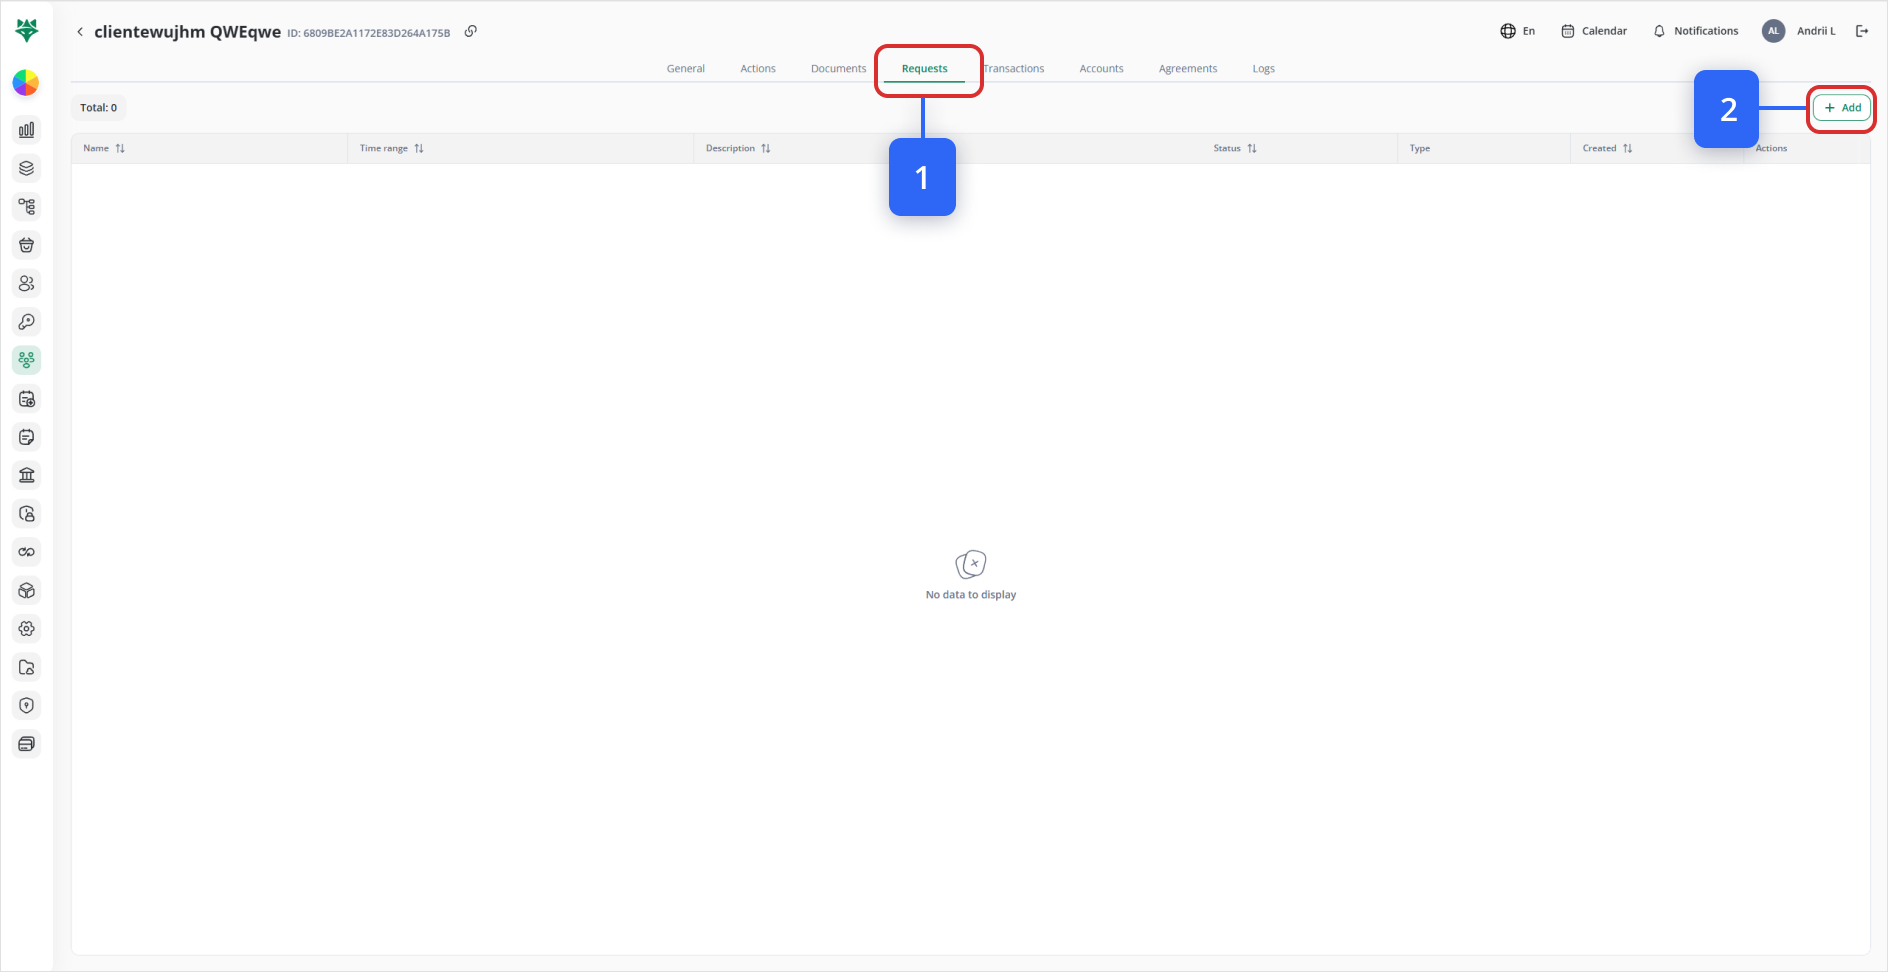
2. Fill in:
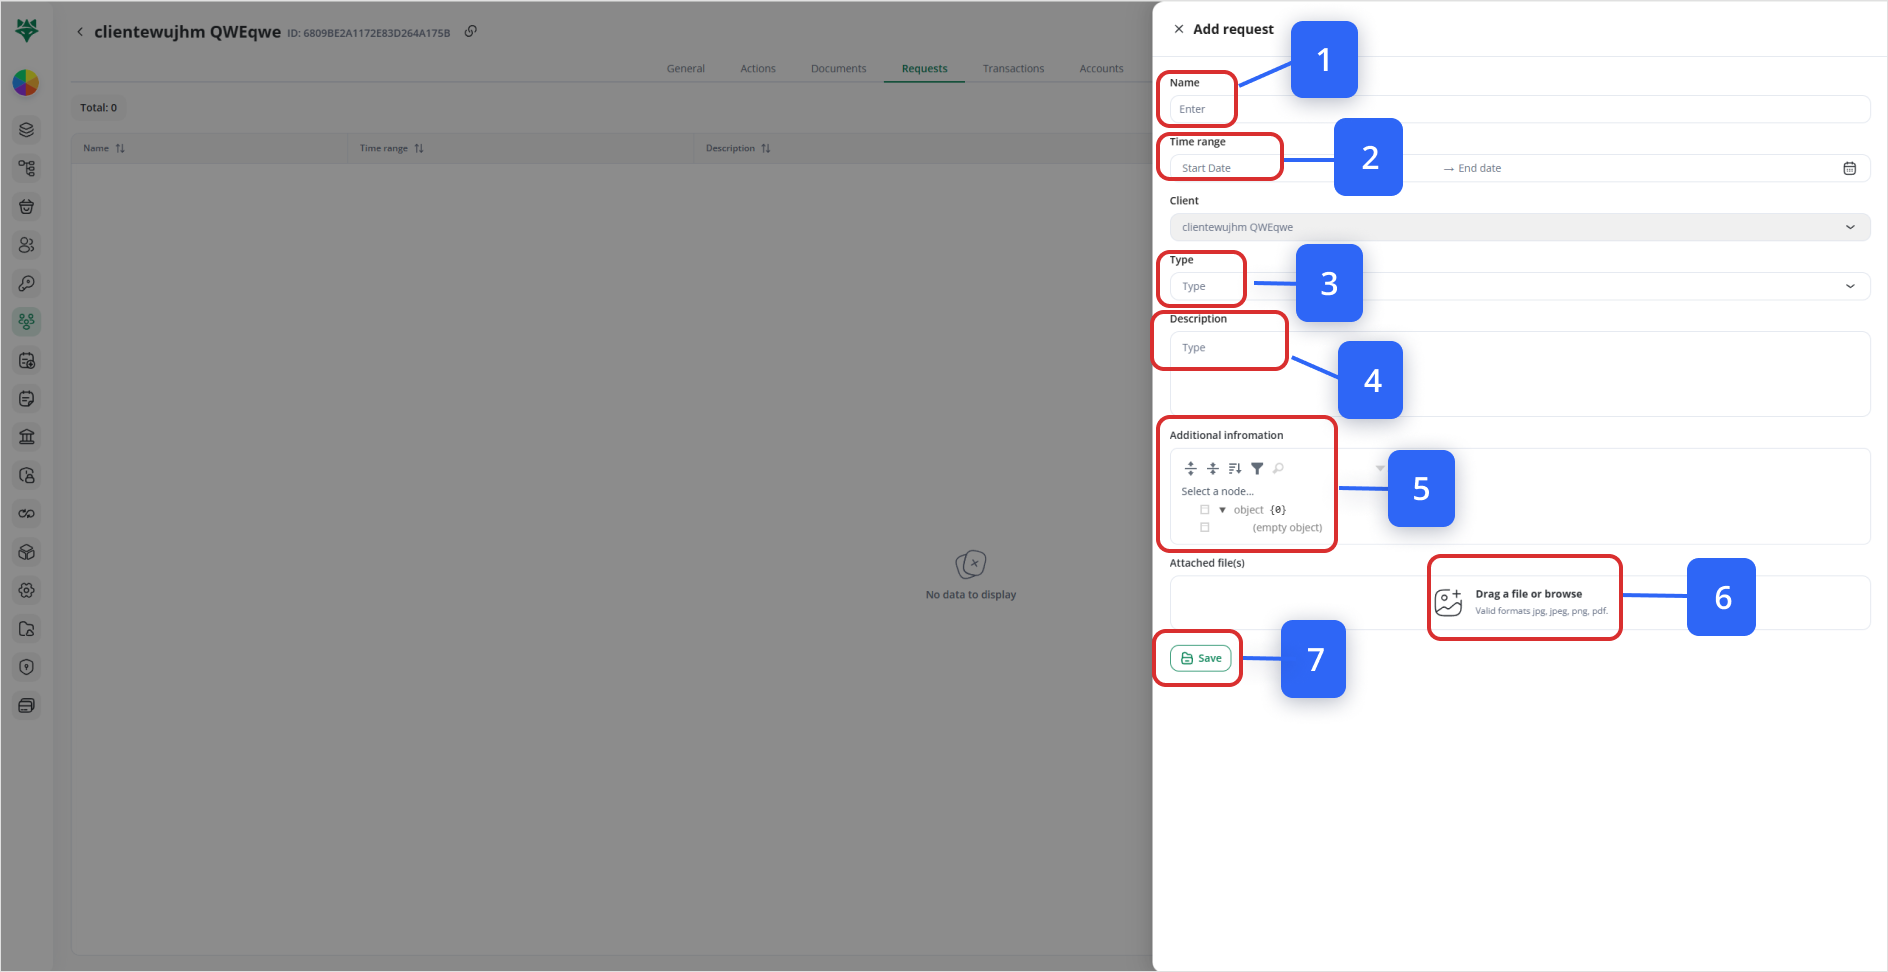
- Name (1)
- Time range (start/end) (2)
- Type (3)
- Description (4)
- Additional information (free text) (5)
- Attach files if needed (6)
3. Click Save (7).
New requests will appear in this list with status and creation date.
Transactions Tab
- View all financial transactions associated with this client.
- No editing here—transactions are pulled from the Transactions module.
Accounts Tab
1. Click Add account.
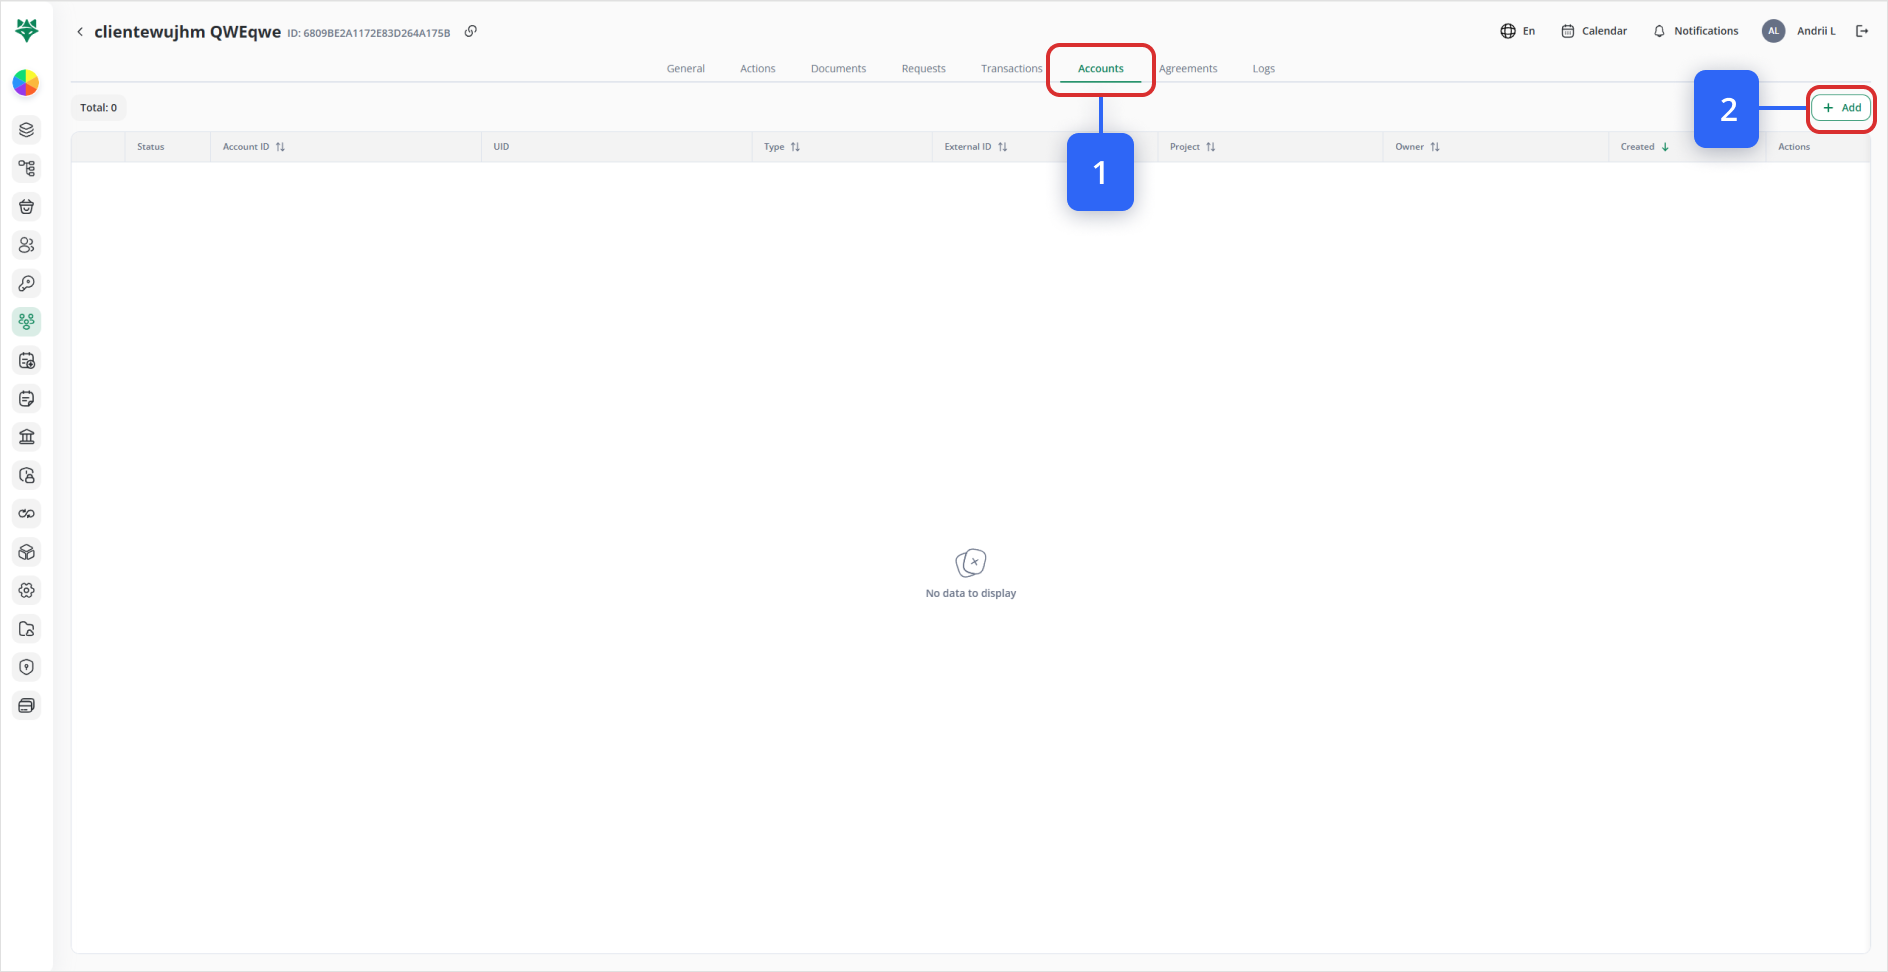
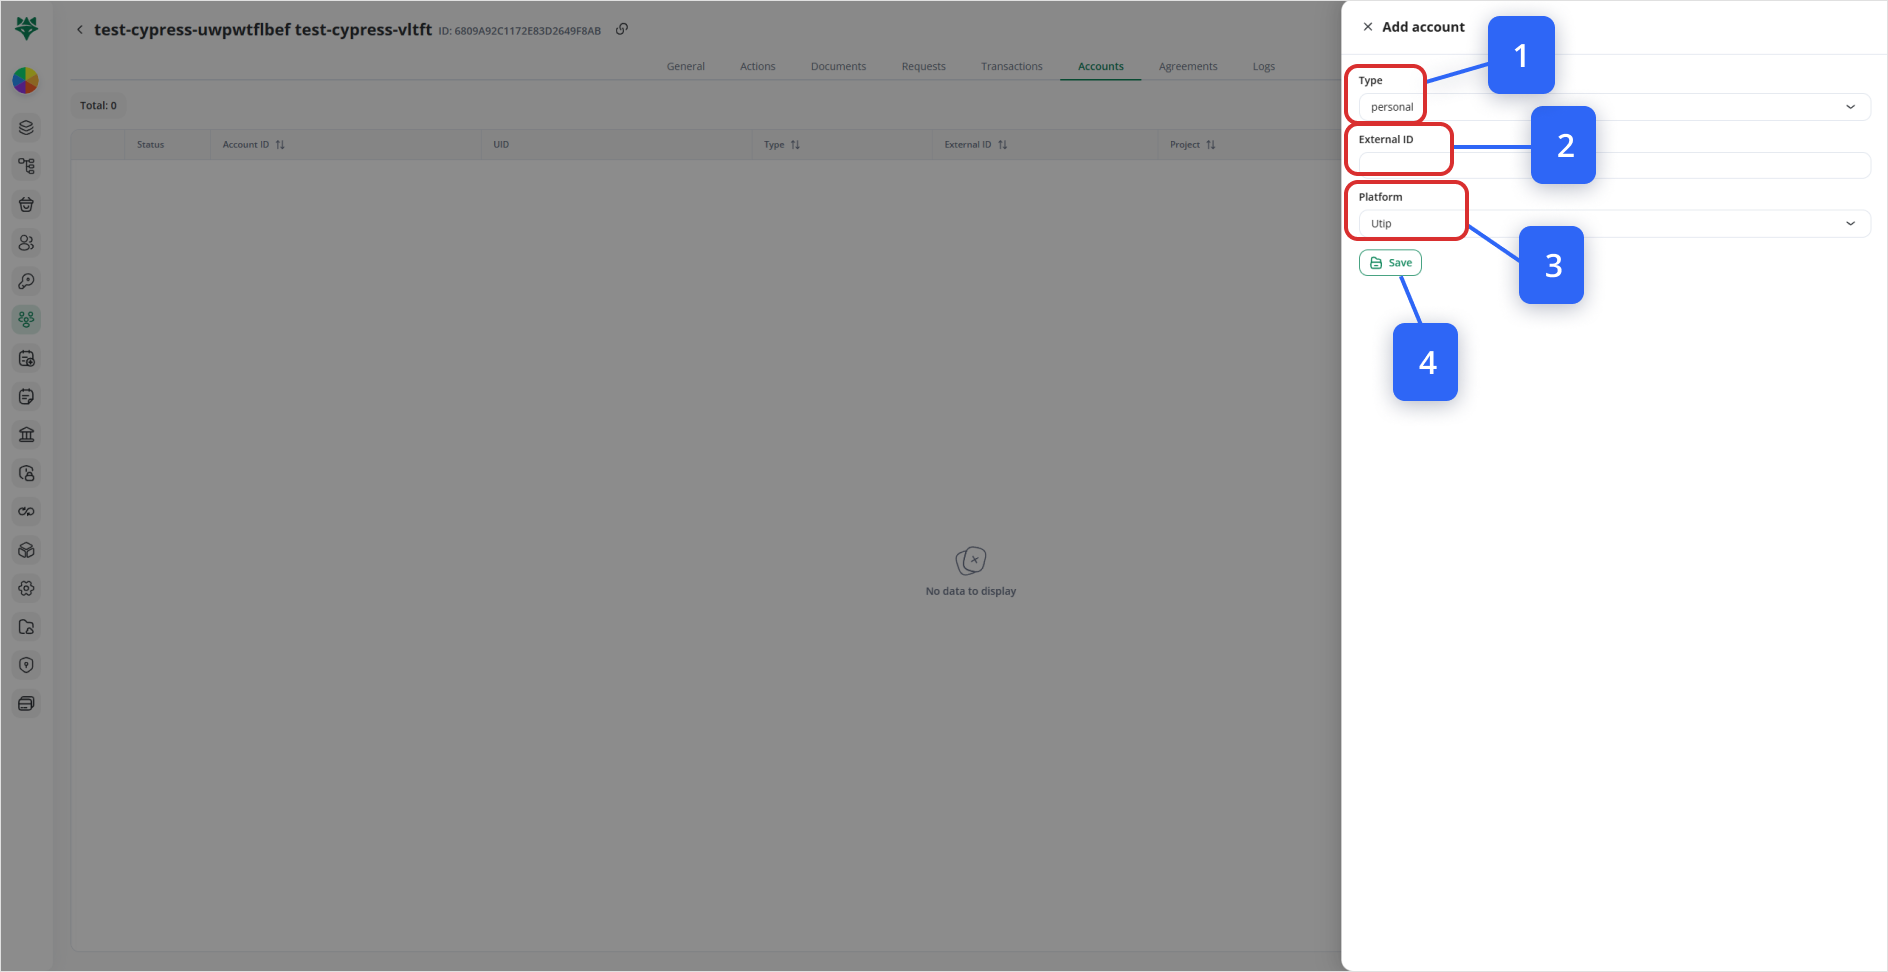
2. Select the Account Type (e.g. Fiat, Crypto) (1).
3. Optionally enter an External ID to link to a bank or external system (2).
4. Choose Platform (3).
5. Click Save (4).
Agreements Tab
-
View any contractual agreements or signed documents linked to this client.
-
No direct editing—agreements are managed in the Agreements module.
Logs Tab
- See a timestamped audit trail of all changes made to this client record.
- Perfect for tracking who did what, and when.
Once you finish editing in any tab, be sure to click Save (where available) to commit your updates.