
3. How to Create a Project
Projects are the foundational containers in Wifox Business Core Solution (WBCS)—each one encapsulates its own Desks, Clients, Employees, and data. By creating a Project, you define an isolated workspace where your team can operate without risk of cross–project data exposure. Follow the steps below to set up a new Project correctly and have it ready for desks, clients, users, and workflows.
1. Open the Projects Module in the sidebar
2. Start a New Project
Click the “+ Add” button in the top-right corner of the Projects screen. This opens the “Add Project” form.
3. Complete the General Section
General: Defines the project’s fundamental settings: its name, internal code (key), default language, and associated website. These values uniquely identify the project in the system and API.
Identification: A visual label—color or icon—that carries through the UI. It ensures that team members instantly recognize which project they’re interacting with in any list, dashboard, or report.
Additional: A flexible classification layer. You gain powerful filtering and reporting capabilities by assigning the project to one or more nodes (regions, business units, custom tags). This keeps your CRM organized by any logical grouping your organization requires.
This section captures the core identity of your project. Fill in:
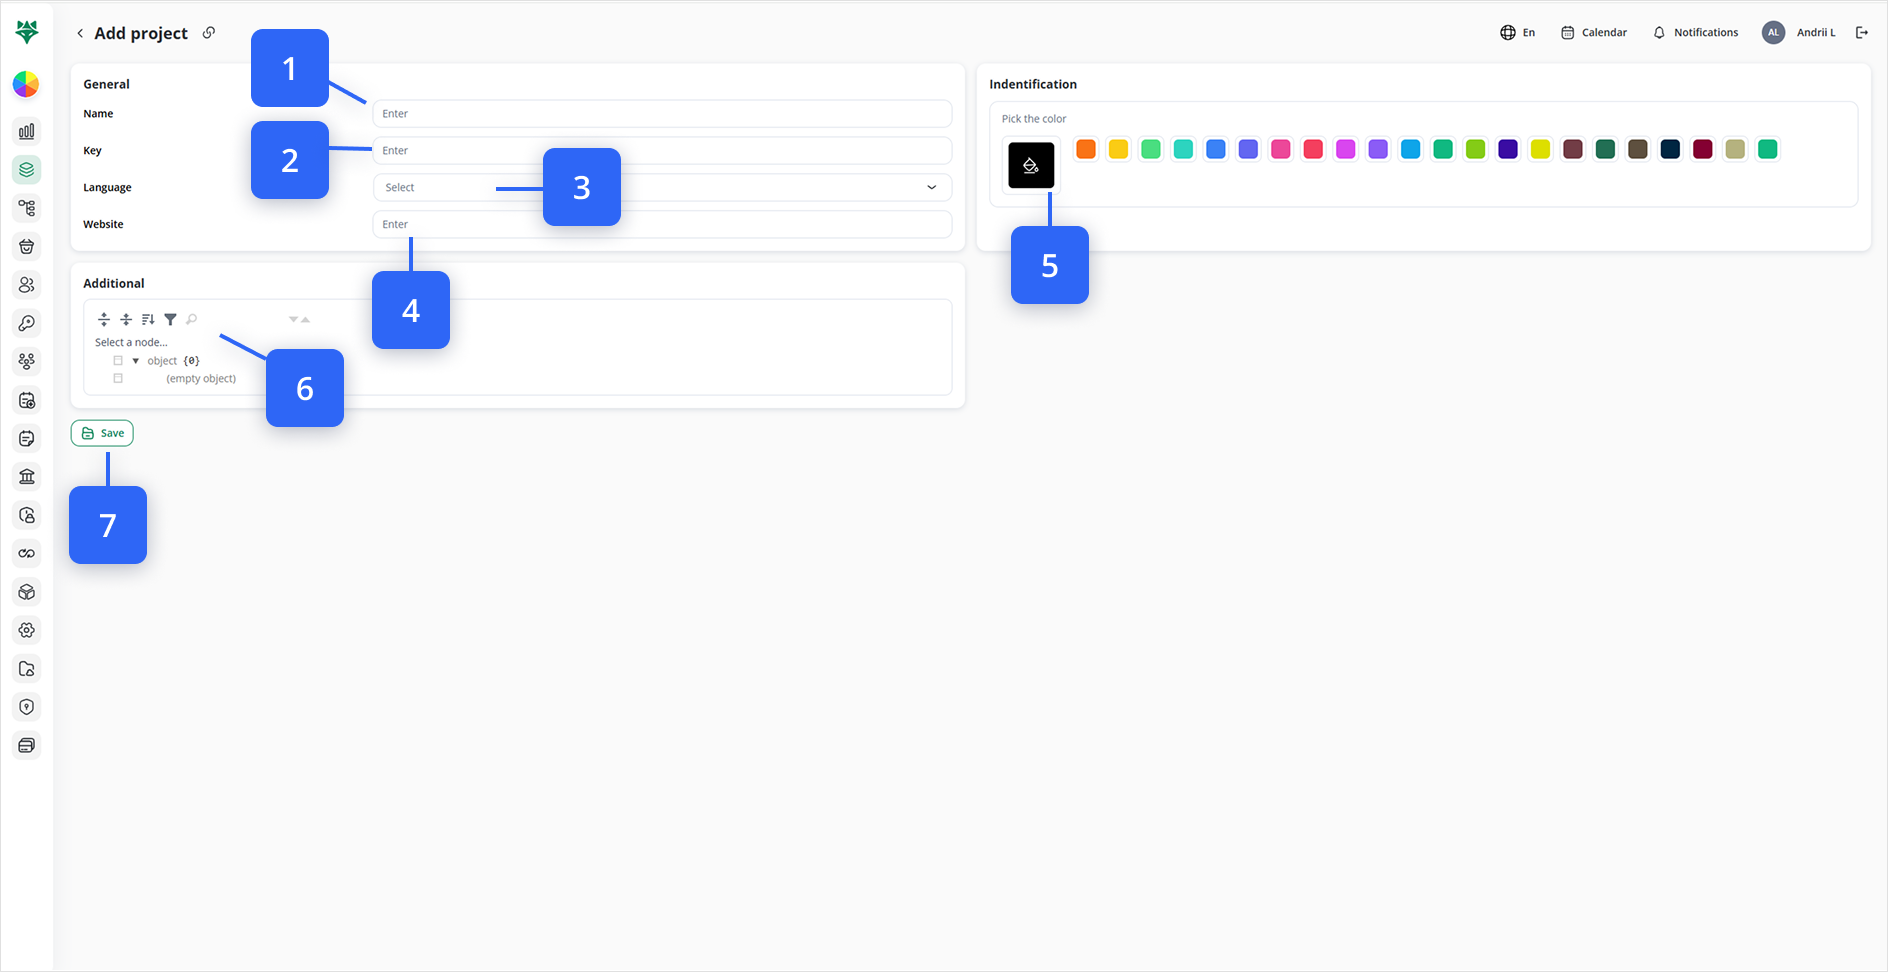
3.1.Name (Step #1)
What it is: The human-readable title for your Project.
Why it matters: Appears throughout the UI (menus, lists, dashboards) so choose something clear and descriptive (e.g. “Acme Europe Office” or “Website Redesign Q3”).
3.2.Key (Step #2)
What it is: A short, unique identifier used internally and in API calls.
Format rules: Letters, numbers, and underscores only (no spaces or special characters).
Example: ACME_EU or WEBSITE_Q3.
3.3.Language (Step #3)
What it is: The default locale for all UI text, date formats, and notifications within this Project.
Options: Choose from the system’s supported languages (e.g. EN, DE).
Effect: Controls which translations are shown first and sets the fallback for multi-language fields.
3.4.Website (Step #4)
What it is: (Optional) The URL of the Project’s public or staging site.
Purpose: Provides quick, one-click access to the live property from inside the CRM. Use full URL format (e.g. https://eu.acme.com).
3.5.Identification (Step #5)
Color Swatch / Icon: Click the large square to open a palette of preset colors and icons.
Why it helps: The chosen color will highlight this Project in navigation menus, card borders, charts, and other visual elements—making it instantly recognizable.
3.6.Additional (Step #6)
Node Picker / Tree Selector: Expand and browse your organization’s hierarchy of Regions, Business Units, and any custom tagging structure.
How to use: Tick one or more nodes to tag this Project. These tags power advanced filtering, reporting roll-ups, and permission scopes later on.
Later, you’ll be able to filter and report on all projects under a given node (for example, all projects in “Europe” or all projects tagged “Beta”).
3.7.Save (Step #7)
Final step: After filling out all required fields (and any optional settings), click Save in the bottom-left corner.
What happens next: You’ll return to the Projects list where your new entry appears—styled with its chosen color, labeled by Name and Key, and ready for desks, clients, and employees to be added.
You’ve successfully created a new Project in Wifox Business Core Solution. Next steps include: assigning Desks to define your organizational structure, adding Employees and Clients with appropriate Roles, and configuring workflows. With your Project in place, you can leverage WBCS’s full feature set—structured, secure, and scalable—for optimal business management.