Wifox Business Core Solution - WBCS
- Getting started
- Analytics
- 1. Analytics: Overview
- 2. Interactive Charts
- 3. Customizing Analytics
- 4. Filtering Date Ranges & Granularity
- 5. Tooltip and Help Text
- Projects
- 1. Projects: Overview
- 2. Projects: Use Cases
- 3. How to Create a Project
- 4. How to Edit a Project
- 5. How to Delete a Project
- Desks
- 1. Desks: Overview
- 2. Desks: Use Cases
- 3. How to Create a Desk
- 4. How to Edit a Desk
- 5. How to Delete a Desk
- Affiliate Hub
- 1. Affiliate Hub: Overview
- 2. Affiliate Hub: Use Cases
- 3. How to Create an Affiliate Hub
- 4. How to Edit an Affiliate Hub
- 5. How to Search for an Affiliate Hub
- 6. How to Configure Affiliate Hub
- 7. How to Automate Affiliate Hubs
- 8. How to Search and Filter Leads
- 9. How to Manually Assign Leads to Desks
- 10. How to Work With Affiliate Hub Dashboard
- 11. How to Delete an Affiliate Hub
- 12. Managing Leads in an Affiliate Hub
- 13. Configuration of Sources within Affiliate Hub
- Employees
- 1. Employees: Overview
- 2. Employees: Use Cases
- 3. How to Create an Employee
- 4. How to Assign an Employee to the Project and Desk
- 5. How to Edit an Employee
- 6. How to Filter and Search Employees
- 7. How to Deactivate an Employee
- 8. View & Manage the Employee’s Calendar
- Roles
- 1. Roles: Overview
- 2. Roles: Use Cases
- 3. How to Create a Role
- 4. How to View Users Assigned to the Role
- 5. How to Search for a Role
- 6. How to Edit a Role
- 7. How to Delete a Role
- 8. Roles Ranking
- Сlients
- 1. Clients: Overview
- 2. Clients: Use Cases
- 3. How to Create a Client
- 4. How to Edit a Client
- 5. How to Reassign a Client
- 6. How to Filter and Search Clients
- 7. How to Deactivate a Client
- 8. How to Import Clients
- 9. How to Export Clients
- 10. How to Customize Columns
- 11. Managing Favourite Clients
- 12. Clients Duplicates
- 13. How to Send Messages to Clients
- 14. AI Voice Filters
- Actions
- 1. Actions: Overview
- 2. Actions: Use Cases
- 3. Clients Actions Module
- 4. How to Create an Action
- 5. How to Edit an Action
- 6. How to Delete an Action
- 7. How to Filter the Actions Table
- 8. How to Search the Actions Table
- 9. Configuring Action Subtypes
- Requests
- 1. Requests: Overview
- 2. Requests: Use Cases
- 3. How to Create a Request
- 4. How to Edit a Request
- 5. How to Filter or Search a Request
- 6. Customizing Table Columns in the Requests Module
- Core Banking
- 1. Core Banking: Overview
- 2. Core Banking: Use Cases
- 3. General Settings: How to Configure Core Banking
- 4. How to Set Company Fees
- 5. How to Set Payment Methods
- 6. How to Set Platforms
- 7. How to Manage Accounts
- 8. How to Manage Assets
- 9. How to Manage Transactions
- 10. How to Manage Banks
- 11. How to Manage Cards
- 12. Configurations
- 13. Invoices
- Trading
- 1. Trading: Overview
- 2. Trading: Use Cases
- 3. Trading: Configurations
- 4. Trading: Price Deltas
- 5. Trading: Orders
- 6. Trading: Trading Groups
- Commerce Hub
- 1. Commerce Hub: Overview
- 2. Commerce Hub: Use Cases
- 3. Commerce Hub: Offerings
- 4. Commerce Hub: Orders
- 5. Commerce Hub: Configurations
- 6. Commerce Hub: Categories
- 7. Commerce Hub: Payment Methods
- Cybersecurity & Risk
- 1. Cybersecurity & Risk: Overview
- 2. Incident Reports
- 3. Violation Reports
- 4. Malware Reports
- 5. Security Assessments
- CI/CD Core
- Finance
- Client Area
- 1. Client Area: Overview
- 2. Client Area: Use Cases
- 3. How to Configure Client Area
- 4. How to Manage Translations
- 5. How to Manage Texts
- 6. How to Manage Templates
- 7. How to Manage Banners
- 8. How to Manage Documents
- Settings
- 1. Settings: Overview
- 2. How to Configure Security and Authentication
- 3. How to Configure Statuses
- 4. How to Manage Languages and Translate CRM
- 5. How to Manage Translations
- 6. How to Manage Texts
- 7. Clients Types in Configurations
- 8. Configurations: Verification levels
- 9. Configurations: Verification Documents
- 10. Clients Custom Fields
- For Developers
- Logs
- Authentication Types in WBCS
- Calendar
- Notification Center
- Identity & Access
- Integrations Module
Getting started
1. What is WBCS (Wifox Business Core Solution)
WBCS is a versatile finance-focused solution (Customer Relationship Management) system that can be adapted for various purposes, including sales.
The system is designed for any organization that needs to manage complex client relationships and financial data. The users of the system include sales, marketing, financial, and project managers, as well as IT administrators.
WBCS supports multilingual configurations, allowing it to be adapted to any language. The system incorporates robust security features, including two-factor authentication.
Main Functionality
The WBCS system provides tools and features for:
-
Project management
-
Client management
-
Financial management
-
Customer platform management
These tools and features are organized across eight modules: Projects, Desks, Employees, Clients, Requests, Roles, Client Area, Core Banking, and API. Additionally, Wifox Business Core Solution can integrate with third-party platforms for a variety of tasks, such as automated translations, financial transactions, and custom API integrations.
AI Assistant
WBCS includes a built‑in AI Assistant - that you can use to get instant answers and step‑by‑step guidance anywhere in the system.
Where to find it: Look for the floating ❓ chat icon in the bottom corner of every page (near the main content area).
What it does:
Ask any question about using WBCS (“How do I create a new project?”, “Where do I edit affiliate hub postbacks?”, etc.)
Receive concise explanations, walkthroughs, and contextual tips without leaving your current screen
Browse suggested help topics or type your own query.
2. WBCS Modules and Their Relationship
The main module of the WBCS system is Projects. The current active project is always displayed at the top of the drop-down menu, allowing you to track which project you're working on easily.
The Projects module is directly linked to the following modules:
-
Desks: Multiple desks can be assigned to a single project. When a new project is created, a default desk is automatically generated.
-
Employees: Employees are assigned to specific projects and desks. Before an employee can be deleted, they must be removed from both the desk and the project.
-
Clients: Clients are associated with projects and desks. Clients are primarily associated with projects but could be assigned to a specific desk and/or to a specific manager (employee).
The following modules are partially dependent on the Projects module and other modules:
Requests: Support tickets and service requests may apply to an entire project or be tied to a specific client within that project, enabling flexible issue tracking.
Core Banking: Manages a project’s financial entities (Accounts, Assets, Transactions) and lets you define project‑specific ledger settings (Actions sub‑types, auto‑increment UIDs).
Client Area: Powers the customer‑facing portal (webstore, client dashboard) with project‑scoped content and embeddable Snippets.
Configurations (Marketplace): Houses project‑scoped reference data (status lists, account types, currencies) that you can clone from other projects for fast setup.
Marketplace → Products / Orders / Payment Methods / Integrations: Catalog modules where each product, order, payment method and integration record is scoped to a project for isolated management.
Roles: Defines View/Manage permissions (own vs. all) within the context of the active project, ensuring access control is project‑aware.
API: All external integrations and webhooks (Postbacks, Fireblocks, Huntli, etc.) operate under the selected project, so calls and events are correctly routed.
Translations / Texts / Templates: Localizes UI labels, longer text content, and notification templates on a per‑project basis to support multi‑lingual deployments.
Analytics: Dashboard metrics (Turnover, Clients Registered, FTD, Manager Performance, etc.) are calculated for the currently selected project.
Calendar / Notifications: Events (Calls, Reminders) and in‑app notifications are tied to both employees and the active project, ensuring timely alerts.
Incident Reports / Violation Reports / Penetration Reports: Security modules for logging, tracking and closing incidents, policy violations and pen‑tests, all linked to the relevant project.
Pipelines: Displays CI/CD run histories (Jenkins, GitLab CI, etc.), project‑by‑project, so build and deployment statuses are scoped correctly.
Analytics
1. Analytics: Overview
The Analytics module provides a unified dashboard of key performance indicators (KPIs), user activity metrics, and operational insights across your Wifox Core environment. It combines real-time “widgets” (numerical summaries) with interactive charts to help you spot trends, track progress, and drill into specific data—whether you’re monitoring daily sign-ups, deposit volumes, or team performance. You can customize which widgets and charts appear, filter by date or category, and expand any panel for a closer look.
Accessing Analytics
Layout Overview
When you first land on Analytics, you’ll see:
Filter & Customize Button
Located at the top-left (below the page title).
Clicking Filter opens a right-hand drawer labeled Customize analytics, where you can toggle individual widgets and charts on or off, reorder them, and set global versus personal filters.
Widgets (Top Row)
Four small “card” widgets display today’s numbers, each accompanied by a mini-sparkline of recent values:
- Turnover today
- Clients registered today
- Requests created today
- Clients verified today
Charts (Grid Below)
A two-column grid of various analytics charts. By default, the first eight charts are visible (you can add “Clients by countries” as a ninth chart via the customization panel). Each chart has:
A calendar icon ( 📅 ) to select a date range or switch granularity (day/month/year).
An expand icon ( ⤢ ) to view that chart in full screen.
Top-Row Widgets
Each widget shows “today’s” count (or sum) plus a “0 for yesterday” comparison line. Hover over any bar/point in the miniature sparkline to see exact values.
Turnover today
Description: Shows the total transaction volume (in your base currency) processed so far today. Hover over each day’s bar to see specific daily turnover figures. The “0 for yesterday” line provides a quick comparison to the previous day.
Usage: Use this to monitor real-time transaction throughput and detect sudden spikes or drops in daily volume.
Clients registered today
Description: Displays the number of new client sign-ups completed today, with a mini-chart showing registrations over the past week. The “0 for yesterday” line gives historical context for yesterday’s count.
Usage: Quickly gauge onboarding performance—if registrations are lagging, you may need to investigate marketing channels or sign-up issues.
Requests created today
Description: Indicates how many service or support requests were opened today, plus a sparkline of recent request volumes. The “0 for yesterday” comparison highlights changes in ticketing load.
Usage: Track your support team’s daily workload and spot sudden increases in incoming requests (e.g., after a release).
Clients verified today
Description: Tracks the number of clients whose identity checks (KYC verifications) were completed today. The embedded mini-chart shows verification counts over the last week, and “0 for yesterday” provides a quick benchmark.
Usage: Use this widget to ensure your compliance/KYC pipeline is on schedule—if verifications dip, you may need to reallocate resources.
2. Interactive Charts
Below the widgets, each chart offers deeper insights. You can toggle between different tabs (e.g., “Pending / Declined / Completed” for pie charts) or switch time granularity via the calendar picker.
Clients registrations and FTDs by affiliate hubs
What It Shows:
A dual-axis chart with:
- Blue bars = number of client registrations per affiliate hub
- Teal bars = count of first-time deposits (FTDs) per affiliate hub
- Orange line = total FTD amount per affiliate hub (in base currency)
Controls:
Affiliate Hub Dropdown: At the top-left of the chart, select from predefined “affiliate hubs” (customer segments or cohorts) to filter data.
Calendar Icon: Click to pick a custom date range.
Expand Icon: View full screen for detailed analysis.
Use Case: Compare the number of users who registered in each affiliate hub with the number who made their first deposit, and see the total deposit value. For example, if hub_3 has high registrations but low FTDs, you may need targeted onboarding incentives for that segment.
Clients registrations over time
What It Shows: A simple line chart showing the number of client registrations across your selected interval (day, month, or year).
Controls:
Granularity Tabs (Day / Month / Year): Toggle above the chart to change the time axis.
Calendar Icon: Manually adjust the start/end dates for any custom period.
Expand Icon: Enlarge the chart for a detailed view.
Use Case: View growth trends in registrations. For instance, you might spot a surge in April 2025 or compare mid-year sign-up rates year-over-year.
Transactions distribution by providers
What It Shows: Two pie charts, side by side, each showing the share of transactions by provider (e.g., Stripe, Crypto, PayPal, Bank Transfer, internal) for three different statuses:
- Pending
- Declined
- Completed
Controls:
Status Tabs (Pending / Declined / Completed): Click the tab you want to view.
Calendar Icon: Select a date range to filter which transactions are included.
Expand Icon: See the pie chart in full screen.
Use Case: Compare how each payment provider’s share shifts from Pending to Completed or detect if one provider has a disproportionately high decline rate.
Average First Time Deposits over time
What It Shows: A line graph plotting the average amount (in base currency) of each client’s first deposit (FTD) over your selected interval.
Controls:
Granularity Tabs (Day / Month / Year): Change the chart’s time axis.
Calendar Icon: Pick a custom date range.
Expand Icon: Enlarge for detailed analysis.
Use Case: Track whether new deposit sizes are trending up or down. For example, if the average FTD jumps in Q1 2024, it may coincide with a marketing campaign or bonus promotion.
Withdrawal counts by providers
What It Shows: A horizontal bar chart showing how many withdrawal transactions each provider (Stripe, Crypto, PayPal, Bank Cards, Bank Transfer, internal, etc.) handled over the chosen period.
Controls:
Calendar Icon: Filter by start/end dates.
Expand Icon: Full-screen bar chart.
Use Case: Identify which withdrawal channels are most heavily used (e.g., if internal transfers dominate versus third-party processors), and detect shifts in channel preference.
Deposit counts by providers
What It Shows: Similar to the withdrawals chart, this horizontal bar chart breaks down deposit transaction counts by provider (Stripe, Crypto, PayPal, Bank Transfer, internal, etc.) over the selected time window.
Controls:
Calendar Icon: Choose a date range.
Expand Icon: Full-screen display.
Use Case: Understand which deposit channels are most popular (e.g., if Bank Transfer or PayPal leads), and monitor how that mix changes during promotions or system updates.
Employees onboarding and offboarding trends
What It Shows: A grouped bar chart with two series:
- Blue bar = count of employees onboarded
- Teal bar = count of employees offboarded
for each time interval (daily, monthly, or yearly).
Controls:
Granularity Tabs (Day / Month / Year): Switch to view daily, monthly, or annual trends.
Calendar Icon: Select a custom date window (e.g., Jan 1 2023 – Dec 31 2023).
Expand Icon: Enlarge for more detail.
Use Case: Analyze hiring vs. attrition patterns. If you see a large “offboarded” spike in mid-2025, you may investigate exit-interview feedback or seasonal churn.
Managers performance
What It Shows: A combination chart (bar + line) where each manager’s performance is broken down by:
- Blue bar (“count”) = number of clients managed by that manager during the selected period
- Teal line (“sum”) = total deposit volume (all clients combined) that those clients contributed
Controls:
Calendar Icon: Filter the period (e.g., 2024 Q2).
Expand Icon: View full-screen for long manager lists.
Use Case: Compare which managers are signing up the most clients (“count”) versus which managers’ clients are depositing the highest sums (“sum”). A manager with high “count” but low “sum” might need coaching on upselling or account activation.
Clients by countries
What It Shows: A donut (ring) chart showing the distribution of clients by their country code (e.g., US, DE, PL, UA) over your selected period.
Controls:
Calendar Icon: Choose a date range for which client registrations to include.
Expand Icon: Full-screen doughnut chart.
Use Case: Instantly see geographic concentration of your user base. If you notice fewer sign-ups from certain regions, you might consider targeted marketing or localization efforts there.
3. Customizing Analytics
Click the Filter button at the top-left of the Analytics page. This slides out a Customize analytics panel on the right side of the screen.
Personal Filters: These toggles and settings apply only to your personal view. If you hide a particular widget or chart here, it remains hidden the next time you log in (unless you toggle it back on).
Global Filters: These settings apply to everyone in your organization. Enabling or disabling a chart under Global Filters affects all user views.
Toggles and Reordering
Within either tab, you’ll see two sections:
Widgets (top of the list)
- Turnover
- Clients
- Requests
- Client verifications: Each widget has a toggle switch. Turn it off to hide that card from the top row; turn it on to show it again.
Charts (below Widgets)
- Clients registrations and FTDs by affiliate hubs
- Clients registrations over time
- Transactions distribution by providers
- Average First Time Deposits over time
- Withdrawal counts by providers
- Deposit counts by providers
- Employees onboarding and offboarding trends
- Managers performance
- Clients by countries (if enabled)
Toggle each chart on/off to control its visibility.
Reordering: Drag the “hamburger” icon ( ☰ ) next to each chart name up or down to rearrange their order on the main dashboard. The topmost chart in the list becomes the first chart in the grid.
Hover-Over Info (Tooltips)
Each section heading (Widgets/Charts) has an “info” icon ( ℹ️ ). Hover over it to see a brief explanation, such as:
“You can change the visibility of some cards and rearrange their order.”
In the chart toggle list, each chart has a small “expand” icon ( ⤢ ) that, when hovered, shows extra detail—e.g.:
“Drop filters and sorting.”
Saving Changes
After adjusting toggles and reordering, click Save at the bottom of the Customize analytics panel.
The page will automatically refresh to show or hide the selected widgets/charts and apply your arrangement.
4. Filtering Date Ranges & Granularity
Every chart (and certain widgets) includes a calendar icon ( 📅 ) at the top-right corner of its frame. Clicking that icon opens a mini date-picker where you can:
Select Predefined Periods (e.g., Last 7 Days, Month-to-Date, Year-to-Date).
Pick Custom Start and End Dates to zoom in on a specific timeframe.
Switch Granularity (Day / Month / Year) for line or bar charts:
In time-series charts (e.g., Clients registrations over time, Average FTD over time, Employees onboarding/offboarding), you’ll see three tabs labeled Day, Month, and Year. Toggling among them changes how data aggregates on the X-axis.
Once you select a date range or change granularity, the chart reloads to display only data within that window.
Chart-Specific Details & Examples
Below is a consolidated list of all charts with thorough descriptions of their purpose, controls, and user-tips for each.
Note: Whenever you see “Expand Icon,” it refers to the ↔️ icon at the top-right of a chart that opens the chart full-screen.
1) Clients registrations and FTDs by affiliate hubs
Purpose: Shows how each predefined affiliate hub (cohort or segment) performs in terms of new registrations versus first-time deposit activity.
Visuals:
Blue bars = number of client registrations.
Teal bars = first-time deposit (FTD) counts.
Orange line = total FTD amount (monetary volume) in each affiliate hub.
Controls:
Affiliate Hub Dropdown: Choose an affiliate hub (drop-down labeled “Please select”) to focus only on that cohort.
Calendar Icon: Select a custom date range.
Expand Icon: View full-screen.
Tips:
If the orange line is zero for affiliate hub_4, it means no FTD amount was recorded in that group.
Hover over any bar to see the exact numeric values.
2) Clients registrations over time
Purpose: A simple trend line showing how many clients registered over your chosen period.
Visuals: A blue line connecting data points (one per day, month, or year).
Controls:
Granularity Tabs: Day / Month / Year (above the chart).
Calendar Icon: Pick a custom date window.
Expand Icon: Full-screen view.
Tips:
To analyze weekly spikes, set granularity to Day and select that week’s date range.
For high-level trends, switch to Year.
3) Transactions distribution by providers
Purpose: Exhibits the percentage share of transactions handled by each payment provider, separated by status: Pending, Declined, or Completed.
Visuals:
Two pie charts side by side (one for the selected status tab, one that updates if you switch statuses).
Each slice is color-coded by provider (e.g., green for Bank Transfer, purple for Crypto).
Controls:
Status Tabs (Pending / Declined / Completed): Click to switch the pie slices.
Calendar Icon: Filter by date.
Expand Icon: Full-screen.
Tips:
Click on the Completed tab to see final success rates.
If “internal” (yellow) dominates, most transactions are handled by the internal ledger rather than third-party rails.
4) Average First Time Deposits over time
Purpose: Displays the average deposit amount of each client’s first deposit (FTD) over the chosen period.
Visuals: A single blue line with Y-axis showing monetary value (e.g., 0 – 5,000).
Controls:
Granularity Tabs (Day / Month / Year).
Calendar Icon.
Expand Icon.
Tips:
If the data point for 2024 is at 4,500, that means the average FTD in 2024 was 4,500 (in your base currency).
Use Month granularity to see how average FTD evolves month by month.
5) Withdrawal counts by providers
Purpose: Shows how many withdrawal transactions each provider handled over a specified time window.
Visuals: A horizontal bar chart with providers on the Y-axis and counts on the X-axis.
Controls:
Calendar Icon: Filter by date.
Expand Icon: Full-screen.
Tips:
If the “internal” bar extends to 400,000, that means 400,000 withdrawal transactions were processed internally.
Hover over each bar to see exact counts.
6) Deposit counts by providers
Purpose: Similar to withdrawals, this chart breaks down the number of deposit transactions per provider.
Visuals: A horizontal bar chart with color-coded providers.
Controls:
Calendar Icon.
Expand Icon.
Tips: Look for anomalies—e.g., if “Stripe” has 150 deposits this month versus “PayPal” with 80, you may decide to prioritize integrating more features with Stripe.
7) Employees onboarding and offboarding trends
Purpose: Visualize your internal team’s hiring (onboarded) versus attrition (offboarded) patterns over time.
Visuals:
Blue bars = Onboarded count
Teal bars = Offboarded count
Controls:
Granularity Tabs (Day / Month / Year).
Calendar Icon (for custom intervals).
Expand Icon.
Tips:
If you see a sudden spike in 2025 for “Onboarded,” that likely reflects a hiring wave (e.g., opening a new department).
Use Month granularity to identify specific months with high offboarding.
8) Managers performance
Purpose: Compare team managers by how many clients they managed (“count”) and the total deposit volume their clients generated (“sum”).
Visuals:
Blue bars (“count”) along the bottom (number of clients).
Teal line (“sum”) overlaid with a separate Y-axis on the right (total deposit volume).
Controls:
Calendar Icon: Select date range.
Expand Icon.
Tips:
A manager with a high blue bar but low teal line may have many clients who deposit small amounts.
Conversely, a manager with a modest bar but a tall teal point may be handling fewer but higher-value accounts.
9) Clients by countries
Purpose: Show the geographic distribution of your user base by country code.
Visuals: A donut (ring) chart where each slice represents a country’s share of total clients.
Controls:
Calendar Icon: Filter by registration date range.
Expand Icon.
Tips:
Each color-coded slice is labeled with the two-letter ISO code (e.g., US, DE, PL).
Hover over a slice to see the exact percentage or count of clients in that country.
5. Tooltip and Help Text
Inline Tooltips: Each chart heading and each toggle in the Customize analytics drawer has a small info icon ( ℹ️ ) that explains the purpose of that element. For example:
Hovering over the “Manage performance” toggle shows:
“Compare each manager’s performance over the selected period: ‘count’ shows how many clients they managed and ‘sum’ shows total deposits by those clients.”
Hovering over “Turnover today” indicates:
“Shows the total transaction volume processed so far today, along with a sparkline of recent days and a ‘0 for yesterday’ comparison.”
Clarification Popovers: In any chart toggle list (Global Filters tab), clicking or hovering the small expand icon next to a chart name might reveal a note like:
“Drop filters and sorting.”
Example Workflow
Initial Setup
Visit Analytics via the sidebar.
By default, you see eight visible charts and four widgets (Turnover, Clients, Requests, Verifications).
Customize Visibility
Click Filter to open Customize analytics.
Under Personal Filters, toggle off any charts you don’t need (e.g., “Clients by countries”).
Drag Managers performance above Withdrawal counts if you want it to appear higher on your dashboard.
Click Save to apply changes.
Filter by Date
Click the calendar icon in Clients registrations over time.
Select June 1, 2024 to December 31, 2024 for a mid-year review.
Observe how the registration curve behaves in that window.
Drill into a Chart
Click the expand ( ⤢ ) icon on Transactions distribution by providers.
In full-screen mode, click the Declined tab to focus solely on declined transactions.
Hover over each pie slice to see provider names and decline percentages.
Compare Widgets
Check Clients registered today to see if your average registrations are up or down compared to yesterday’s “0 for yesterday” baseline.
Switch to Clients verified today to ensure KYC is keeping pace with new sign-ups.
Projects
1. Projects: Overview
The Projects module is the foundational container in Wifox Business Core Solution. Every record you create under Projects represents a discrete business unit—whether that’s a corporate office, a website, a geographic region, or a product line. Projects isolate data (Desks, Clients, Employees, financials, support tickets, etc.) so that each team only sees the records relevant to their scope of work.
Default Project
Upon first login, you’ll see a Default project (with one default Desk). Use this for testing or small-scale operations.
Unlimited Projects
Create as many Projects as your organization needs—each with its own:
- Desks (structural units)
- Clients (customer records)
- Employees (system users)
- Sub-modules (Affiliate Hub, Actions, Requests, Core Banking, etc.)
Access Control
All permissions (view own/all, manage own/all) are scoped at the Project level and inherited by underlying Desks, Clients, and sub-modules. Without at least one active Project, no other CRM functions can be used.
The following actions are available in the Projects module:
2. Projects: Use Cases
Use Case #1: Managing Different Websites
Projects can be used to manage different websites. For each website, you create a separate project, ensuring that only the managers and employees responsible for that specific site can see and interact with the customers associated with it. This setup helps to keep customer data segmented and relevant to the specific team.
Use Case #2: Managing Operations Across Different Countries
Projects can be utilized to manage operations in different countries. For each country in which your company operates, create a separate project (e.g., United States, Germany, Canada). This ensures that employees and managers of the respective offices only see and work with clients from their region, allowing for localized management and compliance with regional regulations.
Use Case #3: Managing Multiple Business Units
Projects can be used to separate different lines of business within your company. For example, if your company offers consulting services (business #1) and real estate (business #2), you can create two distinct projects. Each project operates in isolation, ensuring that employees from one business line do not have access to the clients and data of the other, maintaining confidentiality and focus.
Use Case #4: Feature Pilot & QA Environment
Spin up a “Staging” Project mirroring your production setup. QA engineers can safely test new features, import/export data, or preview integrations without impacting live operations.
Use Case #5: Integration Sandboxes
Stand up a Project solely for API integrations or partner onboarding. Provide external teams with API tokens scoped to this Project, ensuring any test calls cannot affect your real data.
3. How to Create a Project
Projects are the foundational containers in Wifox Business Core Solution (WBCS)—each one encapsulates its own Desks, Clients, Employees, and data. By creating a Project, you define an isolated workspace where your team can operate without risk of cross–project data exposure. Follow the steps below to set up a new Project correctly and have it ready for desks, clients, users, and workflows.
1. Open the Projects Module in the sidebar
In the left-hand sidebar, click “Projects” to show your current list of projects.
2. Start a New Project
Click the “+ Add” button in the top-right corner of the Projects screen. This opens the “Add Project” form.
3. Complete the General Section
General
This section defines the core identity and basic settings of the Project. All fields here apply system-wide and are required to uniquely identify the Project.
This section captures the core identity of your project. Fill in:
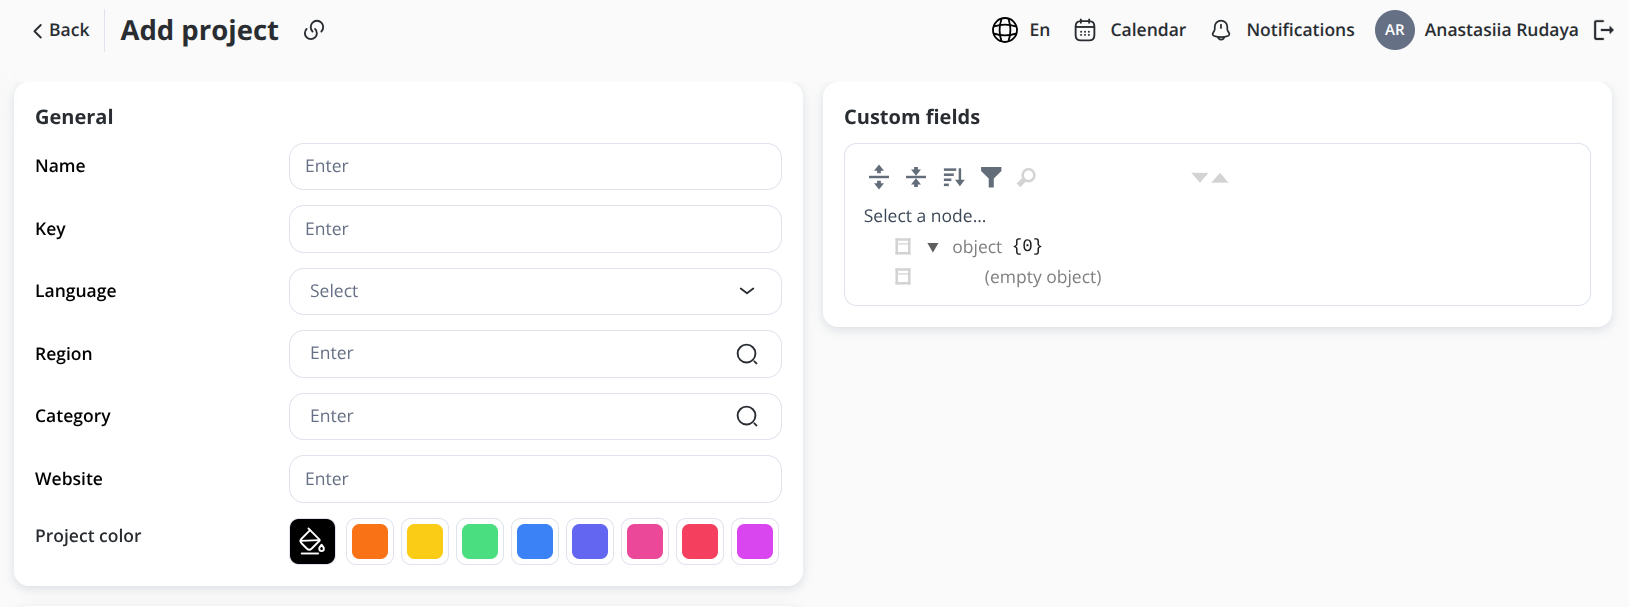
Name
What it is: The human-readable name of the Project.
Usage: Displayed across the platform in lists, selectors, and headers.
Key
What it is: A unique internal identifier for the Project.
Usage: Used internally and in integrations.
Constraints: Must be unique.
Language
What it is: The default language of the Project.
Effect: Sets the primary UI language context for this Project.
Website
What it is: Optional Project-related website URL.
Purpose: Reference link associated with the Project.
Region
What it is: The geographical region linked to the Project.
Usage: Used to filter Projects by location (UK, Asia, North America, or any custom region defined by the client).
Category
What it is: The category assigned to the Project.
Usage: Used to filter Projects easily by purpose, product line, or any other business need defined by the client (e.g., Consulting service, Personal project, Brokerage, etc.)
Project color
What it is: A visual color identifier selected from predefined swatches.
Effect: Used across the UI to visually distinguish the Project.
4. Custom fields
Custom fields allow you to attach structured, schema-based metadata to a Project.
How it works:
Select a predefined schema node from the tree.
The selected object defines additional key–value data stored with the Project.
Custom fields are optional and depend on your system configuration.
Purpose:
Extend Project data without changing core fields.
Support custom integrations, reporting, or automation logic.
Avoid describing specific schemas or usage unless documented elsewhere.
5. Use as organization unit
This optional setting allows a Project to function as a legal or organizational entity.
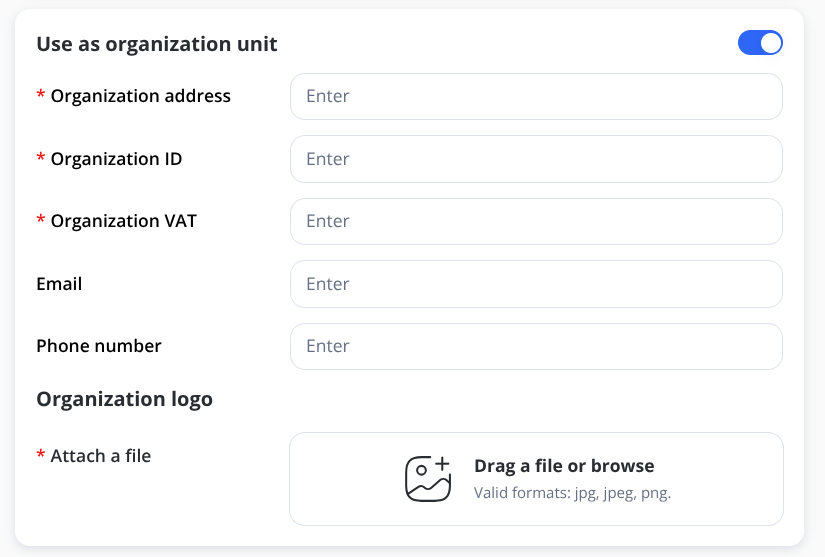
Toggle behavior:
When disabled, organization-specific fields are hidden.
When enabled, the Project requires additional organization details.
Required fields (when enabled):
Organization address *
Organization ID *
Organization VAT *
Optional fields:
Email
Phone number
Organization logo
Organization logo
Upload a logo file associated with this organizational unit.
Supported formats: JPG, JPEG, PNG.
Use case: Enable this option when the Project represents a company, branch, or legal unit that requires identification details.
6. Save
Final step: After completing all required fields, click Save to create the Project.
You’ve successfully created a new Project in Wifox Business Core Solution. Next steps include: assigning Desks to define your organizational structure, adding Employees and Clients with appropriate Roles, and configuring workflows. With your Project in place, you can leverage WBCS’s full feature set—structured, secure, and scalable—for optimal business management.
4. How to Edit a Project
Once a Project has been created, you can update its settings and manage its members from the Edit Project page. Follow the steps below to keep your Projects up to date or to delete one when it’s no longer needed.
1. Open the Projects List
In the left-hand navigation menu, click Projects to display all existing projects as cards.
2. Enter Edit Mode
Locate the card for the Project you wish to change. Click the Edit (✏️) icon in the top-right corner of that card. This opens the Edit Project form pre-populated with the current settings.
3. Update General Settings
In the General section, you can modify the core Project attributes:
Name: Update the Project’s display name.
Key: Read-only after creation and cannot be changed.
Language: Change the default language for the Project.
Website: Update or add the associated Project URL.
Project color: Select a new color from the available swatches to visually distinguish the Project in the UI.
4. Use as organization unit
This toggle determines whether the Project also functions as an organizational entity.
When disabled, organization-specific fields are hidden.
When enabled, additional legal and contact information becomes available and may be required.
This setting is optional and depends on how your organization structures Projects.
5. Custom fields
Custom fields allow you to view or update structured, schema-based metadata attached to the Project.
Select a schema node to view or modify associated data.
Available fields depend on your system configuration.
Custom fields extend Project data without changing core settings.
6. Manage Project Membership
The Members panel on the right shows all users currently assigned to the Project.
Add a member: Click + Add member to assign an existing user to the Project.
Search members: Use the search field to filter members by name or email. To add a new user to this list, go to the Employees tab.
Remove a member: Click the trash icon next to a member to revoke their access to the Project.
Changes are applied immediately after saving.
7. Apply Your Changes
Once you’ve made all necessary edits:
Click Save in the bottom-left corner.
The form will close, and you’ll return to the Projects list with all updates applied immediately.
5. How to Delete a Project
Warning:
You cannot delete the system’s Default Project—its trash icon is disabled.
Once deleted, a Project and all of its associated data (desks, affiliate hubs, clients, requests, agreements, etc.) are permanently removed. This action cannot be undone.
Before you begin, make sure:
You have the manageAll or manageOwn right on the Projects module.
There are no active desks or clients left under this project. You must first delete or reassign all desks → affiliate hubs → clients.
Note: you can delete the project’s member only after you’ve deleted them from the desk they have been assigned to. Read more about Desks here.
Prerequisite Checks
You must
Remove all desks: In each Desk’s actions menu (⋯), click Delete Desk once its affiliate hubs are empty.
Reassign or delete affiliate hubs: In the Affiliate Hub module, remove any affiliate hubs tied to this project.
Archive or delete clients: In the Clients list filtered by this project, archive or move every client out.
This prevents orphaned records and ensures a clean project deletion.
Deleting the Project
1. Locate the Project Card
Scroll through your Projects grid or use the Search… input to quickly find it by name.
2. Open the Project Actions
On that project’s card, two icons appear in the top-right when you hover:
✏️ Edit (to change settings)
🗑️ Delete (trash can)
3. Click the 🗑️ Delete Icon
If the icon is greyed out, you’re either on the Default Project or there are still desks/clients attached.
Otherwise, the confirmation dialog opens.
4. Review the Confirmation Prompt
Read the warning carefully.
Click Confirm Delete to proceed.
5. Post-Deletion Cleanup
The project will vanish from your list immediately.
Any scheduled automations, notifications, or integrations scoped to this project will no longer trigger.
If you have dashboards or saved filters referencing this project, update or remove them.
Desks
1. Desks: Overview
Desks are the core building blocks of your Projects in Wifox Business Core Solution, providing fine-grained structure and access control. Think of each Desk as a “room” inside your Project where related activities, people, and clients live together. Key characteristics:
Default Desk: Every new Project automatically comes with one Default Desk. This ensures there’s always at least one workspace ready to use.
Unlimited Expansion: You can spin up as many additional Desks as needed—no hard limits.
Assignments:
Clients: Attach any number of clients or leads to a Desk. Only the employees assigned to that Desk (or holding appropriate “view all” permissions) can see and work with those clients.
Employees: Grant employees access by adding them to a Desk. They inherit any Project-level rights, plus Desk-specific rights (view own/all, manage own/all).
Manager Tagging: Within each Desk, you can tag one or more employees as “Manager” for a given client. That manager becomes the primary point of contact and can receive notifications, see all actions, and edit that client’s records.
Permission Inheritance & Isolation: Desks inherit overall Project settings (e.g., enabled modules), but enforce isolation of data—users who only have desk-level access cannot see clients or actions in other Desks unless explicitly granted “view all” or “manage all.”
The following actions are available in the Desks module:
2. Desks: Use Cases
Use Case #1: Managing Offices in Different Countries
Desks can be used to manage various offices across different locations or cities within the same country. For example, you can create separate desks for your offices in different cities or regions. If needed, you can isolate clients and ensure that employees from one office only see and interact with their local clients.
Use Case #2: Managing Different Departments
Desks can help streamline client workflows across multiple departments. For instance, a client can first be assigned to the Sales department (Desk), and once the sale is complete, the client can be transferred to the Retention or Analytics department. This helps ensure that each department has clear visibility into the clients they are responsible for at any given stage.
Use Case #3: Lead Segmentation by Source
If you have multiple sales channels, such as social media, website leads, and ads, you can use desks to segment clients based on their source. You can create separate desks for each channel, ensuring that clients are categorized accordingly. This process can also be automated through API integration, making lead segmentation more efficient and less prone to errors.
Use Case #4: Product or Service Lines
If your company sells multiple product lines (e.g., “Corporate Loans,” “Retail Banking,” “Wealth Management”), spin up a Desk for each. Product-specific teams only see those clients and documents—preventing mix-ups and ensuring tailored service.
Use Case #5: Seasonal or Promotional Campaigns
For time-bound initiatives (e.g., “Holiday Promo Q4,” “Summer Flash Sale”), create temporary desks. Staff can be assigned to these desks for the campaign’s duration, then archived or deleted once complete, keeping your core desks clean.
Use Case #6: Multi-Channel Support
Separate desks by support channel: “Email Support,” “Phone Support,” “Live Chat.” Assign different SLAs, notification rules, and managers to each desk to align with channel-specific workflows and tooling.
Use Case #7: Pilot & QA Environments
Mirror your live environment under a “Staging” desk. QA engineers can import dummy clients, test new automations, and run calls without affecting production data. Once tested, you delete or reset the staging desk.
Use Case #8: Partner Onboarding & Sandboxes
Create desks like “Partner API Sandbox” or “Integration Pilot.” Issue limited-scope API tokens and access for external partners; they can only operate within that desk and never touch your real customer data.
3. How to Create a Desk
Desks in Wifox Business Core Solution are the building blocks of your organizational structure within each Project. Think of a Desk as a department, office, or specialized workstream—such as “Sales,” “Support,” or “Analytics.” By creating multiple Desks, you can keep client data, employee assignments, and workflows neatly separated, ensuring that each team only sees and manages the records relevant to their function.
1. Open the Desks Module
In the left-hand navigation menu, click Desks (icon of interconnected nodes). The main grid displays every existing Desk, including its Name, parent Project, and quick-action icons.
2. Click “+ Add”
In the top-right corner of the Desks screen, click the + Add button. The “Add desk” form will slide in, ready for your input.
3. Complete the General Section
Name
The human-readable title for the Desk (e.g., “Support Queue” or “NYC Sales Team”).
Importance: Appears throughout the UI wherever this Desk is referenced. Choose a clear, descriptive name.
Project
The parent Project under which this Desk belongs.
Action: Click the dropdown and select the appropriate Project. This links all Desk data (clients, actions, employees) to that Project’s scope.
Review the Members Panel
To the right of the General fields is the Members section, which initially shows No members. You cannot add employees until the Desk exists.
You will also see the Members tab here, but you will only be able to add new members to the desk in the Edit mode.
Save Your New Desk
Once you’ve entered Name and Project, click the green Save button at the bottom-left. Your form will close, and the new Desk appears in the grid, ready for further configuration.
4. How to Edit a Desk
In Wifox Business Core Solution (WBCS), Desks are the logical work-areas—departments, offices, or channels—within each Project. After you create a Desk, you can fine-tune its settings, manage which Employees belong there, or delete it when it’s no longer needed. Follow the detailed instructions below.
After creating a desk, the editing window will open automatically.
In the Edit window, you can:
- Change the name of the desk.
- Add or delete members of the desk.
Why You Might Edit a Desk
Reflect a team change: Your “Support Queue” Desk might become “Customer Success” after your support model evolves.
Reassign personnel: When an employee moves from Sales to Retention, you remove him/her from the Sales Desk and add to Retention.
Audit access: Periodic reviews ensure only active, authorized staff remain on critical teams.
Before You Begin
Only Desks you’ve manually added can be deleted; every Project retains its one Default Desk.
To add someone here, they must already exist in the parent Project (see Projects → Employees).
Step 1. Open the Desks Module
In your left-hand menu, click Desks.
You will see a card for each Desk, organized by Project.
Step 2. Enter Edit Mode
Hover your mouse over the Desk you need to change.
A small pencil icon appears in its top-right corner—click it to open the edit panel.
Tip: If you don’t see the icon, ensure you have the “manage own” or higher permissions on that Desk.
Step 3. Rename the Desk
In the edit form’s General section, locate the Name field.
Replace the existing text with your new Desk name.
Example: Change “Support Queue” → “Customer Success.”
This new label will appear everywhere—lists, dropdowns, reports.
Step 4. Verify the Project
Directly beneath the Name, the Project dropdown shows where this Desk lives.
This value is read-only: you cannot move a Desk to another Project.
If you need a Desk in a different Project: create a new Desk there instead.
Note: The list consists of members who are included in the connected project. To add a new user to this list, go to the Projects tab and add the member to the relevant project.
Step 5. Filter Existing Members
On the right, the Members panel lists current Desk members.
Use the Search box at its top to type any employee’s name or email.
The list instantly narrows to matching entries—ideal for large teams.
Step 6. Add New Members
Click the + Add member button in the Members panel.
A slide-out appears showing every Employee in the parent Project.
Example: If you’re editing the “Retention” Desk in “Acme USA,” you’ll see all “Acme USA” staff.
Step 7. Grant Access
In that slide-out, click the ➕ icon next to any Employee to add them.
They immediately appear in the Members list and gain access.
Practical note: New members can now see all Clients, Requests, and Actions tied to this Desk.
Desk Membership & Data Visibility
Desk membership directly impacts data visibility across the system, including Clients, Requests, and Transactions.
Access to transactions is governed by role permissions combined with Desk assignment:
-
Users with View own desks permission can only see transactions related to Desks they are assigned to.
-
Users with View all desks permission can see transactions across all Desks.
-
If a user is removed from a Desk, they immediately lose access to data associated with that Desk (subject to their role permissions).
Transaction visibility is enforced at backend level and follows the same authorization logic used across Clients and Projects modules.
Step 8. Save Your Changes
After renaming and member adjustments, click Save at the bottom-left.
All edits apply instantly: teammates can refresh and see the new Desk name or membership.
Confirmation: You’ll see a brief “Changes saved” banner.
Step 9 Quickly View Members (without Editing)
Back on the main Desks grid, hover any Desk card.
Click the 👥 Show members icon to get a read-only peek at its roster.
Use this to audit who’s on each team without risking accidental changes.
Step 10. Remove an Existing Member
In the Members panel, find the Employee you want to remove.
Click the 🗑️ trash icon beside their name.
They lose access to this Desk—useful when someone leaves the team.
Following these detailed steps and considerations ensures that your WBCS environment stays organized, secure, and aligned with your company’s evolving team structures.
5. How to Delete a Desk
When to Delete a Desk
- You ran a pilot “Beta Test” Desk that never went live.
- You permanently closed one of your “Office” desks.
Deletion is permanent: All membership links and any Desk-specific workflows disappear. Only manually created Desks can be deleted; you cannot remove a Project’s Default Desk.
Step 1. Locate the Desk
In the Desks module, find the card for the Desk you wish to remove.
Step 2. Initiate Deletion
Hover over that card and click the 🗑️ Delete icon in the top-right corner.
Step 3. Confirm Permanently
A modal appears warning you: “Are you sure?”
Click Confirm to proceed, or Cancel to back out.
Step 4. Post-Deletion Cleanup
Any Clients still assigned to that Desk automatically fall back to the Project’s Default Desk.
Review your Default Desk to reassign those Clients or move them to another active Desk.
Best Practices & Tips
Rename vs. Delete: If the Desk’s purpose changes, prefer renaming and updating membership to preserve history.
Regular Audits: Monthly, use the 👥 Show members view to verify only current employees retain Desk access.
Pre-Deletion Reassignment: Before deleting, move high-priority Clients or Requests elsewhere to avoid workflow disruption
Affiliate Hub
1. Affiliate Hub: Overview
The Affiliate Hub module serves as a centralized toolkit for tracking, organizing, and managing leads generated by any advertising or referral channel—whether it’s affiliate networks, PR initiatives, paid search, social media, or experiential events. By grouping incoming clients into logical “buckets,” you gain:
-
Clear Attribution: Assign every new lead to the channel or partner that brought them in.
-
Flexible Assignment: Route leads to the right team or “desk,” either automatically using time- or source-based rules, or manually through a simple interface.
-
Performance Monitoring: Use the built-in analytics dashboard to see registrations, first transactions, conversion rates, and revenue per affiliate hub in real time.
-
Scalable Configuration: Add new sources, postbacks, and code snippets on the fly as you expand into new channels or markets.
Together, these capabilities ensure you always know which marketing efforts are driving the most valuable traffic—and can quickly adjust your budgets, creative, or partner arrangements based on hard data.
The following actions are available in the Affiliate Hub module:
-
Creation and Editing
-
Searching
-
Configuration: Adding sources and postbacks
-
Assigning to desks: Automated or manual distribution of leads to relevant desks
-
Deletion
2. Affiliate Hub: Use Cases
Use Case #1: Managing Different Affiliate Companies
Affiliate Hub can organize clients from multiple affiliate partners into separate segments. This setup allows you to monitor registrations, first-transaction rates, and ROI for each company side by side.
Use Case #2: Managing Advertising Campaigns by Region
Affiliate Hub can separate campaigns targeting different geographies (e.g., USA, Canada, EMEA). You can apply region-specific desk assignments, time-zone rules, and reporting to each affiliate hub for clearer regional performance analysis.
Use Case #3: Managing Different Types of Advertising
Affiliate Hub can group clients by ad format—banner ads, video ads, email blasts, influencer shout-outs—to compare engagement, conversion rates, and cost per acquisition across creative channels.
Use Case #4: Testing New Marketing Channels
Affiliate Hub can route early leads from pilot channels (e.g., TikTok ads, podcast sponsorships) into a dedicated “test” affiliate hub. This lets you gauge impact without skewing data in your production affiliate hubs.
Use Case #5: Segmenting by Referral Source
Affiliate Hub can segment organic traffic sources—SEO, direct referrals, in-house promotions—to benchmark free versus paid initiatives on qualified leads, activation rates, and revenue.
3. How to Create an Affiliate Hub
Affiliate Hub module lets you group new clients by their acquisition source—affiliate campaigns, PR outreach, or any custom channel—and funnel them into the right teams with built-in tracking and analytics. Before you can route clients into these groups, you’ll need to create an affiliate hub. Follow the steps below to get started.
To add a new affiliate hub, follow these steps:
Project: The project to which the affiliate hub will be assigned. You will be able to designate clients only to the desks within this project.
Name: The business-facing name of the affiliate hub (displayed in the UI).
Affiliate ID: A unique identifier used to track clients brought into this affiliate hub and monitor their activities. You can enter an Affiliate ID manually or generate it automatically based on the Name.
Responsible Manager: The employee assigned to oversee and manage affiliates. To select a responsible manager from a drop-down list, you must first add them to the Employee table with an Employee role. In the Roles module, you can configure their rights and what information they can access, depending on your needs.
-
Fill out the Sources section
Sources identify the origin of each lead, enabling you to track and analyze which acquisition channels drive traffic. You can create as many sources as needed to match your business requirements and accurately track different lead origins.
To add a source, click + New source and type its name.
-
Complete the Permissions section
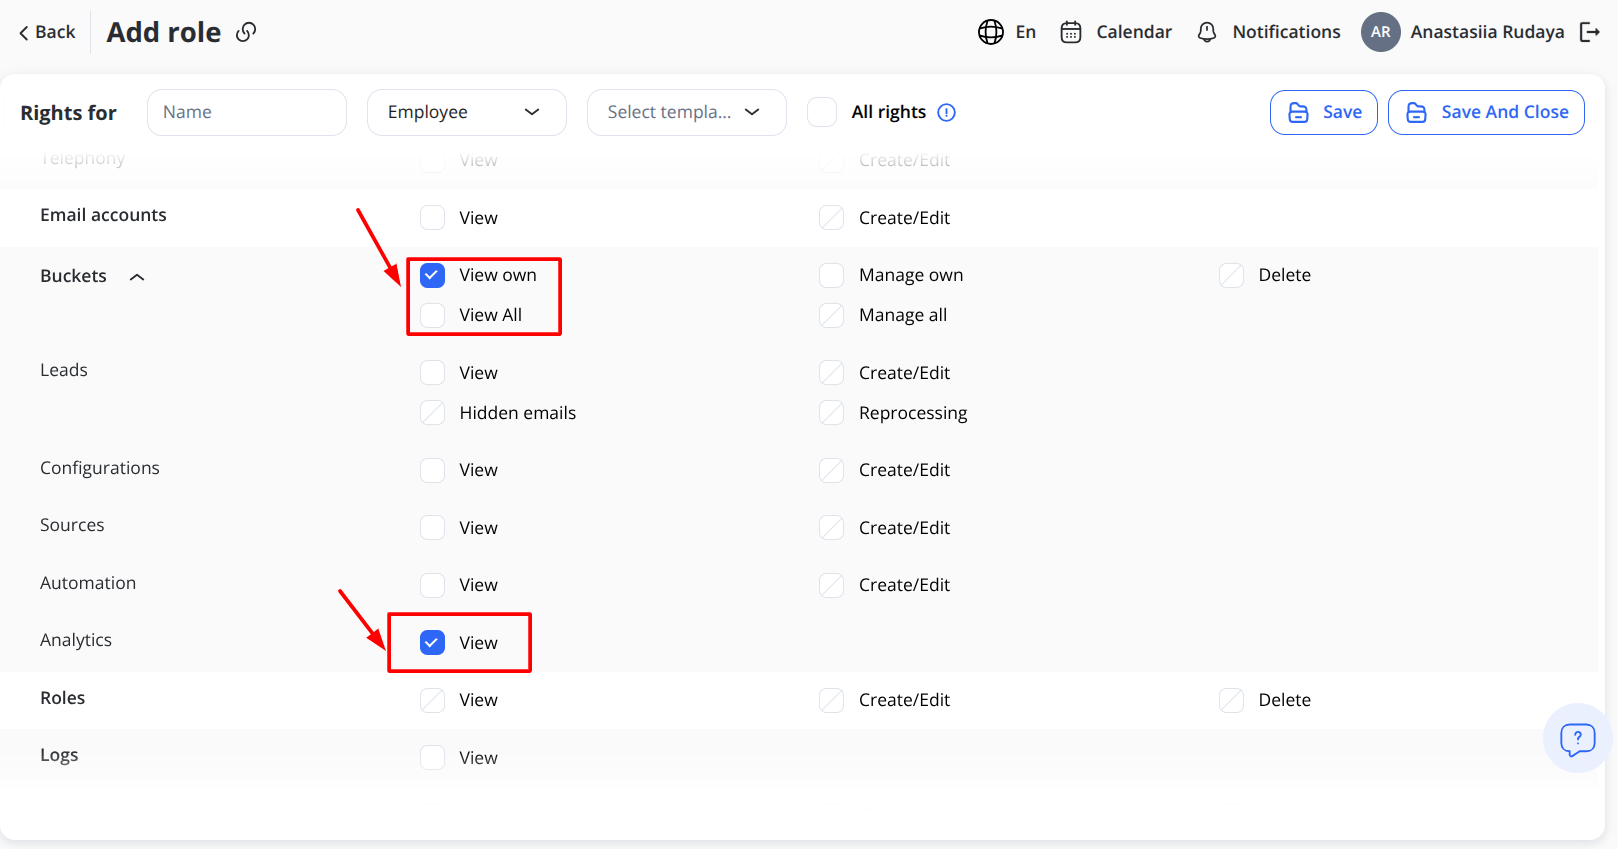
In this section, you need to assign affiliate managers who will be responsible for managing the affiliate hub. To do this, add an employee in the Employees module and assign them the Affiliate role. Next, configure the affiliate manager’s access to the information available to them. Go to the Roles module, check the boxes for the permissions and actions you want to grant.
Affiliate Hub settings:
-
View All provides access to all affiliate hubs you have.
-
View Own grants access only to the assigned hub.
-
Manage All allows the affiliate manager to edit and configure all affiliate hubs.
-
Manage Own allows the affiliate manager to modify settings and manage data only within their assigned hub.
Leads settings:
-
View allows viewing leads from all sources in your affiliate hub.
-
View by Source grants access only to the leads from the specific source assigned to the employee.
-
Create/Edit permits to make changes, add new sources, and edit automation settings.
To ensure the affiliate manager can see all hub-related information, select View for the Leads, Sources, Configurations, Automation, and Analytics fields. If you want to allow changes to settings, tick the Create/Edit option.
Please note: When configuring permissions for the affiliate hub, thoroughly review the rights for each role. The system works like this: To ensure the affiliate hub operates properly, you need two roles. The first is a Root Affiliate. This role must have View permissions for Leads, Sources, Configurations, Automation, and Analytics to access full hub information. Otherwise, the Root Affiliate will act like a webmaster and will not be able to manage the affiliate hub. The second role is employees with the View by Source permission. This allows them to track information limited to the designated source. They can be assigned as webmasters to manage specific sources.
To save the settings, click Save if you plan to continue working with this module, or Save and Close if you have finished configuring it.
Webmasters are users who can track only the leads by their assigned sources. They are assigned after creating an affiliate hub in the Sources table. To designate a webmaster for the Source, you should add them in the Roles module as an Affiliate Webmaster and grant them the View by Sources permission. However, you can adjust the role's permissions as needed. One webmaster can be assigned to several sources.
When all fields are completed, click Create affiliate partner at the bottom of the window. You’ll see a confirmation toast (“Affiliate Hub Successfully Created”), and your new affiliate hub will appear on the main Affiliate Hub page.
Pro Tip: If dropdown lists are empty, ensure you’ve first created the corresponding Projects and Users under Settings.
Next Steps & Conclusion
With your affiliate hub now in place, you can:
Assign clients to it manually via the Clients → Edit screen, or automate assignment through your workflow rules.
Route clients to specific desks within the chosen project for streamlined onboarding.
Analyze performance by filtering on the affiliate hub’s Affiliate ID in your Analytics dashboard to measure ROI and conversion rates.
By defining clear affiliate hubs that map to your marketing channels, you gain full visibility into where your clients come from and how they progress—enabling data-driven optimization of your acquisition strategy.
4. How to Edit an Affiliate Hub
Once an Affiliate Hub is created, you may need to update its settings—whether to adjust its name, swap out the affiliate contact, or toggle its active status. Follow these steps to make edits safely without disrupting client assignments.
How to Edit an Affiliate Hub
1. In the left sidebar, click Affiliate Hub to view all existing affiliate hubs.
2. Click on the three-dot menu in the upper-right corner of the affiliate hub.
3. From the dropdown, choose Edit to open the affiliate hub’s configuration sidebar.
4. Modify the Affiliate Hub Details
In the Edit Affiliate Hub form, you can update:
Active — Toggle on/off to enable or pause the affiliate hub.
Affiliate — Change who is credited for bringing in these clients.
Name — Adjust the public-facing title displayed to your team.
Affiliate ID — Update the tracking code if needed.
Important: The Project, Manager, and Label fields are locked once the affiliate hub is created to preserve your routing logic and API integrations.
5. Save Your Changes
After making your updates, click Save at the bottom of the sidebar. You will see a confirmation toast (“Affiliate Hub Successfully Updated”) and your edits will immediately take effect.
By regularly reviewing and updating affiliate hub settings, you ensure your client acquisition workflows stay aligned with evolving marketing strategies and operational needs.
5. How to Search for an Affiliate Hub
When you have many affiliate hubs, the Search box helps you quickly locate the one you need by filtering the list in real-time.
- Locate the Search field: At the top of the Affiliate Hub page, you’ll see a search input with a magnifying-glass icon.
- Type any part of the affiliate hub’s label or name: As you enter text, the displayed affiliate hub cards will instantly narrow down to those whose Label or Name contains your query.
- Select your Affiliate Hub: Click the matching affiliate hub card to drill in, or use its kebab menu to edit, delete, or view sources.
Tip: You can search on partial words—e.g. typing “Test” will match both “SecondTest” and “TestAffiliateHub.”
Next Steps & Tips
- Client Re-routing: If you’ve changed the affiliate or toggled Active off, verify that any automated assignments or desk mappings still behave as expected.
- Audit Logs: Check your system’s audit trail to confirm who made the change and when—useful for compliance and troubleshooting.
- Communicate Changes: Let your team know if you’ve renamed an affiliate hub or updated its affiliate ID so reporting dashboards and integrations remain in sync.
6. How to Configure Affiliate Hub
The Configurations tab within each affiliate hub lets you manage two key entities for tracking and routing leads:
-
Postbacks – callback URLs for registration and first-trade events
-
Snippets – embeddable code to drive new sign-ups
The Postbacks entity allows you or your partners to control and track user traffic and activity within our CRM system. Once a user registers in our CRM, a request is sent to the configured postback URL. Similarly, when the user completes their first transaction, a request is also sent to the configured postback URL.
You can add postback URLs for two types of activity:
- FTD (First Time Deposit)
- Registration
To add a new postback:
Postbacks let you notify external systems whenever a user registers or makes their very first transaction (FTD). You configure them for each affiliate hub on the Configurations tab:
- Open Your Affiliate Hub’s Configurations: In the left nav, click Affiliate Hub, select the affiliate hub you want, then choose the Configurations tab at the top.
- Enable the Postbacks Panel: Flip the toggle at the top of the Postbacks card to “on” if it isn’t already.
- Enter the Callback URL: In the Postback URL field, type the full HTTPS endpoint your system will expose.
Use mustache placeholders ({{…}}) to inject dynamic client data. Only these tokens are allowed:
Hover the ℹ️ icon next to Fields to view the complete, supported placeholder list. Any other token (e.g. {{phone}}) will fail frontend validation (red warning) and be passed through as literal text if it somehow reaches the backend.
Select the Trigger Event: From the dropdown to the right of the URL, pick Registration (fires on every new signup) or FTD (fires once at first transaction).
Add the Postback: Click the green ➕ button to insert your URL+event into the active list.
Confirm & Save: You can immediately click away or hit the affiliate hub’s Save button.
A “Success! Affiliate hub configuration successfully updated” toast appears once your new postback is accepted.
Editing or Disabling
Edit any existing entry by clicking its ✏️ icon, updating the URL or event type, then saving.
Disable temporarily by flipping the entry’s toggle switch off—no removal needed.
The Snippet entity provides customizable code that you can insert into your website or social media page to attract clients to the platform. You can configure the code in various formats through Settings > Texts > Code Snippets.
To get a snippet:
Snippets are blocks you can embed on websites or ads to route new leads directly into this affiliate hub.
Click Copy to save the code to your clipboard.
Once highlighted, click Copy to grab the snippet text.
You can also get a snippet from the main Affiliate Hub page. To do that:
Tip: All changes take effect immediately for new leads. Existing leads retain their original source/postback assignments unless you manually update them. By carefully configuring your Sources, Postbacks, and Snippets, you ensure accurate lead attribution and seamless integration with external systems
7. How to Automate Affiliate Hubs
Automating your affiliate hubs lets you route incoming clients to the right desks without manual intervention, ensuring timely follow-up, consistent SLA adherence, and clear ownership. You can choose a simple “all leads go here” approach, or build sophisticated rules based on the time of day or the source channel.
The Automation section allows you to set up automated client assignment to relevant desks.
To begin, enable automation:
1. Open the Automation tab within your affiliate hub.
2. Toggle on Active automation so it turns blue.
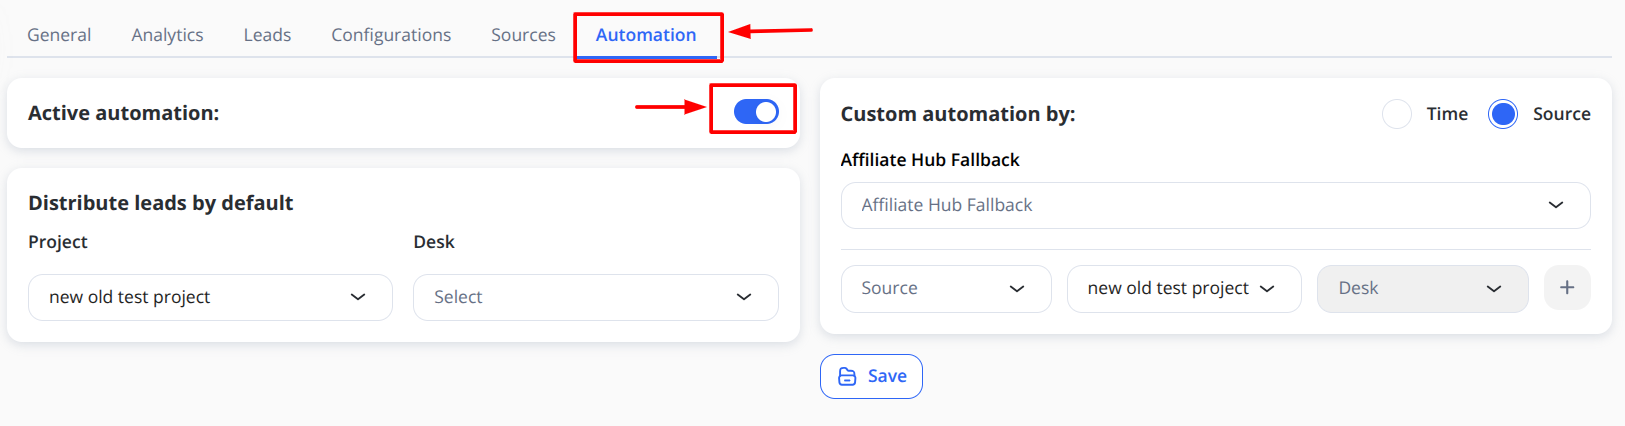
Tip: Flip this switch off any time to pause automation and fall back to manual desk assignments.
Note: To disable automation, click the toggle again. If disabled, you will need to assign clients to desks manually. Instructions on manual assignment can be found [here].
To automatically assign all new clients to one desk (with no conditions):
1. In Distribute leads by Default→ Select Project and Desk from the dropdown.
2. Click Save to apply changes.
All new leads will now land on that desk, straight out of the box.
To set up custom automation:
Use time-based rules when, for example, you have different support teams on different shifts.
1. Under Custom automation by, choose one of the options, Time or Source.
Note: You can choose automation based on either time or source, but not both simultaneously.
For custom automation by time:
1. Select the Affiliate Hub Fallback desk from the drop-down list. Clients that do not match within the specified time periods will be assigned here.
2. Set the Start time and End time to specify the time period. Then select the Project and Desk for that period from the drop-down list and click the plus icon (+).
Note: Time periods may overlap if entered that way (e.g., 8:00–14:00 and 6:00–16:00). In such cases, the first matching period in the list will be selected.
3. You can add an unlimited number of time periods to separate clients. A new line for adding a period will appear once you have added the previous one.
4. You can edit or delete all created periods by clicking the relevant icons.
For custom automation by source:
Route based on where the lead came from (e.g., “Twitter” vs. “Affiliate A”).
1. Select the Affiliate Hub Fallback desk from the drop-down list. Clients that do not match within the specified sources will be assigned here.
2. Select the Source, Project, and Desk from the drop-down lists. Then click the plus icon (+).
3. You can add as many sources as you have set up in Configurations. A new line for adding a source will appear once you have added the previous one.
4. You can edit or delete all created sources by clicking the relevant icons.
5. Once your default desk, time windows, or source mappings are in place, click Save at the bottom of the panel. All new leads into this affiliate hub will immediately flow according to your rules.
By leveraging affiliate hub automation:
Reduce manual work—no more one-by-one desk assignments.
Enforce SLAs—ensure leads always land with the right team at the right time.
Adapt on the fly—update time windows or source mappings in seconds.
Automated routing keeps your pipeline moving smoothly, so your teams can focus on closing rather than chasing down new leads.
8. How to Search and Filter Leads
The Leads section lets you see every client captured by this affiliate hub—complete with their email, ID, affiliate/source, registration date, FTD date, status, and more. When you have hundreds or thousands of leads, the Search and Filter tools help you zero in on exactly the records you need in seconds.
To search for a lead:
1. Go to the Leads tab of your affiliate hub.
2. Click into the Search… field at the top.
3. Type any part of the lead’s email address (e.g. john.doe, @gmail.com, etc.).
4. The list will dynamically filter as you type, showing only matching leads.
Pro tip: Partial queries work too—entering
hotmailwill instantly display all Hotmail addresses.
To filter leads:
While Search matches text, Filters let you narrow down by date ranges and source IDs.
1. Click the Filter button on the left side of the toolbar.
2. In the right-hand drawer, set one or more criteria:
Created date (when the lead registered)
Source ID (the marketing channel tag)
First transaction date (FTD date range)
3. Remove any filter field by hovering over it and clicking the ×.
4. Click Save to apply—your table updates to show only leads matching all selected criteria.
Conclusion
By combining Search for quick text matches with Filter for precise date or source slices, you can:
Rapidly locate individual leads (e.g., to troubleshoot or review).
Segment your data by campaign or conversion period.
Export just the subset you need for reporting or follow-up.
These tools keep your lead management efficient, accurate, and scalable—no matter how many clients flow through your affiliate hubs.
9. How to Manually Assign Leads to Desks
While the Automation section streamlines lead distribution, you can always take direct control by manually assigning individual or multiple leads to any desk. This is useful for special cases or overrides.
To manually assign leads to desks:
1. Navigate to the Leads tab of the affiliate hub where you want to manage assignments.
2. Find the lead you want to assign.
3. Click the Assign icon at the end of that lead’s row. If the icon is gray and unclickable, that lead has already been assigned (either manually or via automation).
4. In the right-hand drawer, choose the Desk from the drop-down list.
5. Click Save to apply. The lead’s Status column will update to reflect the new desk assignment.
Note: You can assign a lead to the desk through the Affiliate Hub module only once. To reassign a client, use the Clients module.
10. How to Work With Affiliate Hub Dashboard
Employees and Affiliates can access analytics only when the relevant permission is enabled in their Role. To grant access, first define whether the user can view all Affiliate Hubs or only their own Affiliate Hub, then enable the View checkbox in the Analytics block. The analytics data displayed in the system will vary depending on the selected access level.
The dashboard primarily displays the number of leads who have signed up. In this section, you’ll see the total FDV leads and the total signed-up leads.
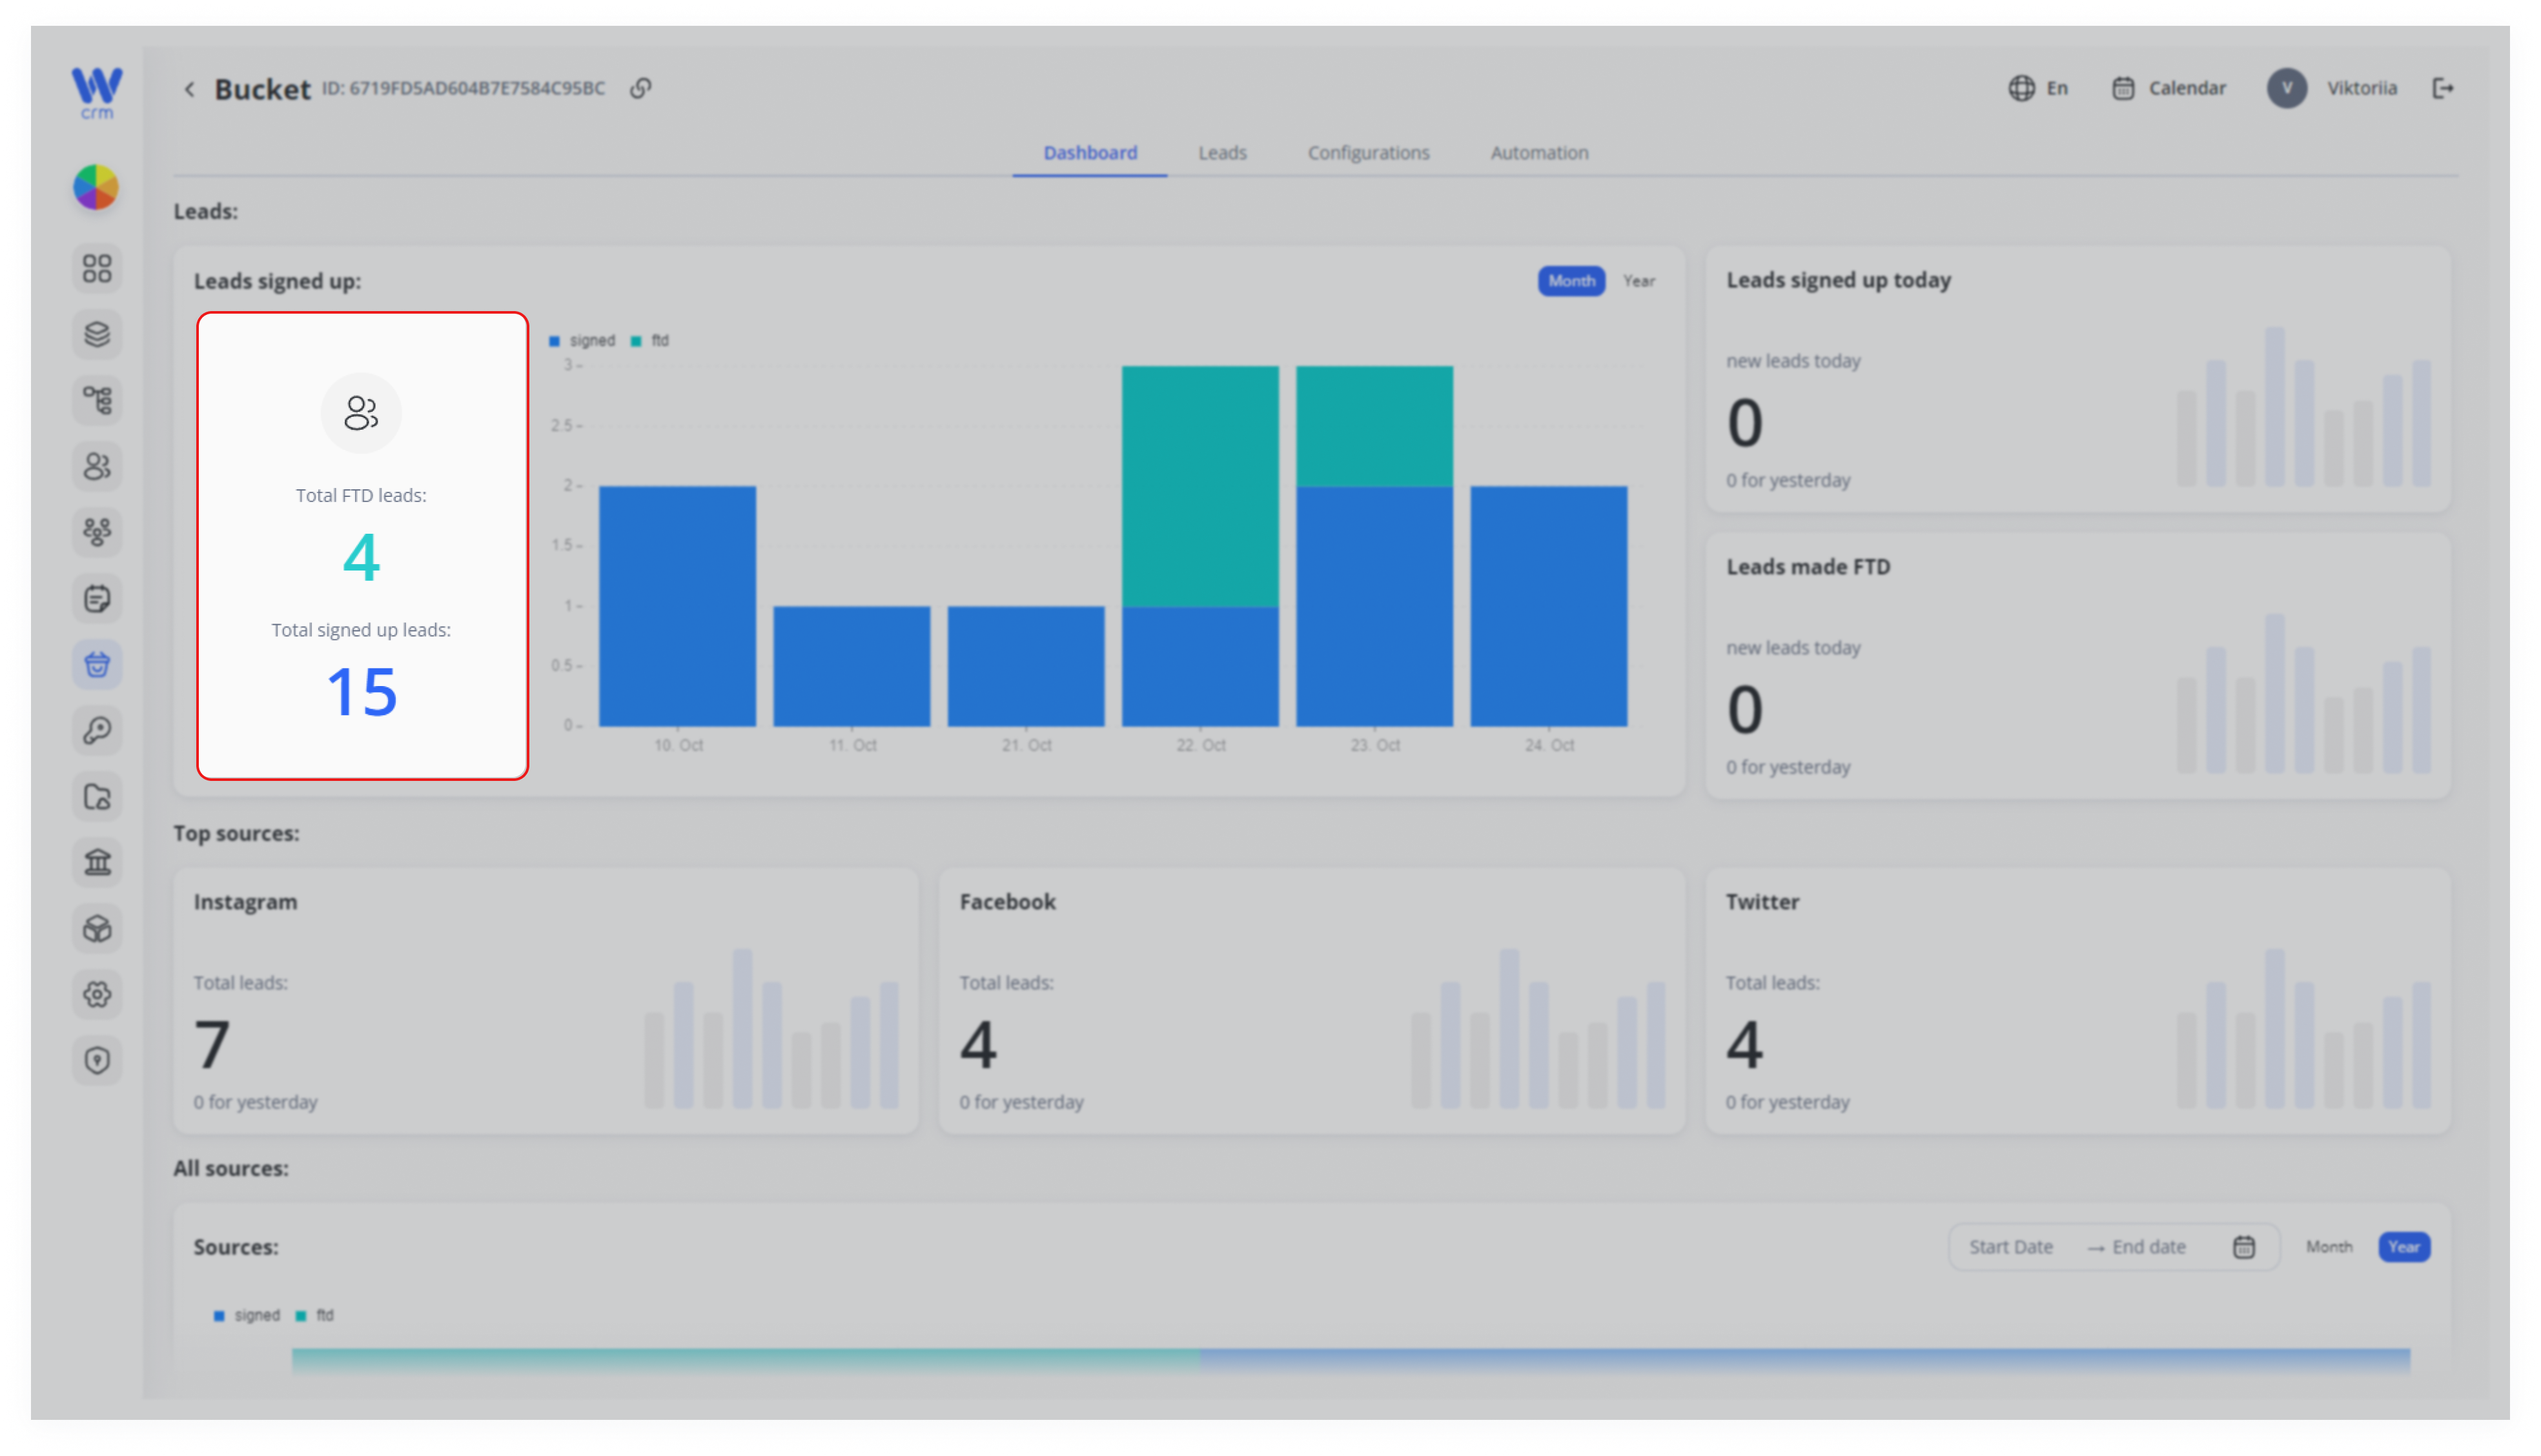
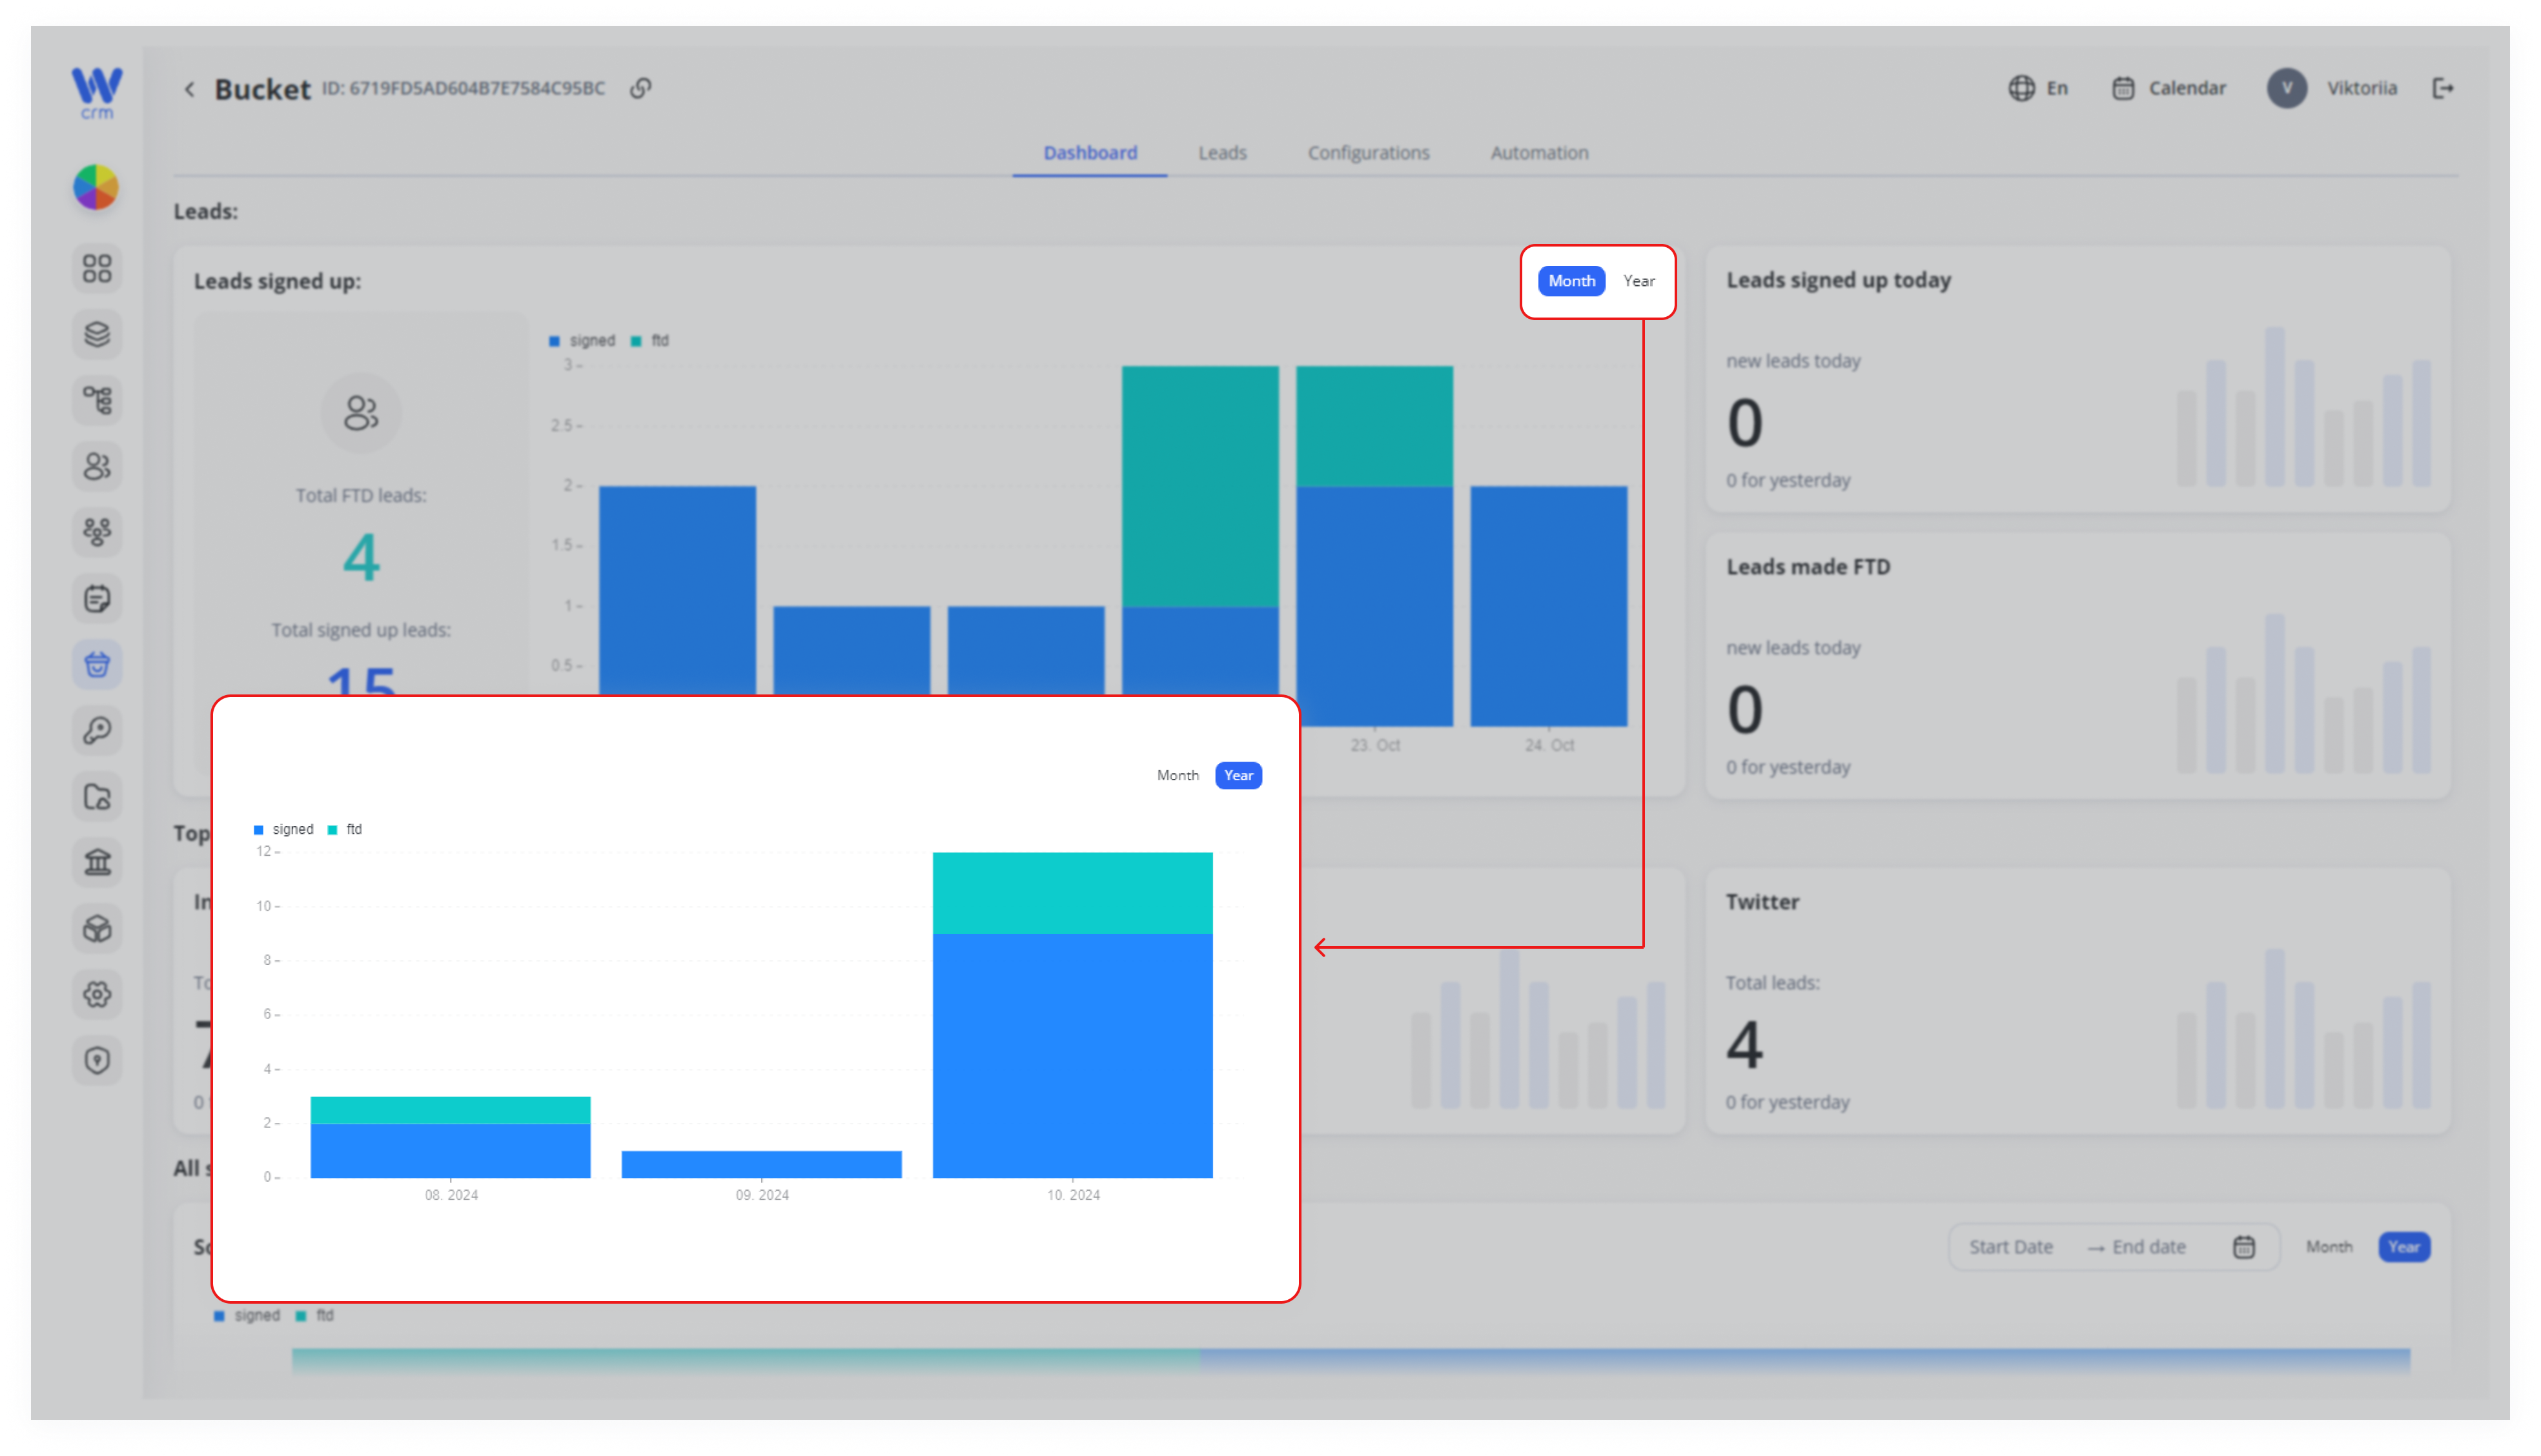
This information is also presented on the chart on the right. In the upper-right corner, you can select Month or Year to adjust the lead distribution view on the graph.
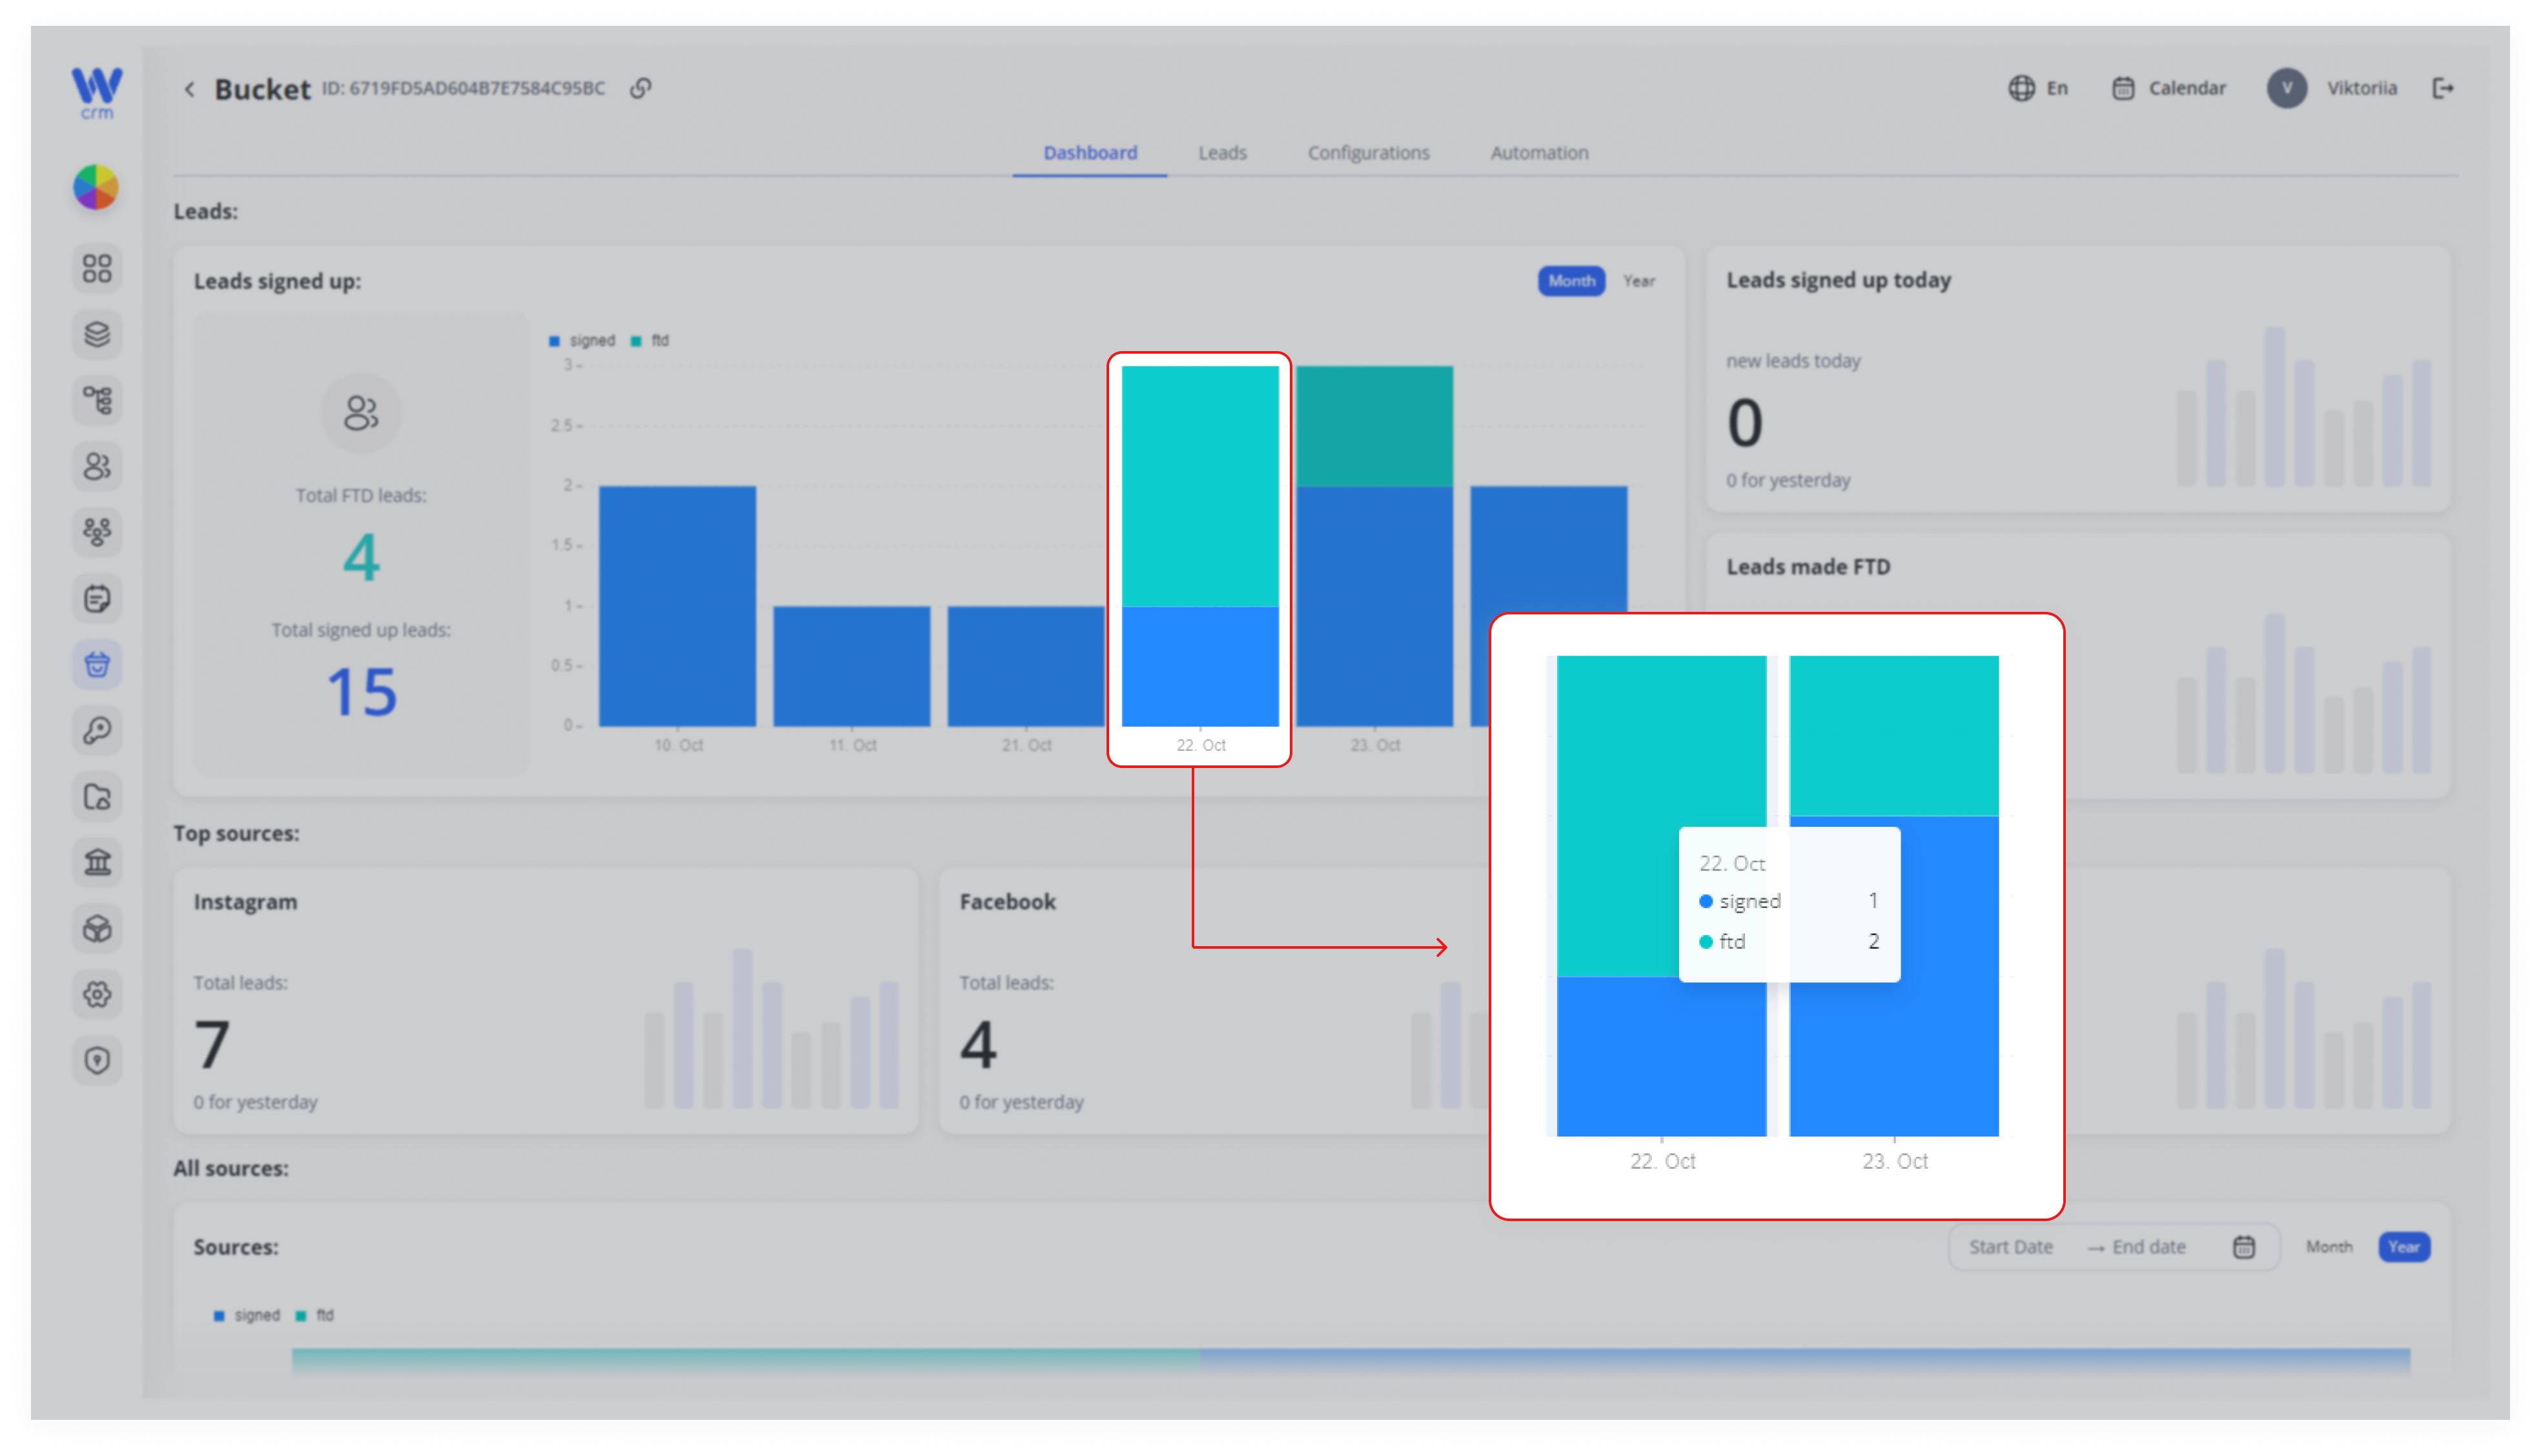
If you hover your mouse over a specific column, you can view how many leads came in for the selected month/year.
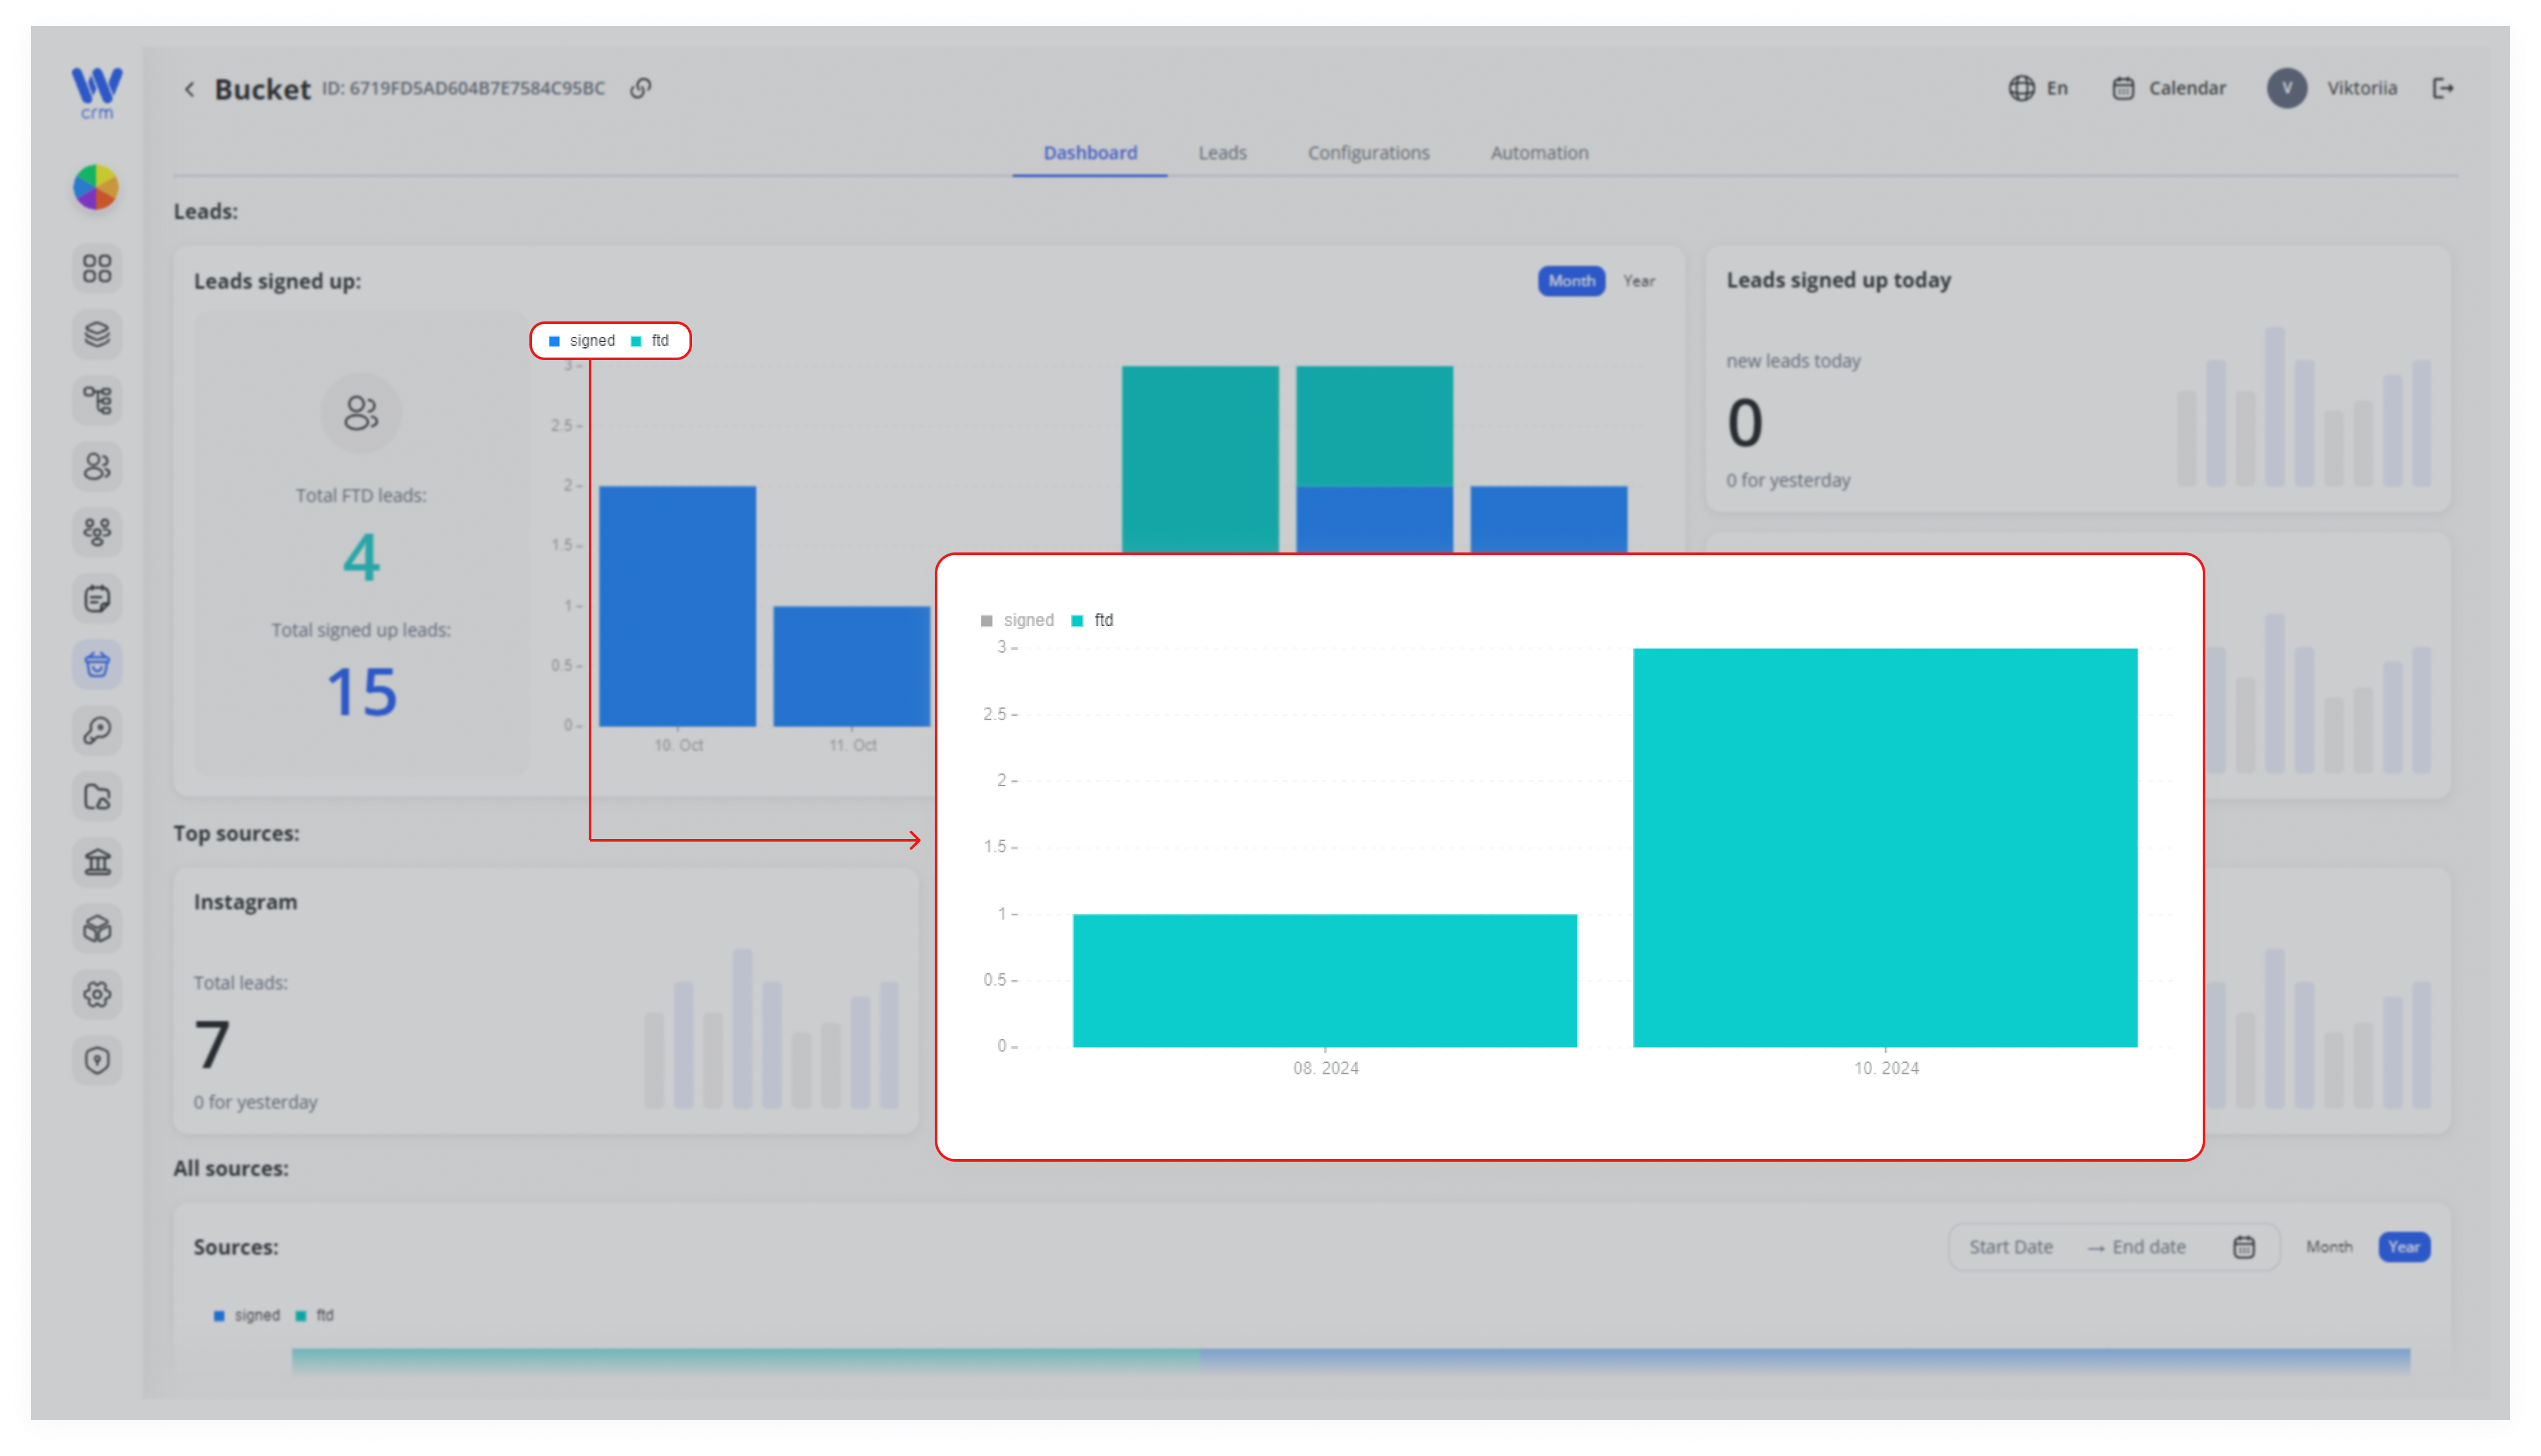
You can also display only FTD or only signed up leads.
The section on the right displays the number of FTD and signed-up leads for today and yesterday.
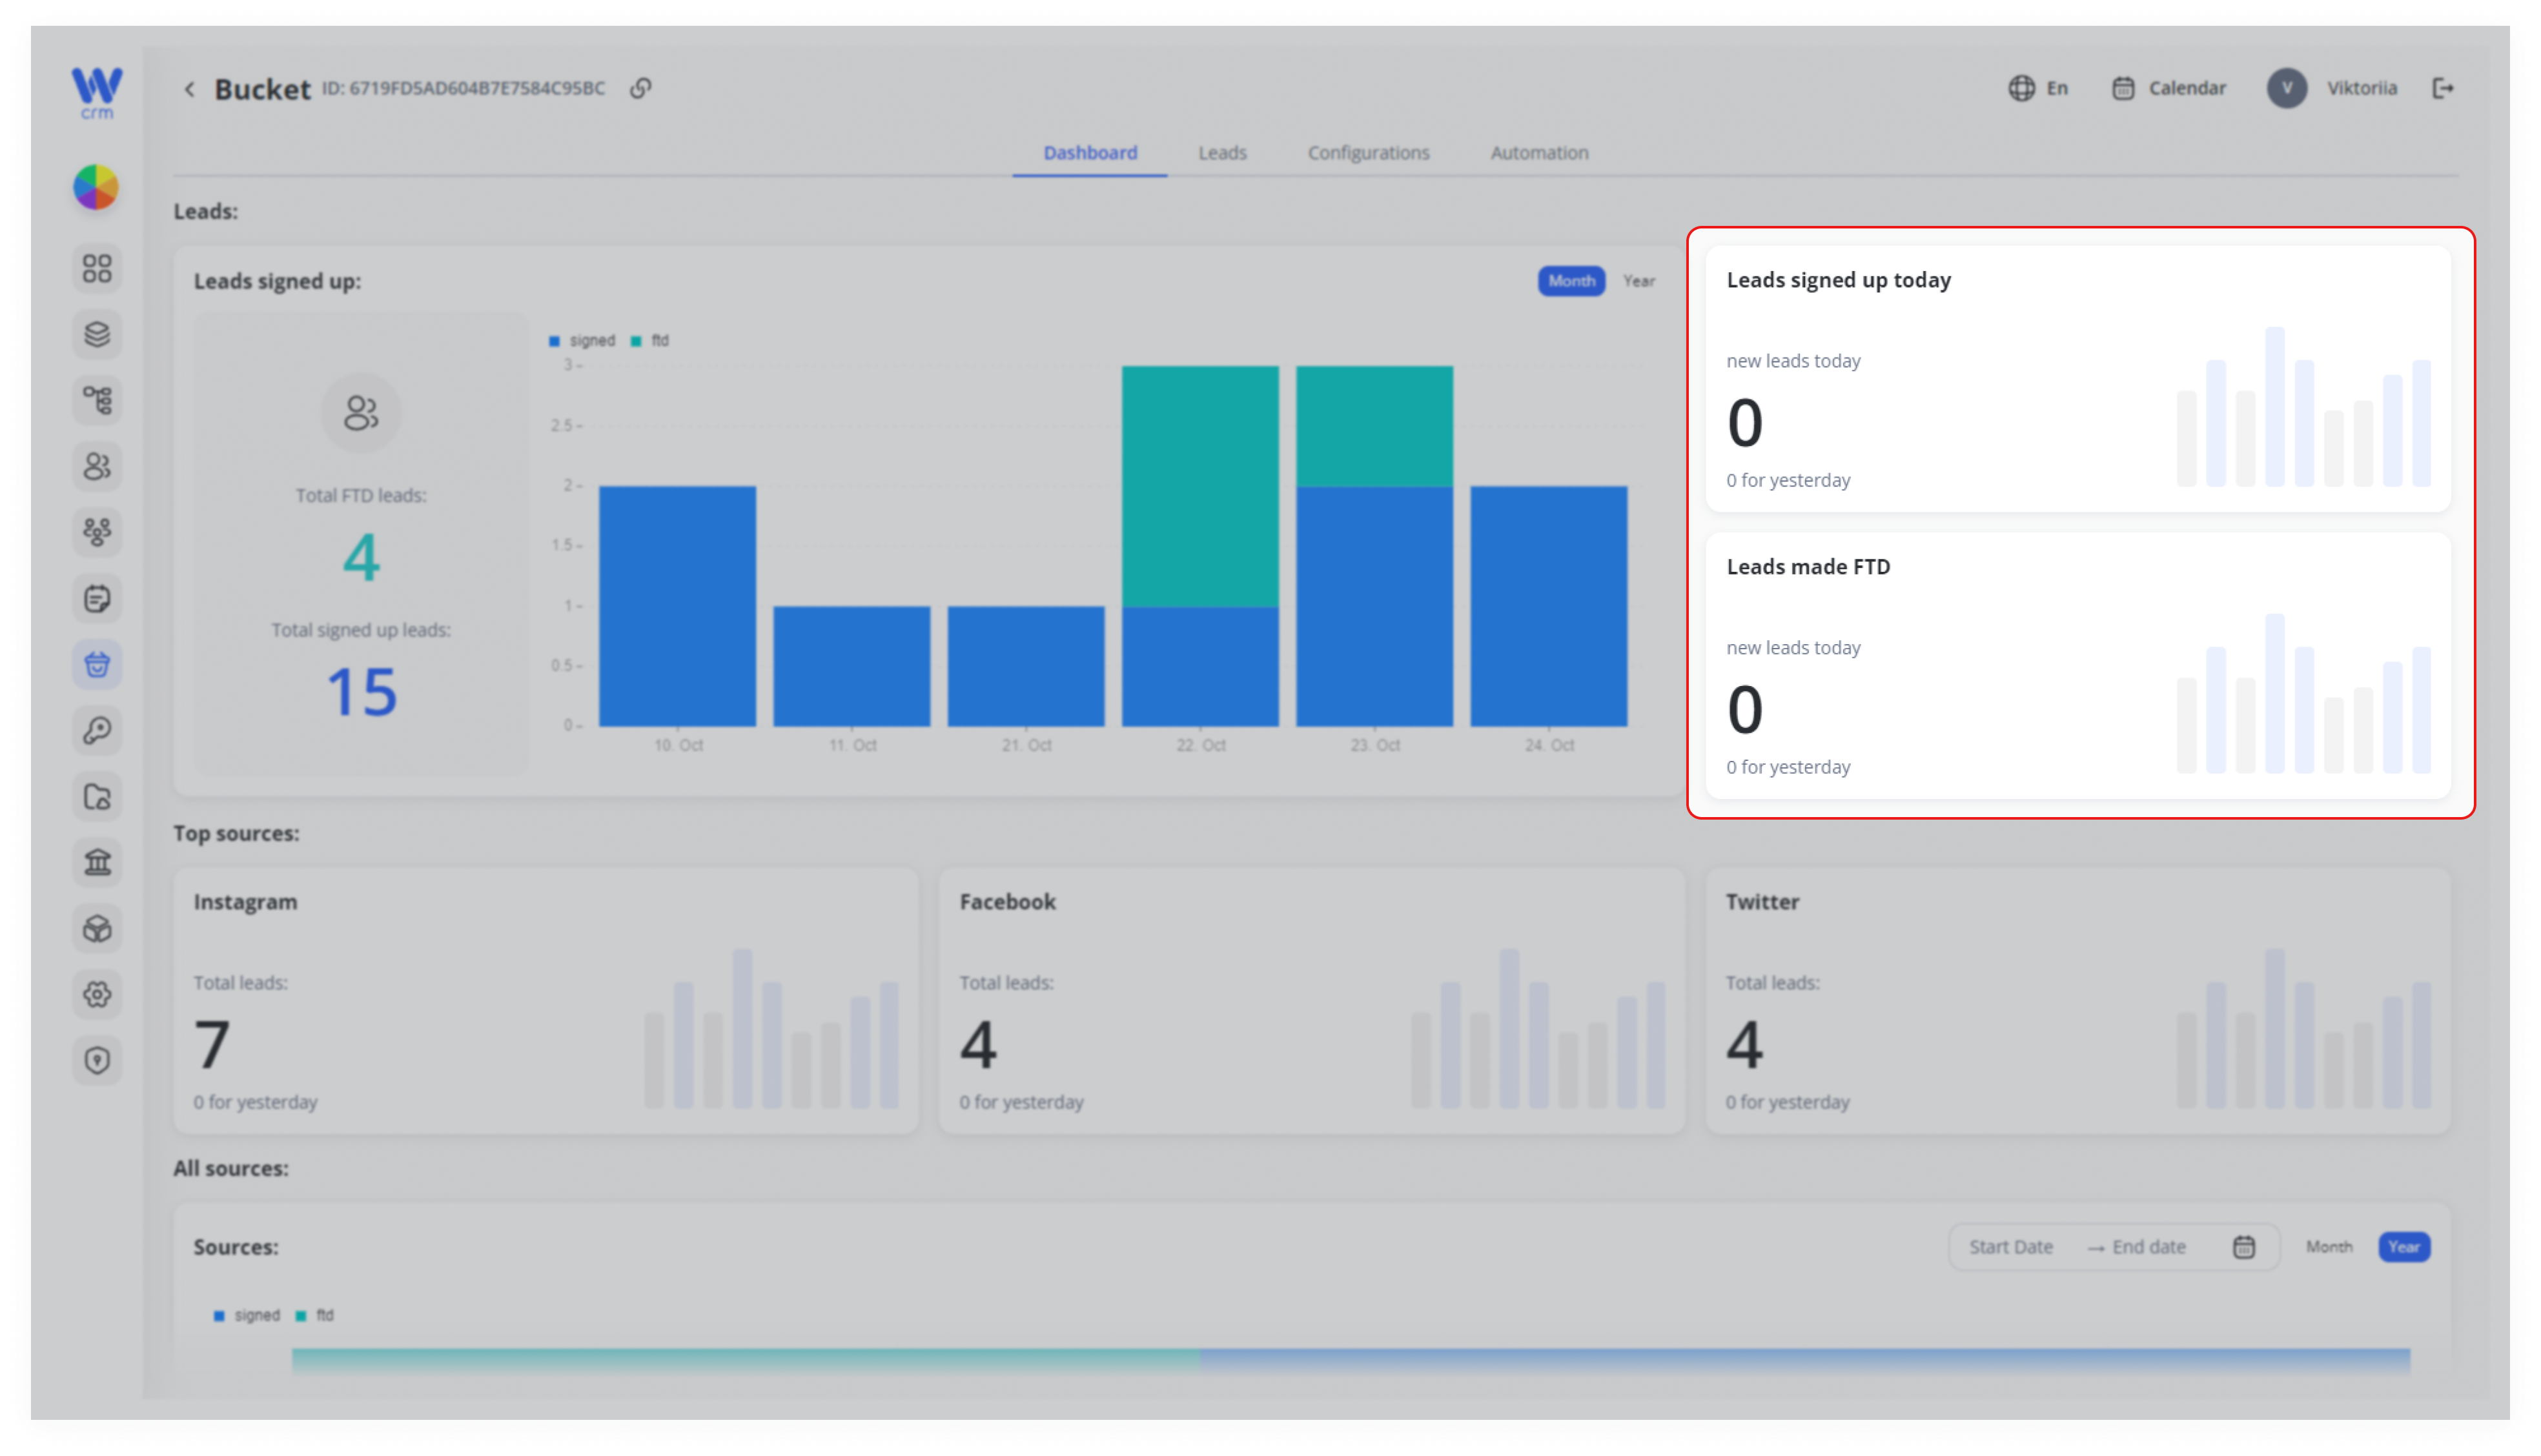
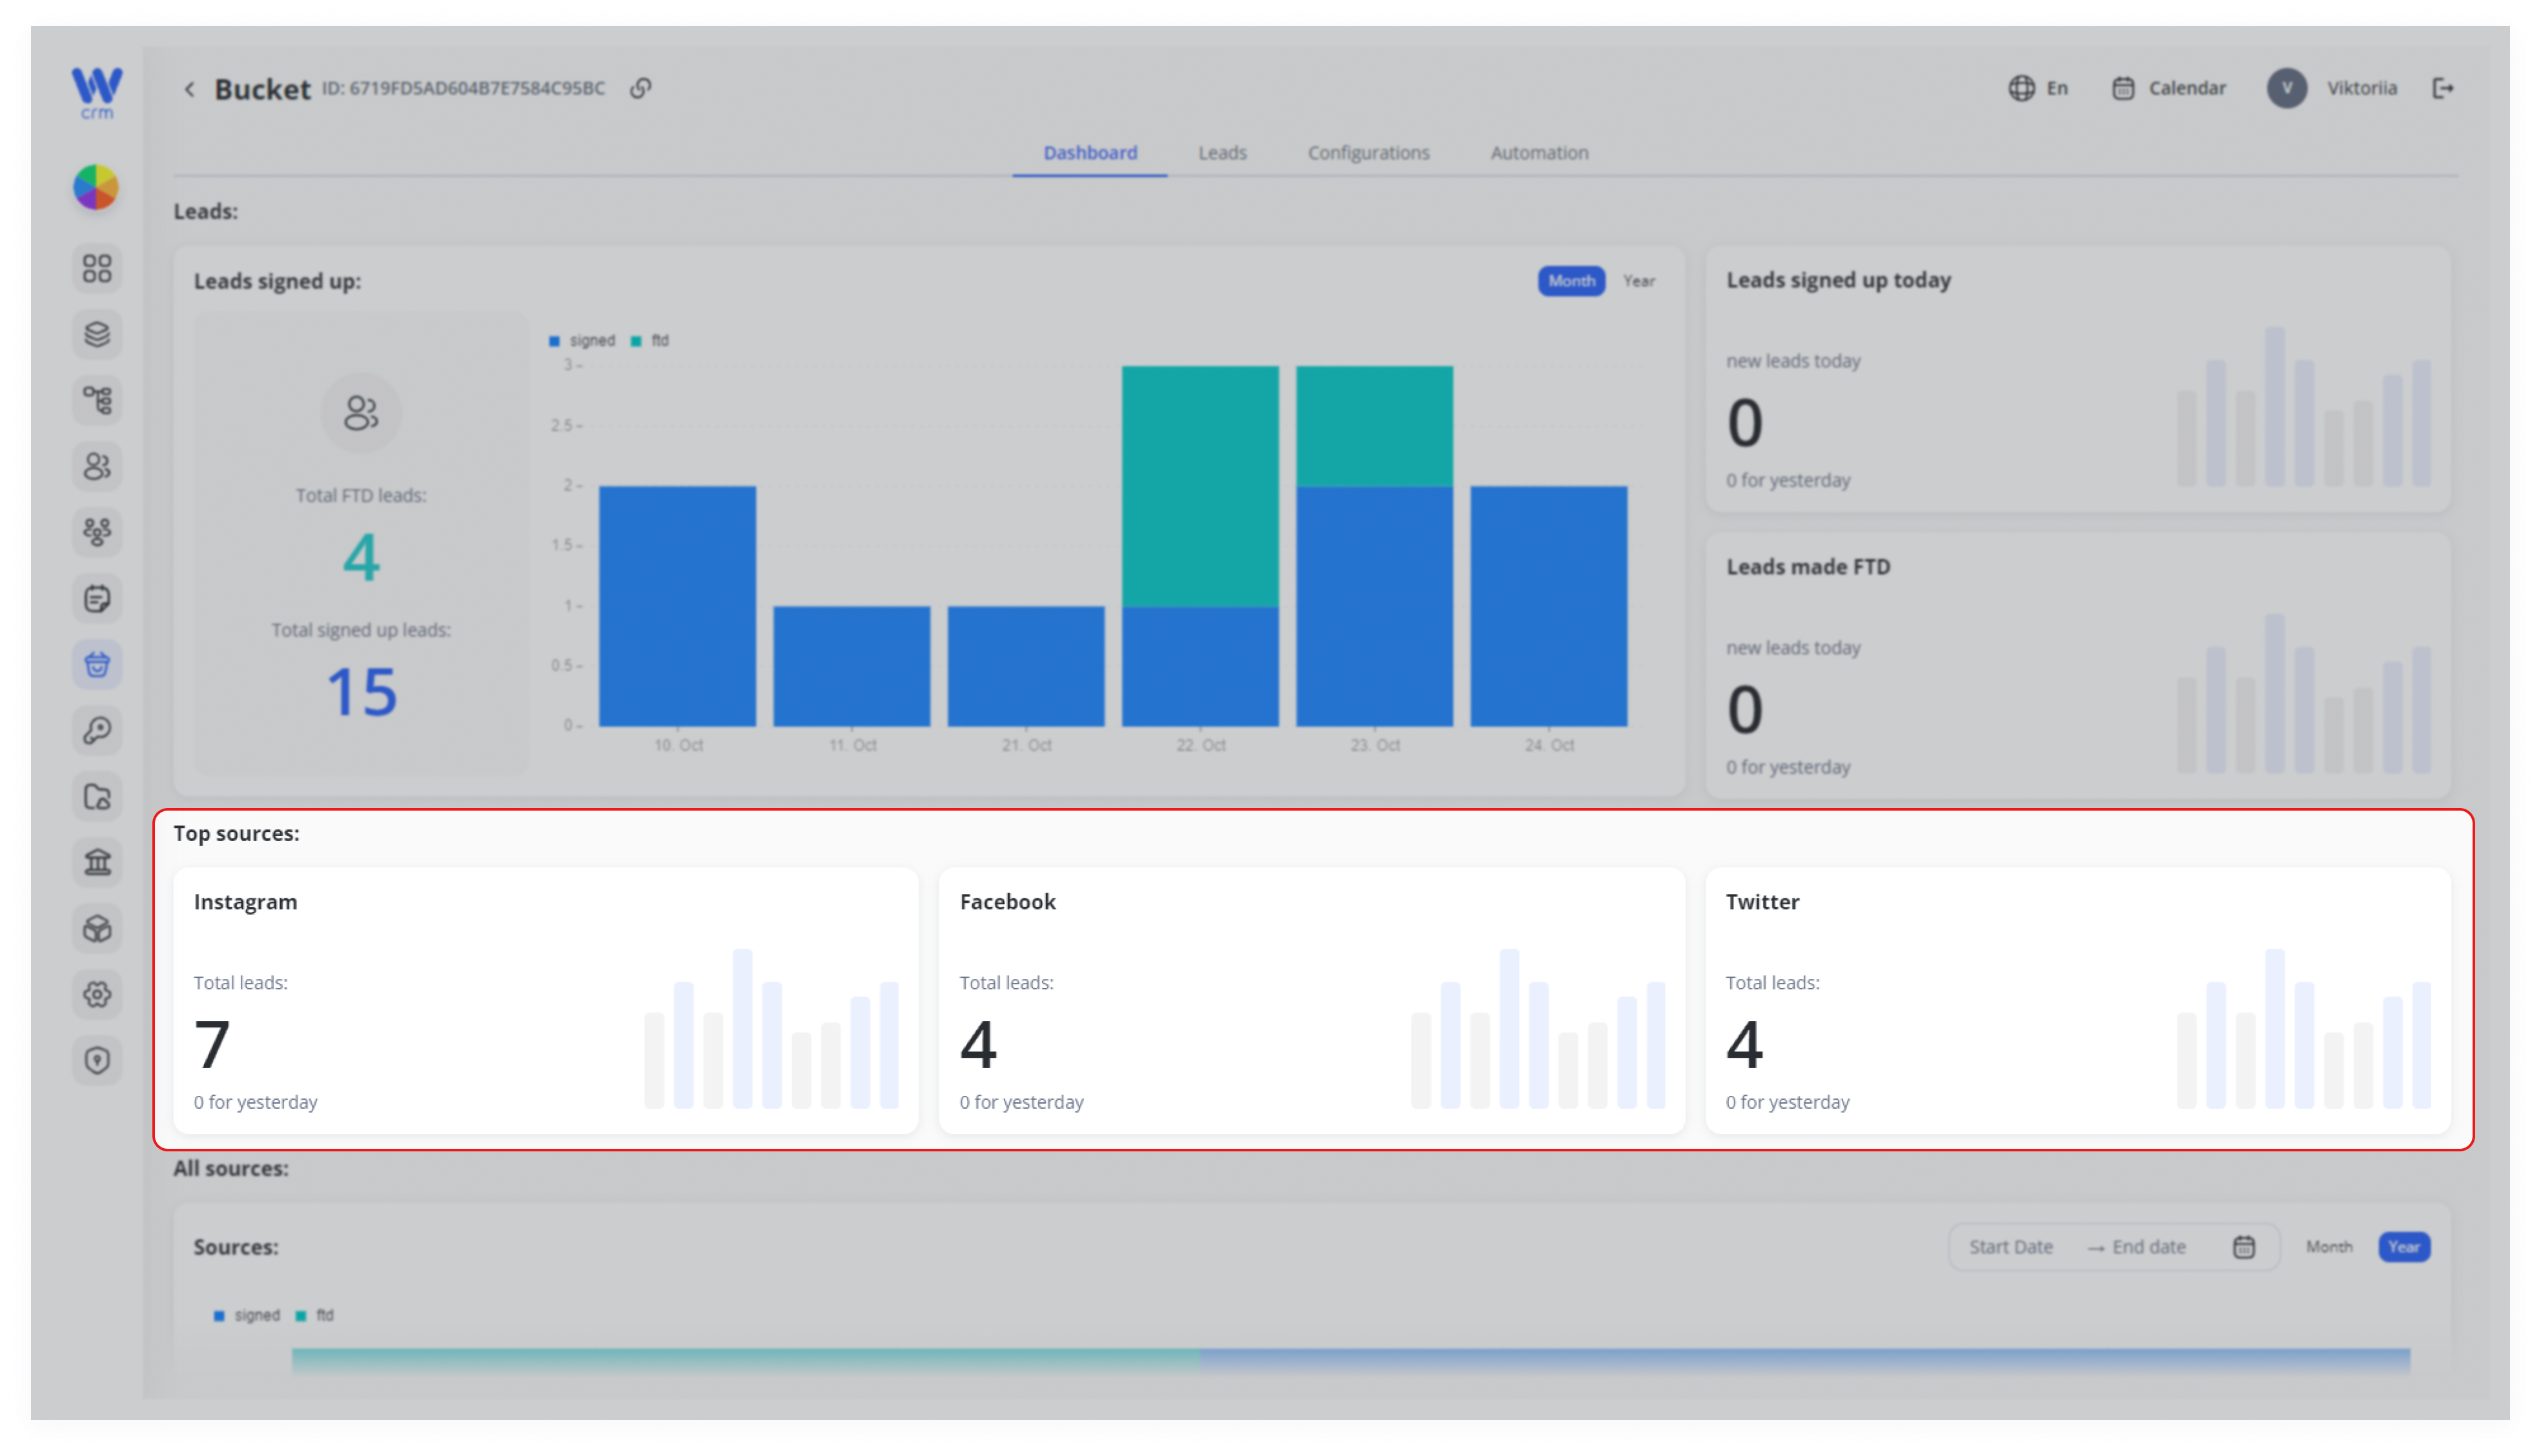
And in the blocks below, you can see the top sources where your leads are coming from.
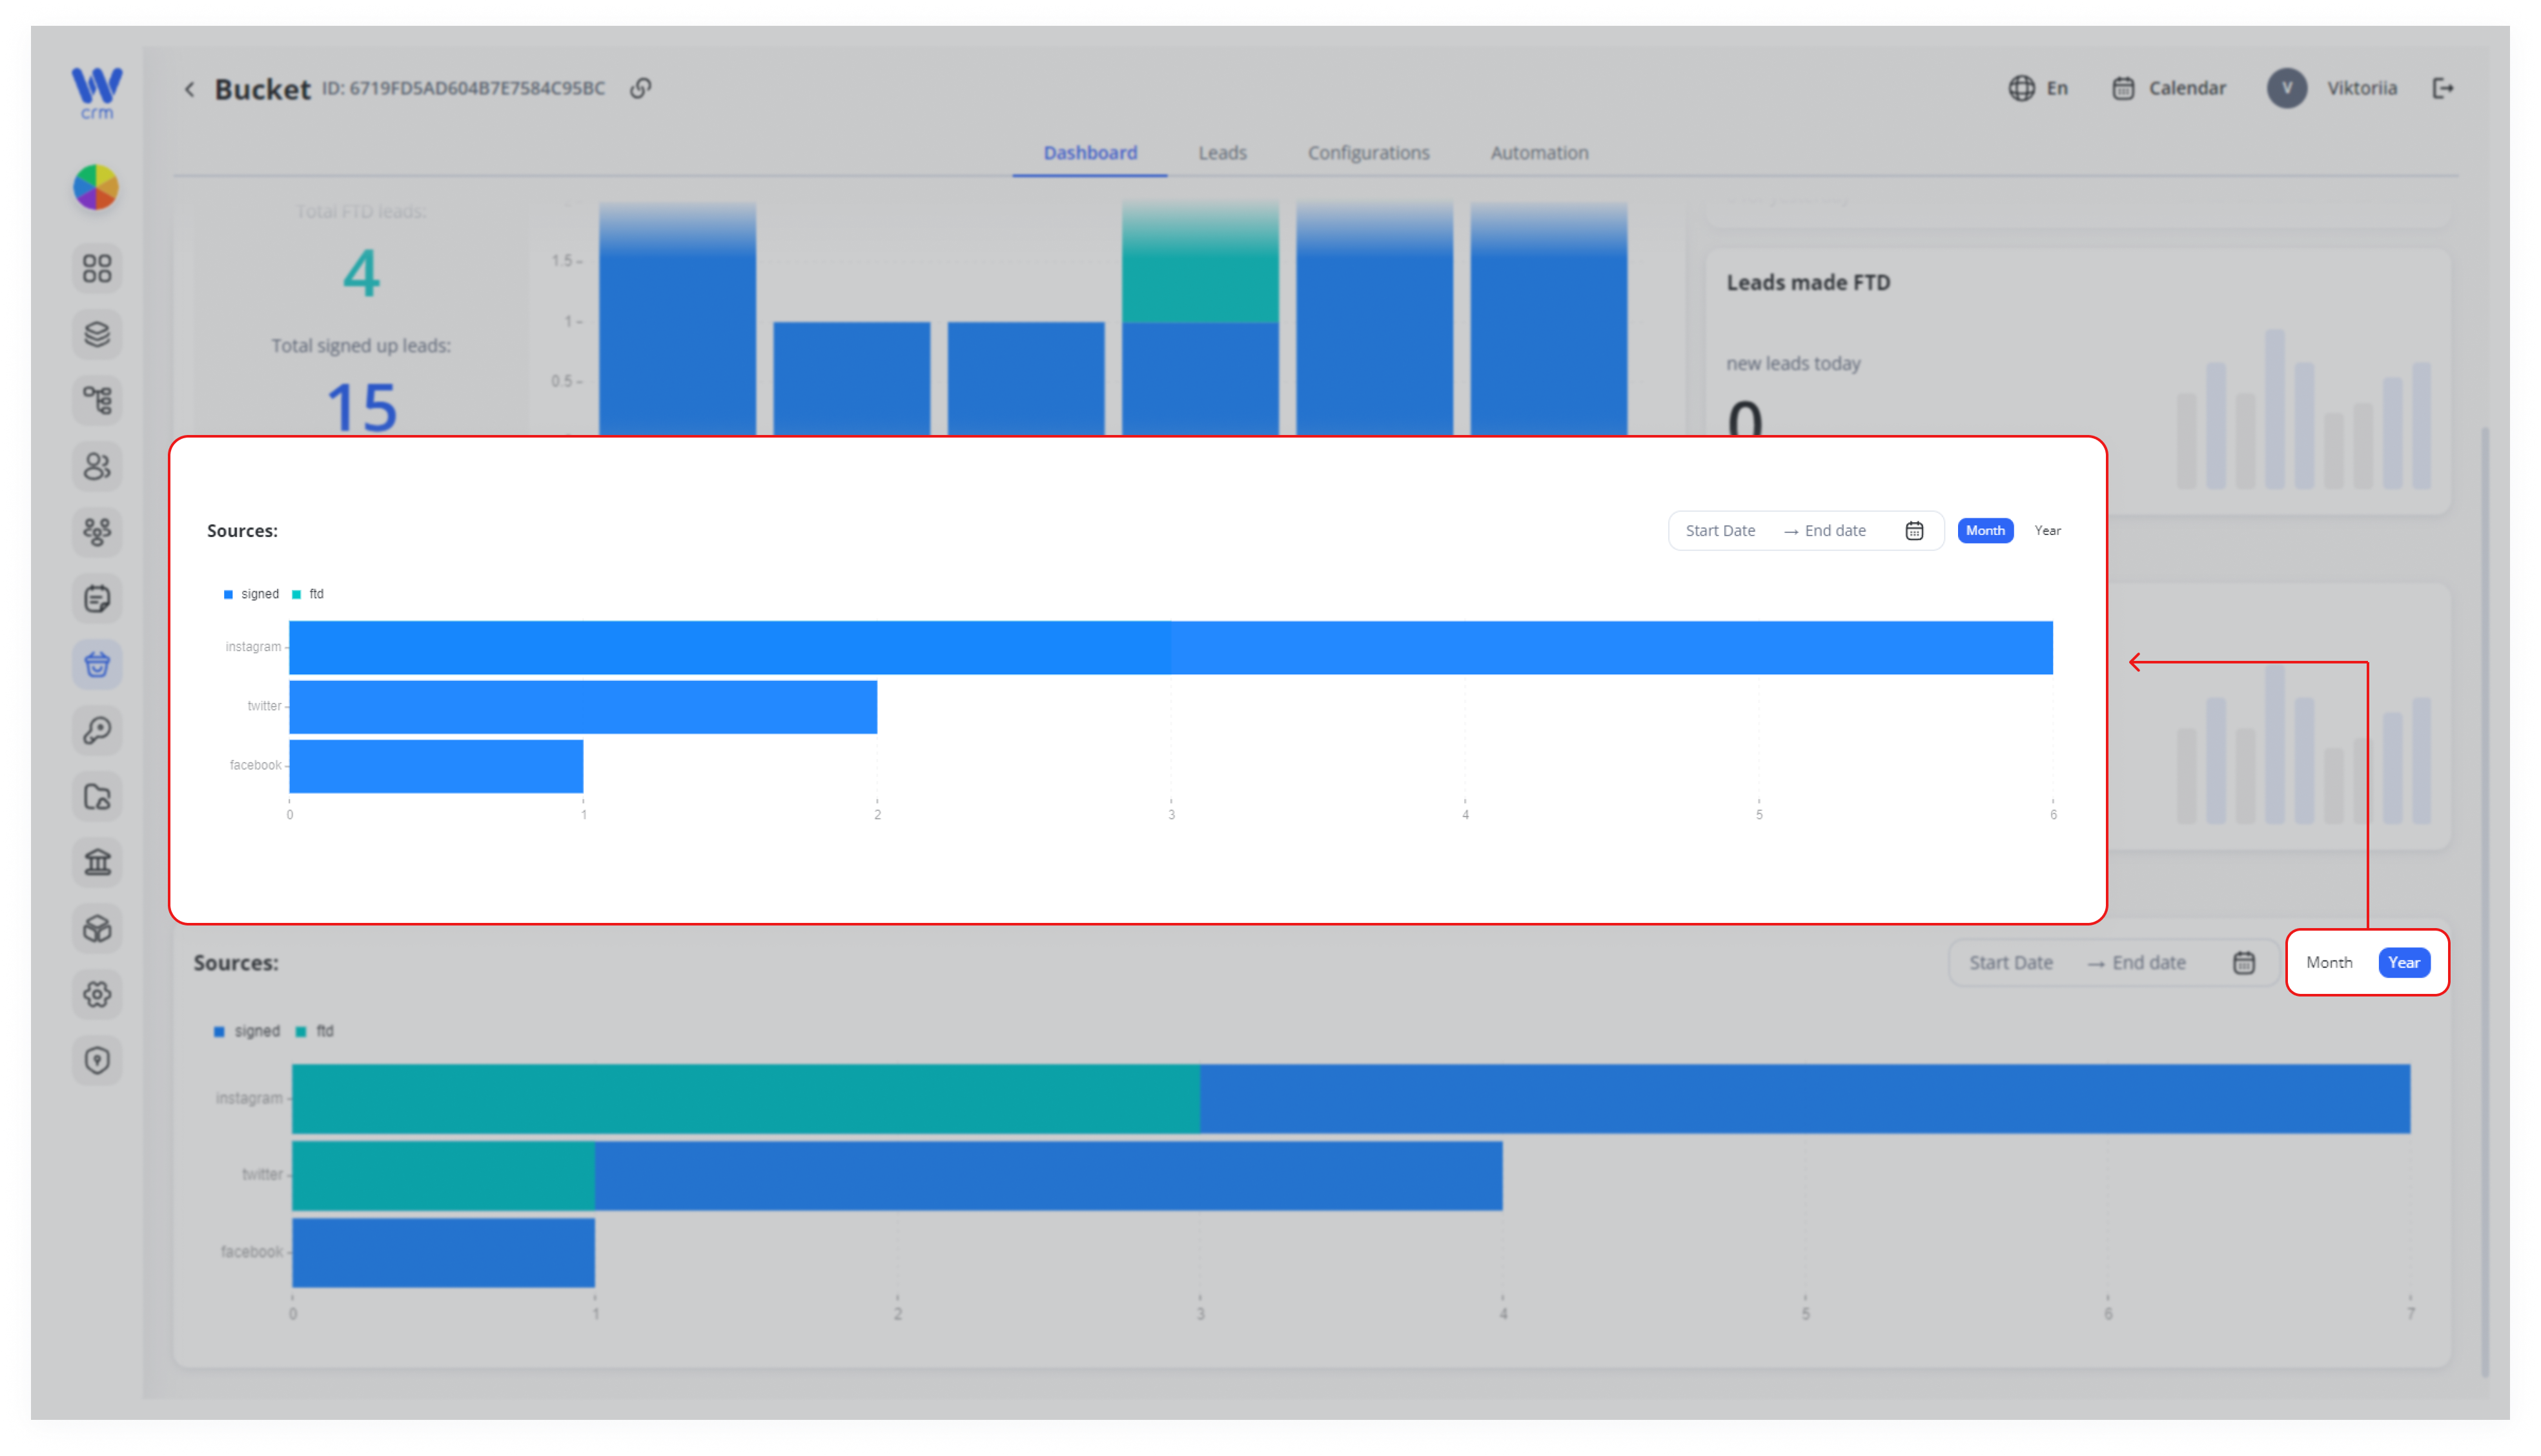
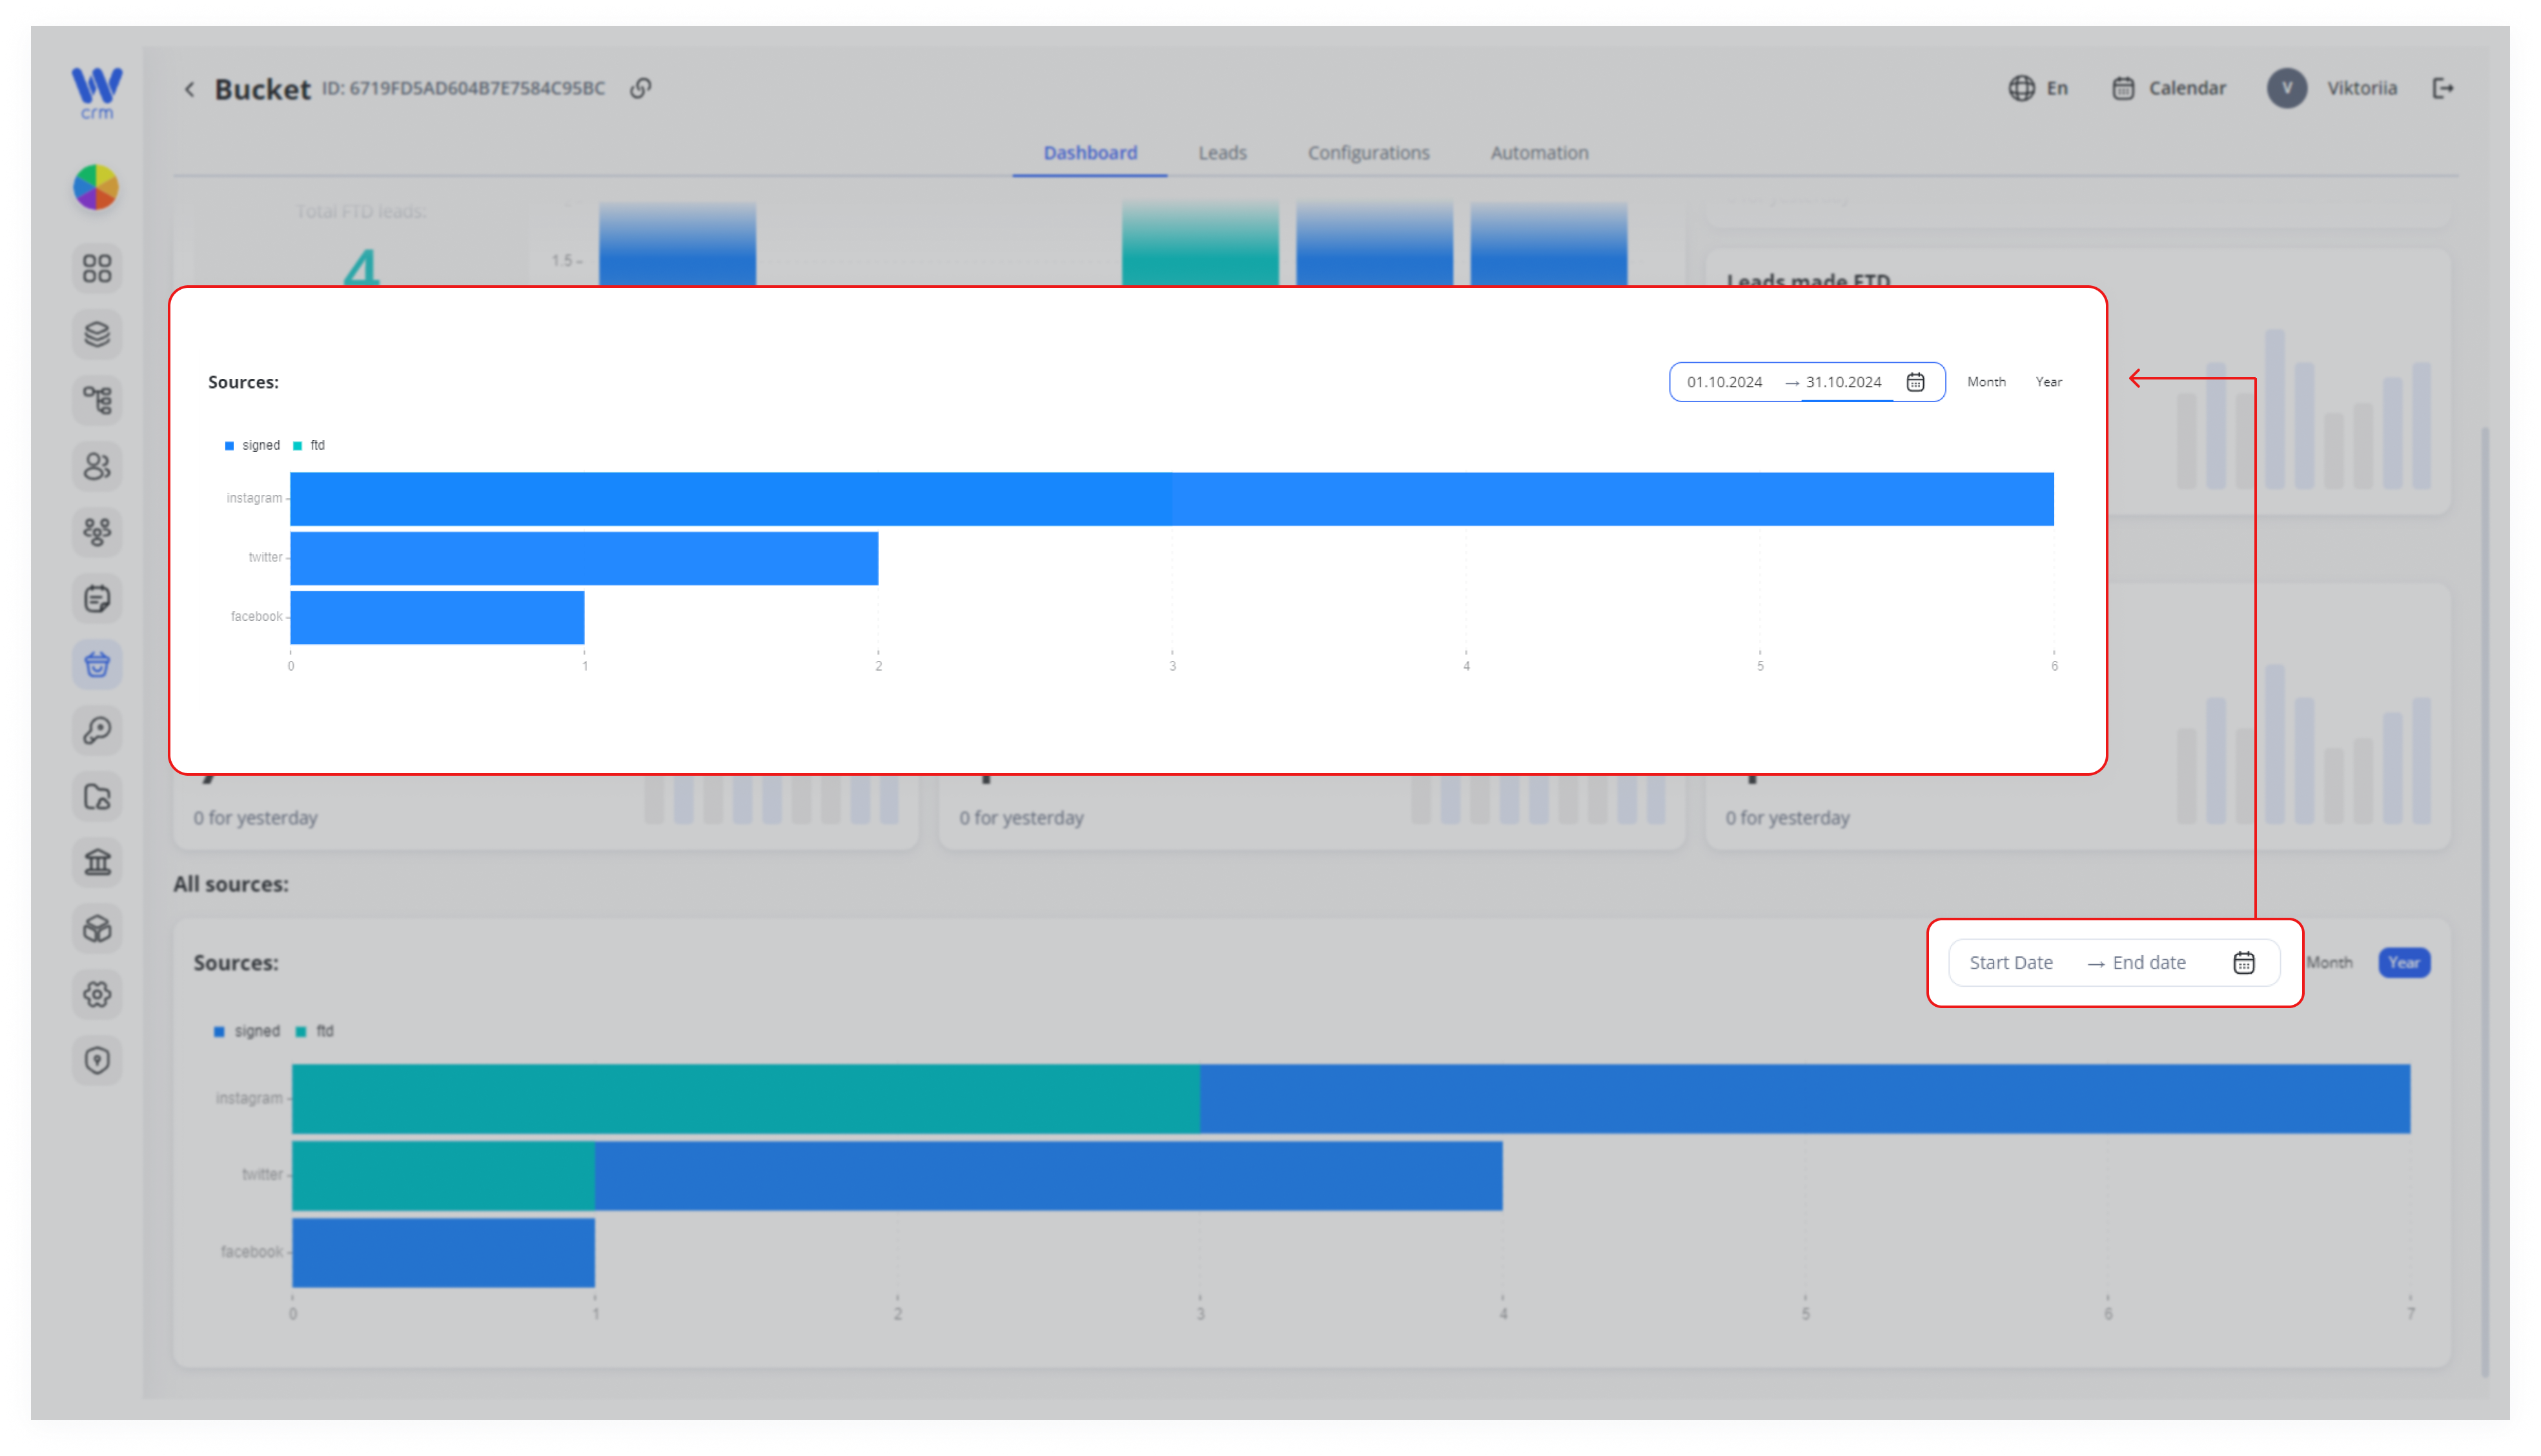
To see more detailed analytics by source, scroll down the page. The All sources block with information about leads from each source will be displayed. In this block, you can:
Choose which data to include in the chart: Month or Year.
Customize the time period for which you are viewing the data.
Display data for signed up leads only or FTD leads only.
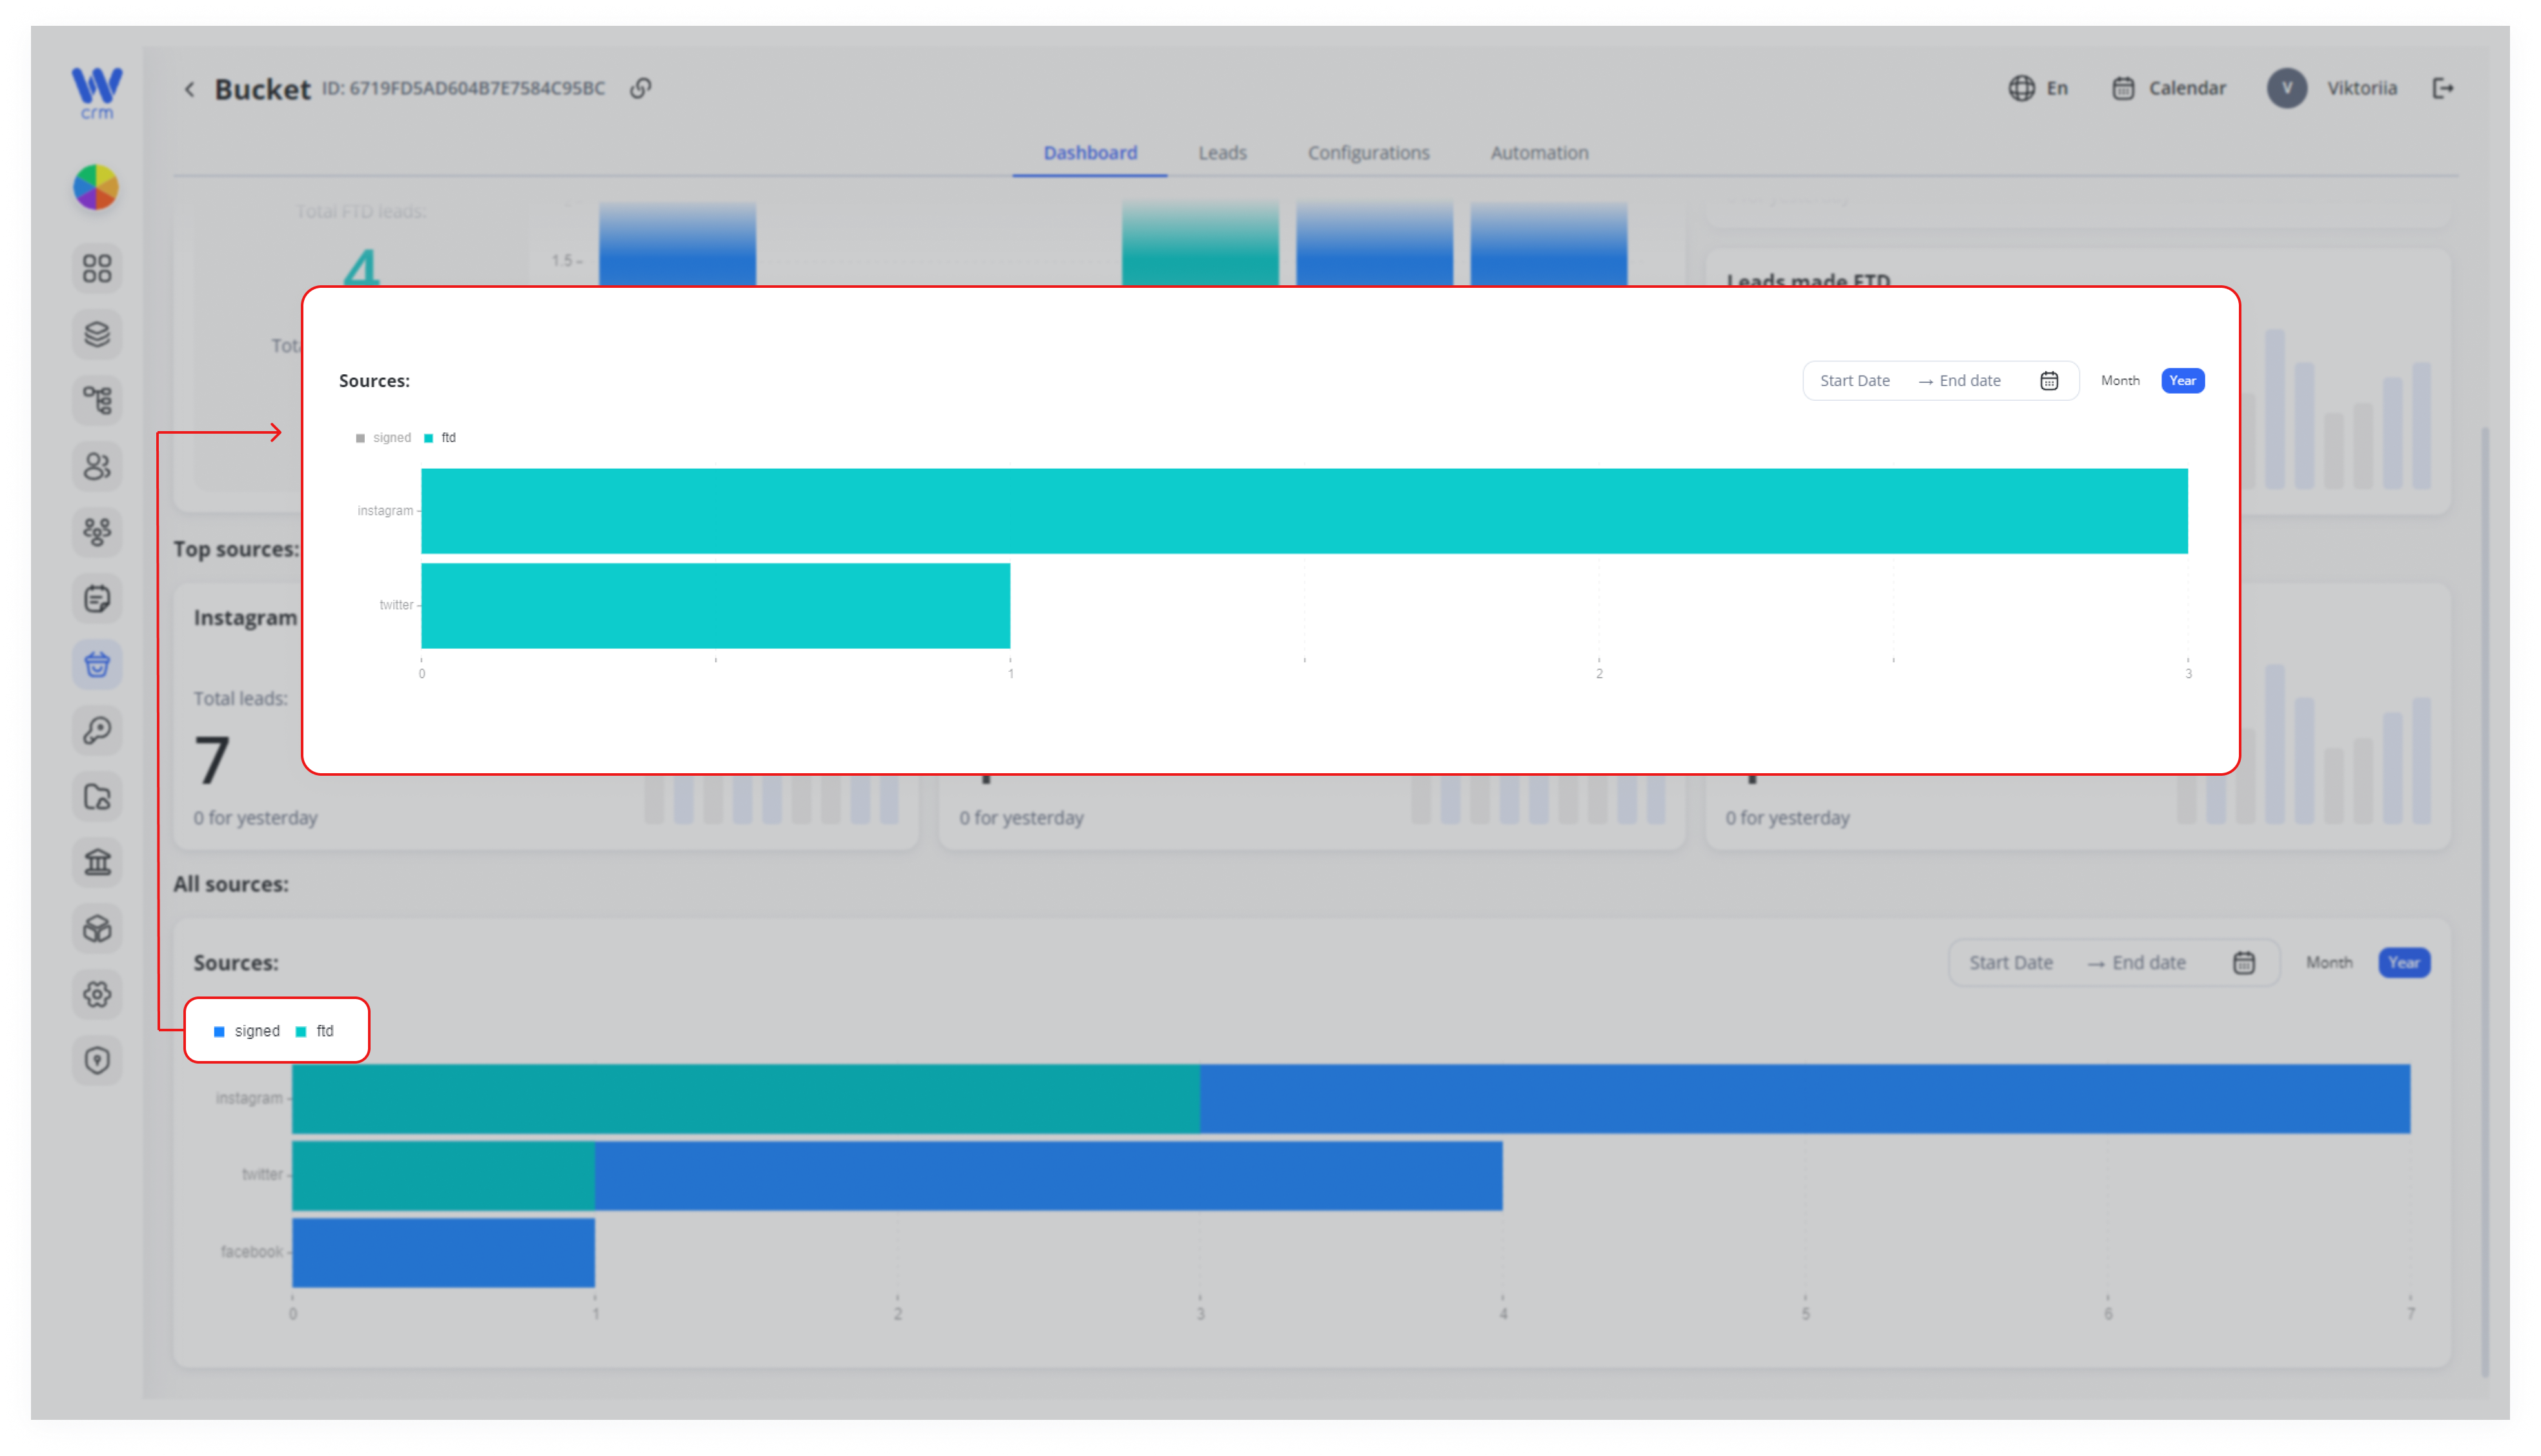
Also, when you hover over a specific bar, the number of leads from that source for the selected period will appear.
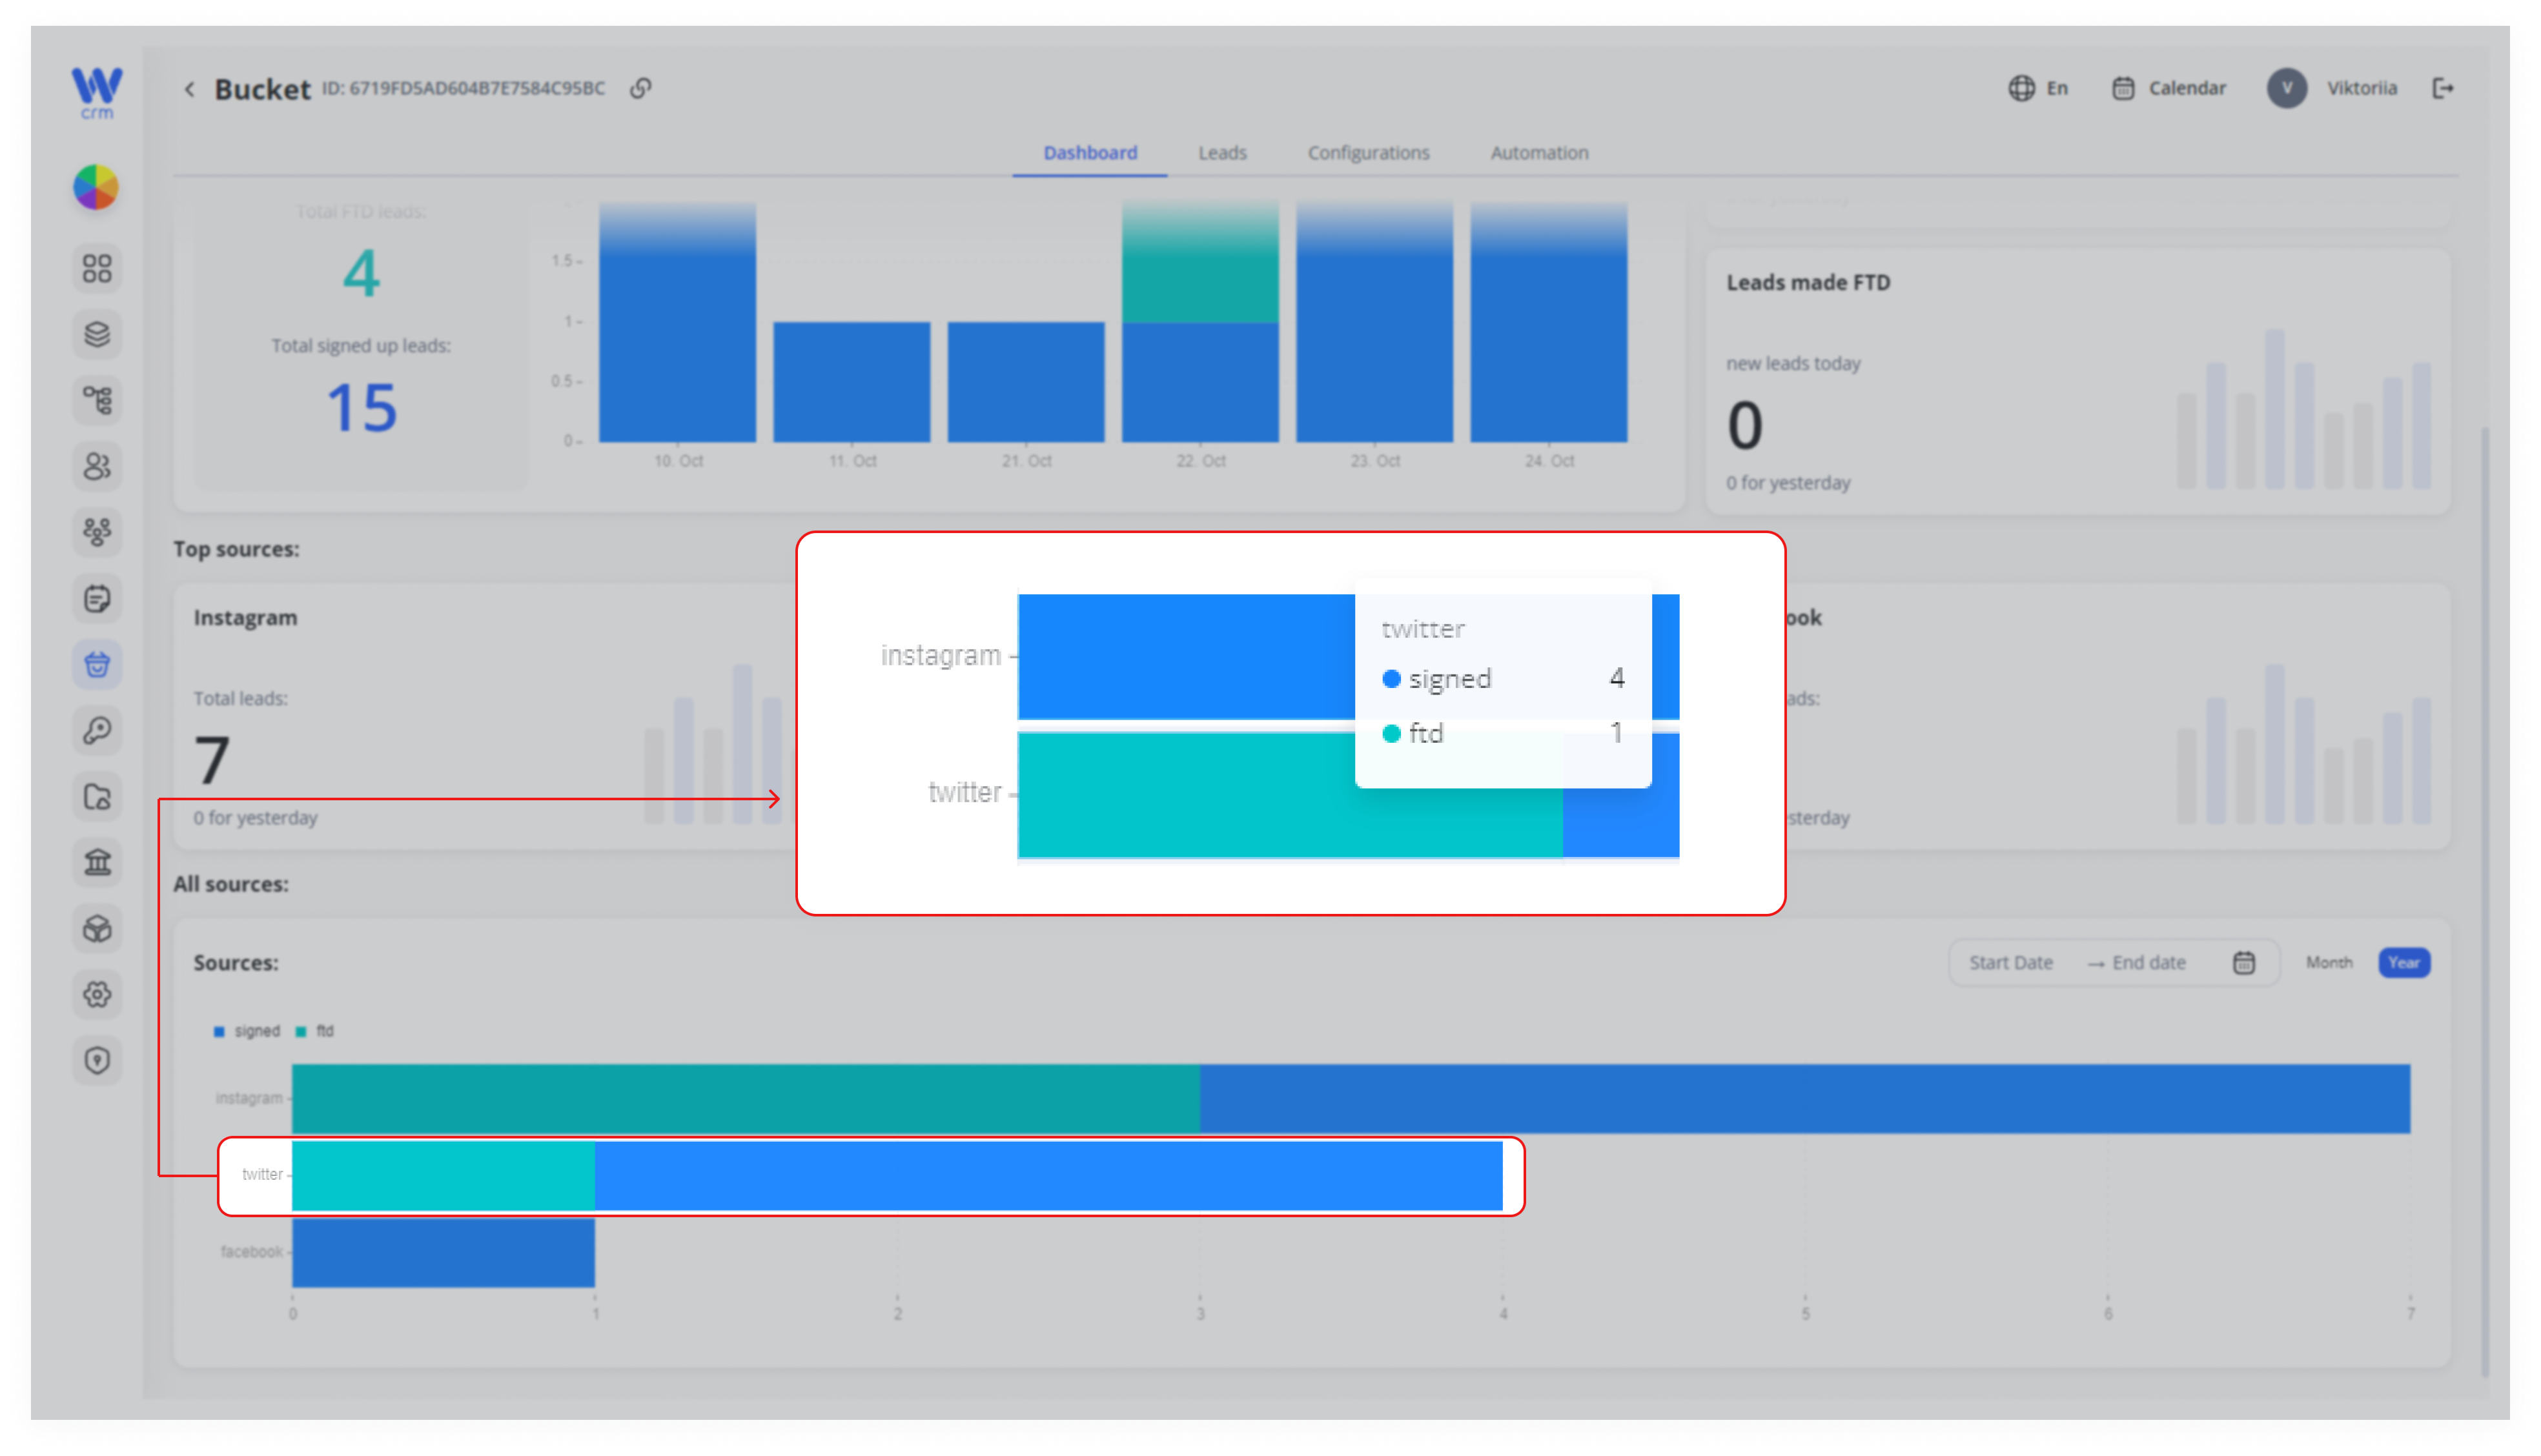
11. How to Delete an Affiliate Hub
When an affiliate hub is no longer needed, you can permanently remove it. Be careful—deleted affiliate hubs and all their configuration (sources, postbacks, snippets, automation rules, and leads) cannot be recovered.
To delete an affiliate hub:
- Open the affiliate hub’s menu: In the Affiliate Hub list, hover over the affiliate hub you wish to delete and click the three-dot (•••) menu in its top-right corner.
- Select “Delete”: From the menu, click Delete.
- Confirm deletion: A confirmation dialog will appear. Confirm that you want to delete the affiliate hub. Once deleted, it cannot be restored.
Warning: Deletion is permanent. Make sure you no longer need any data or configurations associated with this affiliate hub before proceeding.
12. Managing Leads in an Affiliate Hub
Once an affiliate hub is created and connected to a project, it becomes an active entry point for incoming leads. Managing leads inside an affiliate hub allows you to monitor registrations, track processing status, identify duplicates, and ensure proper routing into your CRM.
This section explains how leads behave inside an affiliate hub and how to work with them efficiently.
What Is a Lead in an Affiliate Hub?
A lead in an affiliate hub represents a new client registration that entered the system through a specific acquisition channel (e.g., affiliate, campaign, API, landing page).
Each lead is automatically:
-
Linked to a specific Project
-
Assigned to a Manager
-
Tagged with the Affiliate Hub label
-
Tracked using the Affiliate ID (if configured)
Affiliate hubs act as controlled intake queues before clients become fully processed CRM records.
Viewing Leads in an Affiliate Hub
To view leads:
-
Go to Affiliate Hub in the left sidebar.
-
Click on the desired affiliate hub from the list.
-
Open the Leads tab (or Leads section inside the affiliate hub view).
You will see a table containing:
-
Client name / email
-
Registration date
-
Processing status
-
Duplicate status (if applicable)
-
Project and manager
-
Source tracking details
The table supports sorting and filtering (depending on system configuration).
Leads Table: Full Name Column, Sorting, and Name Filters
To improve usability and allow faster identification of leads, the Leads table includes a dedicated Full name column with sorting and filtering capabilities.
Full Name Column
A new column titled Full name is displayed in the Leads table.
Column position: Immediately after the ID column.
Value format: <firstName> <lastName>
Behavior:
- If both first and last name exist → displayed as “FirstName LastName”.
- If only first name exists → displayed as “FirstName”.
- If only last name exists → displayed as “LastName”.
- If both are missing → the cell remains empty.
The column uses the same first and last name fields already stored for the lead. No additional data sources are introduced.
Sorting by Full Name
The Full name column supports sorting.
Sorting behavior:
Follows the standard table sorting mechanism (ASC / DESC).
Sorting priority:
Primary: first name
Secondary: last name
Sorting integrates with:
- Pagination
- Existing filters
- Other active sorting parameters
No custom sorting logic is introduced outside of the established table architecture.
Filtering by First and Last Name
Two separate filters are available in the Leads filter set:
First Name Filter
Filters leads by first name only.
Uses the same string matching logic applied elsewhere in the system (contains / startsWith / exact — depending on system convention).
Last Name Filter
Filters leads by last name only.
Uses the same matching behavior as the First Name filter.
Combined Filtering
Both filters can be used together.
Behavior:
Filters apply using AND logic.
Example:
First name = “John”
Last name = “Smith”
→ Returns only leads matching both criteria.
The filters work correctly with:
Pagination
Sorting
Other active filters
The “Only unassigned leads” toggle
Performance and Stability
The addition of the Full name column:
-
Does not modify existing columns
-
Does not affect lead processing, assignment, or reprocessing flows
-
Does not introduce UI regressions
-
Uses the existing table rendering, filtering, and sorting mechanisms
Lead Statuses
Leads inside an affiliate hub typically move through defined processing states:
New
The lead has entered the system but has not yet been processed.
Processed
The lead has successfully passed validation and has been created or merged as a client.
Duplicate
The system detected an existing client matching duplicate detection rules.
Rejected / Invalid
The lead did not meet validation criteria.
Status is automatically assigned by the system during processing.
Duplicate Handling in Affiliate Hubs
If a lead is detected as a duplicate:
-
The system links it to the existing client record.
-
The client’s Last duplicate date field is updated automatically.
-
The lead status reflects Duplicate.
This ensures:
-
No duplicate CRM records are created.
-
Duplicate activity is traceable over time.
-
Managers can monitor data quality trends.
Duplicate detection logic is system-driven and cannot be manually overridden inside the affiliate hub view.
Reprocessing Leads
In certain cases (e.g., configuration changes or temporary API errors), you may need to reprocess a lead.
If the system allows reprocessing:
-
Select the lead from the list.
-
Click the action menu (three-dot menu).
-
Choose Reprocess.
Reprocessing will:
-
Re-run duplicate checks
-
Re-apply routing logic
-
Attempt client creation again
Note: Reprocessing does not bypass duplicate detection rules.
Filtering and Searching Leads
Within the affiliate hub Leads view, you can typically:
-
Search by email, ID, or name
-
Filter by registration date
-
Filter by status (New, Processed, Duplicate)
-
Filter by manager or project (if supported)
This helps you:
-
Monitor daily acquisition flow
-
Identify spikes in duplicate registrations
-
Prioritize unresolved or failed leads
-
Analyze campaign-level performance
Only Unassigned Leads (Fast Toggle)
To quickly focus on leads that are not yet assigned to a manager, use the Only unassigned leads toggle located above the leads table.
How it works
-
Disabled (default) — Displays all leads in the selected affiliate hub.
-
Enabled — Displays only leads that do not have an assigned manager.
The definition of “unassigned” follows the system’s backend assignment logic and uses the same criteria as the existing routing model.
Location
The toggle is placed:
-
Above the leads table
-
Next to the Search field
-
Outside of the Filters drawer
This control is designed for fast operational access and is not part of advanced filtering.
Hub-Level Persistence
The state of quick toggles is automatically saved for each affiliate hub separately.
Only FTD (Fast Toggle)
To quickly focus on converted leads, use the Only FTD toggle located above the leads table.
How it works
Disabled (default) — Displays all leads in the selected affiliate hub.
Enabled — Displays only leads that meet the system definition of FTD (First Time Deposit).
The toggle reuses the existing FTD flag and business logic already used in CRM and analytics. No separate FTD calculation is introduced.
Combined Behavior with Other Toggles
The Only FTD toggle works independently from the Only unassigned leads toggle.
If both are enabled:
The system displays only leads that are:
FTD
AND
Unassigned
Standard filter intersection logic applies.
How Leads Become Clients
When a lead is successfully processed:
-
A client record is created in the Clients module
-
The client inherits:
ProjectManager
Affiliate hub label
Affiliate ID (if configured)
-
Action timeline tracking begins
-
The client becomes visible in all CRM modules
After processing, the lead remains part of the affiliate hub history for audit and reporting purposes.
FTD Detection and First Transaction Date
The system determines FTD (First Time Deposit) status based on the client’s transaction history.
How FTD Is Calculated
A lead becomes marked as FTD when:
- The associated client completes their first successful deposit transaction.
- The transaction status is completed/approved.
- The transaction meets the system’s deposit criteria (as defined in the Core Banking module).
The system reuses the same FTD logic used in Analytics and CRM reporting. No separate FTD calculation is introduced at the affiliate hub level.
First Transaction Date
When a client completes their first valid deposit:
- The FTD column in the Leads table is populated with the date and time of that first transaction.
- This value reflects the earliest completed deposit in the client’s transaction history.
Important:
If a client already existed in the system before entering the affiliate hub and had prior transactions:
The FTD date will reflect the true first transaction in the system.
It will not be recalculated based on affiliate hub registration date.
Known Update Requirement
If the First Transaction Date is not appearing correctly:
Possible causes may include:
- Transaction was not marked as completed.
- Deposit type does not match FTD criteria.
- Historical transaction exists but was not indexed.
- Data sync delay between Core Banking and CRM modules.
FTD status and first transaction date are always derived from the Transactions module, not manually editable in the Affiliate Hub view.
Operational Best Practices
Review New leads daily
Monitor Duplicate leads weekly
Investigate abnormal duplicate spikes
Keep Affiliate IDs accurate for tracking
Deactivate unused affiliate hubs to prevent routing errors
Regular affiliate hub monitoring ensures:
-
Clean client data
-
Accurate marketing attribution
-
Proper onboarding routing
-
Reduced compliance risks
Important Notes
Editing an affiliate hub does not retroactively change already processed leads.
Duplicate logic is centralized and cannot be modified at the affiliate hub level.
Affiliate hubs control routing at intake stage only; client lifecycle management happens in the Clients module.
Deactivating an affiliate hub prevents new leads from entering but does not remove historical data.
13. Configuration of Sources within Affiliate Hub
Sources define where leads come from, allowing you to track and analyze acquisition channels. The Sources list tags each lead with its origin (e.g., “Twitter,” “Facebook,” etc.).
To add a new source to the existing affiliate hub, do the following:
-
Open the Sources tab within your affiliate hub
-
Click + New Source in the upper right corner
-
Enter the source name (e.g. Instagram)
-
Add Tags to make source filtering more convenient in the future
-
Fill out the Description field to provide a brief overview of the lead source or its key details
-
Click Save
-
Add as many sources as needed by repeating steps 2–6
In the Sources tab, you can assign a webmaster to track leads from a specific source (e.g., only Facebook or only Instagram). You should add them first in the Roles module as a role you defined for this type of user (e.g., Affiliate Webmaster), and then grant them the View by Sources permission. Role permissions can be adjusted as needed. To designate a webmaster, click Assign in the Affiliate column and select a person from the drop-down list. One webmaster can be assigned to several sources if needed.
To remove a source, hover over the source tag and click Delete (🗑️) icon in the Actions column.
Employees
1. Employees: Overview
The Employees module is designed to manage your team members. In this module, you can view and modify all employee information. Employees are assigned to specific projects and desks, and can also be managers for clients.
The Employees module is your central hub for managing every user in WBCS. Here you can:
-
Create, view, and edit employee profiles (name, contact info, authentication methods).
-
Assign each employee to one or more Projects and Desks, controlling exactly which business units and teams they belong to.
-
Grant managerial responsibility by linking employees as the primary contact for specific Clients.
-
Track each employee’s status (active/inactive), roles, and access permissions across the entire system.
All downstream modules (Clients, Requests, Actions, Core Banking, etc.) respect these assignments and permissions to enforce security and data segmentation.
The following actions are available in the Employees module:
2. Employees: Use Cases
Use Case #1: Onboarding New Hires
When a new employee joins, you create their profile in the Employees module, assign them to the correct Project (e.g. “Acme Europe”) and Desk (e.g. “Sales”), and grant them the appropriate Role (e.g. “Sales Rep”). They immediately gain access to only the data and CRM workflows they need, streamlining ramp-up.
Use Case #2: Department Transfers
If Jane moves from Support to Customer Success, update her Desk assignment from “Support Queue” to “Customer Success.” Her permissions, client access, and dashboard views shift automatically—no need to recreate accounts or manually revoke old rights.
Use Case #3: Cross-Project Collaboration
A data analyst must pull reports across multiple business lines. Assign them to both the “Consulting” and “Real Estate” Projects with the “System Analyst” role. They’ll have view-all permission on Desks in each project, enabling consolidated analytics without over-granting edit rights.
Use Case #4: Delegating Client Management
For VIP clients, designate a senior employee as the client manager by linking them in the Clients module. That employee gets view/manage access to everything under that client—Documents, Transactions, Requests—while the rest of their team remains scoped to other clients.
Use Case #5: Offboarding & Access Revocation
When an employee departs, mark their status “Inactive,” remove all Project and Desk assignments, and disable their authentication tokens. This immediately cuts off CRM access, protecting sensitive data and ensuring compliance with security policies.
3. How to Create an Employee
Whether you need to update a user’s details, reassign them to different Projects, or completely revoke their access, the Employees module gives you a single place to do it. Follow the steps below, using the numbered calls out to guide you through each action.
Why You Might Edit an Employee
-
Change Contact or Name when someone legally updates their name or email.
-
Adjust Role or Permissions if they’re promoted or change teams.
-
Reassign Projects & Desks as responsibilities shift.
-
Enable / Disable 2FA for security policy updates.
Before You Begin
- You can create two employee types: Employee for internal team members who need module access based on their responsibilities, and Affiliate for external or partner users who work only with assigned affiliate hubs and leads.
-
You cannot edit your own Role to a higher privilege than you currently hold.
-
To add a user to a Desk, they must already be assigned to that Project.
Step-by-Step Instructions
1. Open the Employees List
In the left-hand navigation panel, click Employees. You’ll see a table of all user accounts in your system, with columns for Name, Email, Active, Role, Projects, Desks, Created Date, Updated Date, Last Login, and Actions.
2. Launch the Add Employee Form
In the top-right corner of the Employees table, click +Add. A blank Add employee form appears.
3. Fill Out the General Information
On the left side of the form, complete the core fields:
Type: Choose the required employee Type from the dropdown. For internal users, you can select Manager, Sales, Analytics, Support, or Presale. To create an affiliate, choose Affiliate type.
Name: Enter the full name as you want it to appear (e.g. “Jane Doe”).
Role: Select the system role (Admin, Viewer, etc.) from the dropdown. This determines which modules and actions the user can access.
Please note: The available roles depend on the selected employee type. If you select Affiliate, the Role field will show only roles with the Affiliate role type. If you select any other employee type, the Role field will show only roles with the Employee role type.
Email: Enter the user’s email address, which becomes their login and is used for system notifications.
Password: Type a secure password (minimum 8 characters, with uppercase, lowercase, number, and special character). Where: Under Email, as a text box with two icons on the right.
- Click the ✨ “Generate” icon to auto-create a strong password.
- Use the 👁 “Show/Hide” icon to verify your entry.
4. (Optional) Custom Additional
Below General, use the Additional tree picker to assign any custom tags—such as Region, Business Unit, or Department. These tags power advanced filters and permission scopes elsewhere.
5. Assign Projects
On the right side of the form:
Projects Panel: Shows which Projects this employee can access. Click + Add project to open a dropdown of all available Projects. Select one or more to grant access.
When an employee is created inside a specific Project, that Project is assigned to the employee by default. After creation, the employee appears in the employee table for that Project.
Once a Project is assigned, you can later add the employee to specific Desks within that Project via the Desks module.
6. Configure Two-Factor Authentication (2FA)
Below the Projects panel, the Two-Factor Authentication section displays whether WebAuthn or TFA is enabled for this user. No action is needed here during creation—2FA setup occurs on first login.
7. Save Your New Employee
When all required fields are complete (and any optional settings chosen), click Save in the bottom-left corner of the form. You’ll return to the main Employees list, where the new user now appears with their details, assigned Projects, and metadata.
By following these steps—each tied to the corresponding form element—you’ll ensure every new employee is correctly configured with the proper access, roles, and security settings in WBCS.
4. How to Assign an Employee to the Project and Desk
In Wifox Business Core Solution, employees with restrictive roles (e.g. “View Own”) must be explicitly granted access to each Project and, optionally, to specific Desks. Follow these steps to assign an employee to their workspace:
Note: If you have assigned a role that allows an employee to view all projects in the system, you do not need to assign a specific project and/or desk to that employee. In other cases (roles with viewing only their own projects and desks), it is mandatory to assign a project to an employee.
1. Open the Employee’s Detail View
After creating or locating the employee in the Employees list, click the ✏️ Edit icon to open their profile form.
2. Launch the “Add Project” Panel
Within the employee’s form, find the Projects panel on the right side. Click + Add project to slide out the assignment panel.
3. Select a Project
In the Project dropdown, choose the one Project this user should access.
Note: Please assign the project to a designated employee, as this action will give them the necessary permissions to monitor and control various aspects of the project objects.
4. (Optional) Restrict to a Desk
If you want the employee to see only a subset of that Project’s workflows, use the Desks dropdown to pick one or more Desks.
Example: A “Support Agent” role might be restricted to the “Support” desk, while a “Sales Rep” could be limited to “Sales Leads.”
Note: Select project desks to restrict user rights to a specific workspace. This function is effective if the user role is set to “View Own”.
5. Save the Assignment
Click Save at the bottom of the panel. The new Project (and any selected Desks) appear immediately in the employee’s Projects panel.
Important:
Employees with broad roles (e.g. “Admin” or “Viewer All”) do not require explicit assignments—those roles inherently grant access to every Project and Desk in the system.
If you leave Desks blank, the user will have visibility into all Desks within the assigned Project.
To remove access later, reopen the “Add project” pane, clear the selection, and save.
By carefully assigning Projects and Desks, you ensure that each employee sees exactly the workspaces they need—and no more—helping maintain clear boundaries and data security across your organization.
5. How to Edit an Employee
Editing an employee lets you keep your team’s access, credentials, and schedules up to date as roles evolve or people move between teams. Use this guide whenever you need to:
-
Promote or demote someone (change their Role or Type)
-
Correct a misspelled name
-
Rotate or reset a user’s password
-
Scope their data access to new Projects or Desks
-
Deactivate an account when someone leaves
-
Schedule shifts or meetings on their Calendar
1. Open the Employees List
In the left-hand navigation panel, click Employees to load the full roster.
Tip: Use the Filter button or Search… box to quickly locate the person you need. You can also click any column header (Name, Role, Created, Last login) to sort the list.
2. Enter Edit Mode
In the desired user’s row, click the ✏️ Edit icon in the Actions column.
The Edit Employee form appears, pre-filled with their current details.
3. Modify General Details
Under the General header on the left, adjust any of these fields:
Name:
Update their display name as it appears on dashboards, records, and notifications.
Example: Change “Jon Smith” → “Jonathan Smith” if they prefer their full legal name.
Role:
Select a new system role (Admin, Viewer, ProjectAdmin, etc.) to grant or revoke high-level permissions.
Roles are defined in the Roles module and take effect immediately.
Email (Editable – Sensitive Field):
The Email field defines the employee’s login identity and is used across authentication, analytics, audit logs, and system notifications.
This field is editable, but it is considered sensitive.
When changing an employee’s email:
-
The new email must be unique.
-
The email must follow valid format rules.
-
The change is logged for audit purposes.
-
Authentication behavior may be affected (see Email Change Impact section below).
Changing an email does not create a new employee.
It updates the existing employee identity.
Use this feature carefully and only when required (e.g., corporate domain migration, role handover, typo correction).
Password:
Enter a new password (≥8 chars, uppercase, lowercase, digit, special).
✨ Generate icon: auto-create a secure password.
👁️ Toggle icon: show/hide entry for verification.
Type:
Choose a business category (Manager, Sales, Support, Analytics) used for reporting and default workflows.
Active:
Toggle on (✅) to enable or off (❌) to disable logins without losing audit history.
4. (Optional) Update Additional
In the Additional panel, use the tree picker to apply custom tags—such as Region, Business Unit, or Skill Set.
These tags power advanced filtering, permission scopes, and automation rules across WBCS.
5. Assign Projects & Desks
An employee’s data access is controlled by Project → Desk assignments in the right-hand panel:
Edit an existing Project assignment:
- Locate the Project card.
-
Click its ✏️ Edit icon to open the drawer.
-
Check or uncheck specific Desks to fine-tune access.
-
Click Save in the drawer.
Remove a Project entirely: Click the 🗑️ Delete icon on the Project card to revoke all access to that Project and its Desks.
Add a new Project:
-
Click + Add project at the top of the panel.
-
Select one or more Projects from the dropdown.
-
(Optional) Restrict to specific Desks if the user’s Role is “View Own.”
-
Click Save in the drawer to confirm.
Example:
Assign Alice to “Acme USA” (Sales, Support Desks) and to “Acme Canada” (Sales only) by adding each Project and selecting the appropriate Desks.
Bob, with a “GlobalViewer” Role, automatically sees all Projects and needs no explicit assignments.
6. Save Your Changes
After updating any General fields, Metadata, or Project assignments, click Save at the bottom-left of the form. All edits apply immediately.
Note: You cannot remove projects to which an employee has already been assigned. Instead, go to the Projects tab and remove specific members from the project.
7. Email Change – Impact & Behavior
Changing an employee’s email address affects multiple system domains. This feature was introduced only after full impact review and approval.
Identity & Authentication
Email serves as the employee’s login identifier.
After email change:
-
The employee must log in using the new email.
-
Old email can no longer be used for authentication.
-
Active sessions behavior depends on system configuration:
-
Either preserved until expiration
-
Or invalidated immediately (implementation-defined)
-
Password reset links will be sent only to the updated email address.
Analytics
Employee email may be stored in analytics as an attribution dimension.
After email change:
-
Historical analytics data remains associated with the old email value.
-
New activity will be recorded under the updated email.
This reflects identity change over time and is considered acceptable.
No historical analytics rewriting is performed.
Permissions & Access
Changing email:
-
Does NOT change employee role.
-
Does NOT change project or desk assignments.
-
Does NOT create a new permission scope.
The employee remains the same system entity (same ID).
Audit & Logging
Email changes are logged with:
-
Who performed the change
-
Previous email value
-
New email value
-
Timestamp
This ensures traceability and prevents silent identity modification.
Notifications & Integrations
All system notifications are redirected to the updated email.
If external integrations rely on email as an identifier:
-
They may treat the updated email as a new identity.
-
Historical external mappings are not automatically migrated.
Review external integrations before performing bulk email changes.
Risk Considerations
Before changing email, verify:
-
The employee is not being replaced by a different person.
-
Analytics interpretation remains acceptable.
-
No external system depends strictly on the previous email.
If the change represents a new person taking over the account, consider creating a new employee instead.
Email is a primary identity attribute. Changing it may impact login behavior, analytics attribution, and integrations. Proceed carefully.
6. How to Filter and Search Employees
Use the Search and Filter tools in the Employees list to find anyone on your team—whether you know exactly who you’re looking for or just need to narrow down by date, desk, or other attributes.
1. Open the Employees List
In the left-hand navigation menu, click Employees.
The main table displays columns for Name, Email, Role, Desk, Projects, Created, Last login, and Actions.
At the top you’ll see:
- Total: the current count of records
- Search… input box (Step 1 on screenshot)
- Filter button (funnel icon) (Step 2 on screenshot)
Tip: Columns are sortable—click a column header (e.g., Created) to toggle ascending/descending order.
Desk and Projects Columns
-
Desk – Shows the desk(s) the employee is assigned to (grouped by project).
-
Projects – Displays the project(s) where the employee has access or assigned responsibilities.
These columns provide quick visibility into organizational structure and workload distribution without opening the employee profile.
2. Instant Text Search
Click into the Search box located above the Employees table.
Type any full or partial Name or Email string (e.g. “smith” or “@gmail.com”).
As you type, the table updates in real time to show only matching rows.
Search behavior:
- Case-insensitive
- Matches anywhere in the field (not just prefix)
- Supports partial fragments (“dav” finds “David,” “Davies,” etc.)
Example: Typing “alex” will return both “Alexander Johnson” and “Alexis Wu.”
Search operates independently from structured filters and is not saved within filter presets.
3. Open the Filter Drawer
Click the Filter funnel icon next to the Search box.
A side panel slides in with filter fields and controls.
If you’ve applied filters before, pills appear at the top of the main table showing active criteria.
4. Configure Filter Parameters
A. Created Date Range
-
Click the Start Date calendar icon to pick the earliest creation date.
-
Click the End Date calendar icon to set the latest creation date.
-
The filter is inclusive: selecting April 1 → April 30 shows everyone created on or between those dates.
Use Case: Find all employees added during last month’s onboarding push.
B. Desk Assignment
-
Click the Desk dropdown to see a scrollable list of all Desks (grouped by Project).
-
Check one or more desks to include employees who are currently members of those workstreams.
-
The filter matches regardless of whether a person belongs to additional desks. This filter works together with the Projects filter for advanced segmentation.
Use Case: Show only your “Support Queue” and “Retention Team” members.
C. Employee Selector
-
Click the Employee dropdown to open an alphabetical list of every user.
-
You can multi-select one or more names or search within this list for precise selection.
-
Useful when you know exactly which individuals you need to audit or review.
Example: Select “Jane Doe” and “John Smith” to see their account status and last login times.
D. Project Assignment
Click the Projects dropdown to filter employees by one or more projects.
You can:
Select one or multiple projects
Combine with Desk filter for more granular filtering
Use Case: Show all employees working on the “Core Platform” project regardless of desk assignment.
5. Remove or Reset Filters
Remove an Individual Filter
-
In the filter drawer, hover over any selected item (date range, desk name, or employee name).
-
Click the ✕ next to it to clear just that criterion without losing your other selections.
Clear All Filters
-
At the bottom of the filter panel, click Clear All to reset every field back to blank.
-
Alternatively, click the Filter icon again to close the drawer and then click any active filter pill at the top of the table to remove it.
Tip: Clearing filters is faster than refreshing the page or navigating away.
6. Apply Your Filters
Once you’ve configured your parameters, click Apply at the bottom of the filter drawer.
The main Employees table will immediately refresh to show only those records matching all of your selected criteria.
Active filters are indicated by colored pills above the table; hover over them to see details.
Pro Tip: Combine Search + Filter for ultra-precise queries.
Example: Search “alex” then filter to “Sales Desk” and “Core Platform Project” to find only Alexes assigned to that specific team and project.
By mastering these steps, you’ll be able to pinpoint any employee record in seconds—whether you’re auditing access, resetting passwords, or prepping reports.
7. How to Deactivate an Employee
Deactivating an employee suspends their access without removing their record; this preserves audit history and any associations (tickets, notes, etc.) while preventing further logins or assignments. If you need to remove someone, use Delete instead permanently—but note that deleted accounts cannot be restored.
Warning: Deleted employees cannot be restored.
Difference Between Deactivate vs. Delete
1) Deactivate
Account remains in the system (with all history intact).
The user cannot log in, receive notifications, or be assigned to Projects/Desks.
Ideal for long-term leaves or contractors between engagements.
2) Delete
Permanently removes the user record and all associated data.
Cannot be undone—use only when you’re sure the account is no longer needed.
Step-by-Step Deactivation
Step 1. Open the Employees List
In the left-hand navigation panel, click Employees.
Locate the person you want to deactivate—use the Search… box or Filter if needed.
Step 2. Enter Edit Mode
In that employee’s row, click the ✏️ Edit icon in the Actions column.
The Edit employee form appears, showing their current settings.
Step 3. Uncheck “Active”
Under the General section, find the Active checkbox.
Click to remove the checkmark—this flag will switch to “Deactivated manually” and display a reason code.
Note: You may see a tooltip like “Deactivated manually. Code reason: 1100” indicating the change was performed by an administrator.
Step 4. Save Your Changes
Scroll to the bottom-left of the form and click Save.
You’ll return to the Employees list; the deactivated user will no longer appear in active workflows or lookup lists.
What Happens Next?
-
The user’s Last login, Tickets, and Calendar events remain intact for reporting and audit.
-
Any open assignments (e.g., tickets, leads) will need re-assignment to active team members.
-
To reactivate later, simply edit their record again and re-check the Active box.
You cannot delete an employee directly from the Employees module. To delete an employee:
- Remove the employee from all Desks they are assigned to. Instruction is [here]
- Remove the employee from all Projects they are assigned to. Instruction is [here]
8. View & Manage the Employee’s Calendar
The Employee form now includes two distinct tabs—General and Calendar—so you can both manage a team member’s profile and schedule their events from one screen.
Prerequisites:
You must have Create or Edit rights on the Employees module.
Your role’s permissions must include access to view and modify employee events.
Accessing the Employee Form
In the left-hand menu, go to Employees.
Locate the person whose calendar you wish to inspect or update.
Click the Edit (✏️) icon in the Actions column.
Switching Between Tabs
At the top of the side-panel form, you’ll see two tabs:
-
General – The employee’s core details (name, email, role, desk, etc.).
-
Calendar – A built-in scheduler displaying that employee’s events.
By default, you land on General. Click Calendar to view or add events.
Navigating the Calendar
Once in the Calendar tab, you have full calendar controls:
2) View Modes
Month, Week, or Day buttons toggle your calendar granularity.
3) Current View Indicator
At all times, you’ll see which date range you’re looking at—e.g. “May 2025” or “May 10–16, 2025.”
Scheduling a New Event
To add a shift, meeting, or time-off entry for this employee:
- Click the Calendar tab at the top of the Edit Employee screen.
- Navigate dates with the ‹ › arrows or the Today button.
- Switch between Month, Week, or Day views.
- Click + Create event to open the event form—enter title, date/time, description, then save.
Viewing & Editing Existing Events
Click any event block on the calendar to open its detail panel.
Event details include Client & Exact Time
When you click an event, the detail panel header shows the Client’s name and the exact start → end time (e.g. “Acme Corp • 2:00 PM – 3:30 PM”), so you can instantly see who the meeting is with and its full duration.
Edit date, time, or description, then Save.
Delete the event via the trash icon if it’s no longer needed.
After scheduling or reviewing events, you can switch back to the General tab at any time to update name, contact details, permissions, or other profile fields.
Roles
1. Roles: Overview
The Roles module is the heart of your access-control framework in Wifox Business Core Solution. It defines who can do what—from viewing sensitive client data to performing high-impact administrative tasks. By grouping discrete system capabilities (like “view client profiles,” “edit KYC information,” or “export transaction logs”) into named Roles, you create reusable permission sets that can be assigned to any number of employees. This approach ensures consistency, enforces the principle of least privilege, and dramatically simplifies onboarding, auditing, and ongoing security management.
Core Concepts
1) Role Definition
Name & Description: Each Role carries a clear, descriptive name and summary so that even non-technical stakeholders immediately understand its purpose (e.g., “Support Agent,” “Compliance Reviewer,” or “System Administrator”).
Permission Toggles: Inside the Role editor, every discrete action or data-view permission is surfaced as an on/off switch. Permissions are grouped by feature area (Clients, Requests, Transactions, Logs, Settings, etc.), making it easy to see at a glance which modules a Role can touch.
2) Assignment to Users
Employee Profiles: Roles are granted on each Employee’s record. You can assign multiple Roles to a single person, allowing their effective permissions to be the union of all their Roles.
Dynamic Updates: When you edit a Role’s permissions, those changes immediately cascade down to every assigned user—no need to manually reconfigure each individual.
3) Hierarchy & Inheritance
While Wifox doesn’t enforce a strict parent/child Role hierarchy, you can achieve the same effect by cloning an existing Role (via the “duplicate” action) and then adding or removing specific permissions. This makes it easy to build “junior” and “senior” versions of any Role without starting from scratch each time.
4) Audit & Compliance
Built-in Reporting: You can export your entire Role list—complete with names, descriptions, and permission flags—to maintain an external audit record or to cross-check against organizational policies.
Change History: Every time a Role is edited, Wifox logs the timestamp and the user who made the change. This immutable audit trail ensures you can track how permissions have evolved over time.
Typical Workflow
Onboarding a New Team:
Review your organizational chart and identify distinct functional groups (e.g., Support, Finance, Compliance).
For each group, decide which modules and actions they need. Create a new Role (or clone a similar one), toggle the appropriate permissions, and save.
Assign the Role to all relevant employees in bulk via the Employee directory.
Responding to a Security Incident:
If you discover that a Role grants excessive access, simply open the Role editor, turn off the problematic permissions, and publish. Changes take effect immediately, locking down vulnerable areas without touching individual employee settings.
Regular Access Reviews:
Quarterly or semi-annually, export your Roles and compare them against your company’s security policies.
Identify any unused or overly permissive Roles, and either retire them or tighten their scope.
The following actions are available in the Roles module:
2. Roles: Use Cases
Use Case #1: Delegating Support vs. Administrative Tasks
Create two Roles—“Support Agent” with permissions limited to viewing and updating Requests and Actions, and “System Administrator” with full permissions across Projects, Settings, and Users. Assign Support Agents to day-to-day ticket handling without risking data-model or configuration changes, while Administrators maintain overall system health.
Use Case #2: Segregating Financial Controls
Define a “Finance Manager” Role that can view and export Transactions, manage Accounts, and adjust Company Fees but cannot modify client personal data or system Settings. Meanwhile, assign a “Compliance Auditor” Role read-only access to Transactions, Logs, and Agreements. This separation of duties ensures that financial workflows remain secure and auditable.
Use Case #3: Enabling Analytics Access
Create a “System Analyst” Role with view all permissions on Projects, Desks, Clients, and sub-modules (Actions, Requests) but manage own on none. Analysts can generate cross-project reports and dashboards without altering any records, preserving data integrity while granting broad visibility.
Use Case #4: Scoped Project Administration
For regional teams, define “Project Admin – EU” and “Project Admin – US” Roles that grant full CRUD and manage-all permissions—but only on their respective Projects and Desks. This lets local managers configure workflows and users within their region without touching other areas of the business.
Use Case #5: Time-Bound Elevated Access
When contractors or temporary staff need extra privileges—for instance, to perform a data migration—clone the “System Administrator” Role into “Temp Migration Admin” but set an expiration date on the token used to authenticate that Role. After the project completes, remove or let the token expire to automatically revoke access.
3. How to Create a Role
Creating a custom Role in Wifox Business Core Solution lets you precisely control which modules and actions your employees can access. Below is a fully expanded walkthrough, including all settings, options, and caveats.
There are 2 types of roles you can create inside the system:
-
Employee is a standard internal user role for team members (Support, Agent, Manager, Sales, etc.) who use the system for daily operations and require access to modules and permissions based on their responsibilities.
-
Affiliate is a limited role type for external or partner users who work only with assigned affiliate hubs and manage leads without access to other system modules.
How to Create an Employee Role
To create a new Employee role, follow the next steps:
Warning: The role's name can not be edited once it is created.
1. Open the Roles Module
In the left-hand navigation bar, click Roles to load the Roles list.
Click the Add button (green “+ Add”) in the top-right corner of the Roles tab. Then select the Employee role from the dropdown list in the table header.
2. Configure the New Role
When you click Add, the Add role interface appears, divided into three main sections:
| Section | Purpose |
|---|---|
| Modules | Lists every module (Projects, Desks, Employees, Affiliate Hub, Roles, Logs, Clients, Actions, Requests, Settings, Client area, etc.) for which you can grant rights. |
| View Rights | Checkboxes to grant “View own” or “View all” permissions on each module/sub-module. |
| Manage Rights | Checkboxes to grant “Create/Edit,” “Manage own/all,” or “Delete” permissions on each. |
Note: Some modules are hierarchically linked. If you grant view rights to a parent module (e.g., Projects), Wifox will automatically select required view rights on linked modules (Desks, Employees). Manage rights must be set explicitly.
You then have three options:
-
Select a template for the role. (RECOMMENDED)
-
Set all rights (including Security rights) available to the role. (NOT RECOMMENDED)
-
Manually configure a role. (NOT RECOMMENDED)
To Select a Template For the Role:
1. Click the Select template dropdown at the top of the Add role form.
2. Choose Your Template
You will see following templates:
|
Template |
View | Manage |
| Agent |
Own Projects (only those to which the employee assigned) Own Desks Employees (only those that relate to Own Projects) Own Clients Requests (only those that relate to Own Clients) Configurations Company fees Statuses |
Own Clients |
| Desk manager |
All from Agent list + All Clients |
Own Projects Own Desks All Clients Requests |
| Project admin |
All from Desk manager list +
All Desks |
All from Desk manager list + Employees |
Note: You cannot change the configuration of a role template.
3. Apply & Save
Once selected, the form will auto-tick the appropriate checkboxes for view/manage rights.
Note: Template configurations are locked—you cannot alter individual permissions afterward.
Click Save to finalize your new Role.
How to Create an Affiliate Role
To create a new Affiliate role, follow the next steps:
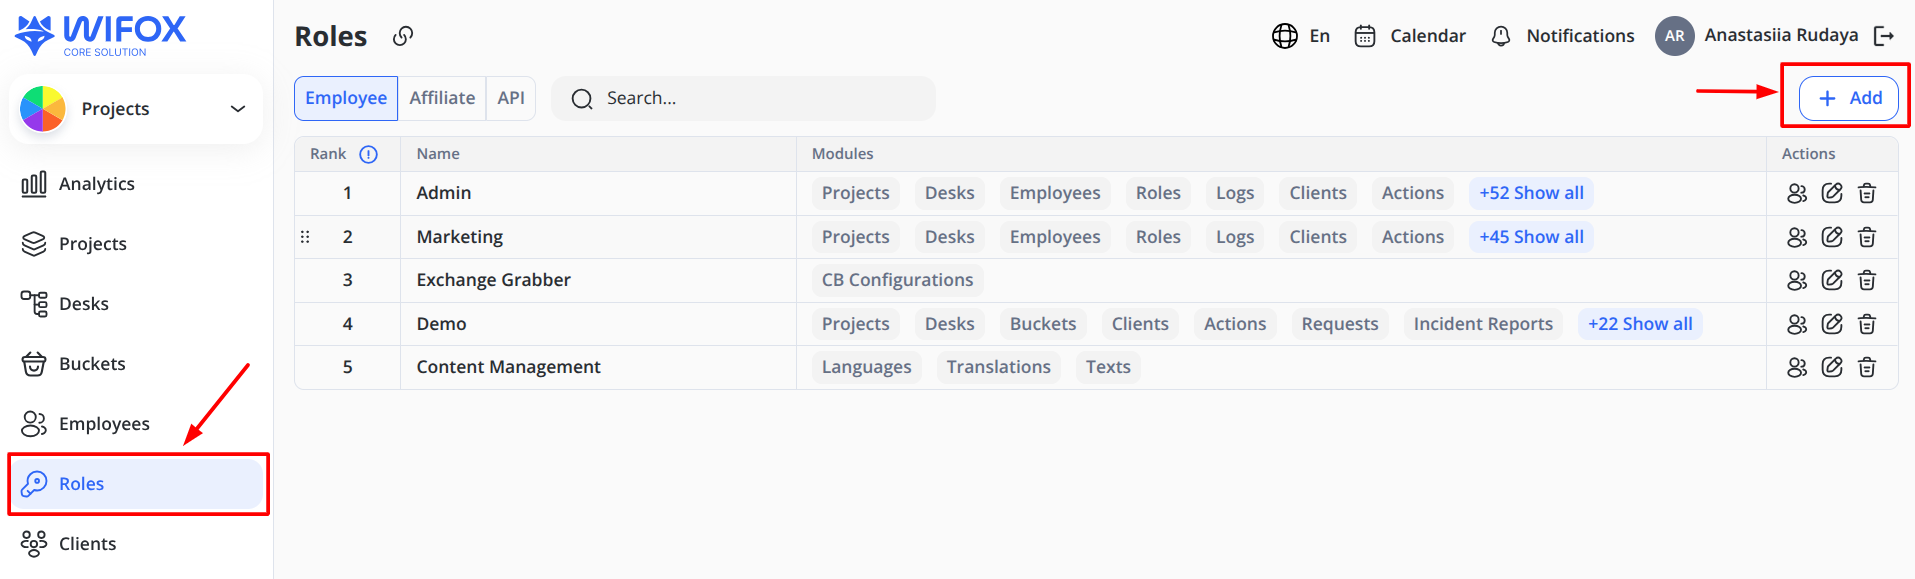
3. Select the Affiliate role from the dropdown list in the tab header.
4. Configure permissions.
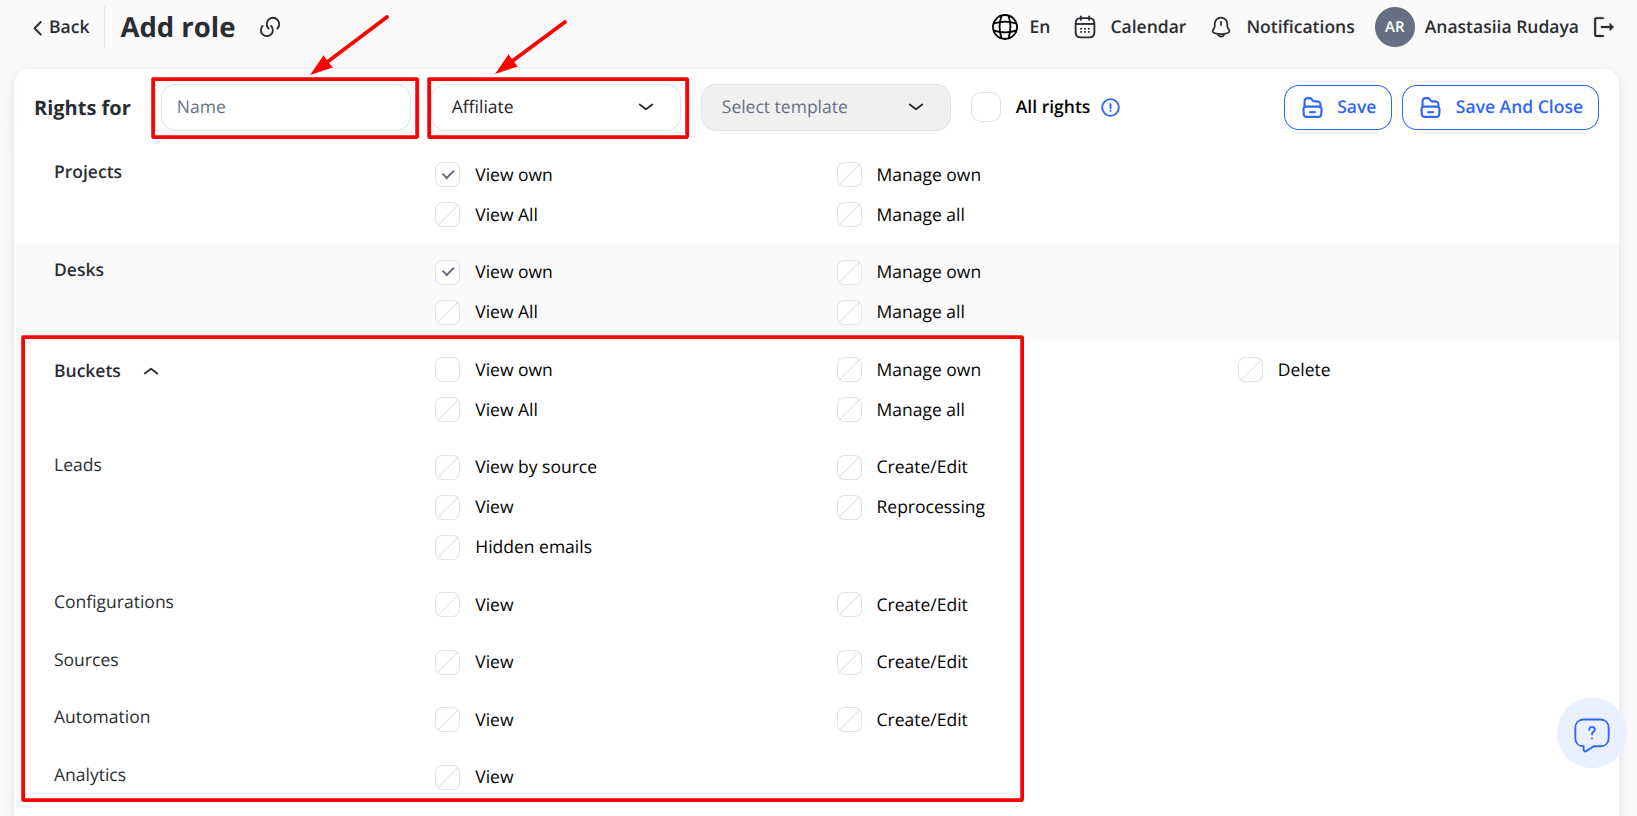
If you need to add a Root Affiliate who will manage the affiliate hub and control its performance, set View permissions for Leads, Sources, Configurations, and Analytics to give access to full hub information. Otherwise, the Root Affiliate will act like a webmaster and will not be able to manage the affiliate hub.
If you need to limit an Affiliate’s access to a specific source, enable View by Source. This allows the Affiliate to work only with the assigned source and be added as a webmaster to manage it. Also, access to lead emails can be hidden. To do this, select Hidden emails in the Leads block when configuring permissions.
To save the settings, click Save if you plan to continue working with this module, or Save and Close if you have finished configuring it.
Important Rules
The following rules apply for manually configuring roles:
- Some modules are linked to others and cannot exist without them. For example, you cannot select viewing rights for Projects without Desks and Employees. In such cases, the viewing rights for the linked modules are selected automatically. More about Wifox Business Core Solution modules and their relationships [here]
- Managing rights are not automatically selected.
Grant All Rights (Not Recommended)
Checking All rights grants every available permission—including all view, manage, import/export, and security settings.
Pros:
Quickest way to give “super-user” access.
Cons:
Violates the principle of least privilege.
Risks accidental data exposure or operations.
Use only for very limited “super-admin” roles when absolutely necessary.
Configure Manually (Not Recommended)
For full control, you can tick each module’s view/manage checkboxes one by one.
How it Works
In the Modules column, expand each section (e.g., Clients, Requests) to see sub-modules.
In the View rights column, select “View own” and/or “View all.”
In the Manage rights column, select “Create/Edit,” “Manage own/all,” and/or “Delete.”
Important Rules
Module dependencies: Granting view rights on child modules (like Desks) automatically selects required parent rights (e.g., Projects, Employees).
Manage rights are always manual: You must explicitly grant “Manage own/all,” “Create/Edit,” and “Delete” per module.
Tip: Only use manual configuration when you have very specific permission needs that templates cannot cover.
For most scenarios, selecting a template offers the best balance of speed, clarity, and security. Use All rights sparingly, and reserve manual configuration for advanced use cases where fine-grained control is essential.
4. How to View Users Assigned to the Role
Before assigning permissions or troubleshooting access issues, it’s crucial to know exactly who holds each role in your system. Viewing assigned users helps you audit permissions, ensure the right team members have access, and quickly spot any misconfigurations.
You can view all created roles in the list under the Roles tab. Here, you can also check modules it has rights for.
Step-by-Step Guide
1. Open the Roles Module
From the main navigation menu, click Roles.
You’ll see a table of every role you’ve created, along with its name and the modules it governs.
2. Find the Role You Want to Inspect
Use the search box at the top to filter by role name, or scroll through the list until you see the target role.
3. Click the “Assigned Users” Icon
In the Actions column on the far right of that role’s row, click the user-group icon (often depicted as two silhouettes).
This opens a slide-out panel on the right side of the screen.
4. Review the Members Panel
At the top is a search field—type a name or email to quickly locate a specific employee.
Below, you’ll see each employee’s name and login email who has that role.
5. Close the Panel
When you’re done, click the “X” in the panel’s header to return to the full Roles list.
Note: Assigning employees to roles is performed through the Employees module. You can find instructions on how to do this [here].
Regularly checking which users hold which roles is a best practice for maintaining security and operational clarity. It ensures that only authorized personnel retain critical permissions, helps you spot and fix assignment errors, and confirms that your team always has the right access to do their jobs.
5. How to Search for a Role
When your organization has many custom roles, finding the exact one you need can be cumbersome. The search functionality in the Roles module lets you instantly locate any role by name or partial keyword—saving time and reducing errors when assigning permissions or auditing access.
Step-by-Step Instructions
2. Activate the Search Field
At the top of the Roles list, locate the Search… input box.
Click inside the box to place your cursor there.
3. Enter Your Search Term
Type all or part of the role name you’re looking for (e.g., admin).
The table updates in real time, filtering to show only roles that contain your keyword.
4. Review Matched Results
Confirm the role appears in the filtered list along with its rank and associated modules.
If too many results appear, refine your search by typing a longer or more specific term.
5. Clear or Modify Your Search
To reset the list and view all roles again, clear the text from the Search field (e.g., click the “×” inside the field or press Backspace until it’s empty).
Enter a new keyword to perform another lookup.
Using the search box in the Roles module is the fastest way to pinpoint any role by name—whether you’re verifying permissions, preparing to edit a template, or simply auditing who has what access. Efficient searching helps maintain security hygiene and keeps your permission structure well-organized.
6. How to Edit a Role
Over time, your organization’s needs may evolve: you might need to grant additional permissions to an existing role or tighten access in response to security changes. The Edit Role function lets you fine-tune an existing role’s permissions—adding or removing rights, switching templates, or even upgrading someone’s capabilities—without having to recreate the role from scratch.
Step-by-Step Process
1. Open the Roles Module
From the main navigation menu, select Roles.
You’ll see the full list of roles along with their current modules and access scopes.
2. Locate the Role to Edit
Scroll or search to find the role you wish to modify.
Each row shows the summary of the modules it can access.
3. Launch the Edit Dialog
In that role’s Actions column, click the Edit (pencil) icon.
The Edit Role panel appears, displaying the role’s configuration fields.
4. Review the Role Name and Template
Template dropdown lets you reassign a different predefined template (e.g., Agent, Desk manager, Project admin). Changing the template will replace the permission matrix with the template’s defaults.
5. Adjust “All rights” Toggle (Optional)
Enabling All rights immediately grants every possible permission across all modules. This is rarely recommended—use only for super-admin or audit roles.
6. Modify View Permissions
In the View column, you’ll see each module (Projects, Desks, Clients, etc.) along the left.
Click checkboxes to grant or revoke “View own” (only records they own) and “View all” (every record) rights.
For nested modules (e.g., under Clients: Export, Import), expand the section to expose sub-permissions.
7. Modify Manage Permissions
In the Manage column, toggle “Manage own” and “Manage all” to allow editing, creating, or deleting records.
Some modules also offer special rights such as “Send a private message” under Clients.
8. Add or Remove Specific Actions
Beyond the view/manage dichotomy, certain modules include granular options:
- Under Employees, you might toggle “Create/Edit” vs. “Delete.”
- Under Settings, you can enable or disable access to languages or verification levels.
9. Save or Cancel Changes
Once you’ve made your adjustments, click Save to apply them immediately.
To abandon your edits, click the back arrow or Cancel—no changes will be saved.
Here, you can delete permissions set during the role creation stage or add new ones. You can also set or change a template for the role.
Note: For roles created or edited based on templates, you can only change the templates later, but not edit the permissions manually.
The Edit Role feature lets you keep your permission structures up-to-date as your team grows and business processes change. By carefully balancing view and manage permissions—optionally leveraging templates for common job functions—you maintain tight security controls while empowering employees with exactly the access they need.
Permission Enforcement Across Modules
Role permissions are not cosmetic or UI-based restrictions.
They are enforced at the backend level and determine which records are returned by the system.
For modules that depend on hierarchical access control (such as Clients, Leads, Orders, Requests, etc.), visibility rules are evaluated using the combination of:
-
Project permissions (View own / View all)
-
Desk permissions (View own / View all)
-
Client permissions (View own / View all)
Records are returned only if they pass all applicable permission checks.
This means:
-
If a role has Project → View own, only records from assigned projects are accessible.
-
If a role has Desk → View own, only records from assigned desks are accessible.
-
If a role has Client → View own, only records where the manager is assigned to the client are accessible.
Modules do not rely on frontend hiding.
Permissions are enforced server-side and define the actual data scope.
7. How to Delete a Role
When a role is no longer needed—perhaps because you’ve reorganized teams or replaced it with a more accurate permission set—you can permanently remove it from your system. Deleting a role is irreversible, so it’s important to ensure that no active employees rely on it before you proceed.
Warning: You cannot restore deleted roles.
Step-by-Step Guide
1. Verify Role Assignment
Before attempting deletion, confirm that the role isn’t currently assigned to any users. If it is, you’ll need to reassign those employees to another appropriate role first—otherwise, the system will prevent deletion.
2. Locate the Role
In the Roles list, scroll (or use the search bar) to find the role you want to delete.
3. Click the Delete Icon
In that role’s Actions column, click the trash-can icon. This immediately triggers a confirmation prompt.
4. Confirm Deletion
A small pop-up asks, “Are you sure?”
Click Delete to permanently remove the role, or Cancel to abort the operation.
Note: You cannot delete a role if it is assigned to anyone.
Deleting unused or outdated roles helps keep your permission structure clean and reduces administrative overhead. By following the steps above—and ensuring no employees remain tied to the role—you can safely remove roles you no longer need, keeping your security model lean and accurate.
8. Roles Ranking
Roles are arranged by rank to control who can create or assign roles at different privilege levels. A user can only manage (create/edit/assign) roles with a rank equal to or below their own. Higher‐ranking roles appear at the top of the list (with lower rank numbers, such as 1), while lower‐ranking roles appear below.
Use Cases
- Role-Based Access Control
A user can only manage (create/edit/assign) roles with a rank equal to or below their own, preventing unauthorized privilege escalation and ensuring secure role management. - Secure Role Visibility
Users can only see roles at or below their rank when creating or managing employees, eliminating confusion and maintaining appropriate permission levels. - Efficient Role Management
Admins can drag and drop roles to adjust the hierarchy, ensuring role privileges align with organizational needs and simplifying role administration.
1. Viewing the Roles Table
When you click Roles in the left-hand nav, the main pane displays every role in a table sorted by “Rank” (highest privilege at the top).
Rank: A number in the first column (1 = highest privilege), automatically assigned by order.
Modules: A list of module-tags showing what each role can access (e.g. Projects, Desks, Clients). Only the first few tags appear, with a “+X Show all” link to expand.
Actions Icons
To the right, under Actions, there are three icons:
- 👥 Users: View/assign employees who hold this role
- ✎ Edit: Open the Edit-role panel to adjust permissions or template
- 🗑️ Delete: Permanently remove the role
2. Editing a Role
Click the ✎ pencil icon under Actions for the role you want to change.
The Edit role drawer appears, listing every module with View/Manage checkboxes (e.g., View own, View all, Manage own, Manage all).
Check or uncheck permissions as needed, then click Save.
3. Changing Role Rank (Drag‐and‐Drop)
Why? Drag-and-drop lets you reorder the hierarchy of roles—higher in the list = higher privilege.
3.1. Locate the Drag Handle
Look at the very left edge of the Rank column (the first column).
You’ll see a small vertical “pill” of dots (⋮⋮) next to each role’s row.
Hovering over it changes your cursor to a “move” icon.
3.2. Move the Role Up/Down
Click & Hold the dotted handle on the role you want to move.
Drag the entire row up to give it a higher priority (lower rank number), or down for lower.
Release to drop it into its new slot.
The role’s Rank automatically updates to reflect its new position. For example, if you move a role above another that had a lower rank number, the dragged role now has a higher privilege (lower rank number).
3.3. Effect on Visibility
Security safeguard: If you drag a role above your own rank, you will no longer see it in any Role dropdowns when assigning to employees or tokens.
Prevents privilege escalation: A rank-4 user can’t promote themselves (or others) to rank 3 or higher.
Additional Visibility Restriction
Users cannot see another employee’s assigned role if that role has a higher rank than their own.
In employee lists and role-related views, higher-ranking roles are hidden from users with lower rank.
This ensures:
-
Sensitive privilege levels are not exposed
-
Hierarchical boundaries are preserved
-
Users cannot infer or interact with roles above their authority
4. Assigning Roles to Employees or Tokens
After ranking roles appropriately, you’ll assign them—but you’ll only ever see roles at or below your own rank.
4.1. Add Employee
In the left-hand nav, click Employees.
In the top-right of the Employees table, click + Add.
In the Add employee drawer, locate the Role dropdown under General.
Only roles whose rank is at or below your rank appear.
4.2. Create Identification Token
In the left-hand nav, expand Security and click Identification tokens.
Click + Add at the top right of the Tokens table.
In the Add identification token drawer, find the Role dropdown.
Again, only roles at or below your rank are listed—higher-rank roles are hidden.
For instance, if your user is rank 4, you’ll only see rank 4, 5, 6… roles listed—rank 3 or above won’t appear.
Why Role Ranking Matters
- Security: Prevents unauthorized privilege escalation (e.g., a mid‐level user granting themselves “super admin” powers).
- Project Scope: Ensures a manager who only oversees one project can’t create or assign roles that exceed their scope.
- Consistency: Keeps the system organized, with each user limited to assigning roles matching their authority level.
Example Scenario
1. Admin Role at Rank 4
The “admin” user sees and can assign roles at rank 4, 5, 6, etc.
2. QATestRole at Rank 5
Admin at rank 4 can't drag roles above it's own rank order(4).
This ensures Admin doesn’t accidentally (or intentionally) grant privileges beyond their own.
Role ranking also impacts access to configuration features. Users can only modify system-level settings, including action subtype ordering, if both their permissions and rank allow it.
In short, Role Ranking is a fundamental security feature. It keeps your platform's environment safe by ensuring users can only create, assign, or manage roles at or below their rank, preventing privilege escalation and maintaining clear permission boundaries across the platform.
Сlients
1. Clients: Overview
The Clients module is designed to grant access to all clients stored within the CRM, based on your access permissions. Depending on your role, you can view clients linked to specific desks or projects.
You can assign a client to a project, and then optionally assign them to a desk and manager. The manager must be assigned to the project and desk to which the client is assigned.
Key features:
1) Scoped Visibility
Clients belong to one Project (required) and optionally one Desk.
You only see clients in Projects/Desks you’re assigned to.
2) List View & Search
Columns: Name, Contact, Status, Manager, Project, Desk, Dates.
Sort by any column; Search by name, email, company; Filter by Project, Desk, Manager, date range, or custom tags.
3) Ownership & Routing
Assign a Manager (must be in the same Project/Desk) to drive notifications and accountability.
Reassign Desk or Manager as clients progress through workflows.
4) Client Detail Page
General Info, Assignments, Status toggle, Meta tags.
Activity Feed: Actions, Requests, Notes.
Related Records: Tickets, transactions, integrations.
5) Bulk & Import
CSV/XLSX import with field mapping.
Mass actions: reassign, retag, status changes, batch emails.
6) Audit & Integrations
Full change history for compliance.
API & webhook support for automated workflows.
This module keeps every client record organized, secure, and visible only to the right teams.
The following actions are available in the Clients module:
-
Creation: Adding new clients and filling in personal, billing and affiliation information.
-
Editing: Modifying existing client information, adding new details, including actions and requests, and uploading client documents.
-
Reassigning: Reassigning multiple clients to projects and desks.
-
Deactivation: Disabling client accounts while retaining their information in the system.
- Managing Favourite Clients
- Clients Duplicates
- «Send a Message» Action
2. Clients: Use Cases
#1 Onboarding New Markets
Scenario: You’re expanding into Europe and Latin America.
Solution: Create Projects “WBCS – EU” and “WBCS – LATAM.” Onboard new clients into the appropriate project, then assign them to a local Desk (e.g., “Berlin Sales,” “São Paulo Support”) and manager. This keeps regional data strictly segmented.
#2 Tiered Support Levels
Scenario: You offer Basic, Premium, and Enterprise support plans.
Solution: In your main Project, set up Desks “Basic Support,” “Premium Support,” and “Enterprise Success.” Assign each incoming client to the desk matching their plan, plus a dedicated account manager. This ensures SLAs and workflows are customized per tier.
#3 Multi-Brand Account Management
Scenario: Your company runs several brands under one umbrella.
Solution: Use separate Projects for each brand (e.g., “Acme Retail,” “Acme Wholesale”). If a client buys from both, assign them to each project as needed, with desk and manager assignments per brand. They appear in both lists but stay logically partitioned.
#4 Cross-Functional Handoff
Scenario: A prospect moves from Sales to Implementation to Support.
Solution: Keep the client in a single Project but reassign their Desk and Manager at each stage: “Sales Desk” → “Implementation Desk” → “Support Desk.” All history stays on one record, but only the current team sees them.
#5 Bulk Import & Segmentation
Scenario: You’ve run a marketing campaign and collected 1,000 new leads.
Solution: Use the API or import tool to upload all leads into your “Marketing Campaign” Project. Then apply a meta-tag (via the Additional/Meta picker) or assign them to “Campaign Desk.” From there, route them in bulk to regional sales desks through filters or automation.
3. How to Create a Client
Use the Clients module to add key contacts or corporate accounts into Wifox. Depending on your business model, you can onboard Business clients via a guided wizard (including company details, ultimate-beneficial-owner, and additional contacts), or quickly spin up Personal client profiles in one screen. By following these steps—and matching the “Step #” callouts in your UI—you’ll ensure every client is correctly profiled, assigned to the right Projects & Desks, and ready for your team to engage.
Client profiles are automatically created when they register on your site.
1. Open the Clients Module
In the left sidebar, click Clients.
You’ll arrive at a table showing all existing clients, with columns for:
- ID – The database record ID.
- UID – System-generated unique client identifier (auto-increment).
- Full name
- Phone number
- Type
- Country
- Comments
- Desk
- Status
- Actions (Edit, Send a message, Change project)
Note: When you open a client’s detail drawer (by clicking their email or the ✏️ Edit icon), the header shows the client’s Name • UID (e.g. Alex N• UID: C00004P), so you always have both their display name and unique identifier at a glance.
2. Launch the “Add Client” Menu
In the top-right corner of the Clients list, click + Add.
3. Choose Client Type
From the dropdown, select either Business client or Personal client.
Create a Business Client
Step 1 — Add Company Information:
Company name: Enter the legal entity name as registered.
Company ID: Your internal reference or system code.
Company VAT: VAT/tax registration number.
Established: Use the date picker to record the incorporation date.
Country: Choose from the list.
City, Address, Postal code: Fill in the billing address fields.
Company logo (optional): Drag-and-drop or browse for an image file.
When all fields are complete, click Next →.
Step 2 — Add Director (UBO)
Note: Toggling the Allow checkbox at the top of the “Add director (UBO)” form will expand the Credentials fields below (email, password), letting you edit or enter those values for the UBO.
2.1 Assign an Existing Client as Director
Select the “Assign Director from the existing clients” card – it will be highlighted in green.
In the Client ▼ dropdown, start typing the name or email of an existing client. A filtered list appears; click the one you want.
(Optional) Click View & Edit Info to review or change that client’s personal details in a pop-over.
Once selected, the Personal, Affiliation, and Credentials panels below will auto-populate.
If you need to override or complete any fields (e.g. add an email or password), check the Allow box at the top of the form, then edit those fields directly.
2.2 Create a New Client as Director
Click the Create a new client for director card on the right.
A blank Personal panel appears below (just like when adding a personal client).
Fill in First name, Last name, Email, Password, and any other required fields.
Complete the Affiliation panel by choosing the company’s Project and Desk for this director.
Click Save (bottom-left) to create that client and set them as your UBO.
When you’ve picked or created the UBO, use the Next → button (top-right) to proceed to adding additional members.
Step 3 — Add Members
In the Clients panel, search or scroll to find additional client contacts.
Click each name to move them into the Members panel.
For each member, toggle between RO (read-only) and RW (read-write), or click the trash icon to remove.
Click Next → to finalize.
Create a Personal Client
Once you’ve chosen Personal client, the full “Add client” form appears on a single page. It’s organized into 7 panels:
Personal (Step 1)
- Type: Pre-set to Personal and cannot be changed.
- First name: Enter the client’s given name.
- Last name: Enter the client’s family name.
- Phone number: Primary contact number.
- Additional phone number: Secondary contact number (optional).
- Date Of Birth: Use the date-picker to select.
- External ID: Any external reference or CRM ID.
- Passport: Passport or government ID number.
- Nationality: Country of citizenship.
- Gender: Select one of the options: Male, Female, Other.
Billing (Step 2)
- Country: Dropdown to select the billing country.
- Region: Free-form region/state field.
- City: Billing city.
- Address: Street address.
- Postcode: ZIP or postal code.
Affiliation (Step 3)
- Project: Assign this client to a Project.
- Desk (Optional): Restrict to one of the project’s Desks.
- Manager: Select the internal user who “owns” this client.
- Company fee group: Drop-down of predefined fee tiers.
- AffiliateID: ID for tracking source or partner.
- CampaignID: ID for tracking which marketing campaign brought the client.
- SourceID: ID for tracking where the client came from.
- SubID: Additional tracking ID for more detailed attribution.
- Verification level: KYC level (e.g. Email, Video, In-person).
- Verification status: Current status (Pending, Approved, Rejected).
Automatic Processed Status
If both Desk and Manager are assigned when creating the client, the system will automatically set:
processed = true
This behavior is enforced globally across the CRM.
You do not need to manually manage the processed flag.
If Desk or Manager are not assigned, the client will remain unprocessed until both are set.
Credentials (Step 4)
Email: Client’s login address (required).
Password:
✨ Sparkle icon – auto-generate a secure password.
👁️ Eye icon – toggle show/hide.
Custom Fields (Step 5)
To add custom fields, go to Settings → Configurations → Client Custom Fields, then add the required fields.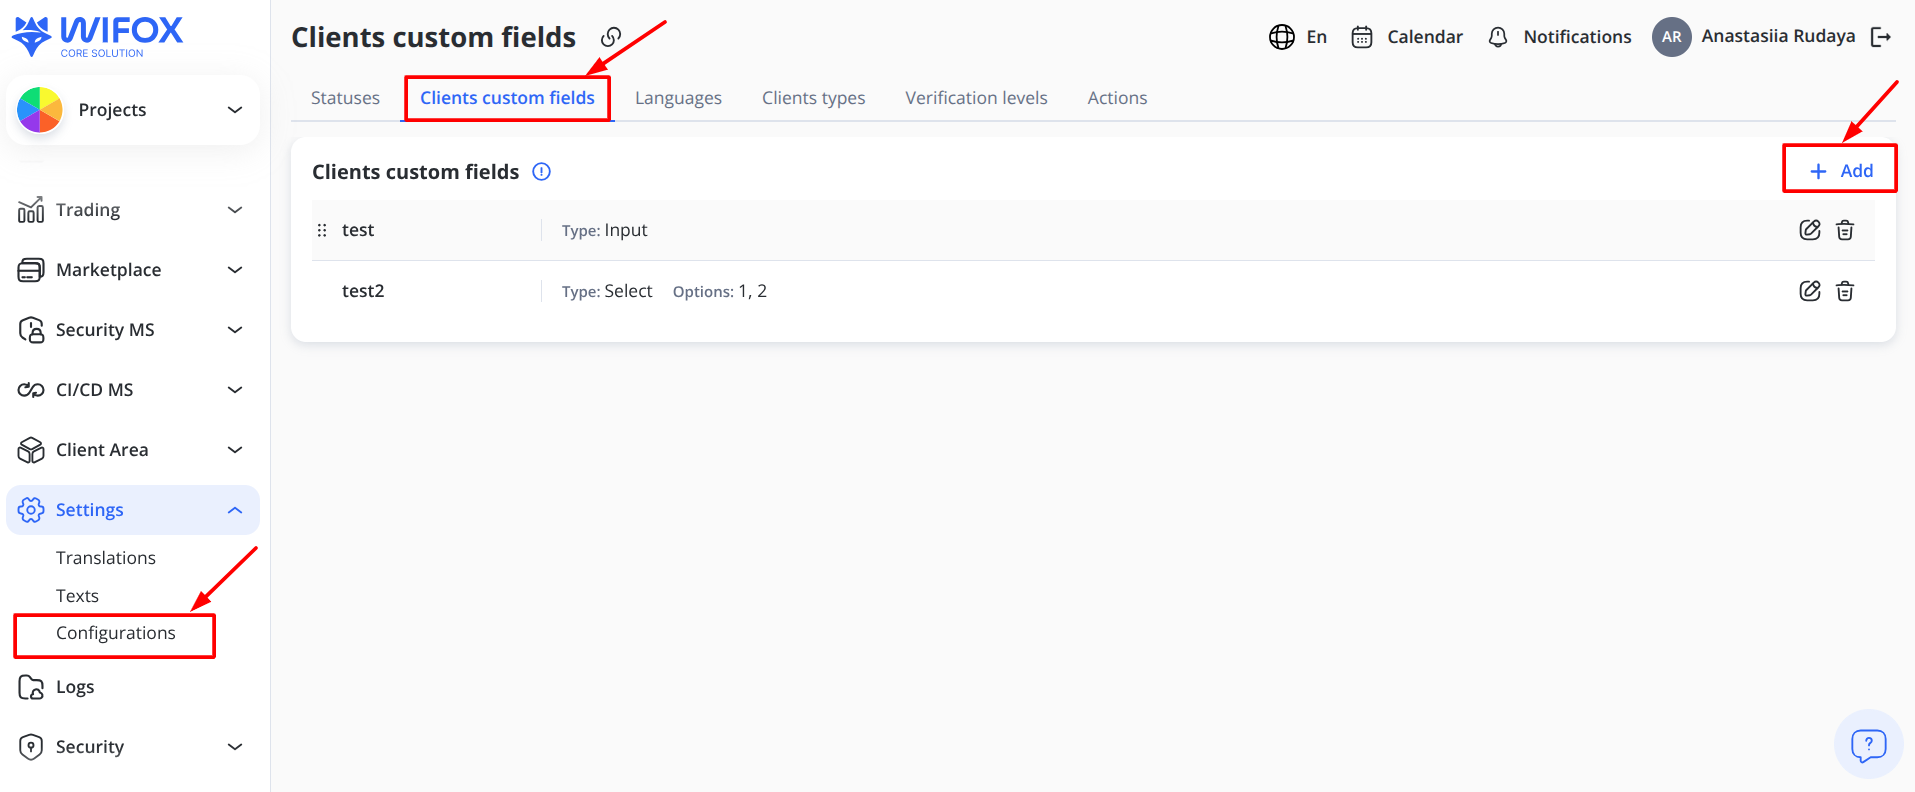 Two-Factor Authentication (2FA) (Step6)
Displays any preconfigured methods (Email, Google, Phone). You cannot add here, but you can review them.
Get more information about authentication types in Wifox Business Core Solution [here]
Description (Step 7): Free-form notes about this client.
To enable asset creation for the client, select Create Asset at the top of the screen.
Save Your New Client (Step 8): When all required fields are filled in, click Save (top-right). You’ll return to the Clients list, where your new personal client now appears.
Note: You cannot change the type of the client and/or the client’s email after saving their information.
You can view all clients in the Clients tab. To get full information about the client, click on the client’s email in the Email column.
A drawer will open on the right with information about the client.
By following this detailed workflow, you’ll ensure that every corporate or personal client is fully onboarded with accurate data, the correct project and desk affiliations, and the right team members assigned. Properly configured client records empower your desks to manage relationships, track compliance (KYC/AML), and deliver seamless service across your organization.
4. How to Edit a Client
Once a client exists in Wifox, you can fine-tune their profile, track interactions, upload documents, and manage accounts—all from the Edit window. Follow these numbered steps to ensure nothing is overlooked.
After creating a client, the Edit window will open automatically.
In the Edit window, you can:
- Edit the client’s information entered during the creation stage (except Type and Project). This also includes reassigning clients to another desk or status.
- Add or edit Actions: comments, notes, and other relevant information within the CRM.
- Add or edit Requests: for instance, support tickets, call requests, etc.
- Upload Documents: passport or ID, and bank card (front and back).
- Check the client’s Transactions.
- Add or edit the client’s Accounts and linked Assets (including currency and balance).
Note: Information about the client’s Requests, Transactions, and Accounts is pulled automatically from the relevant modules.
1. Open the Client’s Record
In the Clients list, locate the row for the client you want to edit.
Locate your client:
Use the Search… box at the top of the Clients list to type any part of their Email, Full name, or ID. (Instant filtering, partial matches allowed.)
Or click Filter ► Desk, Project, or Created date to narrow by scope.
Pro Tip: Bookmark heavy-use filters (e.g. “All Personal clients in Acme Project”) via the URL link icon next to the page title.
Enter Edit mode:
Click the pencil icon in the Actions column for that row.
To create an Action without entering Edit mode, click the Add action icon located next to the pencil icon in the same Actions column.
The right-hand drawer slides out, pre‐loaded on the General tab.
Quick Create Action from Clients List
You can create an action directly from the Clients table without opening the client record.
In the Clients list:
Locate the client row.
In the Actions column, click the Add action icon (next to the Edit icon).
The Action creation drawer opens.
The selected client is automatically prefilled.
Complete the required fields and click Save or Save and create new.
This shortcut allows agents to log calls, notes, or comments without navigating into the client profile first.
Location in the Row Actions
The Add action icon is displayed directly in the row’s visible action buttons, immediately after the Edit (pencil) icon.
It is no longer located inside the ⋮ (More options) dropdown.
Permission note
The Add action icon is visible only to roles with permission to create Actions.
Users without this permission will not see the icon.
At the top of the client’s detail view you’ll see these tabs:
-
General: Core profile fields you can edit
-
Actions: Log calls, notes & follow-ups
-
Documents: KYC uploads (IDs, bank cards, proof of funds)
-
Requests: Client-generated tickets and ad hoc data requests
-
Transactions: All ledger entries for this client (read-only)
-
Accounts: Create/manage asset or bank accounts linked to this client
-
Agreements: View signed contracts, NDAs, service agreements
-
Logs: Complete audit trail of every field change with user/timestamp details
Pro Tip: Press Ctrl + F inside the drawer to quickly find any field or label.
General Tab
1. Balance (Read-Only Financial Summary)
If Core Banking is enabled in your environment, the client’s total balance is displayed at the top of the client card.
Location:
Visible in the Client View drawer
Displayed in the header section of the Client View and Client Edit screens
Field label: Balance
Type: Numeric (float)
Editable: No (read-only)
The Balance represents the client’s total aggregated amount across all linked assets.
Important:
-
The value is automatically retrieved from the Core Banking microservice.
-
The CRM does not calculate this amount locally within the client module.
-
If Core Banking is unavailable, the Balance field will not be displayed at all.
-
This field is informational only and cannot be modified manually.
Use case: Agents can instantly see the client’s financial standing without switching to the Accounts or Assets tabs.
2. Personal
Type:
Personal clients have first/last names, DOB, risk fields.
Business clients use the 3-step wizard (company profile + UBO + members).
Status: Default or any custom statuses you’ve configured (e.g. “VIP”, “High-Risk”).
When creating a new Client status in Settings → Configurations → Statuses, make sure to define the Order field.
The Order value determines how statuses are displayed in dropdowns and lists. Statuses are sorted in ascending order based on this value.If the Order field is not set, the status may appear in an unexpected position in the interface.
Name & Contact:
First name, Last name: Displayed on statements, emails, and internal lists.
Phone number (required) & Additional phone number (optional): Used for SMS alerts or 2FA.
Date of Birth:
Opens a date picker; used for age verification.
Example: You might block accounts under age 18.
External ID: Your own CRM or partner reference number (e.g. “Zendesk User #1234”).
Passport: Enter passport number if you collect it for KYC.
Nationality: Impacts tax or compliance rules.
Risk level: Your internal scale (e.g. Low, Medium, High)—drives transaction limits.
AML Screening: Free-form field to paste screening summary or pass/fail status.
Warning: Changing Type from Business→Personal is not allowed after initial creation.
3. Billing:
Country: Dropdown list of ISO country codes.
Region: State/province field (free text).
City, Address, Postcode: Standard postal fields.
Use case: Some payment rails require exact match between billing address and card on file.
4. Affiliation
Controls where the client “lives” in your operational hierarchy:
-
Project: Required for scoping data and routing workflows.
-
Desk: Optional sub-group within a Project (e.g. “LOAN desk” vs “ONBOARDING desk”).
-
Manager: The internal employee accountable for this client.
-
Company fee group: Assigns tiered pricing or service-level agreements.
-
AffiliateID: Partner or campaign code for revenue sharing.
- Sub ID: Optional secondary tracking or sub‑campaign identifier.
-
Verification level: KYC method requested (Email, Video, In-person).
-
Verification status: Init, Pending, Approved, Rejected.
Example: Jane Doe is in Project = “Acme USA,” Desk = “Sales,” Manager = “Bob.”
Automatic Processed Status Update
The system automatically manages the internal processed flag based on assignment logic.
If both Desk and Manager are assigned to a client during editing, and the client was previously unprocessed, the system will automatically set: processed = true
This behavior applies globally across the CRM and is not limited to affiliate hub processing.
Important:
- The system only promotes
processedfrom false → true.- It does not automatically revert
processedback to false if Desk or Manager are later removed.- No manual action is required from the user.
This ensures consistent client lifecycle behavior across all CRM entry points (manual edit, bulk edit, import, API, etc.).
5. Credentials
Email: Login ID (read-only here).
Password: Must meet complexity: ≥8 chars, uppercase, lowercase, digit, special char.
✨ Sparkle auto-generates a random secure password.
👁️ Eye toggles show/hide.
Tip: Rotate client passwords quarterly by clicking ✨ and emailing the new credentials.
6. Additional
A JSON-style tree picker for arbitrarily structured metadata:
Click the + to append a new key/value.
Rearrange, filter, or delete entries.
Multi-Select Display Behavior
For multi-select custom fields:
-
Selected values are displayed as individual chips inside the field.
-
If the number of selected values exceeds the available field width, the interface collapses the overflow into a “+N more” indicator.
-
Clicking the field expands the dropdown, where all selected values are visible and can be removed.
This keeps the interface compact while preserving full visibility when editing.
Use cases:
Store third-party IDs (e.g. “StripeCustomerID”:“cus_ABC123”).
Attach ad-hoc flags (e.g. “VIP: true”).
7. Two-Factor Authentication (2FA)
Displays any methods already set up (Email, SMS, TOTP).
Hover on a non-default method to reveal Make default or Delete.
Note: You cannot add 2FA methods here—clients configure those on first login.
8. Description: Supports long-form text (up to 2000 characters). Good for case notes or behavioral observations.
9. State & Create asset & Save
State dropdown (top-right) toggles among Active, Deactivated, Suspended.
Deactivated preserves the record but blocks login/assignment.
Suspended can be used for temporary holds pending review.
Create asset
Located in the top‐right header of the General tab, immediately to the right of the State dropdown. When checked, this option auto-provisions a new asset ledger entry for the client as soon as you hit Save.
If changes are not saved, check field validation limits (e.g. text length) and required fields.
Actions Tab
Log every meaningful interaction:
Click + Add (upper right in the Actions block header).
Fast “Create Action” from Client Card
Managers can quickly create an Action directly from the client card without leaving their workflow.
Location
Inside the Client card:/clients/view/{clientId}/client
In the Actions block header (above the table), a + Add button is available.
Permissions
The + Add button is visible only to roles that have permission to create Actions.
If the role does not have create permission, the button is not displayed.
Behavior
Clicking + Add:
Opens the Action creation interface (drawer or modal, depending on system configuration)
The current client is automatically prefilled
The client field is locked and cannot be changed
On Save
The action is created
The modal/drawer closes
The Actions table refreshes automatically
The new record appears without a full page reload
On Cancel:
The modal/drawer closes
No changes are saved
This allows managers to log calls, notes, or reminders instantly while reviewing the client profile.
Type:
- Note: Internal memos (
“Called compliance – waiting docs.”) - Call: Schedule a follow-up call—requires an Action date.
- Comment: Public-facing remarks (e.g. “Client agreed to terms”).
- Manager dropdown: Who’s responsible for follow-up.
- Text box: Detail your note/call/comment.
- Save or Save and create new.
Action Type: “Completed by Default” Behavior
Some Action Types can be configured to be automatically marked as completed upon creation.
For example, a Comment may be logically completed immediately and does not require further follow-up.
Configuration
This behavior is controlled at the Action Type level.
Location: Settings → Actions/settings/actions
Each Action Type includes a checkbox:
Completed by default
If enabled:
All new actions of this type will be marked as Completed automatically when created.
The Completed checkbox will appear pre-selected in the Action creation form.
The user may manually uncheck it before saving.
If disabled: The Completed field behaves according to the standard default (unchecked).
How It Works
When creating a new Action:
-
The system reads the selected Action Type.
-
If
Completed by defaultis enabled for that type: The Completed checkbox is automatically checked. -
If the Action Type is changed during creation: The Completed state updates dynamically based on the new type.
This behavior applies consistently across all Action creation entry points:
-
Client card → Actions tab
-
Clients list → Create Action icon
-
/actions/add -
Global calendar
-
Employee calendar
Important Notes
The default state is derived from the Action Type configuration, not hardcoded in the UI.
Users can override the Completed checkbox manually before saving.
Existing Action Types default to not completed by default unless configured otherwise.
Save and create new
In addition to the standard Save button, the Action drawer includes a Save and create new option.
Button behavior:
Save:
Saves the action
Closes the drawer (default behavior)
Save and create new:
Saves the action
Keeps the drawer open
Resets the form for creating a new action
Preserves the selected Client and Manager
Clears Type, Subtype (if applicable), and Text fields
Resets validation state
This feature allows agents to quickly create multiple consecutive actions without reopening the drawer.
Example use case: An agent logs several follow-up calls or notes in sequence for the same client.
Actions Table Structure and Metadata
The Actions table inside the Client view drawer displays extended lifecycle and audit metadata for each action.
Column Structure
The table contains the following columns in this exact order:
-
Date
-
Type
-
Subtype
-
Message
-
Comment on closing
-
Created at
-
Updated at
-
Creator
-
Responsible
The column order is fixed and must not be rearranged.
If older layouts displayed a different sequence, the table has been updated to follow this standardized structure.
Sorting
Sorting is available for the following columns:
-
Date
-
Created at
-
Updated at
Sorting behavior:
Clicking the column header toggles between ascending and descending order.
Sorting behavior matches other CRM tables.
Sorting does not interfere with pagination.
Sorting does not affect action creation or editing.
Horizontal Scrolling
Because of the increased number of columns, horizontal scrolling is enabled for the Actions table.
Behavior:
The table scrolls horizontally within its container.
The Client drawer layout does not overflow or break.
All columns remain accessible regardless of screen width.
The exact scrollbar behavior (always visible vs overflow-based) follows the approved UI design pattern.
Filtering by Message and Comment on Closing
The Actions module supports advanced text-based filtering by both the main action message and the closing resolution comment.
This allows managers to quickly locate specific interactions using keywords or phrases.
Available Text Filters
Two independent text filters are available inside the Filters panel:
Description (Message)
Filters actions by the main action text content.
Operator: Contains
Comment on closing (Resolution)
Filters actions by the closing comment entered when marking the action as completed.
Operator: Contains
Both filters:
- Support partial text matching
- Are case-insensitive
- Can be combined with other filters (Project, Creator, Responsible, Dates, etc.)
- Work together or independently
How to Use
-
Open the Actions module.
-
Click Filters.
-
Enter text into:
Description field (for action body)
Comment on closing field (for resolution text) - Click Apply.
The system returns all matching actions.
Filter Chips Display
When applied, text filters appear as chips above the table, for example:
Project | Default
Comment on closing contains | client confirmed
These chips can be individually removed without resetting other filters.
Important Notes
Created at and Updated at are system-generated timestamps.
These fields cannot be manually edited.
Editing an action automatically updates the Updated at value.
The Creator field shows the user who created the action.
The Responsible field reflects the assigned manager for follow-up.
Pagination continues to function normally for clients with many actions.
Editing Action Type and Subtype
Users with Edit Action permissions (or the action creator) can modify the action’s Type and Subtype if needed.
This is useful in cases where an incorrect subtype was initially selected (for example, choosing the wrong call category).
To change it:
-
Open the action from the Actions tab.
-
Click Edit.
-
Select a different Type or Subtype from the dropdown.
-
Click Save.
All changes are recorded in the Logs tab for audit purposes.
Documents Tab
Upload or replace verification documents by dragging or browsing to add images for:
-
Bank card (front) (Step #1) & (back) (Step #2): Required for payments.
-
Passport or ID (Step #3): Government-issued photo ID.
-
Source of funds (Step #4): e.g. Pay slip PDF, bank statement.
-
Drag-and-drop or click to browse; valid formats
.jpg,.jpeg,.png.
Auto-save on upload; look for the thumbnail preview to confirm success.
Requests Tab
1. Click +Add in the top-right.
2. Fill in:
Name: Short title (“Upload proof of address”).
Time range: When you need it completed.
Type: e.g. Document Request, Support Ticket.
Description: Full instructions or context.
Additional information: Use the JSON tree for structured data.
Attach files: PDFs, screenshots.
Save .
Note: New requests will appear in this list with status and creation date.
Conversations: Image Upload (Paste & Drag-and-Drop)
The Requests → Messages conversation supports direct image attachments via clipboard paste and drag-and-drop.
This functionality is available in:
CRM → Client → Requests → Messages
Trading Area → Support → Tickets chat
Paste Image from Clipboard (Ctrl + V)
Users can paste an image directly into the message composer.
When pressing Ctrl + V:
-
The system detects image data in the clipboard.
-
The image is converted into a temporary file.
-
A preview appears inside the composer before sending.
Composer Preview
The preview includes:
-
Thumbnail image
-
Remove (×) button
-
Upload progress indicator (spinner or progress bar)
The user may remove the image before sending.
Drag & Drop Image
Users can drag an image file into the conversation area.
Drag Behavior
-
When dragging over the chat container, a drop overlay appears.
-
Only image files are accepted.
-
On drop, the image is attached to the composer with preview.
-
Overlay disappears after drop or drag leave.
The overlay does not permanently block scrolling and is only visible during active drag.
Sending Behavior
The system supports:
-
Image only
-
Text only (existing behavior)
-
Text + image in the same message
After sending:
-
The message bubble displays the image as a thumbnail.
-
Clicking the thumbnail opens a full-size preview modal.
-
The message appears immediately in the conversation history.
Validation Rules
Allowed formats:
-
image/png
-
image/jpeg
-
image/webp (if enabled)
Rejected:
-
Non-image files
-
Unsupported MIME types
-
Files exceeding the maximum allowed size (configured, e.g., 5–10MB)
If validation fails:
-
A user-friendly error message is shown.
-
The image is not attached.
-
The user may try again.
Upload Handling
Upload follows the same storage logic used for existing attachments.
Process:
-
File uploads to storage service.
-
System receives file URL / identifier.
-
Message entity stores attachment data.
Both CRM Requests and Trading Tickets use the same attachment model and rendering logic.
Security & Safety
-
Images are rendered safely (no inline HTML injection).
-
Only validated MIME types are accepted.
-
Images open in secure modal using controlled storage URLs.
-
External storage must be domain-controlled.
Transactions Tab
Read-only ledger of every monetary event for this client: Deposits, withdrawals, fees, adjustments.
Columns include Date, Type, Amount, Currency, Balance.
Pro Tip: Filter by date or type to investigate anomalies.
Accounts Tab
1. Click + Add in the top-right.
Provision new asset wallets or bank links:
Type: e.g. fiat, crypto, e-wallet.
External ID: Bank account number or integration reference.
Platform: Which service (e.g. Stripe, Utip, Binance).
Save.
Each account row shows Status (Active/Inactive), UID, Owner, Created.
Assets Tab
The Assets tab displays all asset entries (wallets, balances, or positions) associated with a specific client.
This tab is available to users whose role has the Assets → View permission enabled in the Roles module.
Use this tab to review, track, or verify every asset currently held by the client.
Each entry includes key information such as:
-
Asset type (e.g. fiat, crypto, tokenized balance)
-
Currency and amount
-
Linked account ID
-
Status (Active / Inactive)
-
Date created and last update
To enable the tab for a user role:
-
Go to Roles → Edit Role.
-
Expand the Clients section.
-
Check the box Assets → View (and Edit if required).
-
Save changes.
Once enabled, the Assets tab becomes visible in the client’s Edit view.
At the top-right of the General tab, next to the State dropdown, you’ll see a checkbox Create asset.
When checked, this option automatically creates a default asset record for the client upon saving, if none exists yet.
This ensures every new client has at least one corresponding asset entry linked to their profile.
-
View detailed balances and currency allocations
-
Adjust statuses or link assets to new accounts (if “Edit” permission is enabled)
-
Export asset data for reconciliation or reporting
Orders Tab
The Orders tab displays all trading orders associated with the selected client.
It supports:
-
Filtering (All / Open / Closed)
-
Column customization
-
Sorting
-
Inline editing (if permitted)
-
Real-time PnL updates
-
Order closing
Order Entry Price Editing and PnL Recalculation
When editing an existing order’s Entry Price, the system immediately recalculates:
-
Displayed PnL
-
Used margin (if applicable)
-
Settlement value on close
The updated entry price becomes the new authoritative reference for all future calculations.
Close Order Settlement Logic
When closing an edited order:
The system calculates settlement using:
-
Updated entry price
-
Actual close price at close time
-
Volume
-
Contract size
-
Direction
Settlement formula: FinalPnL = (ClosePrice - UpdatedEntryPrice) × ContractSize × Volume
For Sell: FinalPnL = (UpdatedEntryPrice - ClosePrice) × ContractSize × Volume
Wallet credit/debit must equal: FinalPnL - Commission - Swap
The credited amount must match the PnL shown in the UI at close moment.
Agreements Tab
Lists PDF or link to signed service agreements, NDAs, or other legal documents.
Read-only; to upload or modify agreements, use the Agreements module in the sidebar.
Logs Tab
The ultimate audit resource:
Every field change is logged with User, Timestamp, Old value, New value.
Search within logs by keyword or date.
Use case: Prove who deactivated a client or changed their fee group for compliance audits.
Final Save & Exit
Wherever you make edits, look for a Save button and confirm it turns green.
Closing the drawer (× in top-left) will prompt you if you have unsaved changes.
After a major batch update, run a filter to verify that all expected changes appear in the list view.
By following this comprehensive guide, you’ll ensure every client record is complete, traceable, and compliant with your organization’s policies—and you’ll maximize the power of Wifox’s modular CRM to keep your data accurate and your teams aligned.
5. How to Reassign a Client
The “Reassign” action lets you bulk‐update key client attributes—Desk, Manager, and Status—all at once. This is useful when, for example, you need to move several clients to a different desk or change their status en masse.
Use Cases
- Transferring Clients to a New Desk
Move multiple clients to a different desk after team restructuring by selecting them in the Clients tab, choosing the new desk from the dropdown, and saving the changes. - Updating Client Status in Bulk
Change the status of several clients from "Pending" to "Active" after onboarding by selecting all relevant clients, updating their status in the dropdown, and applying the changes. - Reassigning Clients to a New Manager
Reassign a portfolio of clients to a new manager by selecting the clients under the previous manager, choosing the new manager, and saving the reassignment.
To quickly reassign the clients:
All selected clients must be in the same project before you can reassign them (e.g., you can’t reassign a group of clients if some belong to Project A and others to Project B).
If you need to work with a different project, switch projects in the left‐hand menu first.
1. Check the box next to the client’s email to select one or more clients:
Individually: Click the checkbox next to each client’s email.
Page-wide: Use the very top-left checkbox to select all clients on the current page.
A green selection bar appears at the bottom showing the exact number of selected clients (e.g., “15 clients selected”). This counter updates in real time as you select or deselect items.
Extended Selection Behavior
You can select multiple clients by holding the left mouse button and dragging across checkboxes while scrolling. The system maintains stable selection during scrolling and does not require the cursor to remain strictly over the checkbox hit area.
The number of selected clients is displayed in the selection bar at the bottom of the page.
2. Click on the Reassign button. After selecting the clients you wish to update, click the Reassign button at the bottom bar.
3. Select a new desk and/or status from the drop-down list.
A “Reassign” panel (or modal) opens.
-
Desk → select the new desk for these clients.
-
Manager → choose the internal user who will now own them.
-
Status → set their account state (e.g. Active, Pending, Suspended).
(All three fields are optional—you can update just one or all three.)
Update the Status.
4. Click Save to apply the changes. Once you’ve set the desired Desk, Manager, and/or Status, click Save.
All selected clients are immediately updated with your new settings.
5. Page‐by‐Page Selection
“Select All” only applies to the current visible page.
If you have multiple pages of clients to reassign, repeat the selection and reassign steps on each page as needed.
Troubleshooting & Tips
-
Mixed-project error: If you select clients from different projects, you’ll see an error. Simply switch to the correct project and retry.
-
Pro Tip: After selecting, press Esc to collapse the drawer if you need to adjust your selection without losing your place.
-
Audit: All Reassign actions are logged in the Logs tab of each client record for compliance.
Bulk Edit Clients
The Bulk Edit action allows you to update selected client fields (Aff ID, Source ID, Campaign ID, Country) for multiple clients at once.
Bulk Edit is available only when at least one client is selected.
How to use Bulk Edit
-
Select one or more clients using checkboxes.
-
Click Bulk Edit in the bottom action bar.
-
A drawer opens with editable fields.
Field Logic
-
All fields are disabled by default.
-
Each field has a “Leave existing” checkbox (checked by default).
-
If “Leave existing” remains checked → the field will NOT be updated.
-
If you uncheck it → the field becomes active and can be edited.
-
Only enabled fields will be updated for selected clients.
Submit Rules
-
Submit is disabled if no fields are enabled.
-
Only activated fields are applied.
-
Existing data will not be overwritten unless explicitly enabled.
6. How to Filter and Search Clients
Efficiently managing your client base requires both pinpoint searches and flexible filtering. In the Clients tab, the built-in Search field lets you instantly find individual records by ID, name, email or phone, while the Filter panel enables you to segment your list by attributes like creation date, action timeline, manager assignment, or verification status. By combining these two tools, you can rapidly locate a single client or drill down into custom cohorts—whether you’re handling onboarding, compliance reviews, or performance reporting.
You can search for clients in two ways:
- Search input: Using their full name, email, or phone number (by '_id', 'firstName', 'lastName', 'email', 'phone').
- Filtering: Using broader parameters, such as the creation date.
Use Cases
-
Quickly Finding a Specific Client: Enter a client’s email or partial address (e.g., “gmail”) in the Search field for instant results.
-
Filtering Clients by Creation Date: Use the Created Date filter to select a date range and review recently onboarded clients.
-
Viewing Clients by Manager Assignment: Apply the Manager filter to display clients managed by a specific employee.
-
Identifying Unverified Clients: Use the Verification Status filter to show only unverified clients for compliance checks.
To find a client using the Search input
The Search input is located above the client table and is always visible.
Type the client's email or name in the Search field at the top of the Clients tab.
Type any of:
- Full or partial email (e.g. “gmail”)
- First name or last name
- Phone number
- Internal _id value
Results filter instantly as you type.
Special Characters in Search
The Search field treats all entered characters as literal text.
Special characters such as ?, %, _, *, +, -, (, ), @, and # are not interpreted as wildcards or regular expression symbols.
For example:
Searching for Anna? will return only clients whose name literally contains Anna?.
This ensures consistent and predictable filtering behavior across all environments.
Search Placement & Behavior
The Search input is permanently displayed above the client table, next to the table controls.
It is independent from Fast Filters and always visible without opening any panels.
Search operates across predefined client fields, including:
-
_id
-
firstName
-
lastName
-
email
-
phone
Search:
-
Filters results instantly as you type
-
Resets pagination to the first page
-
Can be combined with any structured Fast Filters
-
Does not modify or become part of saved Fast Filter views
Saved Fast Filter configurations do not store search terms.
Search input operates separately and does not affect saved filter presets.
To find clients using Fast Filters
In the Clients module, both Personal and Business client lists support the Fast Filters panel. It allows you to segment and review clients using structured filtering criteria without opening additional windows.
Fast Filters panel overview
The Fast Filters section is displayed directly below the main toolbar and includes the following elements:
-
Personal / Business tabs – switch between personal and business client lists.
-
Total counter – shows the total number of clients currently displayed.
-
Filter dropdowns – pre-set structured fields that let you narrow results by key attributes (e.g., country, verification status, manager, date ranges, etc.).
-
Apply button – executes the selected filters and updates the table view.
-
Drop filters – clears all active filters at once.
-
Create view – saves the current set of applied filters and layout preferences for later use.
-
Customize columns – adjusts which data columns are visible in the client list.
The “Actions exist” column can be enabled or disabled via Customize columns. Filtering by “Has actions” works even if the column is hidden.
How to use Fast Filters
-
Select whether you want to view Personal or Business clients.
-
Use one or more dropdown filters to refine the results. Common options include:
Country – filters by the client’s country of registration or residence.Project – displays clients associated with the selected project.
Manager – displays clients assigned to a specific manager.
Verification level – filters by KYC tier (Email, Video, In-person, etc.).
Verification status – displays only Pending, Approved, or Rejected clients.
Created date – select a specific date range using the calendar picker.
Last login date – filter clients by their most recent login within a selected date range.
Last action date – filter clients by the date of their most recent completed action.
Future action date – filter clients by scheduled upcoming actions within a selected date range.
The list of available filters is updated regularly.

Please note: When using the date-related filters, you can select a ready-made period. The system will automatically apply the selected range, such as Today, Last 7 days, This week, or This month, and others. Manual date selection is also available.
-
Click Apply to confirm your selection.
-
To remove all active filters, click Drop filters.
-
If you frequently use a specific combination of filters, click Create view to save it for quick access.
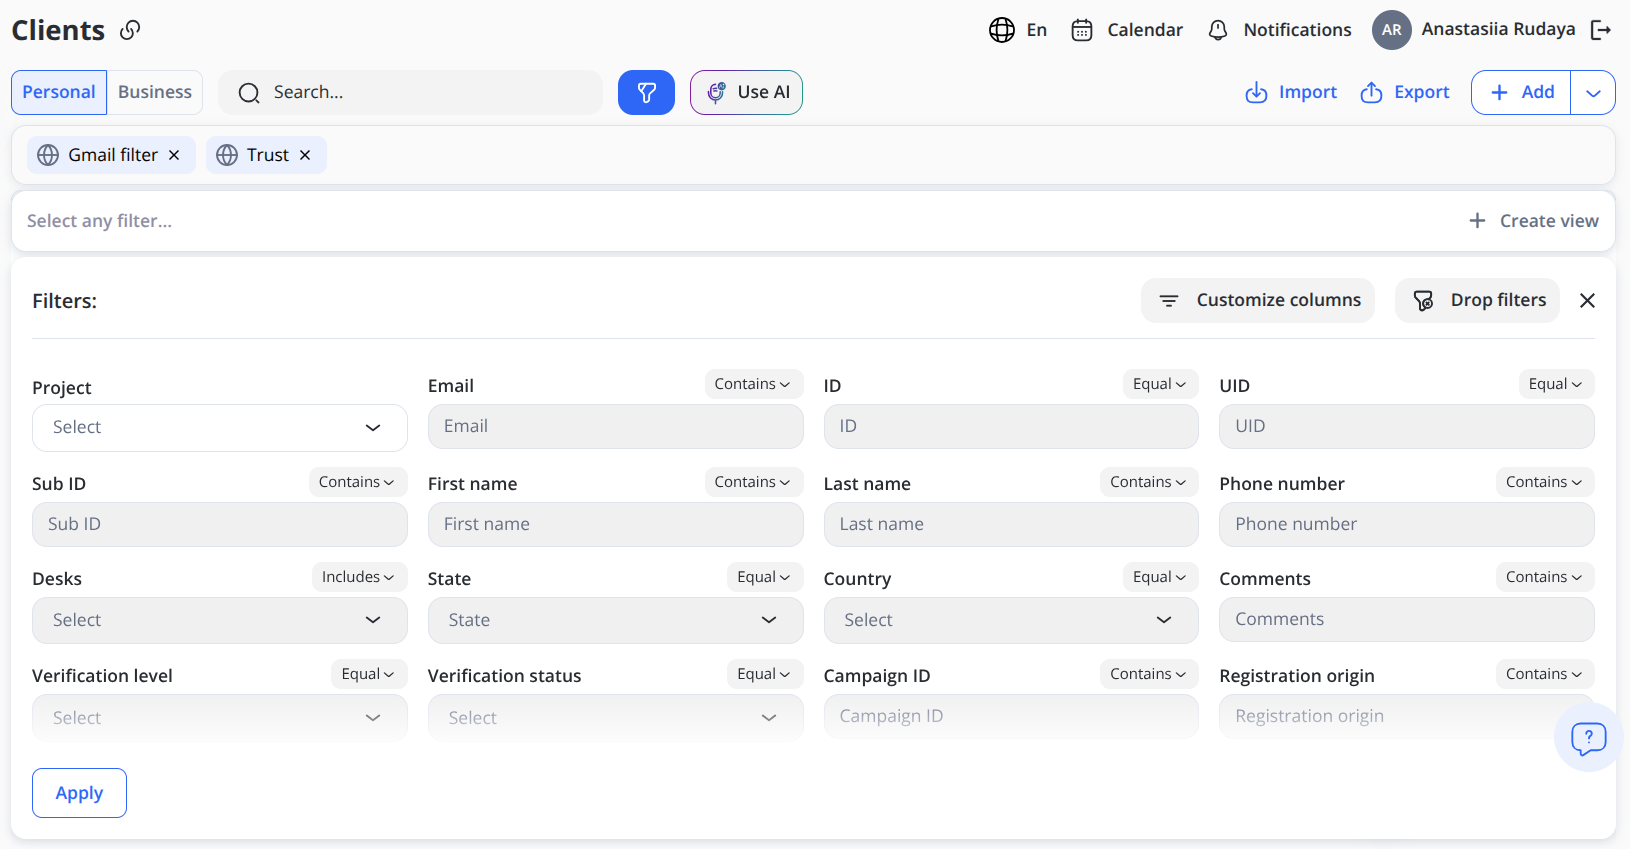
Filtering by Actions Presence
The Clients module also supports filtering based on whether a client has any Actions created in the system.
Has actions – Boolean filter
This filter allows you to segment clients based on the existence of at least one related Action record.
Options:
- Has actions → Shows only clients with one or more Actions
- No actions → Shows only clients with zero Actions
This filter works together with all other structured filters and can be combined with Manager, Status, Country, date ranges, and timeline filters.
How it works
The filter is powered by a persistent system flag stored on the Client record (isActionsExist).
The value updates automatically:
- When the first Action is created for a client → the flag becomes true
- When the last remaining Action is deleted → the flag becomes false
This ensures:
- Instant filtering performance
- No recalculation on each table load
- Accurate and reliable results
Visual Indicator in the Table
The Clients table includes a column:
Actions exist
Displayed as:
✅ – Client has one or more Actions
❌ – Client has no Actions
The column supports sorting and works independently of whether it is visible.
Removing a Single Fast Filter
Active fast filters appear as tags below the main toolbar.
You can remove a single filter in two ways:
-
Click the × icon directly on the filter tag in the toolbar.
-
Open the Other filters popover and click the × icon next to the specific filter.
Removing a filter updates the results immediately without affecting other active filters.
Special Characters in Filters
All text-based filters (First Name, Last Name, Email, Comments, External ID, Phone, etc.) treat special characters as literal values.
Filters using “Contains”, “Starts with”, or “Ends with” do not interpret special characters as pattern operators.Example:
Filtering by First Name → Contains →John?will return records where the first name literally includesJohn?.Fast Filters provide immediate visual feedback: as you select criteria, the list refreshes dynamically, the list refreshes dynamically, ensuring that both personal and business client segments can be reviewed with minimal navigation.
Other Filters Popover
When multiple fast filters are applied, they are grouped inside the Other filters dropdown.
This popover:
-
Displays all active fast filters in one compact view
-
Shows the number of applied filters (e.g., Other filters (3))
-
Allows quick removal of individual filters
-
Keeps the toolbar clean and organized
The Other filters view is now available across all modules that support Fast Filters (Clients, Actions, Transactions, etc.), ensuring consistent filtering behavior throughout the platform.
Putting It All Together
- Enter a search term in the top Search input (optional).
- Set one or more structured filters in the Fast Filters panel (optional).
- Click Apply in the Filters panel.
- You’ll see only the clients that meet all your selected criteria.
- If needed, drop filters to broaden the list again.
This approach lets you combine search and filter parameters for maximum flexibility—whether you need a quick lookup by email or a detailed query spanning dates, desks, managers, or verification statuses.
Filtering by Action Timeline
In addition to registration and login dates, the Clients module supports operational timeline filtering:
- Last action date – shows clients whose most recent completed action falls within the selected date range.
- Future action date – shows clients with scheduled upcoming actions within the selected date range.
Both filters use an inclusive date range picker (From / To) and can be combined with other filters such as Manager, Status, Country, or Verification status.
These filters help business users manage follow-ups, monitor overdue activities, and plan upcoming workload.
7. How to Deactivate a Client
Sometimes you need to remove a client from active workflows—whether they’ve closed their account, gone dormant, or require review—while still retaining their history for auditing and reporting. Deactivating a client keeps their record in the system (visible to authorized employees) but prevents any new assignments to projects, desks, or tasks. You can reactivate them at any time, and every state change is fully tracked in the Logs.
To deactivate a client:
- Open the Clients Module (In the left-hand nav, click Clients to load the client list)
- Find Your Client ( You can scroll, or use the Search… box / Filter drawer to locate them quickly.)
Open the Edit Drawer:
In the client’s row, click the ✏️ Edit icon under the Actions column.
This opens the Edit Client drawer on the right.
Ensure You’re on the “General” Tab: Along the top of the drawer, click General if it isn’t already active.
Locate the “State” Control: In the top-right corner of the General pane, you’ll see a dropdown labeled State.
Open the State Dropdown: Click the current value (e.g. “Active”) to expand the list of options.
Select “Deactivated”: From the dropdown, choose Deactivated.
Active → client can log in / be assigned.
Deactivated → client remains viewable but cannot be assigned to new work.
Suspended → (optional) locks the client out temporarily without full deactivation.
Save Your Changes:Click Save (top-right of the drawer).
A brief spinner may appear, then the drawer refreshes showing State: Deactivated.
Verify Deactivation: Back in the Clients list, the client’s State column will now read “Deactivated.”
They will no longer appear in assignment dropdowns, but their history remains for reporting and audit.
Pro Tip:
You can reactivate at any time by repeating these steps and selecting Active.
Use the Logs tab to see when and who changed the client’s state.
8. How to Import Clients
The Import feature simplifies the process of adding or updating large volumes of client data. By uploading a properly formatted CSV file, users can seamlessly onboard new clients or update existing records. The system supports default values for missing fields and ensures data consistency by validating unique identifiers like email addresses. This functionality is ideal for businesses looking to streamline client onboarding, manage bulk updates efficiently, and maintain up-to-date client records without manual entry.
Use Cases
-
Onboarding New Clients
Import a formatted CSV file to upload multiple client records at once, with default values automatically filling in missing data for streamlined onboarding. -
Bulk Updating Client Data
Import updated client details (e.g., email address changes) by re-uploading an edited CSV file. The system automatically updates existing records based on unique identifiers. -
Partner Data Onboarding
Import CSV files submitted by partners or affiliates, with missing fields auto-filled by default values, ensuring fast and consistent onboarding.
Detailed Steps
After a successful client import, you’ll see a table with the following columns populated for each record*:
|
ID |
First Name |
Last Name |
Gender |
|
Project |
Desk |
Phone Number |
Processed |
Created |
Status |
Type |
|---|---|---|---|---|---|---|---|---|---|---|---|
|
68BAD8C0406F594EAC3FC6FD |
Jacob |
Foster |
Male |
66524609caa3558DD8F8DA65 |
67A346AD8092C651C919337E |
+1-310-688-0141 |
True |
2025-09-05T12:34:08Z |
Active |
Personal |
|
|
68C2C3F47E938586807425D0 |
Amelia |
Reed |
Female |
66524609caa3558DD8F8DA65 |
67A346AD8092C651C919337E |
+1-415-920-3355 |
True |
2025-09-11T12:43:32Z |
Active |
Personal |
|
|
68BE9D8095201E97FDDB1DEF |
Lucas |
Wong |
Male |
66524609caa3558DD8F8DA65 |
67A346AD8092C651C919337E |
+44-20-7019-5580 |
True |
2025-09-08T09:10:24Z |
Active |
Personal |
* Other available (not shown) columns in the dataset:processedDate, billing.city, billing.postcode, Billing address, Date Of Birth, Verification level, Comments, State, First transaction date, Meta, Company fee group, allowToCreateAsset, Last login date, lifestyle.smoking, lifestyle.drinking, lifestyle.hasChildren, lifestyle.wantsChildren, lifestyle.lookingFor, lifestyle.relationshipStatus, lifestyle.interests.0–3, height, educationLevel, religion, Last password change date, Created at, Updated at, UID, External ID, Additional phone, AffiliateID, billing.region, Passport, agreements.*, bio, Registration IP, tradingGroups.0, Registration origin.
File Format: CSV Only – Ensure the file is saved in CSV format before uploading.
Column Descriptions:
The import file supports multiple value formats for selected fields, making it easier to prepare files without searching for internal IDs.
- ID (Required): A unique identifier for each client (system-generated – do not modify).
- firstName (Required): Client's first name.
- lastName (Optional): Client's last name.
- email (Required): Client's email address (must be unique).
- state (Optional): Indicates whether the client is active.
- type (Optional): The type of client account.
- created (Optional): The date and time when the client account was created.
- billing.country (Optional): The client’s country used for billing address details. Supported values: full country name, ISO2 code, or ISO3 code.
- project (Optional): The project associated with the client. Supported values: project _id, name, or key.
- desk (Optional): The desk assigned to the client. Supported values: desk _id, name, or label.
- manager (Optional): An assigned manager to the client. Supported values: _id, name, or email.
- status (Optional): Current client status. Supported values: status label or supported field format.
Note: Only firstName and email are mandatory; all other fields will be assigned default values if not provided.
1. Click “Import”:
Navigate to Clients in the left-hand menu.
In the top-right of the Clients list, click the Import button.
2. Review the Import Requirements:
A modal titled “Wants to import clients?” will overlay the screen.
File format must be CSV only—no Excel, Word, or plain-text files.
User limit: up to 5 000 records per file; larger files are rejected.
Security restrictions: the CSV must contain no macros, scripts, or executables.
Formatting requirements: columns must match the system’s schema (see the file format documentation link in the modal).
Scroll within the modal to read every bullet point and confirm your file complies.
3. Attach Your CSV File:
Click the Attach file button at the bottom of the modal.
In your file picker, locate and select the prepared CSV.
The modal will display your file name once attached—double-check it’s the correct file.
Hit Upload to begin processing.
4. Wait for the Import to Complete:
After confirming, the system will show a brief “Processing…” status.
Do not refresh or close the browser; you can navigate elsewhere in the app while it runs.
Larger files (thousands of rows) may take a minute or two—be patient.
5. Check the Notification:
Once complete, open the Notifications bell icon in the header.
Look for messages like “Client(s) imported successfully — 828 clients were imported”.
If errors occurred, you’ll receive an “Import failed” alert with a link to download error details—fix your CSV and retry.
The notification confirms that your clients have been imported successfully.
Troubleshooting & Best Practices
- Row-level errors: Download the error report (if offered) to see which lines failed.
- Incremental updates: To update existing clients, include their
IDoremail. Fields you omit will remain unchanged. - Split large imports: If you exceed 5 000 rows, break into multiple files by alphabetical or date chunks.
- Validate locally: Run a quick script or spreadsheet validation on your CSV to catch formatting issues before upload.
The Import tool empowers you to manage client records at scale—with minimal clicks and zero manual typing. Once your CSV is validated, you’ll have new or updated client profiles in seconds, freeing your team to focus on high-value work (onboarding calls, KYC checks, relationship building). If you need further details on field mappings or sample templates, see the file format documentation linked in the import modal.
9. How to Export Clients
The Export feature offers a simple and efficient way to manage and retrieve large volumes of client data. With just a few clicks, you can export client records in a CSV format for offline analysis, reporting, backups, or seamless data migration. The export functionality is designed to support both complete data exports and customized exports by applying filters based on your business needs. This flexibility ensures that you can access the exact data you need for various operational purposes—whether it's regular backups, analyzing client trends, or preparing data for integration with other systems.
Use Cases
-
Regular Data Backup
Export all client records in CSV format regularly for secure offline storage, ensuring compliance and quick recovery in case of system issues. -
Custom Data Analysis
Export filtered data (e.g., by date range, verification status) for offline analysis and tailored reporting. -
Data Migration to Other Systems
Export client records for seamless migration or integration with other platforms, preserving client information structure.
1. Filter (Optional)
If you wish to export only a subset of clients, first use the Filter button at the top.
-
If you only need a specific segment of your clients—such as those created in the last month or those with “Pending” verification—click Filter at the top of the Clients page.
-
In the Filters panel, set your criteria (e.g. date range, State, Manager, Verification status) then click Save.
-
The main client list will refresh to show only matching records.
2. Click “Export”
With your filtered list displayed (or with no filters if you want every client), click the Export button in the top-right corner.
The button is located immediately to the left of the Add dropdown and updates based on your current filter context.
3. Download the CSV
Once you click Export, the system begins packaging the CSV. For very large datasets (thousands of rows), this may take a few seconds.
You can continue working in the app; the export runs in the background.
Note: A CSV file (containing whichever records match your filters) will download to your computer.
4. Download & Verify
Shortly thereafter, a download will be triggered automatically. Depending on your browser, it may appear in your downloads bar or folder as clients_export_<timestamp>.csv.
Open the CSV in your preferred spreadsheet tool (Excel, Google Sheets, etc.) to confirm that:
- The number of rows matches the count shown on-screen (check the “Total:” indicator at top-left).
- All required fields (Email, ID, First Name, etc.) are present and correctly populated.
5. Handle Multiple Pages (if needed)
If your Clients list spans multiple pages and you did not filter first, the export will include all records across pages automatically—so there’s no need to navigate page by page.
However, if you used page-level selections (checkboxes) instead of filters, be sure to use filters or confirm that “Select All” applies to every page before exporting.
Tips & Best Practices
-
Consistent Naming: Prepend your export files with a date (e.g.,
clients_2025-05-07.csv) for clear versioning. -
Field Selection: If you only need certain columns, consider requesting a custom export template from your admin settings (if available) or post-process the CSV in Excel to remove extraneous fields.
-
Security: Treat exported CSVs as sensitive data. Store them in secure, access-controlled locations and purge outdated backups per your data retention policy.
-
Automation: For recurring exports, explore scheduled reporting tools or APIs (if supported) to automate this process and avoid manual steps.
By following these detailed steps, you can confidently export any slice of your client data—full or filtered—ensuring you always have the right information on hand for your operational, analytical, or compliance needs.
10. How to Customize Columns
The Columns customization allows you to customize the order and visibility of columns. This helps you focus on specific data fields (e.g., ID, Country, Type) that are most relevant to you.
Why Customize Columns?
-
Focus on Essentials
Hide fields you rarely use (e.g. “External ID” or “Registration IP”) so your eye lands on high-priority data like Email, Phone number, or Verification status. -
Boost Readability
Reducing visual noise speeds up scanning and reduces mistakes when you’re sorting or reviewing long lists. -
Tailor Your Workflow
Move “Desk” next to “Manager,” or “State” right after “Type”—whatever sequence best matches your daily tasks.
Use Cases
Action-Based Date Columns
The Clients table includes action-driven date columns that help managers track recent activity and upcoming follow-ups directly from the client list.
Last action date:
Displays the date and time of the most recent completed Action associated with the client.
Only Actions marked as Completed are considered.
If a client has no completed Actions, the column remains empty.
Future action date:
Displays the date and time of the nearest Action that is not completed.
The date is shown even if it is already in the past, as long as the Action remains in Not completed status.
This allows managers to quickly identify overdue follow-ups directly from the Clients table.
Both columns:
Are independent from the “Actions exist” indicator column, which only reflects the presence of at least one Action
Can be shown or hidden via column customization
Support sorting
Are calculated automatically based on the client’s Actions
Duplicate Detection Date Column
In addition to action-driven dates, the Clients table also supports visibility of duplicate detection activity.
Last duplicate date:
Displays the date and time when the client was most recently detected as a duplicate during registration or system validation.
If the client has never been flagged as a duplicate, the column remains empty.
Behavior:
The value updates automatically each time a duplicate detection event occurs for the client.
Non-duplicate registrations do not modify this field.
This column:
Can be shown or hidden via column customization
Supports sorting (ascending / descending)
Uses the same date-time format as other CRM date columns
Is available in Customize columns
This allows managers to quickly identify recently flagged duplicates and monitor data quality trends directly from the Clients table.
Actions Exist Indicator Column
The Clients table includes a boolean activity indicator column:
Actions exist
This column shows whether the client has at least one Action created in the system.
Display:
✅ – Client has one or more Actions
❌ – Client has no Actions
Behavior:
The value updates automatically:
- When the first Action is created → indicator becomes ✅
- When the last remaining Action is deleted → indicator becomes ❌
The value is stored persistently on the Client record and does not require recalculation on each table load.
This column:
- Can be shown or hidden via column customization
- Supports sorting (clients with actions first or last)
- Works independently of visibility — filtering by “Has actions” remains functional even if the column is hidden
This allows managers to instantly distinguish active clients from those with no recorded operational activity.
How It Works
1. Access the Columns Panel:
Click Columns in the top toolbar of the Clients page.
A slide-out panel titled Customize columns appears on the right.
2. Show/Hide Columns Using Toggles:
Each available column is listed with an On/Off toggle.
On (green) = column will display in the table.
Off (grey) = column is hidden.
Tip: Required/system fields (like Email or ID) may be non-toggleable or locked in the list.
3. Reorder Columns:
Look for the “drag” handle (⋮⋮) on the left of each toggle row.
Click-and-hold that handle to drag the field up or down in the list—this sets its left-to-right position in your table.
Note: You can often click and drag this handle to rearrange the order in which columns appear in the Clients table.
4. Save Your Changes:
After adjusting the toggles (and reordering if needed), remember that some columns are unable to move because of their fixed position in the table (these columns are marked accordingly).
Note: Once you’ve made your changes, click the Save button at the bottom of the panel. This ensures your customized layout is applied.
5. Instant Table Update: The panel slides away and your Clients table immediately refreshes to match your selections.
Pro Tips
-
Personal vs. Global Views
If your workspace supports it, save your column layout as a personal default without affecting colleagues’ views. -
Revert to Defaults
If you ever need to reset, simply open Columns again and click Reset (if available) or turn all toggles back on then rearrange. -
Combine with Filters
For maximum efficiency, first apply a filter (e.g. show only “Pending” clients), then customize columns to focus on the data fields most relevant to that subset.
Customizing your columns transforms the Clients table from a static report into a dynamic dashboard tailored to your role. By hiding distractions, promoting key fields, and arranging columns in your ideal sequence, you’ll navigate your client data faster, make fewer errors, and stay focused on what matters most. Experiment with different layouts and use cases—you’ll likely find that a small tweak in column settings leads to big gains in productivity.
11. Managing Favourite Clients
Managing Favourite Clients lets you quickly bookmark important clients. Once added, those clients appear in a separate, moveable panel for instant access—even after you log back in. This is especially useful for managers or teams who frequently interact with certain clients and don’t want to lose track of them.
Use Cases
- Quick Access to Key Clients
Bookmark high-priority clients for instant access via a moveable panel. Favorites stay saved across sessions for seamless follow-ups. - Managing Active Projects
Track ongoing projects by marking relevant clients as favorites. Reposition the panel for easy project monitoring. - Prioritizing Client Follow-Ups
Keep urgent cases visible for quick support resolution. Remove clients from favorites after resolving issues. - Campaign Client Grouping
Temporarily group clients for marketing campaigns.
Warning: Close All will permanently delete favourites—save details first.
How It Works
1. Mark Clients as Favourites:
Locate the bookmark icon in the first (leftmost) column of any client row.
Click the icon to toggle it on—turning it blue/filled indicates that client is now a favourite.
You can favourite as many clients as needed; each click adds another to your list.
Tip: You can also keyboard-navigate to focus on the bookmark icon and hit Enter to toggle.
2. Open the Favourites Panel:
As soon as you mark two or more clients, a compact Favourites panel slides into view. It hovers over the table and shows:
-
Header with a “Favourites:” label
-
Count bubble indicating how many clients are bookmarked
-
List area with each favourite’s name, email (grayed if truncated), and status badge
This panel displays a list (or tiles) of your favorite clients, including status (e.g., Active, Defaults) and essential details like email addresses.
3. Interact with Favourites
Switch between List and Grid Views:
At the top of the panel, three icons let you toggle layouts:
☰ List View: Vertical list with compact rows
⧉ Grid View: Horizontal cards for visual scanning
⎘ Focus View: Enlarged single-card focus
Click an icon to instantly switch.
View Full Client Details:
Click a client’s name in the panel to open their Client Drawer on the right side of the screen.
The drawer shows all profile fields, actions, documents, and logs—no need to hunt back in the main table.
Remove an Individual Favourite:
Hover over a favourite in the panel: an “X” remove icon appears.
Click X to un-favourite that client; the panel and count update immediately.
Reposition Panel: Drag the panel anywhere on your screen to keep it accessible and out of the way. Use the grid icon or layout switchers (seen at the top of the panel) to change how favorites are displayed.
4. Click “X” to Clear All Favourites:
Click the panel’s top-right “X” (close button)—this does not remove a single favourite but triggers a Clear All prompt.
In the confirmation dialog, click Close All to un-favourite every client.
Warning: Ensure you have saved any important client details elsewhere before proceeding.
5. Login Persistence:
Your favourite selections are saved to your user profile:
Session-independent: Log out or close your browser; favourites reappear when you next log in.
Cross-device: Sign in on another machine, and your Favourites panel will sync up.
Conclusion
Harnessing Favourites transforms your Clients page into a personalized dashboard:
- Speed: One-click access to VIPs and urgent cases
- Clarity: Separate, moveable panel keeps your focus
- Flexibility: List/grid layouts and persistence across sessions
Bookmark once—benefit every day. Your most important clients are now always just a click away.
12. Clients Duplicates
The Duplicates action identifies cases where a client registers more than once, typically using the same email or other key data. This can happen if a client forgets they already have an account or signs up again via different marketing campaigns.
Use Cases
-
Tracking Re-Registrations
View duplicate entries to understand why a client signed up multiple times, whether due to forgotten credentials or different marketing campaigns. -
Maintaining Complete Client Records
Ensure all client sign-ups are accurately tracked and linked to a primary record, preserving a full registration history. -
Identifying Duplicate Accounts
Only clients with multiple registrations will appear in the Duplicates section, allowing for efficient detection and resolution.
How It Works
1. Automatic Detection
As soon as a new registration matches an existing email (or another unique identifier), the system flags it as a duplicate behind the scenes—no manual setup required.
2. Duplicates Icon
In the main Clients table, any row with flagged duplicates displays the Duplicates icon in the Actions column:
Note: Clicking this icon opens a page showing all known duplicate accounts associated with that primary record.
3. Details
Clicking the icon takes you to a dedicated Duplicates screen for that primary client. Here you’ll see all associated accounts lined up side by side, with:
| Callout | Field | Description |
|---|---|---|
| 1 | The duplicated email address. | |
| 2 | Description | Key metadata (e.g., affiliateID, deskLabel, projectKey) to distinguish each record. |
| 3 | Created | Timestamp of when each duplicate account was first created. |
Next Steps: Resolving Duplicates
- Audit Each Record: Click into individual client profiles to compare personal details, activity logs, and transaction history.
- Merge or Deactivate:
Merge: Consolidate contacts, balances, and documents into the primary profile.
Deactivate: If merging isn’t appropriate, deactivate the extra accounts to prevent confusion. - Monitor Over Time: Periodically revisit the Duplicates view to catch new re-registrations and ensure ongoing data hygiene.
Conclusion
By leveraging the Duplicates feature, you can:
-
Keep your client database clean and reliable
-
Preserve a comprehensive history of every registration
-
Prevent fragmented support or billing records
Regular use of this tool ensures that every client interaction is tied back to a single canonical profile—boosting data accuracy and operational efficiency.
13. How to Send Messages to Clients
«Send a message» allows you to send a private message from the system directly to a client. The client receives a notification (e.g., via their online cabinet or any integrated notifications system), letting them know you’ve sent them a message.
Messages and notifications can be integrated into the client’s environment via API, so clients see your messages in their portal or other integrated system.
Why Use “Send a Message”?
Key Use Cases
Prerequisites:
User Permissions: Ensure your role includes the Send a private message permission.
API Integration (Optional): For client-portal notifications, configure the “outgoing message” endpoint in your integration settings.
How It Works
1. Locate the Client:
Navigate to the Clients page in the CRM sidebar.
Scroll or use the search bar to find the client you wish to message.
In that client’s row, hover toward the far-right Actions column until you see the three-dot icon.
Click the three-dot icon to open the actions menu, then choose Send a message.
2. Compose Your Message:
A slide-out panel or modal appears on the right side of the screen.
Click inside the text field at the top of this panel (it may display a placeholder like “Type your message…”).
Enter your message—this can be free-form text, variables (e.g. {{firstName}}), or templates if configured.
3. Send and Notify:
Once your message is ready, click the green Send button at the bottom of the panel.
You’ll see a brief loading indicator, then a success toast confirming delivery.
Behind the scenes:
- The message is sent via your CRM’s messaging API.
- If your system is integrated, the client receives an in-portal notification (or email/mobile push) notifying them of your message.
- All messages are logged in the client’s activity history, attributed to your user account for auditing.
Note: The client is notified (only if this is integrated via API with your business) that a manager or staff member has sent them a message.
The message is attributed to the currently logged‐in user.
4. Verify Delivery & History:
After sending, you can re-open the panel any time to review sent messages in that session.
For a full conversation history, open the client’s Details or Activity Log drawer—your message will appear there with timestamp and sender metadata.
5. Permissions & Error Handling:
The Send a private message action only appears for users granted the appropriate permission. If you don’t see it, request access from your CRM administrator.
If sending fails (e.g., API error or network issue), an error toast will appear. You can retry by clicking Send again once the issue is resolved.
Tip: Keep messages concise and track all important communications in the client’s activity log for full transparency and a complete audit trail.
Best Practices
The Send a Message action streamlines secure, auditable, and integrated client communication—all from within the CRM. By leveraging API integration, it delivers your messages straight into the client’s environment, ensuring high visibility and engagement without switching contexts or tools. Use it to accelerate support, compliance workflows, and proactive outreach, while maintaining full control over permissions and logging.
14. AI Voice Filters
The Clients module includes an AI-powered voice assistant that allows you to filter and search client data using natural language voice commands. This feature provides a faster, hands-free way to explore and narrow down client lists without manually configuring filters.
What the AI voice assistant does
- The AI voice assistant interprets spoken requests and automatically applies the corresponding filters to the Clients list.
- Enables natural language filtering
- Works in real time on the Clients list
- Applies only read-only actions (no data changes)
- The assistant interacts exclusively with existing client data and does not create, edit, or delete records.
How to access the AI voice assistant
You can open the AI voice assistant in two ways:
Option 1: From the Clients toolbar
-
Open the Clients module.
-
Click Use AI in the top toolbar.
-
The AI assistant panel opens on the right side of the screen.
-
Click Start recording and speak your request.
Option 2: From the Help panel
-
Click Need help? in the bottom-right corner of the screen.
-
In the Get help with system panel, switch to AI agent (voice filters).
-
Click Start recording to begin using voice commands.
Both entry points provide the same voice filtering functionality.
Example voice commands
You can use natural phrases such as:
“Show active users”
“Emails ending in gmail.com”
“Clients from Germany”
“Unverified clients”
“Clients managed by John”
The system automatically converts your request into filters and applies them to the Clients list.
Scope and permissions
The AI voice assistant respects all existing access permissions.
You will only see clients from Projects and Desks you are assigned to.
Filters are applied within the same visibility rules as manual filtering.
Limitations
The AI assistant can only filter and search data.
It cannot:
Modify client records
Create new clients
Delete or deactivate clients
Voice filtering complements, but does not replace, standard manual filters.
When to use AI voice filters
Quickly narrowing large client lists
Hands-free searching during reviews or audits
Faster exploration without configuring multiple filters
This feature enhances usability while maintaining full data security and access control.
Actions
1. Actions: Overview
The Actions module in Wifox Business Core Solution centralizes all client‐facing activities—such as calls, emails, meetings, tasks, and custom events—so your team can plan, execute, and track every interaction in one place. Each Action record captures its type, subtype (if configured), assigned user, due dates, status, and results. By leveraging Actions, you ensure:
-
Consistency: Standardized fields and color‐coded labels for quick visual identification.
-
Accountability: Clear ownership and SLA tracking for each activity.
-
Visibility: Real‐time dashboards and filters let you spot overdue follow-ups or high-priority tasks.
-
Automation: Triggers and reminders can be set up based on action types and subtypes.
-
Reporting: Aggregate metrics on activity volume, response times, and outcomes.
2. Actions: Use Cases
Use Case #1: “Call” Logging and Outcomes Tracking
When a sales rep completes a prospecting call, they log a Call action with subtype “Cold Call” or “Follow-up.” They record the outcome (e.g., “Left voicemail,” “Spoke with decision-maker”), assign the next action automatically based on the result, and set due dates—ensuring no opportunity slips through the cracks.
Use Case #2: “Meeting” Scheduling and Attendance
An account manager needs to organize a quarterly business review. They create a Meeting action, pick date/time, attach the calendar invite, assign it to themselves or a team, and track RSVP status. Reminders fire before the meeting, and post-meeting notes are captured directly in the action record.
Use Case #3: “Task” Management for Support Tickets
A support engineer is assigned a critical bug report. They create a Task action with subtype “Bug Investigation,” set an SLA date, and update status from Open → In Progress → Resolved as they work. All steps are timestamped and visible to stakeholders, improving transparency and accountability.
Use Case #4: Automated “Email” Follow-ups
After a webinar, marketing seeds a Email action subtype “Webinar Follow-up” for each attendee one week later. Automation rules generate these actions en masse, and the team monitors open rates and click-throughs directly from the action dashboard—driving timely, personalized outreach.
Use Case #5: Cross-Team Reporting on Actions
The sales director needs a weekly summary of all client interactions. They filter Actions by type, subtype, owner, and date range—exporting counts of completed vs. overdue tasks. This report highlights high-performing reps, reveals process bottlenecks, and informs coaching priorities.
3. Clients Actions Module
The Clients Actions module provides a centralized, read-only view of every action (notes, calls, comments, etc.) logged against your clients—across all projects and desks. It reuses the same columns, sorts, filters, and row-actions you already know from the Clients tab, but consolidates all client actions in one place.
1. Accessing the Clients Actions Module
2. Module Layout
2.1 Header Controls
| Control | Description |
|---|---|
| Filter | Opens the right-side drawer to apply granular filters on any column. |
| Search | Free-text search box that filters rows by matching Creator, Client, or Text fields. |
| + Add | (Optional) Opens the “Add Action” form—create a new note/call/comment record for a client. |
2.2 Actions Table
The table columns mirror those in the Client Details tab:
| Column | What It Shows |
|---|---|
| Action date | When the action actually took place (if set). |
| UID | System-generated unique ID (auto-increment). |
| Type | Category of action (Note, Call, Comment). Click to open its detail panel. |
| Subtype | Secondary classification (if configured under Settings → Configurations → Actions). |
| Client | Client name (link to their profile). |
| Project | Project or desk context for this action. |
| Creator | User who logged the action. |
| Created | Timestamp when this record was first saved. |
| Updated at | Timestamp of the most recent edit. |
| Text | Brief description or note content. |
| Actions | ✏️ Edit — open the record for modification |
3. Sorting:
How: Click on a column header (e.g. UID, Created, Type).
Why: Quickly jump to newest/oldest actions or group by Type/Client.
4. Searching:
Scope: Matches Creator, Client name, and Text.
Behavior: As you type, the table filters in real time—no need to hit Enter.
5. Filtering:
Open Filters: Click the Filter button to slide in the filter drawer.
Available Filters:
Created date: “From → To” picker
Creator: dropdown of system users
Type: select one or more action types
Subtype: select one or more configured sub-categories
Client: pick specific clients
Project: filter by project/desk
Action date: when the event actually occurred
Apply or Clear:
Save applies all chosen criteria and closes the drawer.
Remove individual filters by clicking the “×” on their badges above the table, or reopen the drawer to clear all.
6. Row Actions:
Edit (✏️): Opens the familiar “Edit Action” form where you can adjust Client, Type, Subtype, Text, Action Date, and Responsible.
Delete (🗑️): Prompts “Are you sure? Cancel | Delete” to guard against accidental removals.
Open Client in a New Tab
You can open a client profile without losing your position in the Actions list:
-
Hold Ctrl (Windows/Linux) or Cmd (macOS)
-
Click the Client name in the table
The client profile will open in a new browser tab.
This allows you to:
-
Review client details
-
Edit client information
-
Return to your filtered Actions list instantly
Return to the Actions List
When opening an action or navigating into a client profile, use the Back to Actions button to return directly to the previously filtered list.
Your:
-
Filters
-
Sorting
-
Page number
remain preserved for seamless workflow continuity.
8. Next Steps:
Review or Update Subtypes: If you need more granular action categories, go to Settings → Configurations → Actions, switch to the Subtypes tab, and add/edit your Subtype definitions (Type, Name, Color).
Log New Actions: Use + Add to record client engagements as they happen—then come back to this module for a full audit trail.
Combine Search + Filters + Sort: For powerful cross-project analysis—e.g., find all “Call” actions for “Acme Corp” in the last 30 days, sorted by Action date.
With the Clients Actions module in place, you gain full visibility and control over every touchpoint with your clients—centralized, sortable, searchable, and filterable exactly like your Clients list.
4. How to Create an Action
The Actions module is where you log every client interaction—notes, calls, comments, etc.—across all your projects. This guide walks you through each click, field, and next step, so even brand-new users can follow along confidently.
1. Open the Actions Module
2. Understand the Actions Table
At the top you’ll see controls:
Filter (funnel icon)
Search… (text box)
Below is the table header row:
| Column | What It Shows |
|---|---|
| Action date | When the action occurred (sortable) |
| UID | Unique, auto-incremented ID (ca000001) |
| Type | Category (Note, Call, Comment) |
| Subtype | Secondary category (if enabled) |
| Client | Which client this action is for |
| Project | Which project the client belongs to |
| Creator | Who logged the action |
| Responsible | Who will follow up |
| Created at | When the record was created |
| Updated at | Last edited timestamp |
| Text | The body of your note/comment |
| Actions | Edit ✎ or Delete 🗑️ controls |
Tip: Click any column header (e.g. UID or Created at) to sort ascending/descending.
3. Add a New Action
3.1. Open the Add Form:
Click the + Add button in the top-right corner.
A panel slides in from the right titled Add action.
3.2. Fill in the Fields
| Field | Where to Look | What to Enter |
|---|---|---|
| Client | Top of form, first dropdown | Start typing client name; select from the autocomplete list. |
| Type | Directly under Client | Choose Note, Call, or Comment. |
| Subtype | Under Type (if your Type has subtypes) | Choose the relevant subtype (e.g., “Follow-up” under Call). |
| Text | Large multiline box | Enter your note, call summary, or comment details. |
| Responsible | Below Text | Begin typing an employee’s name; select from the list. |
| Action date | Above the footer buttons | Pick the date/time the interaction actually happened, or leave blank for “no date.” |
| Project | (If shown) Under Responsible | Pick the project if you have multiple projects active. |
Note:
UID is generated automatically when you click Save.
If Subtype doesn’t appear, your admin must configure Subtypes under Configurations → Actions → Subtypes.
3.3. Save Your Action:
Click the Save button at the bottom.
The panel closes and you’re returned to the table.
Your new action appears at the top (sorted by Created at).
4. Verify & Manage Your New Action
Locate it by its UID or the client’s name via the Search… box.
Filter by Type, Subtype, Responsible, or date using the Filter drawer:
- Click the funnel icon.
- Tick the fields you want to filter (e.g. “Type = Call” and “Responsible = Alice”).
- Click Apply.
Edit: Hover over the row, click the ✎ icon in the Actions column to update any details.
Delete: Click the 🗑️ icon to remove an action (you’ll see a confirmation prompt).
5. Troubleshooting Tips
“Invalid Date”? Make sure you pick a valid Action date or leave it blank—don’t enter text.
No Subtype list? Ask your admin to add Subtypes under Configurations → Actions.
Responsible field empty? Ensure you have at least one Employee created under Employees.
Congratulations! You’ve successfully logged an action. Repeat these steps for each client interaction to build a complete, searchable history of all your work.
5. How to Edit an Action
Updating an existing Action lets you correct typos, reassign responsibility, or add missing details. These steps guide you from locating the record through saving your changes.
1. Open the Actions Module:
Click Actions in the left-hand menu.
The main Actions table will appear.
2. Locate the Action You Want to Edit:
Search by client name, UID, or text in the Search… box.
Or use Filter (funnel icon) to narrow by Type, Creator, Responsible, dates, etc.
3. Click the Edit Icon: In the row for your Action, hover at the far right under Actions and click the ✎ pencil icon.
Optional: Open Edit Action in a New Browser Tab
To work with multiple Actions in parallel or avoid losing your place in the list, you can open the Edit action panel in a separate browser tab.
Hold Cmd (macOS) or Ctrl (Windows/Linux) and click the ✎ Edit icon.
The Action edit panel will open in a new tab, allowing faster navigation between Actions.
4. Review & Modify Fields in the Edit action Panel
A side panel titled Edit action slides in. Fields you can update include:
| Field | Can You Edit? | Notes |
|---|---|---|
| Client | No | Read-only—actions stay tied to their original client. |
| Type | No | Fixed once created (Note, Call, Comment). |
| Subtype | Yes | If your Type supports Subtypes, pick one here. |
| Text | Yes | Update the content of your note/comment/call log. |
| Responsible | Yes | Change who’s assigned to follow up on this Action. |
| Action date | Yes | Correct the date/time this interaction occurred. |
Tip: The Created at timestamp is read-only and shows when the action was first logged.
5. Required Comment on Closing an Action
When marking an Action as Completed, providing a closing comment may be mandatory depending on system configuration.
If the Completed checkbox is enabled and the system requires a closing comment:
- The Comment on closing field becomes required.
- The field is highlighted in red if left empty.
- The system will block saving until a comment is entered.
This ensures accountability and proper documentation of why the action was closed.
How It Works
-
In the Edit action panel, check the Completed box.
-
The Comment on closing field appears (or becomes active).
-
Enter a summary of the result, outcome, or resolution.
-
Click Save.
If the field is empty and required:
- A validation message appears.
- The Action cannot be saved.
Why This Is Important
Requiring a closing comment helps:
- Maintain audit transparency
- Document client interaction outcomes
- Ensure proper handover between managers
- Prevent silent closure of tasks
This creates a reliable activity history within the CRM.
6. Save Your Changes:
Click Save at the bottom of the panel.
The panel closes, and the table reloads with your edits.
Check the Updated at column to confirm your changes were recorded.
7. Confirm & Audit:
You can re-open the Edit panel at any time to verify.
All edits are tracked in Updated at for auditing.
6. How to Delete an Action
Deleting an Action permanently removes it from the system. Only do this if the entry was created in error or is no longer needed for record-keeping.
1. Open the Actions Module: Click Actions in the left-hand menu to display your table.
2. Find the Action to Remove: Use Search… or Filter to pinpoint the exact row by UID, client, or text.
3. Click the Delete (🗑️) Icon: In the row’s Actions column, click the trash-can icon.
4. Confirm Deletion:
A small confirmation tooltip appears:Are you sure? Cancel DeleteClick Delete to proceed or Cancel to abort.
Warning: This action cannot be undone. Deleted actions are permanently removed from every report and audit log.
5. Verify Removal:
The row immediately disappears from the table.
Total count (if shown) and any pagination adjust to reflect the deletion.
Best Practices & Notes
- Archival over Deletion: If you need to keep audit trails, consider editing an action’s text to mark it “invalid” rather than deleting.
- Permissions: Only users with delete rights on Actions (configured under Roles & Permissions) can see the trash icon.
- Error Handling: If deletion fails (e.g. due to a backend constraint), you’ll see an error message—contact your system administrator.
7. How to Filter the Actions Table
When your Actions table grows large, the Fast Filters panel allows you to narrow down results instantly by any combination of fields. Filters are available directly above the table.
1. Open the Fast Filters panel:
In the Actions module, click the Filter button (funnel icon) at the top left of the table.
2. Understand the Available Filter Fields
Note: Subtype availability depends on your system configuration. Subtypes are grouped under their corresponding Type in the selector.
3. Apply Your Filters:
The panel includes the following elements:
Created date – a date-range selector that filters actions by their creation timestamp.
Action Date – a second date-range selector used for the scheduled or performed date of an action.
Creator – filters actions by the user who created them.
Responsible – displays only the actions assigned to selected team members for follow-up.
Types – filters by the action’s main category (for example, Note, Call, Comment, Meeting, etc.).
Subtypes – appears automatically once one or more Types are selected. Subtypes are grouped under their parent Type, allowing you to clearly see which subtypes belong to which action category. Multiple subtypes across different types can be selected.
Clients – restricts the view to actions linked to specific clients.
Apply – applies the selected filters and refreshes the table view.
Drop filters – clears all active filters at once.
Create view – saves your current filter combination for repeated use.
How to use Fast Filters:
-
Use the Search box for quick lookups by keyword, client name, or action ID.
-
To filter by dates:
Use Created date to show actions logged within a specific time range.Use Action Date to display actions that were scheduled or performed during a chosen period.
-
Choose a Type (for example, Note, Call, or Comment). Once selected, the Subtypes selector becomes active.
Subtypes are displayed grouped under each selected Type.
You may select multiple subtypes across different Types. -
Narrow results further by selecting Creator, Responsible, or Client.
-
Click Apply to refresh the table and show only actions matching your filters.
-
To clear all filters, click Drop filters on the right.
-
To reuse a specific filter setup later, click Create view and save your configuration.
Using Dynamic “Now” Presets
The date range picker supports dynamic time-based presets:
- Up to now → Filters from selected start date until the current moment
- From now on → Filters from the current moment forward
Important behavior:
“Now” is dynamic, not static.
The filter does not store a fixed timestamp.
Each time the filter runs, “now” resolves to the current system time.
Filters using “now” remain accurate after page reload or relogin.
aved views preserve the dynamic behavior.
Example use cases:
View all overdue actions (Action date → Up to now)
View all future scheduled calls (Action date → From now on)
Type → Subtype Grouping Behavior
The Subtypes selector dynamically reflects the selected Types.
Behavior rules:
-
If no Type is selected → Subtypes selector is disabled.
-
If one Type is selected → Only that Type’s subtypes are displayed.
-
If multiple Types are selected → Subtypes are grouped under each corresponding Type.
-
If a Type is unselected → Any previously selected subtypes belonging to that Type are automatically removed.
-
Selected subtypes display with their Type context (as defined in the UI design).
This grouping improves clarity and prevents ambiguity when filtering across multiple action categories.
Combine Multiple Criteria:
For example, to view all “Note” actions for Client X created last month by Alice, you would set:
-
Created date: March 1 – March 31
-
Type: Note
-
Subtype: Select the relevant subtype(s) under the chosen Type grouping (for example, Note → Internal).
-
Client: Client X
-
Creator: Alice
Click Apply to confirm and refresh the results.
The list will instantly update to show only records that meet all selected filters.
4. Clear or Adjust Filters:
Modify any field: Update any parameter (e.g., change date range or responsible user) and click Apply to refresh results.
Remove a single filter: Clear a selected value (click the “×” next to it) and click Apply.
Reset all filters: Click Drop filters on the right to clear all criteria and return to the full list of actions.
Save configurations: Click Create view to preserve the current combination for future use.
Note: Filters using “now” remain dynamic and automatically update over time without manual adjustment.
5. Quick Search vs. Filter:
Use the Search… field at the top for fast text-based lookups (by keyword, client name, or ID).
Use Fast Filters for structured queries combining dates, action types, grouped subtypes, users, and clients — ideal when you need precise segmentation or multi-parameter filtering.
6. Column Customization
The Actions table allows you to customize visible columns.
Click Customize columns to show or hide specific fields and change their order.
Column settings apply to the current view.
Pro Tip: Once you’ve dialed in your perfect filter combination, bookmark the URL in your browser. On revisit, the same filters will automatically load, giving you one-click access to your custom view.
With these controls, you can slice and dice your Action logs any way you like—by date ranges, responsible parties, action types, or clients—keeping you focused on exactly the records that matter.
8. How to Search the Actions Table
The Search bar lets you quickly find individual actions by typing keywords, UIDs, client names, or text snippets. Unlike filtering (structured queries by date, type, etc.), Search performs a free-text lookup across multiple columns in real time.
Search operates independently from Fast Filters and is not stored within saved filter configurations.
1. Locate the Search Bar: Above the Actions table, next to the Filter button, you’ll see a rounded Search… input.
2. What the Search Covers
By default, typing into Search will match against these columns:
Tip: Search is case-insensitive and supports partial matches (e.g., “morga” finds “morgan”).
3. Performing a Basic Search:
Click in the Search… field.
Type your query (e.g., nicklaus or ca00000a).
As you type, the table filters instantly to show only rows containing that term in any searchable column.
4. Combining Search with Filters:
Search + Filter gives you ultimate flexibility. For instance, you can:
1) Filter by Type = Call (show only calls).
2) Search for “xavier” to see only call records made to client xavier.
To clear the search, click the × icon inside the search field or press Esc. Clearing search does not affect structured filters.
Best Practices
9. Configuring Action Subtypes
Subtypes let you further categorize each Action Type (e.g. Note, Call, Comment), enabling finer filtering, reporting, and visual cues throughout the UI.
1. Open the Actions Configuration:
In the left-hand sidebar, expand Settings.
Select Configurations.
At the top of the Configurations page, click the Actions tab.
You will see a section titled Subtypes beneath the list of other configuration blocks.
2. Overview of the Subtypes Block:
Displays each subtype’s color swatch, name, and associated action type.
Includes Edit (pencil) and Delete (trash) icons on each row.
3. Add a New Subtype:
Click + Add in the Subtypes section.
In the Add Subtype form:
- Type: Choose the parent Action Type (e.g. Note, Call).
- Name: Enter a descriptive label (for example, “Client Follow-Up”).
- Color: Pick a color swatch; this will highlight the subtype in tables and charts.
Click Save.
Once saved, your new subtype appears in the list and can be assigned to any action of that type.
4. Edit an Existing Subtype:
Locate the subtype you wish to modify.
Click its Edit icon.
In the Edit Subtype form, update the Type, Name, or Color.
Click Save to apply your changes.
5. Delete a Subtype:
Find the subtype row and click its Delete icon.
Confirm the prompt (“Are you sure?”) by clicking Delete.
Tip: Actions already assigned this subtype will not be deleted; they will simply have no subtype after removal.
6. Using Subtypes When Creating or Editing Actions
When adding a new Action:
Click + Add on the Actions list page.
Select an Action Type first.
If that type has subtypes configured, a Subtype dropdown appears below.
Choose the proper subtype(optional, action can be created without it), complete the rest of the form, and save.
When editing an existing Action:
Click the Edit icon (pencil) on the action’s row.
The Subtype field shows the current setting (if any).
Change or clear the subtype as needed, then save.
With Subtypes configured, your Actions module now supports an extra layer of categorization—making day-to-day tracking and reporting even more powerful.
Requests
1. Requests: Overview
The Requests module centralizes all client-initiated actions—support tickets, callback requests, document submissions, feature requests, and more—ensuring every interaction is tracked, assigned, and resolved in context. Key features include:
-
Project & Client Association
Every request is tied to a specific Project and Client record, so you always know who asked and under which business line or website. -
Desks & Queues
Route requests into different Desks (e.g., Support, KYC, IT) for specialized teams to pick up. -
Status & Priority
Track request lifecycles (New, In Progress, Waiting on Client, Closed) and set priority levels (Low, Normal, High, Urgent). -
Messaging Thread
Communicate back and forth within each request via the built-in Messages feature, preserving a full audit trail. -
Attachments & Metadata
Clients (or staff) can upload files—screenshots, documents, logs—and custom fields capture key details (e.g., account numbers, incident times). -
SLA & Escalations
Monitor response and resolution times, escalate overdue requests automatically, and generate reports for continuous improvement.
The following actions are available in the Requests module:
2. Requests: Use Cases
Use Case #1: Managing Service Inquiries
Your consulting firm’s website has a “Request a Consultation” form. When a prospect fills it out, a new Request is created, automatically linked to their Client profile (or created anew). All attachments—project briefs, budgets, previous correspondence—are stored in that Request’s thread, so sales and delivery teams can efficiently follow up.
Use Case #2: Ticket System for Customer Support
Treat each support ticket as a Request. Assign tickets to your Support Desk, set priorities (e.g., “Urgent – System Down”), and use the Messages feature to ask for details or provide status updates. The SLA dashboard flags aging tickets, ensuring no issue falls through the cracks.
Use Case #3: Handling Client Feedback and Suggestions
After onboarding or delivery, invite clients to submit feedback through the portal. Each piece of feedback becomes a Request—categorized (UI suggestion, process improvement, bug report), tagged for review by Product, and tracked through to implementation or response.
Use Case #4: KYC/AML Documentation Submission
Use Requests to collect Know-Your-Customer (KYC) documents. A client uploads passports, utility bills, or corporate documents as attachments. The AML Desk can then verify, request additional pages, and set the Request’s status to “Compliance Approved” once complete—maintaining a full audit log for regulators.
Use Case #5: Account Modification & Feature Requests
Clients often need changes to their account settings—new user invitations, permission tweaks, or portal feature requests. Each change request is handled through the Requests module: assigned to the IT or Product Desk, prioritized, and communicated back to the client with progress updates until completion.
3. How to Create a Request
The Requests module is your single pane of glass for all client-initiated actions—support tickets, callback bookings, document uploads, feedback submissions, and more. Each request is automatically tied to a specific Client and Project, ensuring that nothing falls through the cracks. By using Requests you gain:
-
Centralized Tracking: Every inquiry lives in one list with clear status indicators (Active, Archived).
-
Structured Context: Attach files, set time windows, and capture custom data so your team has everything they need.
-
Accountability & Audit: Who opened, who owns, when it was created—and a complete message thread for full transparency.
Below is a step-by-step guide to creating and viewing requests in the system.
1. Open the Requests Module: From the left-hand nav, click Requests. The main Requests list shows total count, filters, search, and the table of existing requests.
2. Launch the “Add Request” Form: Click the + Add Request button in the top-right corner.
3. Complete the General Section
Fill in each field as follows:
| Field | Description |
|---|---|
| Name | Descriptive title (e.g., “Network Outage” or “Schedule Callback”). |
| UID | System-generated unique ID (auto-increment). |
| Time range | (Optional) Select start/end dates to indicate when the request is valid or when the client is available. |
| Client | Pick the client from the dropdown. This cannot be changed after saving. |
| Project | Choose the project context (e.g., “Web Portal Support”). |
| Description | Free-text details provided by the client or added by you for internal context |
Note: Once saved, you cannot change the client of the request.
4. Add Custom Data (Additional Information): Use the Additional information JSON tree to set any structured fields (e.g., priority: "high", documentType: "KYC"). This is ideal for downstream automation or reporting.
5. Attach Supporting Files: Drag-drop or click Browse under Attached file(s) to upload screenshots, logs, or PDFs. Valid formats: JPG, PNG, PDF.
6. Save the Request:
When ready, click Save at the bottom of the panel.
The panel closes and your new request appears at the top of the Requests list with Status = Active.
To view information about created requests, go to the Requests tab and click on the name of the specific request. A drawer will appear with information about it:
Viewing & Managing a Request
Open a Request: Click any request’s Name in the list.
Inspect Details: A Request information drawer opens on the right, displaying:
- General fields (Name, Time range, Client, Description)
- Status badge (Active, Archived)
- Attached files and any custom data
- Full message thread and metadata
Conclusion
By leveraging the Requests module you ensure that every client touchpoint is:
-
Logged: No more lost emails or ad-hoc notes.
-
Linked: Always tied to the right client and project for clear ownership.
-
Transparent: Full audit trail and effortless status tracking.
This standardized process boosts team efficiency, improves response times, and elevates client satisfaction across all service lines
4. How to Edit a Request
The Requests module not only lets you log new client requests, but also provides a full edit interface for updating request details, changing status, and communicating with clients. The Edit Request page centralizes request information and message history in one place.
1. Open the Edit Request page
2. Request Activity Tracking (Last Message Timestamps)
To improve operational visibility, the system automatically tracks when the last message was sent by the client and by the manager for each request.
New System Fields
Each Request entity contains two additional system-managed fields:
-
Last message from client at
-
Last message from manager at
These fields store the date and time of the most recent message sent by the respective party.
Defaults:
-
For existing requests: values are
null -
For new requests: values are updated automatically once messages are created
These fields are system-controlled and cannot be manually edited.
Automatic Update Logic
When a new message is created inside a request:
-
If the message is sent by a client →
Last message from client atis updated to the message timestamp. -
If the message is sent by a manager →
Last message from manager atis updated to the message timestamp.
The timestamp is derived from the message creation time.
If a request contains messages from both parties, each field reflects the latest message from its respective sender.
Requests Table Columns
The Requests list table includes two additional columns:
-
Last message from client at
-
Last message from manager at
Location:
Displayed after the Description column.
Display behavior:
-
Uses the standard CRM date-time format
-
Shows “—” if no message exists from that side
These columns allow managers to immediately understand:
Who interacted last
Whether a request is waiting on client response
Whether manager follow-up is required
Sorting and Filtering
Both fields fully support:
Sorting:
Ascending
Descending
Filtering:
Date range filtering (In Range)
Uses the same filtering logic as other date fields
These filters can be combined with:
-
Project
-
Status
-
Type
-
Created date
-
Other existing filters
Customize Columns Support
The two new fields are available in Customize Columns:
-
Show / Hide toggle
-
Column reordering
-
Persisted per user view (same behavior as other columns)
They behave identically to existing configurable columns such as Created, Updated at, and Status.
Operational Use Cases
These timestamps help teams:
-
Identify requests waiting for manager reply
-
Detect inactive conversations
-
Prioritize active client threads
-
Monitor SLA compliance
-
Filter requests by recent client interaction
3. Update Core Request Fields
Inside the General tab, you can update the main request fields:
Name: The request title.
Time range: Start Date and End Date selectors.
Client: The primary client associated with the request.
Related clients: Additional client contacts linked to the request.
Status: Indicates the current request state (e.g., Active, Archived).
Type: Defines the request category.
Description: A multi-line field for request details.
Note: The Client field is locked after creation to preserve accountability.
4. Additional Information and Attachments
In the General tab, you can add structured data and files to the request.
Additional information: Select available nodes to store structured request data.
Attached file(s): Upload files such as images or PDFs using drag and drop or the browse option.
5. Communicate with the Client
Switch to the Messages tab at the top of the Edit Request page.
The Messages tab displays the conversation history related to the request. If no messages exist, an empty state is shown.
Use this tab to review previous messages and continue communication when available.
All messages are time-stamped, attributed to you, and—if API-integrated—pushed to the client’s portal.
6. Save Changes
Click Save to apply any updates made to the request fields or attachments.
Note: You can add or edit statuses that are assigned to requests in the Settings module (Statuses tab of the Configurations section).
When creating a new Request status in Settings → Configurations → Statuses, make sure to define the Order field.
The Order value controls how statuses are displayed in dropdowns and lists. Statuses are sorted in ascending order based on this value.
If the Order field is not set, the status may appear in an unexpected position in the interface.
The Edit Request feature centralizes all aspects of request management—metadata, status tracking, file attachments, and real-time messaging—into a single, intuitive panel. By keeping request details up to date and maintaining a live chat history, your team can ensure timely resolutions and a seamless client experience.
5. How to Filter or Search a Request
When your list of client requests grows, the Search bar (located above the table) and the Fast Filters panel allow you to narrow results using multiple criteria at once — including name, description, UID, project, client, type, status, and date ranges. Active filters appear as chips above the table, and the Total counter updates instantly.
You can search for requests in two ways:
-
Quick Search (free-text matching)
-
Fast Filters (multi-field structured filtering)
To find a request using the Search input:
The Search input is permanently displayed above the Requests table and works independently from Fast Filters. Search terms are not saved inside filter presets.
1. Locate the Search field: At the very top of the Requests table, you’ll see a text box with a magnifying-glass icon and the placeholder “Search…”.
2. Type your query:
By Name: Start typing the exact or partial request Name.
By Description: You can also enter any word from the Description field (e.g. “setup”, “bug”).
3. Instant filtering: As you type, the table narrows down in real time—only requests whose Name or Description contain your text remain visible. The Total counter at the top left updates automatically to reflect the number of matching records.
4. Clear the search: Click the × at the right end of the Search box (once text has been entered) to reset the table back to showing all requests:
Using Fast Filters
1. Open the Filters panel: Click the Filter button (funnel icon) in the top toolbar.
2. Available Filter Fields
You can filter by multiple parameters simultaneously:
Project – filter by project or desk
Name – filter by request name (Contains / Not contains)
UID – filter by exact or non-equal ID
Clients – select one or multiple linked clients
Description – text-based filter
Status – Active, Archived, Pending, etc.
Type – request category
Created – date & time range (In range / Not in range)
Updated at – date & time range
Each field may support operators such as:
-
Contains
-
Not contains
-
Equal
-
Not equal
-
Includes
-
In range
-
Not in range
3. Apply Filters: After selecting your criteria, click Apply.
The table refreshes immediately and only matching records remain visible.
Active filters appear as filter chips above the table.
Each chip displays:
-
Field name
-
Operator
-
Selected value
Example:
Created date – In range – 28.02.2023 → 13.01.2026
Status – Includes – Active
UID – Not equal – r000117
4. Remove Filters:
Remove a single filter by clicking the × on its chip.
Click Drop filters (top right) to clear all filters at once.
5. Combine Multiple Criteria:
You can combine as many filters as needed.
Example:
To find all Active support-type requests created in the last 30 days for Client “ABC”:
-
Status: Includes – Active
-
Type: Equal – Support
-
Clients: Includes – ABC
-
Created: In range – last 30 days
Click Apply to update the table.
Saving Custom Views
If you frequently use the same filter combination:
-
Apply your desired filters.
-
Click Create View (top right).
-
Save the configuration for future reuse.
Saved views allow you to instantly load complex filter setups without rebuilding them each time.
With Quick Search for instant keyword matching and Fast Filters for multi-criteria segmentation, you can analyze requests using precise combinations of status, client, type, UID, and date ranges — making even large datasets easy to navigate.
6. Customizing Table Columns in the Requests Module
To improve usability and flexibility, the Requests table supports column customization. This allows users to control which non-core columns are visible and in what order they appear — while ensuring that critical operational columns remain fixed and always visible.
Opening Customize Columns
-
In the Requests module, locate the table header area.
-
Click Customize columns (column settings icon).
-
A side panel will open displaying the list of available columns.
The interface follows the standard CRM column customization pattern:
Toggle switches to show/hide columns
Drag & drop (where supported) to reorder columns
Pinned Core Columns (Always Visible)
The following columns are permanently pinned and cannot be hidden or reordered:
-
Name
-
Status
-
Type
-
Created
-
Actions
Pinned Column Rules
-
These columns are always visible.
-
Their position is fixed.
-
They cannot be disabled.
-
They cannot be reordered.
-
They remain consistent across all saved views.
This ensures operational stability and prevents accidental misconfiguration.
Configurable Columns
All other columns in the Requests table are configurable.
Users can:
Toggle visibility on/off
Reorder columns via drag & drop (within the configurable section)
Examples of configurable columns may include:
-
UID
-
Project
-
Client
-
Description
-
Updated at
-
Time range
-
Any additional non-core fields
There are no hard-coded non-pinned columns outside the pinned set.
Column Visibility
To hide or show a column:
-
Open Customize columns
-
Toggle the switch next to the column name
-
Click Save
The table updates immediately after saving.
Column Reordering
Where supported, configurable columns can be reordered using drag & drop inside the customization panel.
Rules:
-
Pinned columns remain fixed.
-
Reordering applies only to configurable columns.
-
Sorting behavior remains unchanged.
-
Pagination and filters are not affected.
Persistence
Your column configuration:
-
Is saved automatically after clicking Save
-
Persists after page reload
-
Is retained per user session (according to system settings)
If no customization exists, the system loads the default layout (which matches the current production layout).
Default Layout Behavior
The default table layout:
-
Matches the current production configuration
-
Displays all standard columns in their original order
-
Keeps core columns pinned
There are no visual or functional changes unless a user customizes the table.
What Customization Does Not Affect
The Customize Columns feature does not change:
-
Filtering behavior
-
Sorting logic
-
Pagination
-
Request processing logic
-
Permissions or access control
-
Performance characteristics
All existing table functionality remains stable.
For better usability:
Keep only operationally relevant columns visible.
Hide rarely used metadata fields.
Use saved views together with column customization for maximum efficiency.
This ensures the Requests table remains clean, readable, and optimized for daily workflows — especially when working with large datasets.
Core Banking
1. Core Banking: Overview
The Core Banking module in Wifox Business Core Solution (WBCS) provides a centralized, API-driven platform for managing all your institution’s financial accounts and transactions in real time. Key features include:
-
Universal Ledger:
A single, immutable record of all account balances, deposits, withdrawals, transfers and fees—across projects, desks and client portfolios. -
Account Lifecycle Management:
Open, suspend, close or reassign digital accounts with full KYC/AML enforcement, custom account types (e.g. checking, savings, escrow) and IBAN assignment. -
Real-Time Transactions:
Process intra-bank transfers, external ACH/SWIFT payments and QR-code or card-based transactions instantly, with immediate balance updates and notifications. -
Multi-Currency & FX Support:
Hold and transact in multiple currencies per client or project with live exchange-rate feeds, automatic currency conversion and cross-currency fee schedules. -
Configurable Interest & Fees Engine:
Define tiered interest-rate schedules (daily, monthly, annual), overdraft penalties, maintenance fees and one-off charges—all computed automatically per account. -
Role-Based Security & Audit Trails:
Fine-grained permissions control who can view, initiate or approve transactions; every action is logged with user metadata for compliance and forensic review. -
Regulatory & Management Reporting:
Out-of-the-box balance sheets, P&L reports, transaction journals and custom report builder—exportable in PDF, CSV or JSON for regulators, auditors and executives. -
Extensible API Layer:
Fully documented REST endpoints for account inquiry, transaction posting, batch settlement and webhook notifications—easy to integrate with mobile apps, payment gateways or partner platforms.
Core Banking module includes the following sections:
-
Accounts: Serve as containers for managing financial activities and transactions within the system.
-
Assets: Represent various forms of value, including cryptocurrencies, traditional fiat currencies, trade-ins, NFTs and more, and are assigned to specific accounts.
-
Banks: Stores information about the details of the banks in use.
-
Cards: Stores information about the details of the cards in use.
-
Transactions: Displays deposits, withdrawals, and other activities involving the client's financial resources. Global model for accounting of cash flow in your system/product.
-
Payment Methods: Contains information about payment systems, allowing users to pay for services and goods on your site.
-
Platforms: Customizes integration with banks and other platforms that store information about accounts and assets.
-
Configurations: Manages general settings for the Core Banking module.
-
Company Fees: Customizes the fees the company charges during transactions and manages fee groups.
- Invoices: Manages billing records issued to clients, including invoice creation, status tracking (Pending, Paid, Expired, etc.), related transactions, postbacks, and supporting documents.
2. Core Banking: Use Cases
Use Case #1: Customer Account Onboarding & KYC
Automatically create new digital accounts when a client is approved. Trigger identity verification workflows (via integrated AML/KYC services), assign the correct account type and send welcome notifications—all without leaving WBCS.
Use Case #2: Real-Time Payment Processing
Enable tellers, back-office staff or automated jobs to post deposits, withdrawals and internal transfers in seconds. External payments (SWIFT/ACH) flow through the same ledger, with status updates (pending, settled, failed) shown live.
Use Case #3: Automated Interest & Fee Charging
Schedule daily balance snapshots to calculate interest on savings accounts, automatically debit maintenance fees or overdraft charges, and post accrual transactions at month-end—freeing finance teams from manual spreadsheets.
Use Case #4: Multi-Currency Treasury Management
Manage pools of foreign-currency balances for corporate clients or branches. Execute spot conversions or forward-contracts via the FX API, and reconcile P&L on currency spreads with a click.
Use Case #5: Regulatory Reporting & Audit Compliance
Generate end-of-day journals, AML transaction reports and capital adequacy summaries from within WBCS. All ledger entries and user actions are timestamped and tamper-proof, simplifying audits and regulatory filings.
3. General Settings: How to Configure Core Banking
The Configurations tab in Wifox Business Core Solution (WBCS) is your central hub for defining the building blocks of the Core Banking module. Every change here immediately becomes available system-wide—whether you’re opening new accounts, posting transactions, or generating reports.
To configure the general settings for Core Banking, open the Configurations tab.
This tab includes four sections, where you can add, edit, or delete items:
- Types of Account: Customize account types (e.g., Business, Personal, Crypto, Fiat). These account types can later be selected when creating accounts through the Accounts module.
- Currencies: Define the currencies and networks (for cryptocurrencies) that will be processed by the system, such as USD, USDT, BNB, etc. Without defining currencies here, you will be unable to perform many activities in the CRM: e.g. to set company commissions for different transaction types or to add assets to customer accounts.
- Sub-types of Transactions: While the system has two main transaction types — In and Out — you can add sub-types for further classification. By default, sub-types like Exchange, Withdrawal, and Deposit are included. You can also create additional sub-types here based on your custom logic.
- Transaction Statuses: Track the current state of transactions, with default statuses like Pending, Processing, Completed, and Canceled. These statuses are predefined in our system, and we have the own logic to handle transactions with it. You can also add or modify custom transaction statuses here.
To add a Types of Account
1. Locate the section on the left side of the Configurations page labeled Types of account.
2. Add a new type:
Click Add (top-right of that panel).
In the drawer that opens:
Label: enter a unique identifier (e.g. corporate)
Name: the human-readable title (e.g. “Corporate Account”)
Properties (optional): use the node picker to attach custom metadata fields for API-driven logic.
3. Click Save.
4. Edit an existing type:
Click the pencil (✎) icon on the row of the type you wish to modify.
Update Label, Name or Properties, then Save.
5. Delete a type:
Click the trash-can icon on its row.
Confirm deletion in the prompt.
To add a Currency
Defines which fiat or crypto assets can be held and transacted.
1. Find the Currencies panel on the right side of the Configurations page.
2. Add a currency:
Click Add in the panel header.
In the drawer:
Type: choose Fiat, Crypto, or Custom.
For Fiat/Crypto:
- Select the currency code from the dropdown (e.g. USD, BTC).
- Limit: set a minimum transactable amount (optional).
- Network fee: for cryptos, enter the on-chain fee (e.g.
0.0005BTC).
For cryptocurrencies, you can also specify a Limit (minimum amount to process) and a Network fee. Transactions below the set limit will not be conducted, and the specified network fee (e.g. ERC20 for USDT) will be charged additionally for the transaction.
For Custom:
Enter Label, Name, Network and Description as needed.
Check Create asset within condition if you want the system to auto-generate token assets under your business rules.
3. Click Save.
4. Edit a currency:
Click its pencil (✎) icon.
Adjust any parameters, then Save.
5. Delete a currency: Click its trash-can icon and confirm.
You cannot delete the one marked Default unless you first choose a different default.
To add a sub-type of transaction
(Helps you categorize “In” vs. “Out” further—e.g. Exchange, Fee.)
1. Locate the Sub-types of transaction panel at bottom-left.
2. Add a sub-type:
Click Add in the panel header.
Enter a Label (machine ID) and Name (display text).
3. Click Save.
4. Delete a sub-type: Click the trash-can icon next to any non-default entry.
Note: you cannot edit existing sub-types.
To add a transaction status
(Tracks each transaction’s lifecycle: Pending, Completed, etc.)
1. Find the Transaction statuses panel at bottom-right of the Transaction statuses section.
2. Add a status: Click Add in the panel header.
In the drawer:
Label and Name for your new status (e.g. reversed / “Reversed”).
Color: pick from the palette for easy visual scanning.
Make as default: check this to have new transactions start in this status.
3. Click Save.
4. Delete a status: Click its trash-can icon.
Note: default system statuses (e.g. Pending, Completed) cannot be deleted.
Each time you Add, Edit, or Delete one of these items, the change is effective immediately across all WBCS Core Banking operations—no system restart required.
By tailoring account types, currencies, transaction sub-types and statuses to your organization’s needs, you ensure that every ledger entry, API call and report aligns precisely with your business logic and compliance requirements.
4. How to Set Company Fees
To set Network fees for cryptocurrencies, you can configure them when adding a cryptocurrency in the Configurations section. If you need to set Company fees, navigate to the Company Fees section of the Core Banking module. All specified fees, including network and company fees, will be totaled and applied during transactions.
In the Company Fees section, you can create both static (fixed) or percentage-based fees for different transaction types. You can also group these fees. Fee groups are useful for assigning specific fees to different types of Clients when creating or editing client profiles. For example, you can create a group for developers that is exempt from fees (0% fee).
Navigate to the Company Fees Tab
To add a new fee group
1. Click the Add Group button in the top-right corner of the Company Fees tab.
2. In the drawer that appears:
Name: Enter a human-friendly title (e.g., Spot Trading Fees).
3. Click Save to apply the changes.
4. The new group appears in the table.
To add a new fee
You can add a fee either globally (via the top button) or directly under a specific group.
A. Via the Top-Level Button
1. Click the Add Fee button in the top-right corner of the Company Fees tab.
Alternatively, click the plus icon in the relevant group row to add a fee directly to a specific group.
2. Fill in or select the following fields:
Company Fee Group: This will be pre-filled if you're adding the fee via a specific group.
Type of Transaction: If no transaction types are available, go to Core Banking > Configurations to create them.
Currency: For Exchange transactions, select two currencies (one for In and one for Out). If no currencies are available, go to Core Banking > Configurations to create them. Alternatively, leave this field blank to apply the fee to all currencies.
3. Next, select the type of fee:
Static: A fixed fee amount.
Percent: A percentage-based fee.
4. Enter the following details:
Min. Value: The minimum transaction amount to which the fee applies (leave blank for no minimum).
Max. Value: The maximum transaction amount to which the fee applies (leave blank for no limit).
Amount: The fixed fee or percentage that will be charged per transaction.
You can add multiple commissions for different thresholds at once. For example:
- For value from 0 to 100: 10%
- From 100 to 1000: 15%
- From 1000 and above: 20%.
To add additional fees, click the plus icon again after entering the first fee. The next line will appear.
To edit or delete created fees, click on the Edit or Delete icon:
5. Click Save to apply the changes.
B. Directly Under a Group
1. Locate the group’s row in the table.
2. Click the ➕ icon in that row’s Actions column.
3. The same Add company fee drawer opens with the Company fee group pre-selected.
4. Complete steps 2–4 above to define and save the fee.
To view all fees associated with a group
Click the Expand icon next to the group:
- To edit a group or fee: Click on the Edit icon in the relevant row.
- To delete a group or fee: Click on the Delete icon in the relevant row.
Warning: Deleting of group is only allowed when no client is assigned to it. Deleting a group will automatically delete all fees associated with it. This action is irreversible.
Tips & Best Practices
5. How to Set Payment Methods
The Payment Methods module is used to configure payment systems (e.g., ApplePay, LiqPay) that allow users to pay for goods and services on your site. You can set up two types of payment methods in the CRM:
- Deposit
- Withdrawal
You can perform the following actions for both deposit and withdrawal payment methods:
-
Adding
-
Activation/Deactivation
-
Searching
-
Editing
-
Deletion
Additionally, deposit methods can be activated or deactivated as needed.
To add a new deposit payment method:
1. In the left-hand menu click Core Banking → Payment Methods, then select Deposit.
2. Click +Add: Look at the upper-right of the Deposit table header (just above the “Actions” column).
3. Select the following from the drop-down list
Type is the first field on the left:
Auto: Fully set up the payment system on your side, so the user can make payments directly through your site.
Manual: Transfers the user to the payment system’s site via a link for payment.
Integration dropdown sits immediately to its right:
Internal: For your internal payment systems. When Server-to-Server (S2S) integration occurs and your platform allows the user to enter a card on the site.
External: For third-party systems. When the user enters the payment amount and clicks Pay, they are taken to the payment system page where they fill in the card details, etc.
4. Enter a Name for the payment method.
5. In the Label field, select the required payment system from those already integrated into the CRM to automatically populate the remaining fields. Alternatively, you can fill in these fields manually.
6. If necessary, fill in or edit the following fields:
Label: The user-facing name (e.g. “Bank Transfer”).
Name: Internal identifier (used in API/webhooks).
Merchant ID: Your processor’s account ID.
Currencies: Select which currencies are allowed (expand the array and tick each one).
Language: Choose the default language for this method’s UI.
(Optional) Configure advanced settings:
Rules: JSON object defining fraud checks, min/max amounts, etc.
Credentials: API keys or tokens for your gateway.
Additional: Any custom JSON your integration needs.
Placeholder: Custom “enter details” text.
Note: These fields are used for integration and are configured by developers or the integration team.
7. Click Save at the bottom of the panel to create the payment method.
After creation, a payment method is not automatically activated. To activate it, find the method in the list and toggle the switch in the Status column.
To add a new withdrawal payment method:
1. Click the Add button in the upper-right corner of the Withdrawal tab.
2. Enter a Label and a Name for the method.
3. If necessary, fill in the MerchantID and Currencies fields.
4. Select the appropriate Language from the available options.
5. Click Save to apply the changes.
To search for a payment method:
Works in both (Depost and Withdrawal) tabs.
Click into the Search… field at the top-left.
Begin typing the payment method’s label in the Search field at the top of the tab.
To edit a payment method:
Works in both (Depost and Withdrawal) tabs.
- Locate the row you want to change.
- Click the ✎ Edit icon in the rightmost Actions column.
- Update any editable fields in the panel (all except Label).
- Click Save to apply your changes.
Note: You cannot edit the label of a payment method.
To delete a payment method:
Works in both (Depost and Withdrawal) tabs.
For deposit methods, ensure the method is deactivated first. Deactivate a method by clicking the toggle in the Status column (deactivated methods will turn gray).
Click the Delete icon in in the Actions column.
Warning: Deleted payment methods cannot be restored.
6. How to Set Platforms
The Platforms module is used to integrate and customize third-party platforms (e.g., banks) that manage customer assets and accounts. If an asset or account is assigned to a platform, connecting to that platform is essential to display relevant information, such as balances.
Use Cases
- Switching Between Projects
Select a project to view or manage its unique financial configurations. If no settings exist, the section displays "No data to display" until configurations are added. - Cloning Configurations for New Projects
Use the "Clone from project" feature to copy currencies, transaction sub-types, or account types from an existing project, saving time and maintaining consistency across projects. - Cloning Currency Configurations
Clone currency settings (e.g., USD, EUR, USDT, TRX) from a project like Wibroker to a new one (Incur) to avoid manual currency entries, ensuring quick and consistent setup. - Cloning Transaction Sub-Types and Account Types
Apply existing configurations by cloning Sub-types of Transactions or Types of Accounts from one project (e.g., Cypress Test Default) to another (Incur), instantly reflecting them without manual input.
To add a new platform:
- Click the Add Platform button in the upper-right corner of the Platforms module.
- Enter or select from the drop-down list:
Name: The name of the platform.
Label: A unique identifier for the platform. The list will include platforms that are already integrated into CRM. - Add the necessary URL(s) and Credentials required to connect to the platform. If you select a label from the drop-down list, the required fields will be automatically populated.
- Click Save to apply the changes.
To edit a platform:
- Click the Edit icon next to the platform.
- You can change the Name and update or add new URL(s) and Credentials (or modify existing values).
- Click Save to apply the changes.
To delete a platform:
Click the Delete icon next to the platform.
Note: You can only delete platforms that have no associated assets. For more information on managing assets, refer to the [Assets section].
Viewing Platforms
Platforms Page
For instance, we have two existing platforms: “platform” and “Utip” (each card shows a Label and the Project it belongs to, such as “Cypress Test Default”).
The trash icon (for deleting a platform) and the pencil icon (for editing a platform) are visible only if the corresponding user permissions—(platforms.delete) for delete and (platforms.edit) for edit—are set to true.
Platform Details
Each platform has fields for Name, Label, URLs, and Credentials.
The example shows Utip with multiple URL fields (like tradingUrl, accountUrl) and credential fields (tradingSecretKey, accountSecretKey, etc.).
Linking Assets to a Platform
Add or Edit an Asset:
Within an account, you can Add asset (e.g., a USDT asset).
A dropdown labeled “Platform” appears.
Select “Utip” (or whichever platform you created).
Result: Any balance or transaction related to this asset is now stored on the external platform instead of the CRM’s internal database. When you perform a deposit or withdrawal, our platform communicates with the platform via API to update balances.
Why Use External Platforms?
1. External Balance Storage
Internal (no platform): If you create an asset without selecting a platform, its balance lives solely inside the CRM’s database.
External (with platform): When you link an asset to an external platform (e.g. Utip), all balances and holdings are stored on that external system, and the CRM merely mirrors them.
2. Real-Time Transactions
All deposits, withdrawals or trades are executed via the platform’s API.
The CRM only updates its view of the balance once the external system confirms the change, ensuring accuracy and consistency.
3. Flexibility & Scalability
Multiple integrations: You can configure as many platforms as needed (e.g. Utip, Binance, etc.).
New integrations on demand: If your business adopts a new processor, just discuss the requirements and we can add it.
Example Workflow
A. Create a New Platform (Utip)
B. Add a USDT Asset
1) Go to Accounts: In the CRM sidebar, select Accounts.
2) Click Add asset
3) Fill in asset details:
Currency: USDT
Type: Crypto
Platform: Choose Utip from the dropdown.
4) Save
Result: Your USDT asset is linked to Utip — all USDT movements will route through Utip’s API.
C. Perform a Deposit
1) Initiate deposit in CRM: User clicks “Deposit” on the USDT asset.
2) CRM sends API request: The CRM calls Utip’s deposit endpoint with amount and account info.
3) Utip processes & confirms: Utip updates its own ledger and returns the new balance.
4) CRM reflects balance: The CRM refreshes the USDT balance to match Utip’s confirmed value.
Key Points
- Project-Based: Every platform is scoped to a specific project.
- Credentials & URLs: Must be configured correctly for seamless API communication.
- External Balances: Any asset tied to a platform is managed off-platform; the CRM simply displays what the external system reports.
- API-Driven Transactions: Deposits, withdrawals, and other operations always go through the platform’s API rather than internal database updates.
In summary, the Core Banking Platforms function allows you to add, edit, and manage integrations like Utip so that asset balances and transactions occur on an external platform rather than within the CRM itself. By configuring Name, Label, URLs, and API credentials, you enable real-time interaction between your chosen platforms, ensuring seamless and secure transaction management.
7. How to Manage Accounts
The Accounts module is designed to manage client accounts and is closely integrated with the Clients module. While accounts are visible from client profiles, all core account management actions are performed in the Accounts module.
In this module, you can:
-
View all accounts in the system (for clients visible to you).
-
Add new accounts.
-
Activate and deactivate accounts.
-
Filter and search for accounts.
-
Edit account properties and manage related assets and wallets.
You’ll land on a table showing all accounts you have permission to view.
Columns:
Status — Toggle switch (Active / Inactive)
Account ID — System‐generated UUID
UID — System-generated unique identifier
Type — Account type defined in system configuration
External ID — Integrator’s reference (if any)
Project — Linked project
Owner — Client name (clickable). The owner of an account cannot be changed after the account is created.
Created — Timestamp
Actions — Context actions such as adding assets, editing the account, deposits, and withdrawals
When you enter the Accounts module, you'll see a list of all accounts. To view details about the client who owns an account, click on the name in the Owner column of the corresponding row:
To view client details, click the client name in the Owner column. This opens the client’s profile.
To add a new account:
1. Click the Add Account button in the upper-right corner of the Accounts tab.
2. Enter or select the following:
Type: The type of account (e.g., Business, Personal, Crypto, Fiat). If no types are available, go to Core Banking > Configurations to create them.
Owner: The client to whom the account belongs. If no clients are listed, go to the Clients module to create one.
External ID: (Optional) An identifier for linking the account to a third-party platform via API.
3. Click Save. The system generates a unique Account ID (UUID).
Note: A unique ID is automatically assigned to each account upon creation. Account status can be managed using the Status toggle after creation.
To activate or deactivate an account:
To activate an account, toggle the switch in the Status column of the corresponding row. The switch will turn blue.
Blue (on) = Active
Gray (off) = Inactive
To deactivate the account, toggle the switch again.
To search for an account:
Type the Account ID in the Search field located above the Accounts table.
Press Enter or click the magnifier to filter the list in real time.
To filter accounts:
The Search field operates independently from structured filters. Search terms are not stored in saved filter views.
1. Click Filter next to the search field:
2. Select one or more parameters for filtering:
Created Date: The period during which the account was created. If you know a specific date, set it as the End Date and select a Start Date before that.
Type: The account type, based on the types you’ve set in Configurations.
Owner: The specific client, searchable by email.
Active or Inactive: Filter by account status using the checkbox.
To delete a specific filter, hover over the field and click the x icon.
3. Click Save to apply the filters.
To edit the account, click the Edit icon in the corresponding row of the account.
In the Edit Account tab, you can:
Change the account’s Type.
Enter or update the External ID.
Note: You cannot change the owner of the account.
To view and manage account assets:
1. Click the Expand icon in the corresponding account row to view all assets associated with the account.
2. If you need to add an asset, click the Add Asset icon.
To add an asset:
1. In the Add asset window, select:
Currency: Once selected, its type (fiat or crypto) will be automatically detected.
Balance: The initial balance of the asset.
(For fiat currencies) Address, External ID, and Bank (optional fields). If you are doing integration with a bank, you do not need to specify an address. If there is no integration with the bank, you should specify IBAN in the Address field.
Platform. Non-mandatory field. It is only filled in when integrating with third-party platforms. Read more about platforms in [How to Set Platforms].
2. Click Save to add the asset.
Note: Once added, the asset will need to be activated. Activation can be done in the Assets module.
For cryptocurrencies with several different networks, you can also add wallets.
How to add a wallet:
1. Click the Expand icon in the corresponding account row to view all assets associated with the account.
2. Click on the asset. If the asset is clickable, it will be highlighted in blue.
3. Click the Add button in the upper-right corner.
4. Enter or select from the drop-down list Network and Address.
5. Click Save to apply changes.
You can search created wallets by address, using the Search field.
You can also change address of the wallet. To do that:
1. Click the Edit icon in the corresponding wallet row.
2. Enter the new address.
3. Click Save to apply the changes.
Note: You cannot change the network of the wallet.
Account Deletion (Permission-Based with Financial Safety Validation)
In Core Banking, account deletion is strictly controlled to protect financial integrity, audit history, and ledger consistency.
Deletion is permanent and cannot be undone.
Permission RequirementTo delete an account, a role must have:
Accounts → Delete
Location:
Roles → Edit Role → Accounts section → Delete
Behavior:
- If the role does not have this permission, the Delete action is not visible in the UI.
- Any direct API/backend attempt without permission returns 403 Forbidden.
If permission is granted:
- A Delete (trash) icon appears in the Actions column for each account.
- The action follows the standard confirmation modal pattern.
On click:
A confirmation modal appears:
Title: Delete Account
Body: This action cannot be undone.
Buttons:
Confirm
Cancel
If confirmed, the backend performs eligibility validation before deletion.
Backend Eligibility Rules (Mandatory)An account can be deleted only if ALL conditions below are met:
-
All assets under the account have:
No linked transactions
Available balance = 0
Bonus balance = 0
On hold balance = 0 -
The account itself has no additional system constraints (if applicable).
If any asset under the account contains transactions or non-zero balances:
Deletion is rejected.
Example error responses:
- Account cannot be deleted: it contains assets with transactions
- Account cannot be deleted: it contains assets with balance
Status codes:
- 403 — missing permission
- 409 — state conflict (financial data exists)
Important: Eligibility is validated server-side at the moment of deletion to prevent race conditions.
After Successful DeletionIf the account meets all eligibility conditions:
- The account is permanently removed from the system.
- It disappears from the Accounts table immediately.
- A success notification is displayed.
No orphan assets or ledger inconsistencies remain.
Why This Restriction ExistsAccounts serve as containers for financial assets.
If assets with balances or transaction history exist, deleting the account would break:
- Financial reporting
- Audit trails
- Reconciliation workflows
- Compliance obligations
Therefore, accounts with financial history are immutable.
If operational removal is required, the recommended approach is:
Deactivate the account instead of deleting it.
Extra Information
Bulk Import/Export: Available via the CRM API for large-scale onboarding.
API Endpoints:
Pagination & Performance: The UI loads 50 accounts per page; use filters/search for quicker lookup.
Audit Logs: Changes to accounts, assets, and wallets are logged under System → Audit Trails.
Troubleshooting:
If you cannot see an account, verify your role permissions.
“Cannot save” errors often mean a required field is empty or mis-typed.
Wallet creation failures may indicate an unsupported network—ensure network names match those in Configurations.
8. How to Manage Assets
The Assets module provides centralized management of all assets in the system. It allows you to:
-
View a list of all assets (for visible clients) and check their balances.
-
Activate and deactivate assets.
-
Filter and search for specific assets.
-
View transactions for assets.
-
Make deposits and withdrawals.
Note: If you want to add an asset to an account, you need to do it through the Accounts module.
Use Cases
-
Segregation of Funds
Real money and promotional credits remain clearly separated, ensuring transparent financial tracking. -
Flexible Promotions
Companies can create custom bonus programs—such as first deposit bonuses, loyalty rewards, or marketing campaign incentives. -
Enhanced User Engagement
Users can explore platform features with bonus funds before committing their real money, increasing retention and activity.
View All Assets
To see every asset in the system, navigate to the Assets module from the sidebar. At the top of the page you’ll find:
Shareable Link 🔗 (next to the “Assets” title) – copy a URL that preserves your current filters and sort.
Total Count – updates dynamically as you filter or paginate.
Language / Calendar / Notifications / User Menu in the top-right corner.
The Assets module displays a read-only table of every asset in your system, with the following columns:
- Status – Toggle to activate (blue) or deactivate (gray) this asset.
- Currency – Asset’s currency icon and code (e.g. BTC, USD).
- UID – System-generated, auto-incrementing asset code (e.g. cbas00002d).
- Owner's full name – Client who owns the account (clickable).
- Owner's email – Email address of the client who owns the account
- Available – User’s spendable balance.
- All time deposited – Cumulative funds ever deposited.
- On hold – Funds locked by pending transactions or holds.
- Actions – Icons for Show Transactions, Deposit, Withdraw, Refresh Balance, and a “⋯” menu for Show Wallets.
Status:
- Toggle to activate (blue) or deactivate (gray) an asset for that account.
- If there are transactions, a small chevron appears here—click to expand and view them.
- Deactivated assets are hidden from end-user views and cannot be transacted until reactivated.
Column Sorting: Click any header’s ▲/▼ arrows to sort by that field (e.g. Available, Bonus). Clear by clicking again.
Search for an Asset
Enter the ID of the account in the Search field located above the Assets table to filter rows in real time. You can search by:
-
Account ID (full or partial UUID)
-
Asset ID (UUID)
-
Currency code (e.g. “USD”, “BTC”)
-
Owner’s name (first/last) or email
The search is case-insensitive and matches substrings as you type.
The Search field operates independently from Fast Filters and does not become part of saved filter views.
Filter Assets
The Assets module uses the Fast Filters panel, located directly above the assets table. This interface allows you to instantly narrow down results by project, type, currency, ownership, and balance parameters without opening a separate drawer.
The panel includes the following elements:
Project – filters assets belonging to a specific project or environment.
Currency – filters by asset currency (e.g., USD, EUR, USDT, BTC).
Types – allows you to choose between asset categories such as Fiat, Crypto, Bonus, etc.
Owners – filters by user or client who owns the asset.
Available – numeric filter showing only assets with balances below or above a given amount (using Less Than / Greater Than selectors).
All time deposited – filters based on total deposit volume recorded for the asset.
On hold – filters assets currently locked or pending withdrawal.
Bonus – filters by available bonus balance, using numeric range options.
Show only – displays only specific subsets such as Active, Disabled, or Zero Balance assets.
Apply – applies all chosen filters and refreshes the asset table.
Drop filters – clears all active filters in one click.
Create view – saves the current filter combination and table layout for future access.
Apply Your Filters:
-
In the Assets module, locate the Fast Filters bar above the table.
-
Enter a keyword or asset name in the Search field if needed.
-
Use dropdown filters to refine results:
Project → choose the project the assets belong to.
Currency → filter by specific currencies.
Types → select Fiat or Crypto to limit the view.
Owners → pick one or more client names or email addresses. -
Adjust numeric fields if needed: Available, All time deposited, On hold, and Bonus fields accept numeric ranges (e.g., “Less Than 1000”).
-
Click Apply to update the table and view matching records.
Clear or Adjust Filters:
-
Modify a field: Change any value (e.g., select a new currency) and click Apply again.
-
Remove individual filters: Click the “×” next to any selected filter to remove it, then Apply.
-
Reset all filters: Click Drop filters on the right to clear all fields and show all assets again.
-
Save a view: To reuse the same filter combination later, click Create view.
Quick Search vs. Filter:
Use the Search… field at the top for quick lookups by keyword, currency, or owner name.
Use Fast Filters for structured queries combining multiple parameters such as project, asset type, currency, and numeric conditions (e.g., available balance or total deposited).
Actions Column
In the Actions column, you can manage the selected asset:
1. Show transactions:
Click the Show Transactions icon to view all transactions for the asset.
In the opened window, you can:
View the logs of any transaction from inception to completion (who took what actions, how and when) by clicking the Show Transaction History icon in the Actions column.
Search transactions by Transaction ID, Asset ID, or Account ID.
Filter transactions by Owner, Created Date, Account Type, Status, Transaction Type, and Sub-Type.
Export transactions in CSV format by clicking the CSV icon in the upper-right corner.
Note: For more detailed transaction management, refer to the Transactions module.
2. Make deposit:
Click the Deposit (➕) icon.
In the window that opens, you will see the current balance and fields to add an amount. Enter:
Amount: Deposit amount.
Description: Any text description. For example, the purpose of the transaction, etc.
Source: The source where the money came from. Can be a general description (e.g. “company”) or specific details such as IBAN or wallet.
Click Save to apply the changes. When you save, a transaction will automatically be created.
3. Make withdrawal:
Click the Withdrawal (➖) icon.
In the window that opens, you will see the current balance and fields to withdraw an amount. Enter:
Amount: Withdrawal amount.
Description: Any text description. For example, the purpose of the transaction, etc.
Destination: The destination where the money went. Can be a general description (e.g. “company”) or specific details such as IBAN or wallet.
Click Save to apply the changes. When you save, a transaction will automatically be created.
Account Balances (Platform-Backed)
By default, any account linked to an external Platform will pull its Available balance directly from that platform whenever you see balances in the Accounts module.
Note: You can learn more about platform customization in the Platforms section.
The functionalities for Show Transactions, Show Wallets, Deposit, and Withdrawal are also available within the Accounts module. To access these, click the triple-dot icon in the corresponding asset row.
Assets with Available and Bonus Balances
In Core Banking, each asset in a user’s wallet can have two separate balances:
1. Available Balance
Represents the user’s real, spendable funds.
Deposits or withdrawals of actual money (e.g., via a payment system or direct bank transfer) increase or decrease this amount.
2. Bonus Balance
Represents promotional or virtual credit, often used to let users try features or test the platform.
Funds may be non-withdrawable under typical conditions—users might need to meet additional requirements (e.g., reaching a specific trading volume or making a minimum deposit) before withdrawal is possible.
Note: Our system does not regulate this functionality; its usage is entirely up to you.
You can see these two fields on the Assets page for each currency (e.g., USD, EUR, USDT). There’s a column for Available and another column for Bonus.
Example: Awarding a Bonus
1. Standard Deposit
Initial state: Available = 9 900, Bonus = 0
User deposits 100 EUR via payment system.
Result:
Available → 10 000 (9 900 + 100)
Bonus remains 0
2. Bonus Deposit
User makes a 200 EUR deposit and qualifies for “Deposit 200 → +200 EUR bonus.”
The real deposit adds to Available; the promotional credit goes into Bonus.
Result:
Available → 10 200 (10 000 + 200)
Bonus → 200
Note: “All time deposited” now reads 300 (100 + 200), while “On hold” remains unchanged.
Core Banking Assets Bonus functionality distinguishes real, withdrawable funds (Available balance) from promotional or test credits (Bonus balance). This structure gives businesses the flexibility to offer promotions, demo credits, or loyalty rewards while maintaining separate tracking, ensuring clarity for both the company and the end user.
Asset Deletion (Permission-Based with Financial Safety Validation)
In Core Banking, asset deletion is strictly controlled to protect financial integrity and historical data.
Deletion is not a cosmetic action — it is permanently destructive and cannot be undone.
Permission Requirement
To delete an asset, a user role must have:
Assets → Delete
Location:
Roles → Edit Role → Assets section → Delete
If the role does not have this permission:
- The Delete icon will not appear in the Assets table.
- Any direct backend attempt will return 403 Forbidden.
Where Delete Appears
If permission is granted:
- A Delete (trash) icon appears in the Actions column for each asset.
- The action follows the standard confirmation modal pattern.
On click:
A confirmation modal appears:
Title: Delete Asset
Body: This action cannot be undone.
Backend Eligibility Rules (Mandatory)
An asset can be deleted only if ALL conditions below are met:
-
Asset has no linked transactions (historical or pending).
-
Available balance = 0.
-
Bonus balance = 0.
-
On hold balance = 0.
If any of the above conditions fail:
Deletion is rejected by the backend.
Example error responses:
- Asset cannot be deleted: it has transactions
- Asset cannot be deleted: non-zero balance
Status codes:
- 403 — missing permission
- 409 — state conflict (balance or transactions exist)
Important: Validation is executed server-side at the moment of deletion to prevent race conditions.
After Successful Deletion
If the asset is eligible:
- The record is permanently removed from the database.
- It disappears from the Assets table immediately.
- A success notification is shown.
No orphan ledger entries remain.
Why This Restriction Exists
Assets are part of the financial ledger.
If transactions or balances exist, deletion would break:
- Historical financial reporting
- Audit trails
- Reconciliation processes
- Compliance requirements
Therefore, assets with financial history are immutable and cannot be deleted.
If removal is required for operational reasons, the correct approach is:
Deactivate the asset instead of deleting it.
9. How to Manage Transactions
The Transactions section is designed to view and monitor all transactions that were created in CRM via other modules or automatically. You can do the following:
-
Select the information that will be displayed about the transaction.
-
Change the transaction status.
- Edit the transaction description (permission-based).
-
Search and filter transactions.
-
View the transaction history.
-
Download a list of transactions in .csv format.
By default, the transaction list displays all transaction information, from basic as Type (In or Out) to advanced as assigned Desk.
The Transactions module shows a table of every transaction in your system, with the following columns (possibly to add more):
Amount – Positive (green) for inbound, negative (red) for outbound.
Type – Direction icon (⤴ for withdrawal, ⤵ for deposit).
Project – Linked project (clickable).
Account type – The type of account (e.g. Demo, Personal).
ID – Internal UUID of the transaction.
UID – Auto-incrementing transaction code (e.g. cbtr00002q).
Asset ID – Clickable link to the asset record.
Account ID – Clickable link to the account.
Source email – Remitter’s email (if available).
Source – Origin of funds (e.g. External, deposit-source).
Beneficiary – Destination tag or account/crypto address.
Status – Transaction state (Completed, Processing, etc.).
Actions – View full transaction history or edit the transaction (permission-based).
To select which transaction information to display:
1. Open the Filters window and click Customize Columns at the top of the Transactions tab.
2. Check the boxes next to the fields you want to be displayed.
3. Click Save to select columns.
You can view additional information on the field values that are highlighted in blue. To do this:
1. Click on the field value in the Currency column.
2. A drawer with information about the field opens.
You can change all transaction statuses, except Completed and Canceled. Accordingly, you can approve or cancel transactions in Processing, Pending, and other custom statuses.
To change the status:
1. Click on the status in the corresponding row.
2. Select a new status from the dropdown. Custom statuses (e.g., “Review,” “Escalated”) appear here too.
Warning: After selecting the Completed or Canceled transaction status, the transaction history ends. It is not possible to cancel this action.
Edit Transaction Description
If your role includes the appropriate permission, you can edit the transaction description.
To edit a transaction:
-
Click the Edit icon in the Actions column.
-
A right-side drawer opens.
-
Modify the Description field.
-
Click Save to apply changes.
Notes:
-
The Description field is pre-filled with the existing value.
-
Only users with the required permission can see the Edit action.
-
All edits are logged in the transaction history.
-
Core financial data (amount, currency, IDs) cannot be modified.
Transaction Visibility & Role-Based Access
Transaction visibility is strictly controlled by role permissions and follows the same access logic used in the Clients, Projects, and Desks modules.
Access is determined at backend level and cannot be bypassed by frontend filtering.
Transaction visibility follows these rules:
Clients permissions
-
If a user has View all clients, they can see transactions for all clients.
-
If a user has View own clients, they can only see transactions for clients assigned to them.
Projects permissions
-
If a user has View all projects, they can see transactions across all projects.
-
If a user has View own projects, transactions are limited to projects they are assigned to.
Desks permissions
-
If a user has View all desks, transactions from all desks are visible.
-
If a user has View own desks, only transactions from assigned desks are shown.
Combined Permissions Behavior
When permissions are mixed, visibility is calculated as the intersection of allowed scopes.
Example:
View all projects + View own clients
→ User sees transactions only for their own clients across all projects.
Users without “View all” permissions will never see unrelated transaction data.
This behavior ensures:
-
Full compliance with role-based access rules
-
No overexposure of financial data
-
Consistency with other modules
To search for a transaction: Type into the Search field located above the Transactions table to live-filter by any visible text field (e.g., ID, asset code, remitter email, amount). Matches substrings, case-insensitive.
The Search field works independently from Fast Filters and is not stored in saved filter configurations.
Manager Snapshot Persistence
Each transaction permanently stores the manager who was assigned to the client at the moment the transaction was created or updated.
This ensures historical accountability and prevents retroactive changes if the client’s manager is reassigned later.
When the Manager Snapshot Is Applied
The manager snapshot logic runs automatically in transaction write operations:
-
On transaction creation
-
On save
-
On findOneAndUpdate
-
On updateOne
-
On any other transaction write path
Bulk update operations (updateMany) must explicitly support this logic if used in the codebase.
Important Behavior
-
If the client’s manager changes later, previously created transactions retain the original manager value.
-
If a transaction is updated later, the manager field is refreshed from the current client manager.
-
If the client does not exist, the system does not overwrite the existing manager value.
-
If the client exists but has no assigned manager:
-
The system sets manager to null (if following null convention),
-
or preserves existing value (based on platform-wide consistency rules).
-
Performance & Integrity
-
Client lookup uses minimal projection: { manager: 1 }
-
No recursive writes are triggered.
-
No historical transaction records are mutated by later client edits.
-
The manager snapshot is immutable unless the transaction itself is updated.
To filter transactions:
1. Click the Filter button.
2. Enter or select from the drop-down list one or more parameters for filtering. Main filters include:
| Field | Type |
|---|---|
| Project | dropdown (available projects) |
| Desks | dropdown (available desks inside the project) |
| Owner Manager | dropdown (name) |
| Owners | dropdown (name) |
| Account | free-text UUID |
| Asset ID | free-text UUID |
| Currency | dropdown (e.g., CAD, EUR) |
| Owner | dropdown (client name/email) |
| Created Date | date-range picker |
| Account Type | dropdown (Personal, Demo…) |
| Sub-type | dropdown (from integrations) |
| Status | dropdown (all statuses) |
| Type | dropdown (IN / OUT) |
| Operation Manager | free-text |
3. Click Apply to apply filters.
You can also save selected filters and quickly reuse them the next time you open the Transactions table. To do this:
-
Select the required filters
-
Click Create view
-
Enter the name
-
Click Submit
To clear a single filter, hover its field and click ×; to reset all, close and reopen the panel.
To view the transaction history:
1. Click the Show transaction history icon in the Actions column in the corresponding row.
2. You will see the logs of the transaction from inception to completion (who took what actions, how and when).
A side-drawer lists each state change and user action in chronological order.
Tip: You can also jump directly to history from the Transactions module’s own drawer (see next section).
Inspect Full Transaction Details
Click any Transaction ID cell to open the Transaction Information drawer:
General (Currency, Amount, Type IN/OUT, Provider, IDs, Dates, Description)
Owner (Client name, email, profile link)
Source (Remitter details, External ID, Order ID, Hash, Fees)
Destination (Beneficiary, Destination address or account)
Use the ☰ chevrons to expand/collapse each section.
To export the transactions list in .csv format: Click the CSV icon in the upper-right of the Transactions tab to download every row currently visible (respecting your filters, columns, and pagination) as a comma-separated file.
By mastering Columns, Search, Filter, Status, and Drawer controls, you can tailor the Transactions view to any reconciliation, audit, or support workflow—then export or update statuses in just a few clicks.
10. How to Manage Banks
The Banks section stores information about the details of the banks in use. This section is directly related to Assets. At the stage of adding an asset (provided that it is a fiat currency), you can (optionally) select the bank to which it belongs from a given list.
For example, you have a platform where a user can create an EUR asset with its own IBAN and select a banking system for it. You can use this functionality to identify which bank this asset's IBAN is from. Then you can divide assets across different banks, create integrations, and understand which bank and its credentials need to be queried from CRM and other systems.
Accessing the Banks Module
In the left-hand Core Banking sidebar, click the Banks.
The header shows “Banks” with:
A Total count of bank records.
A Search field to quickly locate banks by any visible column.
Add a bank button on the upper-right.
To Add a Bank:
1. Go to the Banks section.
2. Click the Add Bank button in the upper right corner of the tab.
3. Fill in the following fields:
Name (Required): Full legal name of the bank.
Address: Street address or headquarters location.
Country (Required): Select from the dropdown of country names/flags.
Bank code (e.g., routing number).
Licence: Regulatory licence number, if applicable.
SWIFT/BIC: International bank code.
IBAN: Default IBAN format for this bank (used when auto-populating assets).
Make as default (checkbox): If checked, this bank is automatically pre-selected when adding new fiat assets (you can only have one default at a time).
4. You can also make this bank the default bank. To do this, click the Make as default checkbox.
5. Optionally, fill in the Rules and Credentials fields for additional settings:
Rules: Custom rules. For example, you can define how to use a given bank on the platform, with what conditions.
Credentials: Developer field. Here you can save the bank's credentials for integration.
6. Click Save to apply the changes.
You can do following actions with all created banks:
- Searching
- Editing
- Deletion
To Search For a Bank:
Search: Begin typing any part of a bank’s Name, IBAN, SWIFT/BIC, or Country ISO code. The list filters in real time.
Sorting: Click the ▲/▼ icon next to any column header (e.g., Bank, Country, Licence) to sort ascending/descending.
Note: Banks cannot be “filtered” by advanced criteria—use the live Search and column sorting to narrow the list.
To Edit a Bank:
1. In the Actions column of the bank’s row, click the Edit (✏️) icon.
2. The same drawer appears, pre-populated with that bank’s details. Update any editable field—Name, Codes, Rules, Credentials, etc.
3. Click Save to apply changes.
If you change Make as default, the previous default bank is automatically unset.
To Delete a Bank:
Click the Delete (🗑️) icon in the Actions column.
Confirm the prompt.
Warning: Deletion is permanent. Any assets previously linked to this bank will lose their bank association (you’ll need to re-assign them manually).
Linking Banks to Assets
When you Add Asset (fiat) in the Accounts or Assets modules, the Bank dropdown lists every bank you’ve created—default first, then alphabetically. Selecting the correct bank ensures:
-
Automated IBAN validation (based on bank code).
-
Platform integrations (via the bank’s stored credentials).
-
Accurate reconciliation when querying external banking APIs.
Quick Tips
-
Default Bank: Always ensure you have one default bank for your most-commonly used fiat currency.
-
Rules & Credentials: Use these JSON editors to configure country-specific routing rules or to store sandbox/live API keys.
-
Audit Trail: All create/edit/delete actions appear in your system’s audit logs—perfect for compliance reviews.
With this setup, your platform can precisely route fiat deposits and withdrawals, segment assets by banking partner, and leverage integrations seamlessly.
11. How to Manage Cards
The Cards section stores information about the details of the cards in use. This section is directly related to Accounts, Assets, and Banks. You can create a card for a client and connect it through the account to a fiat and crypto asset at the same time (or to one of that asset). All this is done when adding a new card to the CRM.
Accessing the Cards Module
Click the Cards icon (💳) in the left-hand sidebar.
The header shows:
Total: Number of cards in the system.
Search by ID… field (to filter by card ID or masked number).
Add card button in the upper-right.
Searching & Sorting Cards:
- Search: Type any portion of the Card (e.g. “4567”) or ID to narrow the list in real time.
- Sort Columns: Click the ▲/▼ icons in any column header—such as Owner, Bank, or Priority—to reorder ascending/descending.
To Add a Card:
1. Click the Add card button in the upper right corner of the tab.
2. Enter Card number.
3. Then step-by-step add:
Owner of the card: from the list of Clients.
Account ID: from the list of the client’s accounts.
Crypto asset ID and/or Fiat asset ID: from the lists of the account’s assets.
4. In case you select both crypto and fiat asset, select the priority for the asset.
5. Select from the drop-down list Bank.
6. Optionally enter External ID for third-party integration.
7. Click Save to apply the changes.
You can do following actions with all created cards:
- Searching
- Editing
- Deletion
To search for a card: Start typing its ID in the Search field.
To Edit a Card:
1. Click the Edit icon in the corresponding row.
2. All field in the opened window, except the Owner, are changeable. ange account links, asset assignments, bank selection, or external IDs as needed.
3. Click Save to apply changes
To Delete a Card:
Click the Delete (🗑️) icon in the card’s Actions column.
Confirm in the prompt.
Warning: Deleted cards are not restored.
Quick Tips
With the Cards module, you maintain a clear, auditable link between physical/virtual cards and the underlying client accounts, assets, and banking relationships.
12. Configurations
The Configurations module in Core Banking allows managing project-specific settings. Unlike a global configuration affecting all projects simultaneously, this system ensures that each project has its own independent settings. This modular approach enables better organization, customization, and scalability.
Use Cases
#1. Switching Between Projects
Users can quickly switch between projects, with the system displaying configurations specific to the selected project. If no settings are defined, the section shows "No data to display" until configurations are added.
#2. Cloning Configurations for New Projects
When creating a new project, users can use the "Clone from project" feature to copy configurations (e.g., currencies, transaction sub-types, or account types) from an existing project, saving time and ensuring consistency.
#3. Cloning Currency Configurations
Users cloning currency settings (e.g., USD, EUR, USDT, TRX) from one project (e.g., Wibroker) to another (e.g., Incur) avoid manual currency additions, enabling faster project setup.
Accessing the Configurations Module
Each project can have specific settings. Once inside, you’ll see four panels:
| Panel | Purpose |
|---|---|
| Types of account | Define labels for different account categories (e.g. Personal, Business). |
| Currencies | Pick which currencies the project supports (e.g. USD, EUR, USDT). |
| Sub-types of transaction | Add custom transaction sub-types (e.g. Deposit, Fee). |
| Transaction statuses | List possible statuses (e.g. Pending, Completed, Canceled). |
This modularity helps businesses handle multiple projects with ease, allowing them to customize financial settings for each project separately.
1. Switching Between Projects
At the top is Settings by project:
Click the project pill or type in the search field to pick a project.
All four panels update to show that project’s configurations.
Each project can have unique configurations. When selecting a project, the system updates the displayed settings specific to that project.
Note: If a project doesn’t have any settings defined yet, it will show “No data to display” for its sections.
2. Cloning Configurations from Another Project
To make configuration setup easier, the system includes a Clone from Project functionality.
How It Works
The user selects a section, such as Currencies, Sub-types of Transactions, or Types of Accounts.
Set a Default Account Type:
In the Types of account panel only, each row has a Make as default link (or a “Default” badge if already set). Clicking Make as default marks that type as the project’s default—only one type can be default at a time, and the UI will highlight it accordingly.
Click “Clone from project” in that section.
A popup appears where the user selects a project from which they want to clone data.
Clicking “Clone” copies all configurations from the selected project to the current project.
Note: If data has already been cloned (or created manually), the Clone button disappears to prevent duplication.
Cloning Example: Currencies
For example, the user clones currency configurations from Wibroker into the Incur project.
Once cloned, the system automatically displays the available currencies (e.g., USD, EUR, USDT, TRX).
This prevents the need to add each currency for new projects manually.
Editing & Deleting Entries
Edit: Click ✏️ next to an item, update its fields, then Save.
Delete: Click 🗑️ and confirm.
Warning: Deletions are permanent and cannot be undone.
Cloning Other Configurations
The same cloning process applies to Sub-types of Transactions and Types of Accounts.
For instance, the user clones Sub-types of transaction from Cypress Test Default into Incur.
Once cloned, the configurations instantly appear under the selected project.
This saves time and ensures consistency across projects while allowing each one to operate independently.
Best Practices & Tips
-
Clone all panels when launching a new project to maintain consistency.
-
Customize statuses per project (e.g. “Held,” “Reconciled”).
-
Use clear naming conventions for account types (e.g. “Demo,” “Live”).
-
Regularly review and prune unused currencies or statuses to keep the UI clean.
This project-based approach ensures each environment has tailored financial settings, speeds up onboarding of new projects, and prevents cross-project configuration conflicts.
13. Invoices
The Invoices section is designed to create, track, and manage invoices issued to clients. It allows you to monitor payment status, associate invoices with transactions, attach supporting documents, and follow the full lifecycle of each invoice from creation to settlement or expiration.
In this section, you can:
-
Create new invoices for clients
-
View and manage all existing invoices
-
Change invoice statuses
-
Search and filter invoices by multiple criteria
-
Attach and manage invoice documents
-
View related transactions and postbacks
By default, the invoice list displays all invoices you have permission to view, including their current status, client, amount, and key dates.
Invoice List and Columns
The Invoices module displays a table of all invoices in the system with the following columns:
- Currency – Invoice currency (with asset icon if applicable)
- Amount – Invoice amount
- Project – Linked project (clickable)
- Client – Client associated with the invoice (clickable)
- External ID – External or integration identifier (if provided)
- Description – Invoice description (if provided)
- Expires At – Invoice expiration date and time
- Created at – Date and time the invoice was created
- Status – Current invoice status (Pending, Paid, Overpaid, Underpaid, Expired)
- Actions – Context actions such as documents, edit, and related records
Columns can be sorted by clicking on the column headers.
Creating a New Invoice
To create a new invoice:
In the Add invoice window, fill in the following fields:
Client – Select the client the invoice is issued to
Currency – Select the invoice currency
Amount – Enter the invoice amount
Network – Optional field for blockchain or payment network
Wallet address – Destination wallet address (if applicable)
External ID – Optional identifier for external systems
Expires At – Expiration date of the invoice
Status – Initial invoice status
Comment – Internal comment
Description – Invoice description or notes
Click Save to create the invoice.
The newly created invoice will appear in the invoice list with the selected status.
Editing an Invoice
To edit an existing invoice:
-
Locate the invoice in the list.
-
Click the Edit (✏️) icon in the Actions column.
-
Update any editable fields such as amount, expiration date, status, comment, or description.
-
Click Save to apply changes.
Invoice Status Management
Invoices support multiple statuses, including Pending, Paid, Overpaid, Underpaid, and Expired.
To change the status:
-
Click the Status badge in the corresponding invoice row.
-
Select a new status from the dropdown list.
The status updates immediately and is reflected in the table.
Searching for Invoices
Use the Search field located above the Invoices table to quickly find invoices by visible text fields such as client name, currency, or identifiers. The list updates in real time as you type.
The Search input is independent from Fast Filters. Saved filter views include only structured filters and do not store search terms.
Filtering Invoices
To filter invoices:
Click Select any filter to open the filter panel.
Configure one or more of the available filters:
- Project – Filter invoices by project
- Clients – Filter by one or more clients
- Currency – Filter by invoice currency
- Amount – Filter by amount (e.g., less than a value)
- Status – Filter by invoice status
- Created date – Filter invoices created within a date range
- Wallet address – Filter by wallet address (contains)
- Comment – Filter by comment text (contains)
Click Apply to apply the selected filters.
To remove all filters at once, click Drop filters.
You can also save a filter configuration using Create view for reuse.
Invoice Documents
Each invoice can have documents attached.
To manage documents:
Click the Documents icon in the Actions column.
In the Documents window, drag and drop a file or click Browse to upload it.
Supported formats include pdf, doc, docx, xls, xlsx, txt, csv, jpg, jpeg, and png.
Uploaded files appear in the documents table with file name, extension, size, creation date, and actions.
Related Transactions
To view transactions related to an invoice:
Click the Actions (⋮) menu in the invoice row.
Select Related transactions.
You will see a read-only table listing all transactions linked to the invoice, including currency, amount, type, project, account type, IDs, asset details, status, and actions.
Related Postbacks
To view postbacks associated with an invoice:
Click the Actions (⋮) menu in the invoice row.
Select Related postbacks.
The Invoices module centralizes invoice creation, tracking, and reconciliation. With powerful filtering, status management, document attachments, and direct links to related transactions and postbacks, it provides full visibility into invoice lifecycle and payment outcomes within the Banking system.
Trading
1. Trading: Overview
The Trading section is the control center for configuring tradable instruments and running day-to-day trading operations. It provides the baseline market calendar, price/fee/margin parameters, operational price adjustments, order management, and client-level overrides—so risk, pricing, and execution behave consistently across the platform.
What it includes
-
Configurations – Define instrument families and trading pairs: active state, spread (pips), swaps, commission, margin requirement, leverage (margin ratio), lot volume, price precision, timezone; manage weekends/holidays and bulk import/export.
-
Price deltas – Schedule temporary price offsets (in pips) for a symbol/pair over a time window; the adjusted price is published and used for execution during the window.
-
Orders – View, filter, create, edit, and close client orders; enforce trading calendar and margin checks; adjust price/quantity, stop-loss, take-profit, and (where allowed) swap overrides.
-
Trading groups – Create client segments (e.g., VIP, Watchlist) with parameter overrides at family or symbol level (commission, swaps, margin ratio, etc.); assign and order groups per client with inheritance and fallback to base pair configuration.
2. Trading: Use Cases
Use Case #1: Launching a New Trading Pair
Ops adds a new instrument under Trading → Configurations. They pick the symbols group (e.g., Crypto), click + Add symbol, and set Active, Spread (pips), Commission (pips), Margin requirement (%), Margin ratio (leverage), Lot volume, Price precision, and Timezone. From that moment, margin checks, pricing, and calendar rules apply consistently to the pair, and it becomes available to Orders.
Use Case #2: Scheduling Market Closures (Weekends/Holidays)
Risk defines a recurring non-trading window under Weekends. They choose a base timestamp, set Repeat (week/month/year), and optional work hours. For instruments with their own Timezone, the closure is evaluated in that zone. During the window no ticks are published and no orders are accepted for the affected instruments.
Use Case #3: Running a Controlled Price Simulation
For a short demo or QA scenario, an admin opens Price deltas and clicks + Add. They select a symbol, set From/To, and enter a Pips offset (positive to push price up, negative to pull it down). While active, the venue shows and executes at the adjusted price. Chaining minute-long deltas produces stepwise ramps without touching fees or spreads.
Use Case #4: Risk-Adjusting a Live Order
A risk manager filters Orders to a client’s open market positions, opens Edit, and updates Stop loss and Take profit (and, if policy allows, Price/Quantity). On save, validations enforce precision/step and re-check margin using the pair’s effective parameters (including any Trading Group overrides). The audit log records before/after values and the user.
Use Case #5: VIP Segmentation with Trading Groups
A client starts trading high notional daily. Ops goes to Trading groups to create a VIP group with Commission=0 and a higher Margin ratio, then assigns it to the client on Clients → Trading Groups. If the client later also needs a Watchlist group, ops adds it and drags the groups to set precedence. Resolution applies settings from the first group; missing fields cascade to the next group, then to the base pair configuration.
3. Trading: Configurations
The Configurations page defines market availability and all instrument/pair parameters used by pricing, margin checks, execution, and risk. It is the primary setup area for symbols in Crypto, Commodities, Forex, Stocks, Indices.
Who uses this: Admins and Risk Managers (edit); Traders and Read-only users (view).
Key actions: Add weekends/holidays, add time zones, add/edit symbols and pair parameters, import/export settings.
Finding the page
You’ll see:
-
Settings by symbols group: Settings by symbols group: group chips (Crypto, Commodities, Forex, Stocks, Indices) + Search.
-
Weekends panel with + Add weekend.
-
A toolbar on the right: Import, Export, + Add symbol, + Add timezone.
-
A table of trading pairs with status and parameters.
Group switcher & search
The All tab displays all trading symbols across every group in a single view.
The All tab is selected by default when opening the page.
Group chips filter the table to a specific symbols family (e.g., Crypto).
Search… finds symbols/pairs and names:
– In All tab: across the full symbols list.
– In a specific group: only within that group.
Weekends
This block holds non-trading windows (regular weekends or recurring holidays). When a weekend rule applies, the platform does not stream ticks and does not accept orders for the target instruments.
Toolbar (right side)
-
Import: bulk upload of symbol/pair parameters (see §5).
-
Export: download current table as CSV/JSON for auditing or migration.
-
+ Add symbol: create a new tradable pair entry (see §3.2).
-
+ Add timezone: register a trading time zone selectable by symbols (see §3.3).
Trading pairs table
Columns include:
| Column | Meaning |
|---|---|
| Active | On/Off toggle for trading the pair. |
| Symbol | Pair code (e.g., BTC/USDT). |
| Name | Human-readable display name. |
| Trading hours | Time period when the pair is available for trading. |
| Spread | Bid/Ask difference in pips (controls minimum price advantage). |
| Price precision | Number of decimal places the price uses/rounds to. |
| Lot volume | Base unit size for the pair (e.g., 1; in FX a “lot” may map to 100,000). |
| Created at / Updated at | Audit timestamps. |
|
Minimum volume |
Minimum allowed trade volume for the pair. |
| Actions | ✏️ Edit, ⛭ other pair-level tools if enabled. |
How to work with the table:
-
Click a column header where it is possible to sort table data in ascending or descending order.
-
Select symbols using checkboxes in the table, including the header checkbox to select all rows, and apply bulk updates to Lot Size and Min Volume for multiple symbols at once.
-
Tick the star icon near the symbol to mark it as Top and add it to favorites.
-
Use the edit button to change settings for the specific symbol.
Dialogs and forms
Add weekend (non-trading rule)
Opens from + Add weekend.
Fields:
- Timestamp: base date/time (UTC storage; UI presents local or selected TZ).
- Repeat:
week,month, oryear(recurring weekend/holiday). - Work from / Work to: intraday window that is allowed to trade on the repeated date; outside of it, the market is closed.
Typical weekend rule: set a timestamp on the target weekend day, Repeat=week, and leave Work from/to empty to block the full day(s); or specify partial work hours for special sessions.
Validation & rules
-
The defined window applies to instruments in the current group or (if your instance supports targeting) to selected symbols/pairs.
-
Overlapping rules are permitted; the most restrictive outcome wins.
-
When a pair has its own Timezone, the engine evaluates the “closed” period in that TZ.
Add symbol (create trading pair)
Opens from + Add symbol.
Fields:
-
Symbol (select) – required (e.g.,
BTC/USDT). -
Active (toggle) – enable trading.
-
Name – display name (e.g., “Bitcoin vs USDT”).
-
Swap long / Swap short – overnight fee long/short (pips).
-
Order calculation type – present in UI, do not use (per transcript).
-
Spread – bid/ask difference (pips).
-
Margin requirement (%) – collateral percent required.
-
Commission – per-order fee (pips).
-
Margin ratio – leverage; used in margin formula.
-
Lot volume (per symbol) – lot size is configured separately for each symbol. This makes it possible to calibrate trade volume efficiency across instruments. Use larger lots for Forex pairs or other low-volatility instruments so user trade quantities remain meaningful.
-
Symbol configuration enhancements:
Name — a human-readable label for the trading pair, also used for text-based search.
Minimal Lot Volume — ensures users cannot trade with volumes below a defined threshold, validated asuser_quantity * lot_volume >= minimal_lot_volume. -
Timezone – select IANA TZ (affects weekends).
Validation:
Numeric fields must be non-negative; Margin ratio > 0; Lot volume > 0.
Keep Spread/Swap/Commission consistent with the pair’s minimum price step/precision.
Name 1–64 chars.
Save to add the pair to the table.
Edit symbol
Click ✏️ Edit in Actions. All fields as above are editable.
Changes apply immediately for pricing/margin checks.
Add timezone
Opens from + Add timezone.
Timezone: selectable list of IANA zones (e.g., Africa/Abidjan).
Usage: Once added, the time zone becomes available in the Timezone selector for symbols/pairs.
User configuration groups
Configuration groups bundle parameters such as swap, commission, and margin, and may apply either to specific pairs or to entire trading groups.
Groups can then be assigned directly to users. When a user belongs to multiple groups, the system applies the groups in the defined priority order.
This enables flexible business policies, such as:
-
Creating VIP groups with minimal commissions and enhanced leverage.
-
Assigning Watchlist groups with extremely high commissions or stricter margin settings for accounts suspected of cheating or arbitrage.
Groups are maintained and edited by Admins and Risk Managers. Traders and read-only users cannot change group assignments.
Margin logic
Used by pre-trade checks to ensure account collateral is sufficient.
Formula:
lot — number of units/lots requested by the order.price — current price of the instrument.margin_ratio — leverage factor (e.g., 1000).
The platform then enforces Margin requirement (%) against this collateral.
If available balance is less than required, order creation is blocked.
Notes:
Commission and spread are accounted for by pricing/risk components.
Rounding follows Price precision and pair’s minimal step.
Import / Export
Import lets you bulk create/update pairs.
-
Format: CSV or JSON (project-standard schema).
-
Mode: Validate only (dry run) or Upsert (create new + update existing).
-
CSV replace behavior: trading configurations for symbols can now be imported and exported in CSV format. If a configuration already exists for a symbol, the imported row will replace the existing configuration. This simplifies migration and setup processes.
-
Mapping: Source columns → fields (
Symbol,Active,Name,Swap long,Swap short,Spread,Margin requirement,Commission,Margin ratio,Lot volume,Timezone, optionalPrice precision). -
Report: A per-row success/error log after the run.
Export downloads the current, filtered table (CSV/JSON) including audit timestamps (Created at, Updated at). Useful for versioning and reviews.
Operational notes & best practices
-
Do not document or rely on “Order calculation type”—it’s a placeholder.
-
Spread and Swap are configured in pips; ensure Price precision matches your minimum step so UI and risk math align.
-
Lot volume calibrates user-visible quantities to meaningful exposure (e.g., FX often defines 1 lot = 100,000; in crypto/equities, use pair-specific units).
-
Timezone at pair level controls how the weekend/holiday rules apply for that instrument (U.S. equities vs. crypto, etc.).
-
If you need to simulate market shapes for testing, use Price deltas (separate page) in short intervals to create stepwise up/down patterns; Configurations simply defines the baseline parameters and trading calendar.
Audit & security
Every create/update/delete in Configurations is written to the audit log with user, timestamp, and before/after values (reflected by Created at / Updated at columns).
Only users with Admin/Risk Manager roles can change pair parameters and weekends; others are read-only.
Glossary
-
Pip (Point) — minimal price increment used for spreads, swaps, commissions.
-
Spread —
Ask − Bid, quoted in pips. -
Swap — overnight fee for carrying positions to the next session.
-
Margin requirement (%) — minimum collateral percent that must be free to open a trade.
-
Margin ratio (Leverage) — factor controlling exposure vs. collateral.
-
Lot volume — base unit size for quantity on the pair.
-
Price precision — number of decimals used for price display and rounding.
-
Weekend/Holiday rule — non-trading window; blocks ticks and order intake for targets.
4. Trading: Price Deltas
The Price deltas module schedules temporary price offsets (in pips) for a chosen Symbol/Pair over a defined time window. While a delta is active, the platform publishes the adjusted price and executes orders against it. All users see and trade on the shifted price for that symbol during the window.
Typical uses
Finding the page
Left navigation → Trading → Price deltas.
Page layout & controls
Table columns
Columns support sorting where indicated.
Creating a delta
Click + Add to open the form.
Fields
Symbol Display Format
In the Symbol dropdown, instruments are displayed using a two-line format for clarity and consistency across the platform.
Each option shows:
Line 1 — Symbol code (e.g., EURUSD, BTC/USDT)
Line 2 — Human-readable instrument name (e.g., Euro vs US Dollar, Bitcoin / US Dollar)
Example:
EURUSD
Euro vs US DollarBTC/USDT
Bitcoin / US Dollar
This format matches the display behavior used in:
-
Orders → Add Order
-
Trading Groups
-
Trading → Configurations
The two-line format improves readability and reduces symbol selection errors.
Creating a delta → Fields:
Offset value and interval — you can specify a positive or negative price offset for a chosen pair. The minimum supported interval is 1 minute, ensuring precise short-term adjustments.
Creating a delta → Behavior:
Offsets apply to the full candle within the defined window. This includes short 1-minute bars, allowing fine-grained control.
Note: Chaining multiple 1-minute windows with small positive or negative offsets creates smooth shifts, visible ramps, or even “pump-and-dump” patterns for testing and demonstrations.
Behavior:
When the current time is within [From, To), the system adds the delta to the symbol’s price stream and trades at the adjusted price.
Example: market 905; +1000 pips → 915; −1000 pips → 895.
The offset applies to the whole bar (full candle) within the window.
Chaining short windows (e.g., 1-minute intervals) with modest pips produces visible step patterns.
Validation:
Overlaps & priority: Multiple deltas may overlap for the same symbol. Platform policy is last applied wins, unless your instance defines an explicit priority rule. Prefer non-overlapping windows for deterministic behavior.
Save to persist the rule.
Managing deltas
Delete: removes the rule immediately. If it was active, price reverts to the unadjusted stream.
Audit: creating and deleting deltas are logged with user, timestamp, and parameters.
Interaction with other Trading settings
Spread, Commission, Swaps from Configurations still apply after the delta; the delta shifts the base price, not fees.
Weekends/Holidays: if a non-trading window closes the market, deltas have no effect during the closure; they resume if still within time when trading reopens.
Timezone: deltas are stored/evaluated in UTC; coordinate any time conversions with the symbol’s trading hours if needed.
Best practices
Examples
Limitations & notes
Deltas affect only the targeted symbol; crosses or synthetics require their own deltas.
Historical OHLC may reflect adjusted prices for “as-traded” storage; confirm your data policy.
Monitoring is recommended for unusually large or long-lived deltas.
Candle data and historical OHLC records are stored per broker. Changes in price or trading settings for one broker do not affect others. Historical as-traded data reflects only the broker’s own feed.
5. Trading: Orders
The Orders page is the operational workspace for viewing, filtering, creating, and editing client orders. It surfaces key fields required by risk, pricing, and execution, and enforces margin and trading-calendar rules from Configurations.
The table includes sortable timestamps for creation, execution (UTC), and last update to support audit and operational review.
Finding the Page
Orders Visibility and Permission Enforcement
Order visibility strictly follows role permissions defined in the Roles module.
The Orders page does not apply UI-only hiding.
All visibility rules are enforced server-side.
Only authorized orders are returned by the backend API.
Visibility Rules
An order is visible to a manager only if it satisfies all applicable permission checks:
1. Project Permission
If the role allows:
Projects → View all→ Orders from all projects are visible.
If the role allows:
Projects → View own→ Only orders belonging to projects assigned to the manager are visible.
2. Desk Permission
If the role allows:
Desks → View all→ Orders from all desks are visible.
If the role allows:
Desks → View own→ Only orders linked to desks assigned to the manager are visible.
3. Client Permission
If the role allows:
Clients → View all→ Orders from all clients are visible.
If the role allows:
Clients → View own→ Only orders where the client is assigned to the manager are visible.
Combined Permission Logic (Critical)
An order must pass:
(project visibility)
AND
(desk visibility)
AND
(client visibility)
If any check fails, the order is not returned by the system.
Full-Access Roles
Roles with global permissions (e.g., Admin) are not restricted and can view all orders.
Orders in Client Profile
Inside a client profile (Clients → select client → Orders tab), orders are separated into two tabs:
- Open Orders — displays only active (OPEN) orders for the selected client.
- Close Orders — displays only closed (CLOSE) orders for the selected client.
Behavior:
Orders are automatically filtered by the selected client.
Open Orders is active by default.
Total count reflects only that client’s orders within the selected tab.
All table sorting and timestamp columns remain available.
Page Layout & Controls
-
Total — number of orders in the current view (respects filters).
-
Filter — opens the advanced filter panel.
-
+ Add — opens the create-order form.
-
Table — sortable columns; actions appear on each row.
Column Customization
The Orders table supports dynamic column visibility customization.
Users can choose which columns are visible in the table.
Accessing Column Customization
To do this, in the Filters window, click on Customize columns and choose the required columns.
This opens a dropdown panel listing all available table columns.
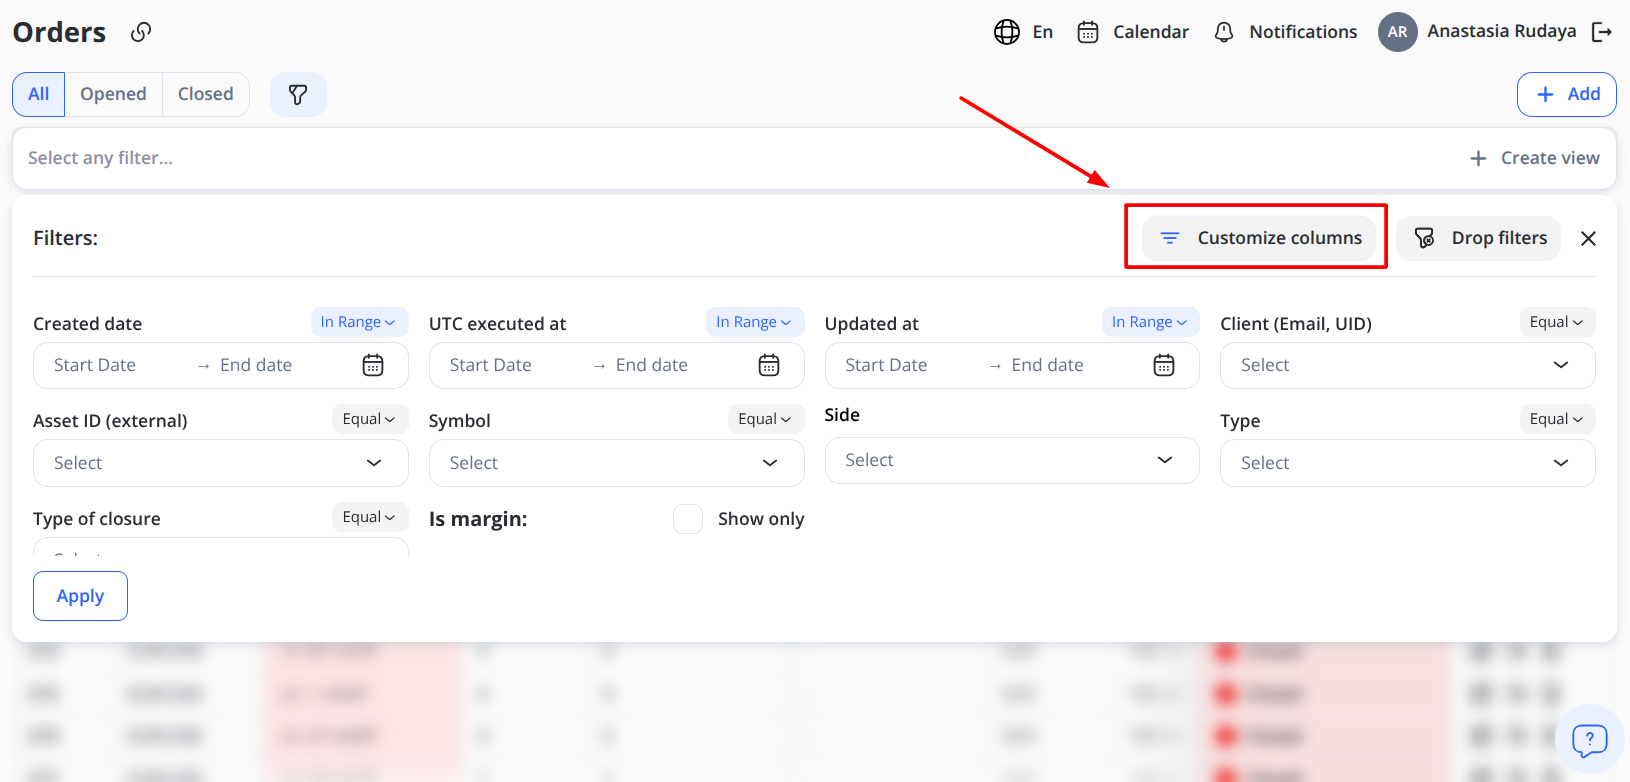
The column list is dynamically derived from the table configuration and always reflects the current implementation.
New columns added in future releases will automatically appear in this list.
Visibility Behavior
When a column is toggled:
-
Visibility updates immediately.
-
No page reload is required.
-
Table re-renders automatically.
-
Sorting and filtering remain functional for visible columns.
-
Are not rendered in the DOM.
-
Do not affect row alignment.
-
Do not break layout or scroll behavior.
Mandatory Column Rule
At least one column must remain visible.
The system prevents hiding all columns.
If mandatory columns are defined (e.g., Actions or ID), their toggle will be disabled.
If no mandatory columns are defined, the system blocks hiding the last visible column.
Persistence
Column visibility preferences:
-
Are saved per user.
-
Persist after page reload.
-
Remain consistent across sessions.
If new columns are introduced in future updates:
They default to visible.
Table Integrity
Column customization does not affect:
-
Pagination
-
Filtering
-
Sorting
-
Row actions
-
Order editing
-
Layout stability
The table layout remains stable when:
-
All columns are visible.
-
Only one column is visible.
-
Many columns are hidden.
Working with Table
The Orders table displays key information about trading orders and may include different columns, depending on the current configuration and enabled system features.
To sort the data, click the header of any sortable column, such as ID, Swap, Commission, Quantity, Status, Price, etc., to sort the table in ascending or descending order.
Row actions (common)
- Edit: Open the edit panel for the selected order. Editing is available for both open and closed orders.
- Clone: Create a new order using the selected order’s details as a prefilled template. All fields are automatically filled with the values from the original order, and the user can change them if needed before creating the new order. This action is available only for open orders.
- Reopen: Reopen a previously closed order as a new active order. A new order ID is assigned, while data from the original order is used as the basis for the new order. Before reopening, the system checks whether the margin requirements are met. This action is available only for closed orders.
- Close/Cancel: Request order closure/cancellation where policy allows (open orders only).
- Delete: Delete the selected order from the list. This action is available for both open and closed orders, not only for non-executed orders. When an order is deleted, the account balance is recalculated and restored based on the order’s reserved margin and profit/loss value.
Filtering & Searching
Open Filter to combine multi-criteria searches. All filters are optional; applying them updates Total and the table.
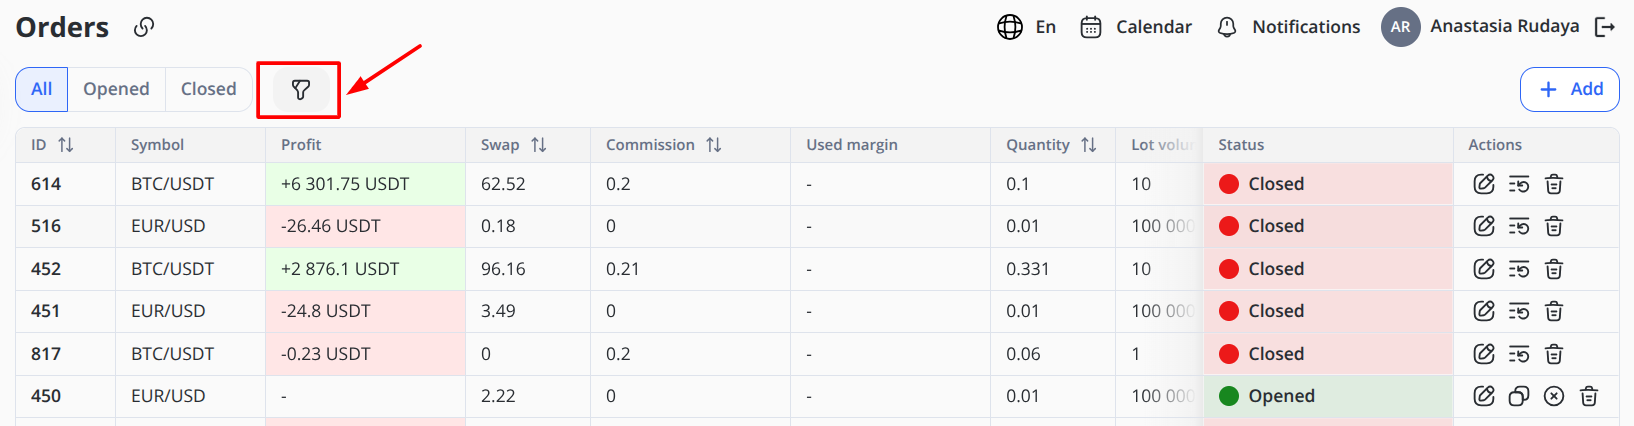
Fields:
-
Created date: Range filter (
Start date→End date) -
Updated date: Range filter (Start date → End date)
-
Executed date (UTC): Range filter based on execution timestamp recorded in UTC
-
Client (Email, UID): Single-select from known clients
-
Asset ID: Narrow by account/portfolio identifier
-
Symbol: Instrument/pair
-
Side —
BUYorSELL -
Type — e.g.,
MARKET(others if configured) -
Type of Closure: Stop, Take profit, Liquidation, Closed by client, Closed by manager
-
Margin: Toggle to show only margin-enabled orders if your instance differentiates
Click Save in the filter panel to apply.
You can also save selected filters and quickly reuse them the next time you open the Orders table. To do this:
-
Select the required filters
-
Click Create view
-
Enter the name
-
Click Submit
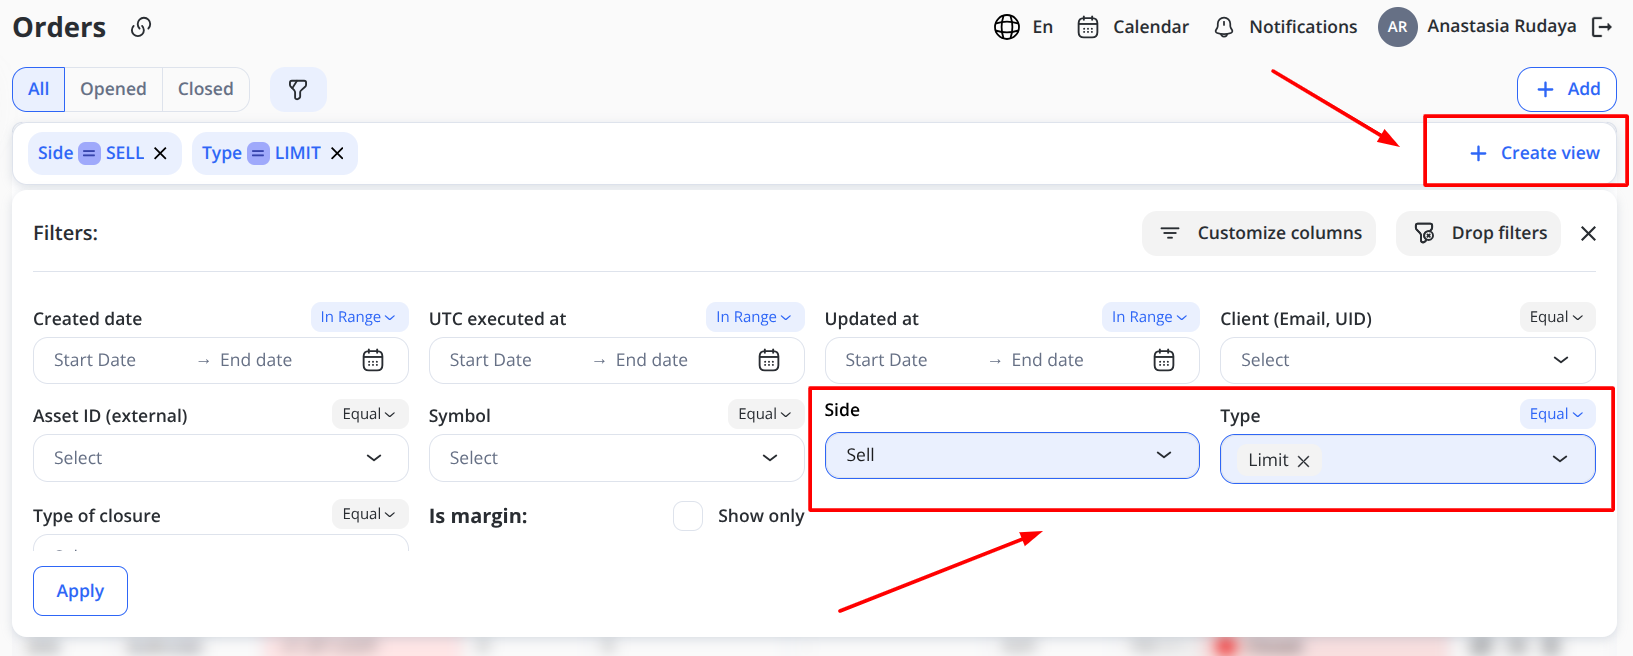
Creating an Order
Click + Add to open the form for creating a New order (exact fields vary by enabled order types).
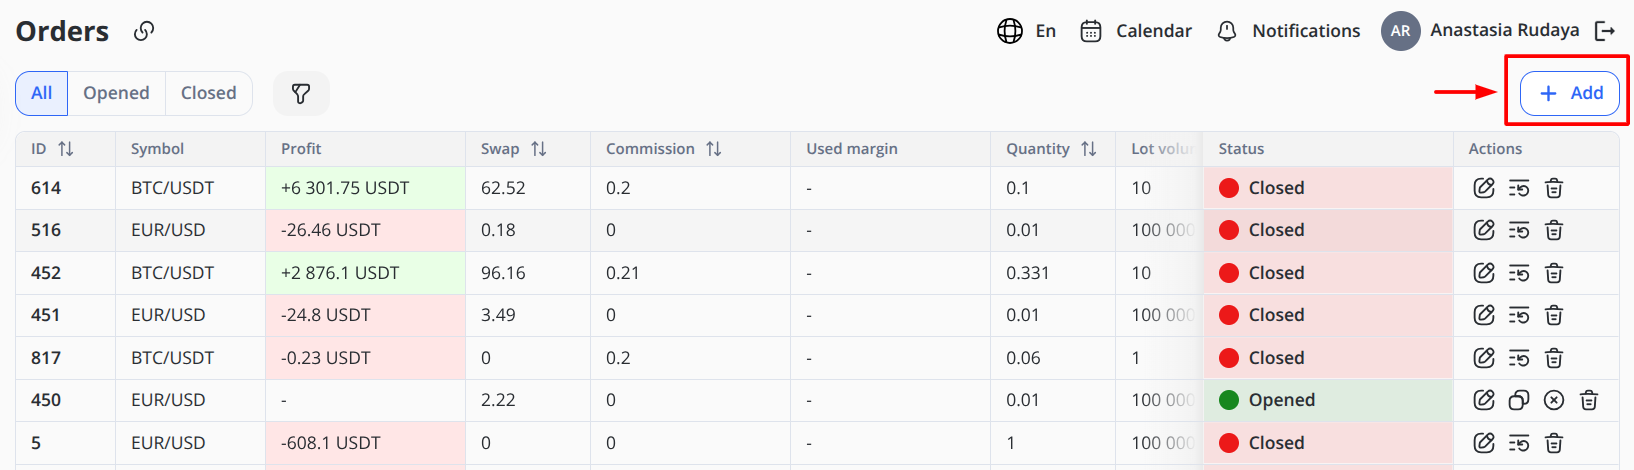
Common fields:
-
Client / Asset ID
-
Symbol
-
Side
-
Volume
-
Limit order
-
Static used margin
-
Commission
-
Accumulated swap
-
Long or Short swap rate
-
Stop loss / Take profit
-
Order in past
After selecting Order in past you have to fill Execution date & time and Opening price.
In the Buy/Sell modal, the system also displays the trading conditions (Calculation type, Lot size, Leverage) and the working hours for the selected trading pair. These hours are based on the trading schedule configured for the symbol.
Business rules at create:
Trading calendar: The system checks the symbol’s trading schedule and time zone before creating an order. If the symbol is in a non-trading window, such as a weekend or holiday, order creation is blocked.
Margin check: The system runs pre-trade margin validation before creating an order:
Margin = Contract Size × Volume × Price / Stored Leverage
Then the account’s free balance must meet or exceed the pair’s Margin requirement (%) of the collateral. If it is insufficient, creation is rejected with an insufficient-margin error. The minimum margin level required to open an order is 40%.
Precision & steps: Price and quantity must align with the pair’s precision/minimum step.
Submit the form to place the order. On success, the order appears in the table.
Editing an Order
Select Edit on a row to open the side panel. Choose Buy or Sell operation, then define the required settings in the editable fields:
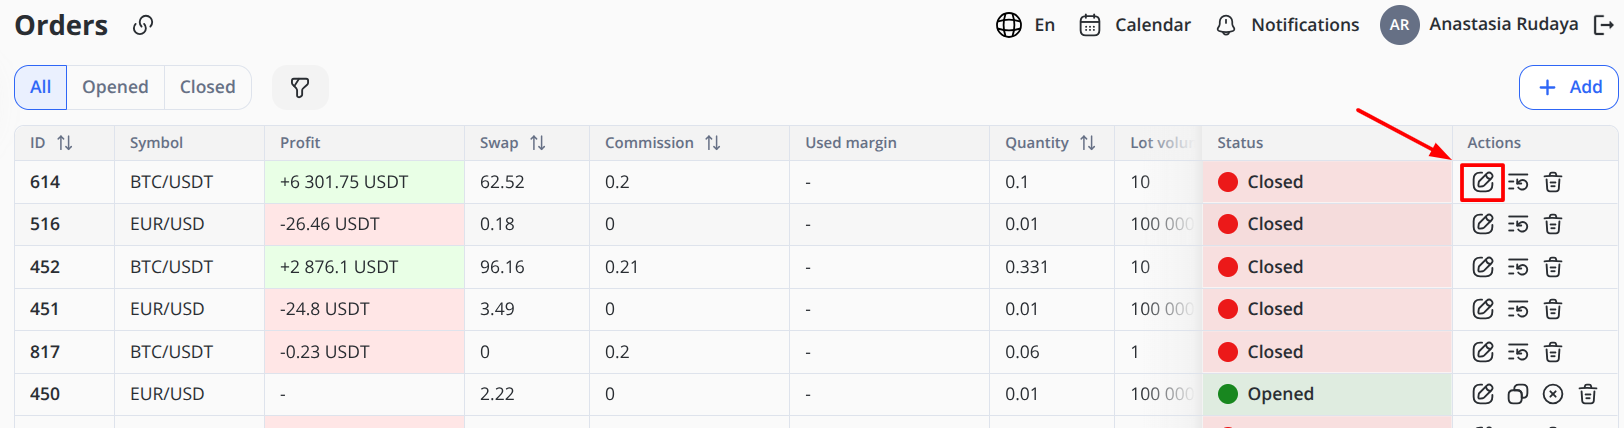
-
Volume
-
Limit order
-
Static used margin
-
Commission
-
Accumulated swap
-
Long swap rate
-
Take profit
-
Stop loss
-
Execution date & time
-
Opening price
Click Update the Order to apply all changes.
Managers have extended control over open orders:
Order Price Adjustment – ability to modify the opening price of an order to increase or decrease profitability.
User PnL Overview – aggregate PnL across all open trades for quick monitoring and reaction.
Margin Adjustment – managers can manually add or subtract a static margin value (positive or negative) in the relevant currency, increasing or decreasing the locked margin.
Validation & behavior:
All edits are re-validated against precision, lot size, and margin availability.
If the instrument is in a non-trading window, actions may be restricted.
Saving applies changes immediately; the audit log records before/after values with user and timestamp.
Margin call and Stop out notifications:
When a trader’s available balance approaches a critical level, the platform sends staged warnings. It is a custom setting configurable for each client. For example:
-
At 30% of the required margin, an early warning is sent to the user.
-
If the balance falls below 10%, one or more open positions are liquidated automatically according to platform policy.
Notifications are sent to both the user and the assigned manager. This mechanism helps users take corrective action before forced liquidation.
Closing/Canceling an Order
Close a position from the row actions when the status is OPEN.
Cancel applies to unfilled pending orders (if such types are enabled).
System enforces trading-calendar rules and available liquidity; resulting fills, and residuals are reflected back in the table.
Interaction with Other Trading Settings
-
Configurations → Trading pairs:
Spread,Commission,Swap,Margin requirement (%),Margin ratio,Lot volume, andTimezonedrive order pricing, fees, and margin checks. -
Configurations → Weekends/Holidays: when active for a symbol’s time zone, order creation and execution are blocked.
-
Price deltas: if active for a symbol, orders execute against the adjusted price stream during the delta window.
Quote Storage Optimization
Performance improvements have been implemented to optimize the storage and retrieval of price quotes. These optimizations reduce memory usage and improve throughput during high-frequency trading without altering user-facing workflows.
Audit & Security
Every create, edit, and close/cancel event is written to the audit log with user, time, and before/after payloads.
Permissions are role-based; elevated edits (e.g., manual margin or swap overrides) are restricted to risk/admin roles.
Monitoring, Health Check, and Logging
Comprehensive monitoring and statistics have been added across all trading platform services to ensure stable operations.
-
Health checks provide continuous status indicators for each subsystem.
-
Centralized logging aggregates events and errors into a unified store for faster issue identification.
-
Statistics dashboards support performance analysis and proactive incident detection.
These features strengthen system stability and shorten troubleshooting time without requiring user intervention.
Examples
-
Filter to open market buys for a specific client this week
Set Created date to the current week, Client to the email/UID, Side=BUY, Type=MARKET, Status=OPEN, then Save. -
Create a market buy on BTC/USDT
Choose Client/Asset ID, set Symbol=BTC/USDT, Side=BUY, Type=MARKET, Quantity=1. Submit. The system runs margin checks using the pair’s Margin ratio and Margin requirement (%). -
Adjust stop loss / take profit
Open Edit on the order, set Stop loss and Take profit to desired levels consistent with instrument precision, then Save. Changes are audited.
Glossary (Orders)
-
Market order — executes immediately at the best available price.
-
Limit order — posts at a specified price; fills when price is reached.
-
Swap — overnight fee for carrying a position to the next session (long/short specific).
-
Lot volume — base quantity unit defined per pair.
-
Margin requirement (%) — minimum collateral percent required to open/maintain a position.
-
Margin ratio (leverage) — factor used in the margin formula to compute required collateral.
-
Status —
OPEN(active) orCLOSE(closed/exited).
6. Trading: Trading Groups
Trading Groups define leverage and trading parameter overrides for clients registered within the system.
Trading Groups are the single source of truth for leverage.
Symbols and Trading Pairs do not define or influence leverage in any margin, execution, or risk calculation.
Finding the Page
Page Layout & Controls
+ Add — Opens the Add Trading Group form.
Search Field — Allows users to search for trading groups by entering relevant keywords or identifiers.
Total — Shows the number of trading groups displayed in the table.
Locked Leverage Groups
The system includes 5 predefined, locked Trading Groups:
-
Leverage 1:10
-
Leverage 1:100
-
Leverage 1:200
-
Leverage 1:400
-
Leverage 1:500
These groups:
-
Can be modified or deleted
-
Can define category-level overrides
-
Are available for assignment to any client
On account creation: The system automatically assigns a trading group, which is marked as default.
Creating a Trading Group
Click + Add
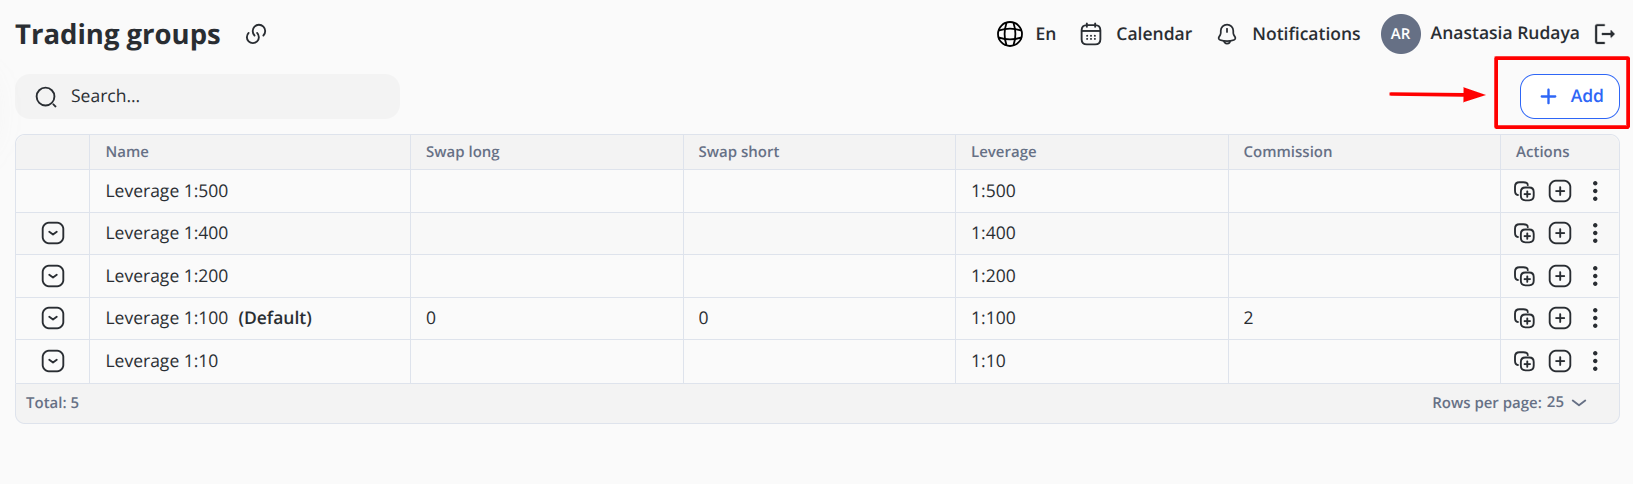
General Section
- Name: Full descriptive name
- Leverage: Defines the base leverage for the group
Example:
1:10
1:100
1:400
- Swap Long: Defines the swap value applied to long positions
- Swap Short: Defines the swap value applied to short positions
- Commission: Commission value applied to trades
- Active (toggle): If disabled, the group remains stored but cannot be used for new assignments.
Click Save
Group Configuration Overrides
To add specific values for Symbols and Symbol groups for the trading group, select the group from the Trading groups table and choose one of the actions you need: add Symbol or Symbol group.
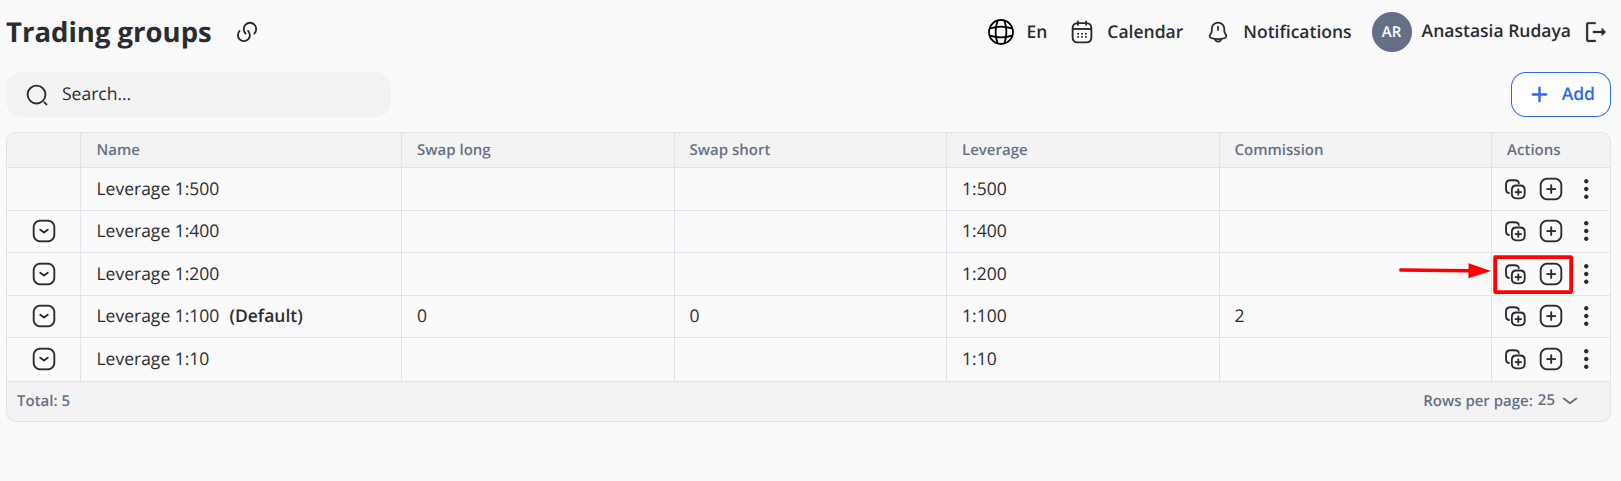
You may define overrides for the following Symbol groups:
-
Forex
-
Crypto
-
Commodities
-
Stocks
-
Indices
Example:
- Group: Forex
- Swap Long: -3.5
- Swap Short: 1.2
- Leverage 1:200
- Commission: 0.05
*Example values are provided for demonstration purposes only
To define configurations for specific Symbols (trading pairs) like BTC/USDT, ETH/BTC, or NEO/USDT, set configurations for each field:
Example:
- Symbol: BTC/USDT
- Swap Long: -0.16
- Swap Short: 0.5
- Leverage 1:200
- Commission: 0.05
*Example values are provided for demonstration purposes only.
If no override exists, the group applies the default configurations.
What Trading Groups Can Override
Trading Groups may override:
-
Commission
-
Swap long
-
Swap short
-
Category-level leverage
They do NOT override:
-
Price feeds
-
Tick size
-
Contract size
-
Trading hours
-
Weekend rules
-
Price deltas
The following is no longer supported:
-
Margin ratio defined on Symbols
-
Leverage defined in Trading → Configurations
-
Multiple group stacking for leverage resolution
Leverage resolution is strictly: Account → Trading Group → Category Override → Effective Leverage
Assigning Trading Group to an Account
When a new client is created inside our system, it automatically assigns the trading group marked as default.
This group serves as the initial trading configuration for all newly registered accounts and defines leverage, swaps, and commission settings. Values for specific Symbols or Symbol Groups are not defined by default.
The assigned Trading Group can be changed manually later if the client requires different trading conditions.
To change the Default group:
1. Choose the client in the Clients module that requires changes
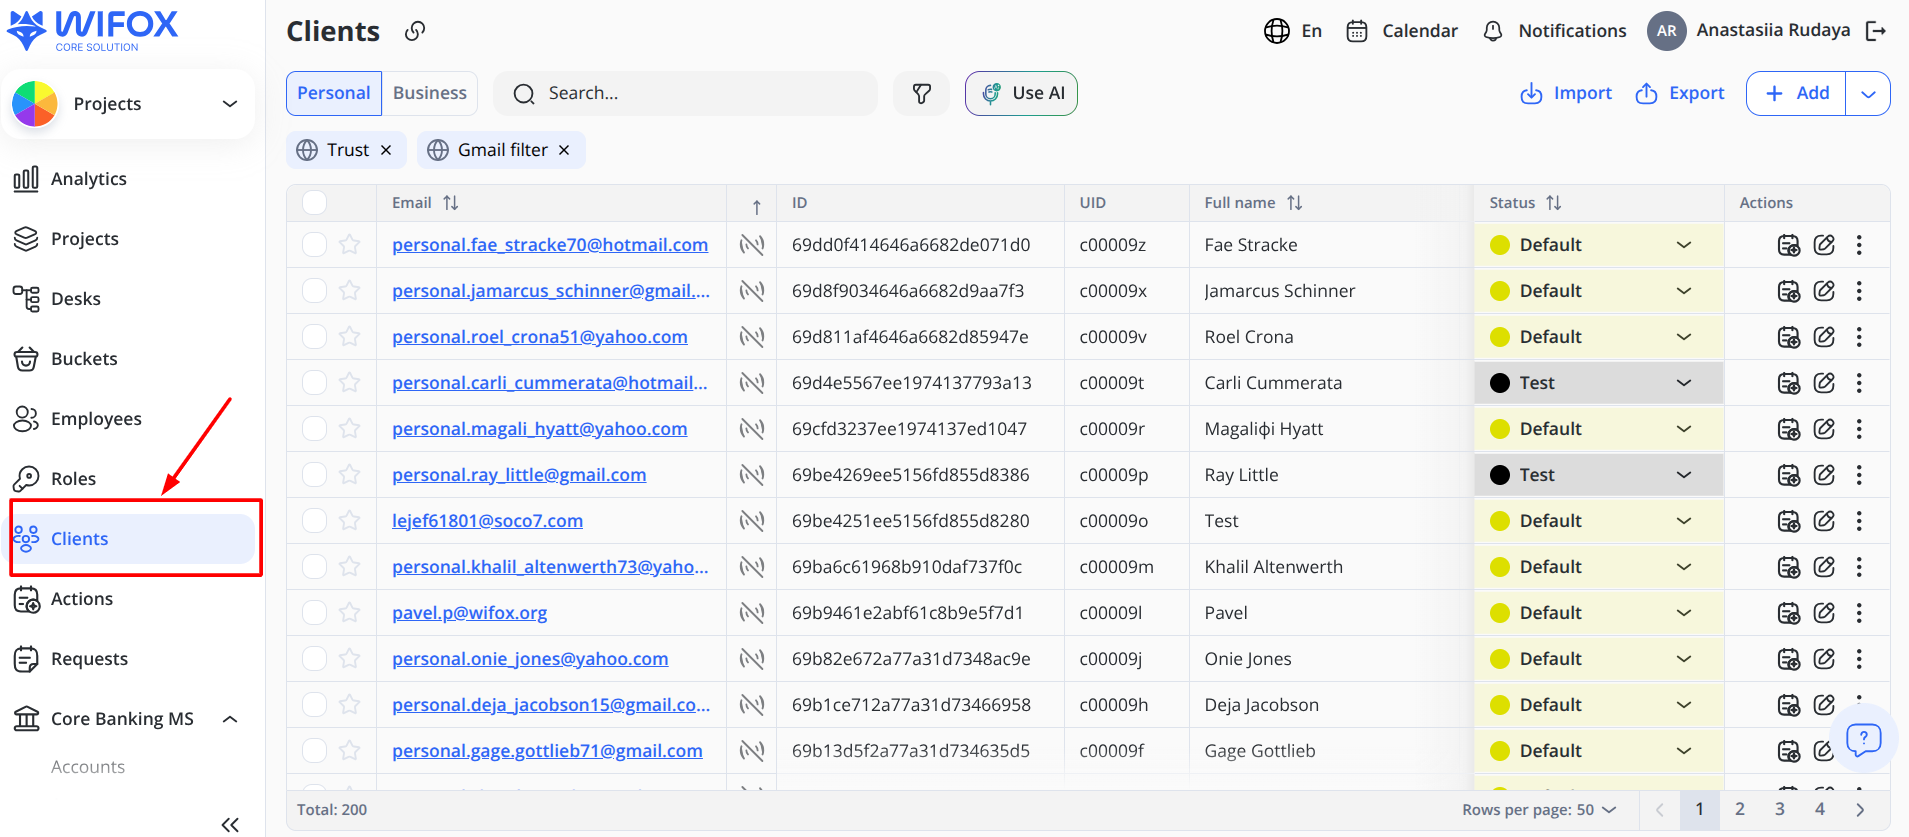
2. Click Edit on the right side of the table
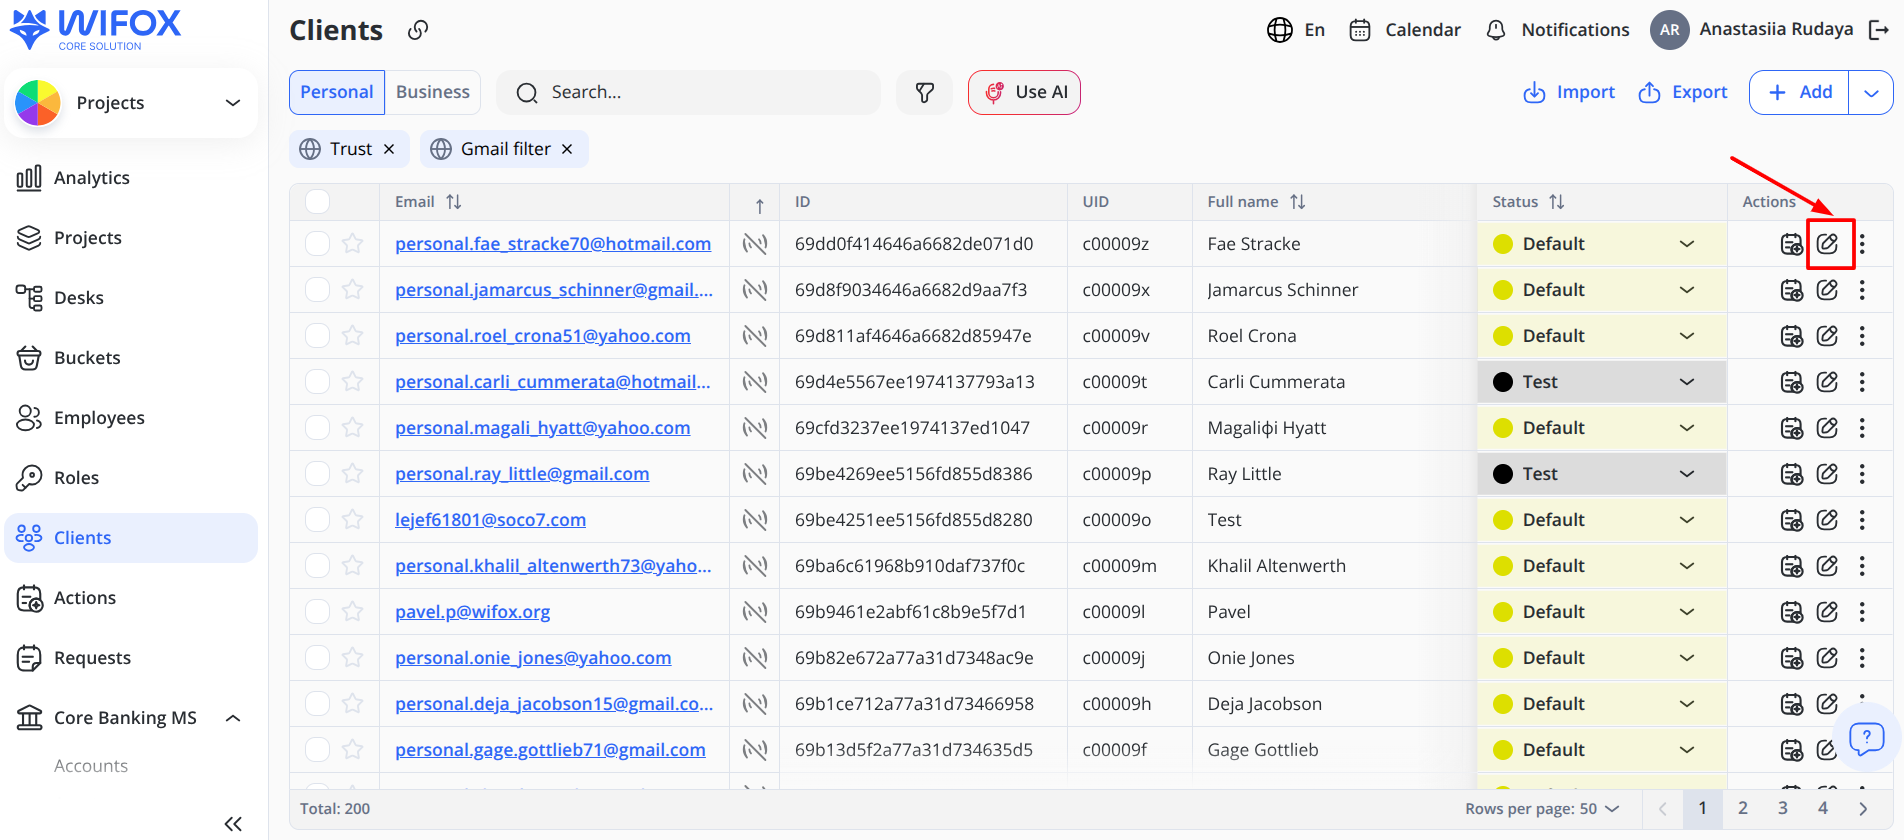
3. Select Trading Groups in the table header
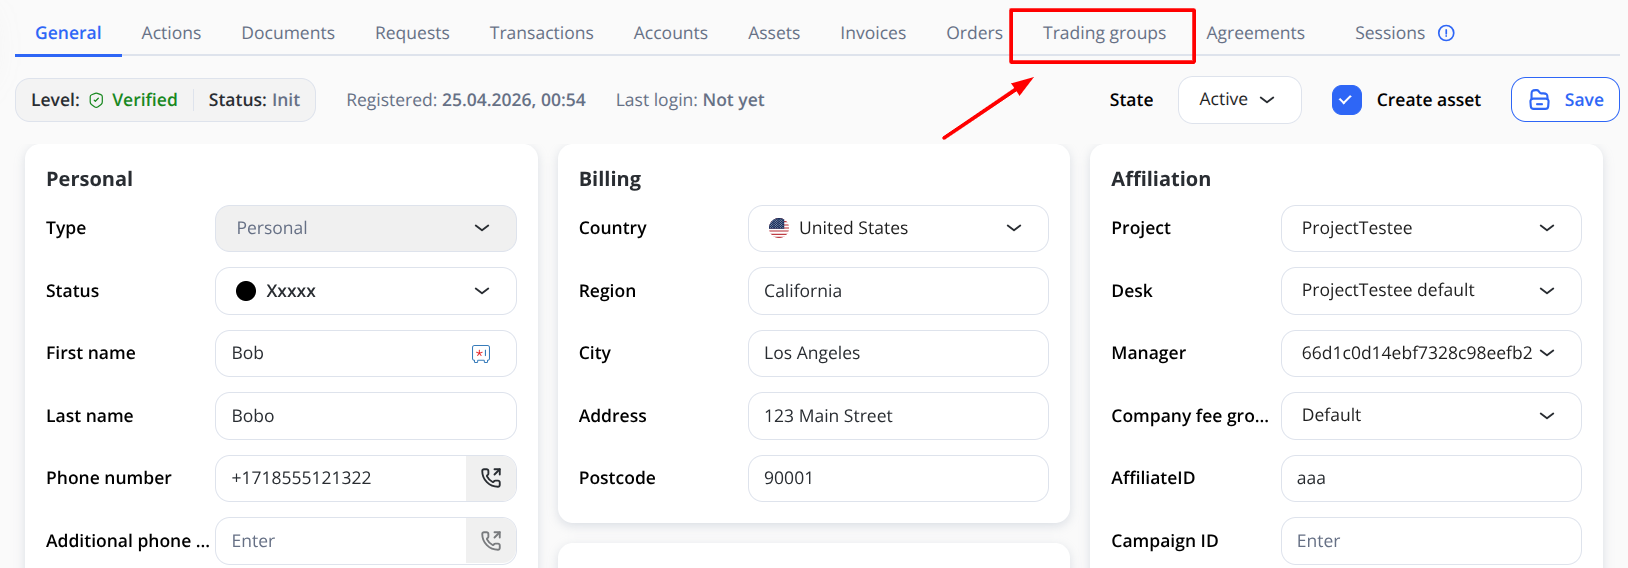
4. Click Replace and select the required option from the drop-down list
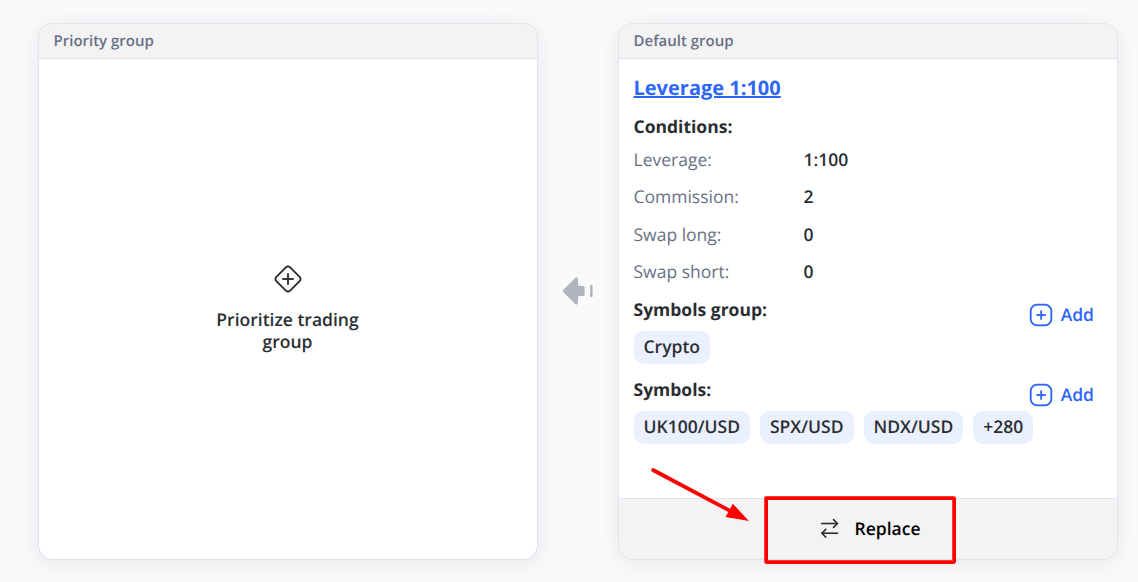
5. Click Save
You can also add values for specific Symbols or Symbol Groups within this Default group. For example, if you need to add custom values for crypto trades, open the window with the current values for the Default group and click Add to configure settings.
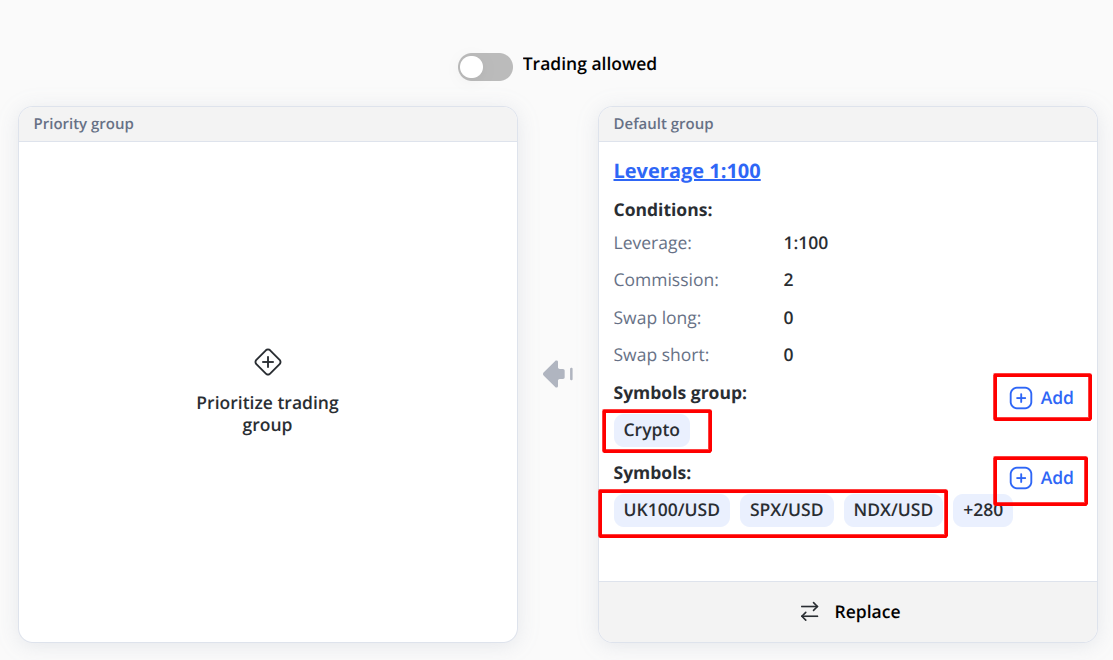
Then:
-
In the window that opens, select the required category from the drop-down menu.
-
Assign values for Swap Long, Swap Short, Leverage, and Commission.
-
Save the changes.
In this way, you can define all required specific settings.
Hierarchy of Values
When the client initiates a buy or sell trade, the system determines which value configuration to use as follows:
-
First, it checks whether specific values are predefined at the Symbol level.
-
If no Symbol-level values are defined, the system checks the Symbol Group level.
-
If no specific values are configured at either the Symbol or Symbol Group level, the system applies the default settings from the assigned Trading Group.
This creates the following hierarchy for applying value configurations:
Symbol → Symbol Group → Trading Group
Changing the Default group to the Priority group
If your client requires specific configurations for Symbols or Symbol Groups, you can change their default Trading Group to the Priority Group.
Follow these steps:
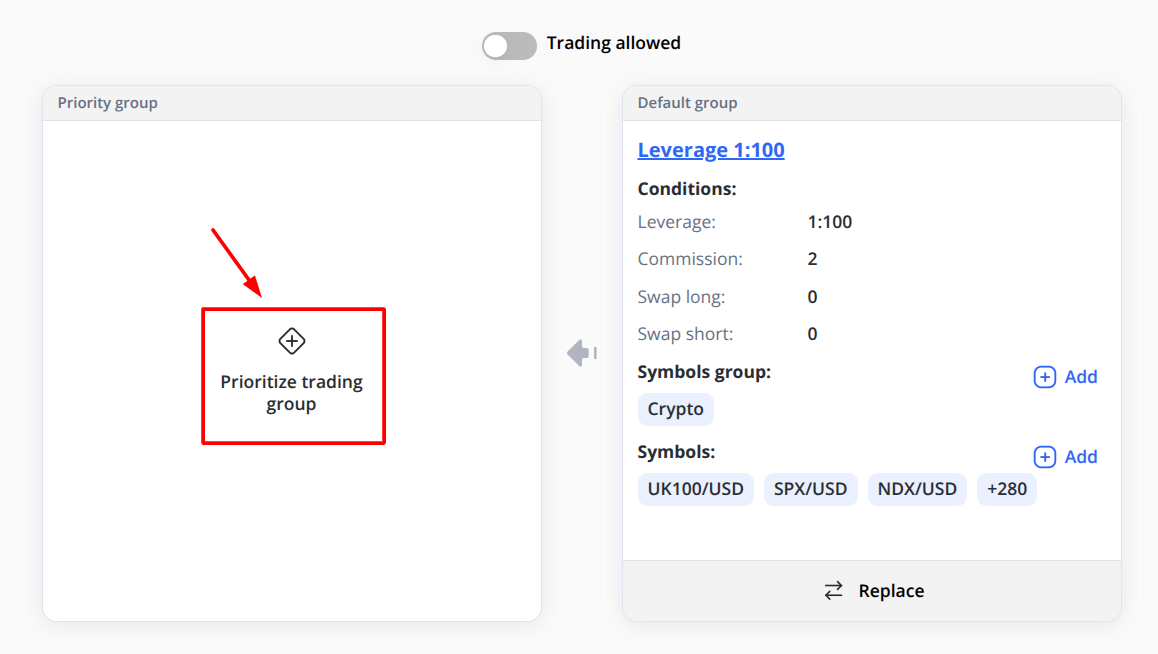
-
Choose the client in the Clients module that requires changes
-
Click Edit on the right side of the table
-
Select Trading Groups in the table header
-
Click + Prioritize Trading Group and select the required option from the drop-down list
-
Click Save
-
In the Priority Group Settings window, choose a specific Symbol Group or Symbol and set the required values
In this case, the hierarchy for applying configurations will be as follows:
-
Symbols in the Priority Group
-
Symbol Groups in the Priority Group
-
Symbols in the Default Group
-
Symbol Groups in the Default Group
-
Default configurations of the Trading Group
The system must always have one active Trading Group assigned to each client before trading is allowed.
Multiple group ordering logic is no longer used for leverage.
Specifics of Changing Trading Group
If the account has open positions, a modal appears:
Recalculate margin for current open positions?
Yes / No
If "Yes" Selected
-
All open positions are recalculated using new effective leverage
-
Margin requirement updates immediately
-
Liquidation levels adjust accordingly
If "No" Selected
-
Existing positions keep original leverage and margin
-
New orders use the new Trading Group leverage
-
Stored leverage on positions remains unchanged
Position Leverage Storage
At order execution:
-
Effective leverage is calculated
-
That leverage is stored on the Position
-
It becomes immutable
Stored leverage is used for:
-
Margin maintenance
-
Liquidation checks
-
Risk monitoring
-
PnL exposure logic
If Trading Group changes later and "No recalculation" was selected:
Existing positions continue using stored leverage.
Leverage Architecture
Core Principle
Leverage is resolved exclusively through Trading Groups.
Symbols and Trading Pairs never define leverage.
Effective Leverage Resolution
When an order is placed:
-
System reads the account’s Trading Group
-
System checks for an instrument category override
-
If override exists → use override leverage
-
If no override exists → use group default leverage
Effective Leverage =
Category Override (if exists)
else Group Default Leverage
The effective leverage is:
-
Applied during margin validation
-
Stored on the Position at execution
-
Used later for liquidation and risk logic
Margin Calculation
Margin is calculated using stored leverage on the position:
Margin = Contract Size × Volume × Price / Stored Leverage
For example:
-
Contract Size = 100,000
-
Volume = 0.1 lot
-
Price = 1.1000
-
Stored Leverage = 100
Calculation:
- Margin = 100,000 × 0.1 × 1.1000 / 100
- Margin = 110
- So, the required margin is 110.
The system does not read leverage from:
-
Symbol
-
Trading pair configuration
-
Historical group values
Only stored leverage is authoritative.
Editing & Deleting Groups
Edit
Open the form → Modify values → Save.
Changes affect:
-
New orders immediately
-
Existing positions only if recalculation was selected
Delete
Deleting a group:
-
Removes it from availability
-
Does not delete historical stored leverage on positions
Locked default groups cannot be deleted.
Interaction With Trading Configuration
Trading → Configurations remains baseline for:
-
Symbol setup
-
Contract size
-
Trading hours
-
Swap defaults (if not overridden)
-
Commission defaults (if not overridden)
Leverage is never read from Trading pairs.
Best Practices
-
Use predefined leverage groups whenever possible.
-
Avoid excessive category overrides unless required by risk policy.
-
Review open positions before changing leverage for large accounts.
-
Use clear and descriptive Names. Label is generated automatically.
-
Document internal criteria for assigning leverage tiers.
Glossary
Trading Group
Container defining leverage and trading parameter overrides for clients.
Default Leverage
Base leverage defined at group level.
Category Override
Optional leverage rule for instrument family.
Effective Leverage
Leverage resolved at order execution.
Stored Leverage
Immutable leverage saved on a Position at creation time.
Commerce Hub
1. Commerce Hub: Overview
The Commerce Hub section is your central hub for managing the ecommerce components of your platform. It includes Offerings, Orders, Configurations (order statuses), Categories, and Payment Methods—each tailored to support project-scoped setups and rapid cloning.
Overview
-
Scope: Everything under Commerce Hub in the left nav—Offerings, Orders, Configurations, Categories, Payment Methods.
-
Project-Scoping: Many pages let you choose a project context (via pills or dropdowns) so each project can have its own settings.
-
Clone Support (Configurations): Quickly copy order-status setups from one project into another.
-
Unified UI Patterns: List views with Total, Filter pane, Search bar, and a +Add button; side-panel forms for create/edit; inline actions for edit/delete.
2. Commerce Hub: Use Cases
Use Case #1: Publishing New Products
Your e-commerce team wants to onboard a new line of items to the Marketplace. They click Commerce Hub → Offerings, then + Add to open the “Add product” form. They select the target Project, enter Name, SKU, Price, choose a Category, upload a Main Image, and toggle Active. Upon saving, the new product appears in the table (with Total count updated) and is immediately searchable and filterable by Name, SKU, Category, and Status—ready for customers to browse and purchase.
Use Case #2: Reusing Marketplace Settings via Project-Scoped Configurations
A second business unit needs the same Order Statuses, Category hierarchy, and Payment Methods you built for Project A. From Commerce Hub → Configurations, they select their Project in the “Settings by project” bar, click Clone from project, choose Project A in the modal, and hit Clone. Instantly, all statuses, labels, and configuration entries appear for the new Project. They can then tweak colors or labels in-place without rebuilding from scratch.
Use Case #3: Building & Managing Categories for Discovery
Your merchandising team wants to group products by “Electronics,” “Accessories,” and “Clearance.” They go to Commerce Hub → Categories, click + Add, pick the Project, enter the Label and URL slug, and optionally nest it under an existing parent. In the table view they can expand each row to see how many products already use that category, edit or delete categories, and drag-and-drop to reorder. Search and filtering on the Category name let them locate and manage any node in a large tree.
Use Case #4: Enabling Multiple Payment Methods & Integrations
Your finance team needs to offer PayPal, Stripe, and an in-house “Manual” option. Under Commerce Hub → Payment methods, they click + Add, choose the Project, pick Type (e.g. “Stripe”), select Integration, set the Merchant ID, and define Currencies, Rules, and Credentials via the JSON editor. Toggling the Status switch immediately enables or disables that payment option on the storefront. The table shows Name, Type, Integration, and Project columns—so teams can audit and adjust live methods in seconds.
Use Case #5: Reviewing & Fulfilling Customer Orders
Customer support needs to monitor incoming orders. They open Commerce Hub → Orders, where the table lists Order ID, Date, Project, Customer, Cost, and Status—together with Total count, Search box, and a Filter drawer for date ranges, customer name, price slider, and status selectors. Clicking the expand-row arrow on any order reveals full order details on the right. From there, they can update the Status dropdown (e.g. “Shipped”), add internal notes, or trigger notifications—ensuring every order is tracked, processed, and closed in one unified interface.
3. Commerce Hub: Offerings
The Offerings page in Commerce Hub is your central catalog for defining and managing the items available for customers to purchase. Each product can be scoped to a specific Project, assigned to one or more Categories, priced, and localized with rich content and SEO metadata.
Finding “Offerings” in Commerce Hub
Open the left-hand navigation menu.
Scroll down to Commerce Hub and click its chevron to expand.
Click Offerings under the Commerce Hub section.
That will take you to the Products page where you can view, add, filter, and manage your catalog.
Table View
Total (top-left): Shows the number of products in your current view.
Filter (funnel icon): Opens a side-panel with advanced filters (see Filtering & Searching below).
Search: Instant, real-time search across product names and subtitles.
Columns:
| Column | Description |
|---|---|
| Products | Thumbnail, Name link (e.g. “teast”), and subtitle below (e.g. “Teast”). |
| Reference | Custom SKU or reference code (or “–” if none). |
| Project | The Project the product belongs to (or “–” for global). |
| Category | Primary Category label (e.g. “Test”). |
| Price ⇅ | Numeric price in your currency. Click header to sort ascending/descending. |
| Status ⇅ | Active (green) or Inactive (gray) badge. Click header to sort. |
| Actions | ✏️ Edit opens the Edit form; 🗑️ Delete permanently removes the product (with confirm). |
+ Add (top-right): Opens the “Add product” form (see below).
Filtering & Searching
Click Filter to open these options:
-
Name – Free-text search on the product name.
-
SKU – Free-text search on SKU/reference.
-
Reference – Dropdown of existing reference codes.
-
Categories – Multi-select categories.
-
Price range – Enter a From and To value to set a minimum/maximum price range (e.g. 10 – 300).
-
Show only – Checkboxes for Active or Inactive.
After choosing criteria, click Save to apply filters (the Total count updates accordingly).
Adding a Product
Open the Form: Click + Add in the Products table header.
General Section
- Project – (Required) Select the Project context.
- Name – (Required) Enter the product name.
- Categories – Pick one or more categories for discovery.
- Reference – (Optional) Select or type a reference/SKU.
- SKU – (Optional) Enter your own SKU.
- Price – (Required) Numeric price.
- Active – Toggle on to make the product live.
Images
- Main image – Drag-drop or browse to upload a primary photo (jpg/png).
- Main external image – Paste a URL to load an off-site image.
- Additional images – Upload multiple supporting photos.
- Additional external images – Paste URLs for extra photos.
Properties: JSON editor for custom key/value attributes (e.g., color, weight).
Save: Click Save to create the product. It immediately appears in the table.
Editing a Product
Click ✏️ in the Actions column to open the Edit panel, which has two tabs:
A. General Tab
Identical to the Add form, but pre-populated. You can:
-
Change Name, Categories, Reference, SKU, Price, Active state.
-
Update or replace images.
-
Modify JSON Properties.
B. Contents Tab
This tab manages translations, page content, and SEO metadata:
Languages – Select the target language badge (Ar, En, Es, Zh, etc.).
Title – Localized product title for the storefront.
Subtitle – Short tagline or description.
Page meta title – SEO title tag.
Page meta description – SEO meta description tag.
Properties – JSON editor for any locale-specific attributes.
Text – Rich-text editor for detailed product description, features, specs.
Clone translation from: Opens a modal to select a source language; copies its fields into the current language.
Translate: Invokes an integrated translation service (e.g., OpenAI) to auto-translate all fields into the current language.
Save: Click Save (bottom-left) to apply edits in both tabs.
Deleting a Product
Click 🗑️ in the Actions column. A confirmation tooltip appears:
Are you sure? [Cancel] [Delete]
-
Delete – Permanently removes the product.
-
Cancel – Closes the tooltip without action.
Audit Logging: Every deletion registers the product name, user, and timestamp in the system audit log.
With these tools, the Marketplace Products module becomes a powerful, project-scoped catalog manager—fully searchable, sortable, localized, and audit-ready.
4. Commerce Hub: Orders
The Orders page gives you a read-only ledger of all customer purchases. You can sort, search, and filter your orders—and expand any row to see the individual products (line items) in that order—but you cannot create, edit, or delete orders from this interface.
Navigating to Orders
Table View
Columns
| • ▾ Expand icon | Click to expand/collapse the row and reveal that order’s line items. |
| Order ID | Unique identifier for the order. |
| Date ⇅ | Date/time when the order was placed. Click header to sort ascending/descending. |
| Project | (Optional) Project tied to the order, if any. |
| Customer | Clickable link to the Client profile who placed the order. |
| Cost | Total sum of all line-item costs. |
| Status | Colored badge showing the order’s current status. (View-only.) |
Expanding an Order
When you click the ▾ icon on the left of a row, a nested section opens showing each product in that order:
View Order Details (Drawer): If you click the Order ID link (instead of the ▾ expand icon), a full‑height drawer slides in from the right to show low‑level metadata:
Additional: A read‑only JSON editor displaying the order’s meta object.
JSON View: You can expand/collapse properties to inspect all nested fields.
This drawer is strictly view‑only—useful for debugging or audit purposes when you need to see every piece of metadata attached to the order.
Filtering & Searching
Click Filter to open these options:
Enter values and click Save to apply. The table and total count will update accordingly.
Permissions & Actions
5. Commerce Hub: Configurations
The Marketplace → Configurations page lets you set up all your Marketplace lookup‐lists—like order statuses, payment methods, and product categories—on a per-project basis. Each project has its own entries, but you can save time by clicking Clone from project to import another project’s configuration in one step.
Navigating to Configurations
Open the side menu → Marketplace → Configurations.
At the very top of the Configurations page you’ll find the Settings by project bar. This is your single-click switcher for viewing or editing any project’s lookup lists:
-
Search – Filter the pill list by typing part of a project’s name.
-
Project pills – Click a pill to load that project’s configuration panels below.
-
Horizontal scroll – If you have many projects, scroll left/right to reveal hidden pills.
Below the project selector, you’ll see Order statuses.
For example:
Order statuses
(If none exist yet) “No data to display”
Adding a New Order
Click + Add on the Order statuses card.
Fill in the Add order panel fields:
Click Save to create the new status.
Editing & Deleting Items
Once a status exists, use the Edit icon to modify Name, Color, or flags, and the 🗑️ Delete icon to remove it.
Label is displayed in the Edit panel as a read-only field and cannot be modified.
Cloning from Another Project:
- Click Clone from project.
- In the modal, pick the source project whose items you want to copy.
- Click Clone.
- All statuses from that project instantly appear in your current project’s list.
6. Commerce Hub: Categories
The Categories section lets you organize your Products into hierarchical groups for easy discovery and management. You can view, add, edit, nest, and translate categories—all scoped per Project.
Accessing Categories
Categories List
At the top of the Categories page you’ll see:
Total: Total number of categories (updates as you filter/paginate)
Search…: Live-search by category label or URL
+ Add: Opens the “Add category” drawer
Below is a table of all categories visible to you:
Searching & Filtering
Search: Type any part of a category’s name or URL to filter the table in real time.
Expand: Click a parent row’s arrow ▾ to see its children.
Adding a New Category
Click + Add (top-right).
In the Add category drawer, fill in:
General:
Project – Select the Project to which this category belongs.
Label – Human-readable category name (e.g. “Electronics”).
URL – The slug used in your storefront (e.g. /electronics).
Properties: A JSON tree picker for any custom metadata. Click the tree icon and Append to add key/value pairs. Read more on «How to Manage Texts» here.
Translation
Select one or more Languages.
For each language, enter:
Name – Localized category name.
Text – Optional description or tooltip.
Click Save. The new category appears in the list (and can be nested under its parent if you edit its URL to include a parent slug).
Editing an Existing Category
Deleting a Category
Click the 🗑️ Delete icon in the Actions column.
Confirm to remove the category. (Products assigned to it remain, but lose that category tag.)
With these tools, you can quickly structure your Marketplace catalog, localize for global audiences, and ensure that Products are always grouped logically.
7. Commerce Hub: Payment Methods
Cybersecurity & Risk
1. Cybersecurity & Risk: Overview
The Cybersecurity & Risk module serves as the central hub for all security operations within your environment, providing a unified platform to safeguard system integrity and protect sensitive data. By integrating multiple layers of defense and proactive monitoring tools, Security Core enables your organization to anticipate, detect, and respond to threats in real time.
Security Core includes the following sections:
Benefits at a Glance
-
Holistic Visibility: Correlate data across incidents, vulnerabilities, malware events, and testing results to identify systemic weaknesses and emerging attack vectors.
-
Faster Response: Automated alerts, playbooks, and remediation tools reduce mean time to detect (MTTD) and mean time to respond (MTTR).
-
Regulatory Compliance: Maintain comprehensive logs, audit trails, and evidence of controls to satisfy GDPR, HIPAA, PCI DSS, and other industry mandates.
-
Continuous Improvement: Ongoing vulnerability scans and regular pen tests feed back into your security strategy, driving a cycle of assessment, remediation, and validation.
Use Cases
#1. Security Assurance
Detects and manages vulnerabilities to prevent security breaches, ensuring system integrity.
#2. Operational Continuity
Minimizes disruptions by quickly identifying and resolving issues, maintaining business operations.
#3. Improved Collaboration
Facilitates seamless tracking and assignment of tasks among teams, enhancing efficiency.
#4. Root Cause Analysis
Collects closure details for lessons learned, helping prevent similar incidents in the future.
Security Core ensures robust protection by providing structured workflows for detecting, tracking, and resolving security threats across the ecosystem.
2. Incident Reports
The Incident Reports section in Security Core is essential for tracking and managing security-related or general system issues such as bugs, vulnerabilities, and unexpected behavior. It ensures efficient incident resolution, reduces downtime, and strengthens system security by providing structured workflows for issue management.
Use Cases
- Create Incident: A security engineer or developer logs a new issue, ensuring all security concerns are documented.
- Assign & Update: The incident is assigned to the relevant person, severity is set, and progress is tracked for accountability.
- Track in Board: Team members move the incident card across workflow stages (Open → In Progress → Resolved) for clear visibility.
- Closure: Upon closing, the system collects details on the resolution, supporting files, and lessons learned to prevent future occurrences.
Where to Use Incident Reports
- Software Development: To track bugs and unexpected system behavior during development and deployment.
- Financial Systems: For monitoring and resolving vulnerabilities in transaction processes.
- Web Applications: To manage issues affecting user experience, performance, and security.
- Enterprise IT: For handling system outages, security incidents, and compliance issues across departments.
Key Components of Incident Reports
The Incident Reports Action tracks and manages security‐related or general system issues (e.g., bugs, vulnerabilities, unexpected behavior). It provides two main views (Table and Board), plus the ability to filter, change statuses, and add closure details.
1. Table View
Use Table view for a detailed, spreadsheet-style list. Columns include:
| Column | Description |
|---|---|
| Severity ⇅ | Icon indicating Low (↓), Medium (=), High (↑), or Critical (⇈). Sortable. |
| Project ⇅ | Name of the project this incident belongs to. Sortable. |
| Name | Clickable incident title; opens the edit drawer. |
| Assigned to ⇅ | Engineer(s) responsible (name + UID). Sortable. |
| Component | Affected system component or module. |
| SLA | Target remediation date/time. If the SLA has passed and the incident is not Resolved, the entire SLA cell is highlighted red to draw immediate attention. |
| Created at ⇅ | Timestamp when the incident was first logged. Sortable. |
| Updated at ⇅ | Timestamp of the most recent update. Sortable. |
| Status ⇅ | Current status badge (Open, In Progress, Resolved). Click to change. Sortable. |
| Actions | ✏️ Edit opens the side panel; 🗑️ Delete prompts confirmation. |
Incident Reports – Clickable Name
In the Table view for Incident Reports, the Name column entries are clickable: clicking any Name opens the full-width “View Incident Report” drawer, showing all fields, lesson-learned history, attachments, root-cause analysis, and summary.
Status Control: Click the colored status label to choose a new state from a dropdown.
Edit Incident:
Click the ✏️ Edit icon in the Actions column to open the side panel.
Update fields like Assigned to, Severity, Status, SLA, or Component.
Wider Detail Drawer (Resolved Incidents): When an incident’s status is Resolved, the side-panel pops out in an expanded, full-width layout to neatly display your Lesson learned history, attachments, screenshots, or long-form notes without cramped columns or horizontal scrolling.
2. Board View:
Kanban‐Style Board: Switch to Board view to see incidents arranged by status column (e.g., Open, In Progress, Resolved).
Drag & Drop: Move incident cards between columns to reflect status changes.
Resolving an Incident: When you move an incident to Resolved, a dedicated form may appear, prompting you to describe how the issue was fixed, attach any proof or files, and add a root cause analysis or lessons learned.
3. Filtering & Searching:
Filter Panel: Click Filter to open filters for Status, Severity, and Assigned to. Select your criteria and click Save to narrow the list or board.
Search Bar: In either view, type a full or partial incident name (or keyword) into the Search field to locate specific reports instantly.
How to Delete an Incident Report
Deleting an Incident Report removes it permanently from the system and records who performed the deletion and which report was removed. Follow the steps below.
Prerequisites:
You must have Delete permissions on the Incident Reports module.
Ensure you really intend to remove the record, as deletion cannot be undone.
Deletion Steps
1) Open the Incident Reports List:
In the left-hand navigation, select Incident Reports.
Locate the row for the report you wish to delete.
2) Trigger Deletion: In the Actions column of that row, click the 🗑️ Delete icon.
3) Confirm Deletion:
A confirmation pop-up appears:
Are you sure? [Cancel] [Delete]
Click Delete to proceed.
4) Completion: The report is removed from the table.
A success toast or message confirms the deletion.
Audit Logging
Every deletion is recorded in the system audit log to maintain a clear trail of administrative actions. The log entry includes:
Report Name – The title or unique identifier of the deleted incident report.
Deleted By – The username of the person who performed the deletion.
Timestamp – When the deletion occurred.
Tip: Regularly review audit logs to ensure all deletions were intentional and comply with your data-retention policies.
3. Violation Reports
Violation Reports generally refer to compliance or policy violations that an automated scanner identifies. For instance, a daily script might check your codebase or server configurations and log any suspicious results:
- NPM: Could be scanning for vulnerable dependencies in a Node.js project.
- SERVER_SCAN: Might check server configurations, open ports, or outdated libraries.
- SYNC: Another custom tool or integration that reports code or config discrepancies.
Once a violation is “found,” security engineers review it, assign it a State (e.g., “In progress”), and, after investigation, mark it “Resolved” or “Not processed” if it’s a false positive or low priority.
Use Cases
#1. Updating Vulnerable Dependencies
A daily NPM scan detects outdated packages in a Node.js project. Engineers mark the report as "In progress", update the dependencies, and resolve the issue.
#2. Server Configuration Errors
A SERVER_SCAN identifies open ports. The IT team secures the ports and marks the violation as "Resolved".
#3. Sync Discrepancies
A SYNC scan flags code inconsistencies after deployment. Developers review the logs, sync configurations, and close the report.
#4. False Positives Management
An automated scan reports a minor issue. The security team reviews the report and marks it as "Not processed" if deemed harmless.
Typical Workflow
1. Daily/Periodic Scans
A security scanner (via API integration, not by default) runs on a server or code repository on a set schedule, reporting:
"notFound" – No issues detected.
"found" – Issues identified for review.
2. Report Creation
The system automatically creates a Violation Report entry, or a security engineer manually logs it.
Fields include:
Server name: Which server was scanned.
Tool: Name of the scanning tool (e.g., NPM, SERVER_SCAN, SYNC).
Result: Was a violation discovered (found) or not?
State: Whether the issue is “Not processed,” “In progress,” or “Resolved.”
Project: Which project or environment the server is linked to.
Created at/Updated at: Timestamps for when the record was created or last updated.
Description: Any extra details or logs from the scan.
3. Engineer Review
A security engineer checks the new violations.
If the issue needs action, they mark it as “In progress.”
Once it’s handled or deemed harmless, they set State to “Processed” (or a similar status).
Table View
Use Table view for a spreadsheet-style overview, sortable and filterable by any column. By default, you’ll see:
| Column | Description |
|---|---|
| Severity ⇅ | Visual severity icon (— for Medium, ↓ for Low, ↑ for High/Critical). Click to sort by severity level. |
| Created at ⇅ | Timestamp when the report was first logged. |
| Title | Clickable report name; opens the Edit panel. |
| CVSS v3 Score | The numeric CVSS score (e.g. 7.5). |
| Assigned to | One or more engineer names/UIDs. |
| Tool ⇅ | Scanning tool (e.g. NPM, SYNC, SERVER_SCAN). Click to sort. |
| Scan type | Code base or Server scan. |
| Component | If Code base → module or repo path. |
| Server name | If Server scan → hostname or IP. |
| Project | Linked project name. |
| SLA | Target remediation date / time. |
| Updated at |
Timestamp of the most recent update to the report (status change, reassignment, or edit). |
| Status |
Current workflow state of the report (Open, In Progress, Resolved), editable directly from the table via dropdown. |
Overdue alert: If the SLA has expired and the report is not closed, the SLA cell is shaded red to draw immediate attention.
Violation Reports – Clickable Title
In the Table view for Violation Reports, the Title column entries are clickable: clicking any Title opens the full-width “View Violation Report” drawer, displaying all of that report’s fields, history, attachments, resolution summary, and close details.
Sorting & Total: Sort reports by any column. The Total count shows how many entries match your current view.
Board (Kanban) View
Board view—a Kanban-style layout groups reports into columns by Status. Drag & drop cards between Open, In Progress, Resolved to update their status in real time.
Use the Board view for a high-level, drag-and-drop workflow:
Columns: One column per status—
- Open
- In Progress
- Resolved
Cards: Each report card shows:
- Title
- Created at (with calendar icon)
- Snippet of Description
- CVSS score badge in the top-right
Adding a Violation Report
To log a new compliance or policy violation:
1. Open the Add Form
Click the + Add button in the top-right corner of the Violation reports table.
2. Fill in the Report Details
In the “Add violation report” side panel, complete the following fields:
- Title: A short, descriptive name for the issue (e.g. “SQL Injection in Login”).
- CVSS v3: Enter the numeric vulnerability rating (e.g. 7.5) based on the Common Vulnerability Scoring System.
- Severity: Manual classification of the issue (Low, Medium, High, Critical) used for visual prioritization.
- Tool: Select which scanner or pen-test tool generated this report.
- Scan Type
▸ Codebase → reveals an extra Component text field (e.g. the repo path or module name).
▸ Server Scan → reveals Server IP and Server Hostname fields. - Component (only if Codebase): Free-text name of the sub-system or code module affected.
- Server IP & Server Hostname (only if Server Scan): Identify the scanned host (e.g. 192.0.2.15 / api-prod-01.example.com).
- Assigned to: Pick one or more engineers responsible for triage.
- Project: Link this report to the appropriate project or environment.
- SLA (optional): Set a target remediation date/time.
- Penetration report (optional): Link to a related pen-test entry if available.
- Description: Use the rich-text editor to paste or type detailed logs, error messages, or remediation notes.
3. Save the Report
When all mandatory fields are populated, click Save to create the new Violation Report.
The report will now appear in your table (and board) views, ready for review and triage.
Editing a Violation Report
1. Locate the record
In Table view, scroll or search to find the row for the violation you want to update.
In Board view, find the card in its status column.
2. Open the edit form:
Table: Click the Edit (✏️) icon in the Actions column.
Board: Hover over the card and click the pencil icon or the “⋯” menu, then choose Edit.
3. Make your changes
In the side-panel form you can update any field:
- Status (Open, In Progress, Resolved, etc.)
- Severity
- Assigned to
- Scan type, Tool, Component, Server name
- SLA, Penetration report
- Description (detailed notes or logs)
4. Save: Click Save at the bottom of the panel to apply your edits.
Closure Workflow
When you mark a Violation Report “Processed,” it now—rather than simply updating the status—opens a mandatory “Close Report” dialog so you capture a concise Resolution Summary. This guarantees every closed finding has:
Complete Context: How it was fixed or verified
Accountability: Who closed it and when
Audit Trail: Full details bundled into one log entry
What’s New
How It Works
Benefit: Every closed report is now a self-contained record of what was found, who fixed it, how, and when—making compliance and troubleshooting faster and more reliable.
Deleting a Violation Report
-
Find the violation: In Table view, locate the row you wish to delete.
-
Click the trash icon: Click the Delete (🗑️) icon in the Actions column for that row.
-
Confirm deletion: In the confirmation dialog, click Delete again to permanently remove the report
Warning: Deleted violation reports cannot be restored. Be sure you no longer need the record before confirming deletion.
Filtering & Searching
- Filter Panel: Click Filter to narrow by Status or Tool.
- Search Bar: Type a partial or full server name in the Search field to find specific reports instantly.
4. Malware Reports
Malware Reports track the output of antivirus or anti‐malware scans on servers. Common tools include:
- ClamAV (open‐source antivirus)
- Rootkit detection scripts
Use Cases
- Detecting Server Malware: A CLAMAV scan detects malware in email attachments. Security isolates the files and marks the report as "In progress" for further analysis.
- Rootkit Detection: A ROOTKIT scan finds hidden malicious processes. Engineers remove the infected files and mark the report as "Resolved".
- Scheduled Security Checks: Weekly malware scans report no issues. Security logs the "Found = false" status and archives the report.
- Emergency Malware Response: Malware is detected during a live incident. The security team performs an immediate investigation, quarantines infected files, and completes a system clean-up.
Table View
Total: (top-left) shows how many reports are in your system.
Filter launches a sidebar to narrow your list by:
Scan type (e.g. CLAMAV, ROOTKIT)
State (Not processed • In progress • Resolved)
Project
Search finds any term in server names or descriptions.
+ Add (top-right) opens the “Add malware report” form.
Columns
| Column Name ⇅ | What It Shows | |
|---|---|---|
| ☑️ | (checkbox) | Select individual rows for bulk actions. |
| 1 | Server name | Hostname or IP address scanned. |
| 2 | Project | Link to the project/environment. |
| 3 | Scan type ⇅ | Which tool ran (CLAMAV, ROOTKIT, etc.). |
| 4 | Vulnerabilities ⇅ | “Detected” or “Not found” based on scan. |
| 5 | Created at ⇅ | When the report was first logged. |
| 6 | Updated at ⇅ | When any field was last changed. |
| 7 | State ⇅ | Processing status (Not processed, etc.). |
| 8 | Actions | • ✏️ Edit • 🗑️ Delete |
Security engineers then mark the report as “In progress” to investigate or “Resolved” if no further action is needed.
Adding a Malware Report
1. Click + Add.
2. In the “Add malware report” form:
Server name: Enter the machine’s name or IP.
Scan type: Choose from your configured tools (ROOTKIT, CLAMAV, etc.).
Project: Link it to the correct project.
State: Select “Not processed,” “In progress,” or “Resolved.”
Malware found: Check this box if the scan flagged any threats (it’ll show “Detected” under Vulnerabilities).
Description: Summarize any details or remediation steps.
3. Click Save. The new row appears in the table.
Editing Reports
Edit: Click the ✏️ icon in the Actions column to open the side-panel. You can change Server name, Scan type, State, Malware found, or update the Description. Then hit Save.
If action is required, they set the State to “Processed” or “Not Processed.”
Filtering Malware Reports
To narrow down the list of malware reports, use the Filter panel available at the top of the Malware Reports table.
To open filters, click Filter in the upper-left corner of the table. A sidebar will appear with the following options:
State
Filter reports by their processing status:
-
Not processed
-
In progress
-
Resolved
This helps track which reports still require investigation versus those already handled.
Scan type
Limit results to reports generated by a specific malware detection tool, such as:
-
CLAMAV
-
ROOTKIT
Vulnerabilities
Use these checkboxes to control whether reports with or without detected threats are shown:
-
Show issues with detected vulnerabilities
-
Show issues without detected vulnerabilities
This is useful for quickly isolating confirmed incidents or reviewing clean scan results.
After selecting the required parameters, click Save to apply the filters.
To change the filter set, reopen the panel and adjust the selected values.
5. Security Assessments
Security Assessments or Penetration testing is the practice of simulating attacks on a system or application to uncover security weaknesses:
- Black Box: The tester has no prior knowledge of the system.
- White Box: The tester has detailed knowledge of the system.
- Gray Box: Some knowledge is provided, but not full.
Use Cases
- Black Box Testing: External testers find a login vulnerability. The team patches the issue and retests for confirmation.
- White Box Testing: Full system knowledge reveals code injection risks. Developers implement code fixes and resolve the report.
- Gray Box Testing: Limited access tests expose endpoint vulnerabilities. Engineers secure the endpoints and log retesting results.
- Retesting After Fixes: Vulnerabilities are fixed post-penetration test. Follow-up tests are conducted to ensure no further risks remain.
Pen testers document discovered vulnerabilities and exploitation paths. In the system, you’d log each test (or each portion of a test) as a Penetration Report, noting the Name and any steps or results in the Description. Security teams typically use it to confirm that known vulnerabilities are patched and no new ones have appeared.
Table View
| Column | Details |
|---|---|
| Name ⇅ | Title of the test (e.g. “Denial of Service,” “Open Redirect”). Clicking the link opens full details. |
| Description | One-line summary of what was tested or discovered. |
| File |
Uploaded assessment file (e.g. penetration test report or supporting document), downloadable directly from the table. |
| Project | Link to the related project or environment. |
| Created at ⇅ | Date and time when the report was logged. |
| Actions | ✏️ Edit |
There’s no built-in delete option for penetration reports—entries are archived by editing or by policy.
Penetration Reports – Clickable Name
In the Table view for Penetration Reports, the Name column entries are clickable. Clicking any Name opens the full-width View Penetration Report drawer, showing that report’s Name, Description, Created at timestamp.
Viewing Linked Violation Reports
You can now see which Violation Reports were raised as a result of each penetration test—right in the Penetration Reports table.
Expand the row: In the leftmost column of any report row, click the ▼ arrow.
Review associated violations: A sub-row appears listing each Violation Report linked to that Pen test (with Title, Status, and Date).
Click a Violation Report title to open its detail panel.
No linked violations? You’ll see “No data to display” if no Violation Reports are attached yet.
Adding a Penetration Report
1. Click + Add.
2. In Add penetration report:
-Name: Enter a clear title for the engagement.
-Description: Summarize the scope and key findings.
-Project: Select the associated project.
-Attached files: Drag an image or browse to upload one or more PDF documents (e.g. your full pen-test report).
3. Click Save. Your new report appears in the table.
Editing a Penetration Report
Click the ✏️ icon under Actions.
In the Edit penetration report panel, update the Name, Description, or Project.
Attached files: Drag an image or browse to upload additional PDFs or replace existing attachments.
Click Save to apply changes.
Typical Workflow
Pen Test Execution: Security team or external vendor runs tests (e.g., vulnerability scans, manual exploitation, stress tests).
Report Logging: Each test campaign is logged with a Name and Description of findings (e.g., “SQL injection found in search endpoint”).
Review & Action: Security engineers review findings, tag them to development/ops teams, and track fixes.
Once remediated, tests may be rerun and the report updated to reflect the final status.
CI/CD Core
1. CI/CD Core Overview
Continuous Integration (CI) and Continuous Deployment (CD) are practices that help you quickly and reliably deliver software updates to customers. CI/CD Core module provides an interface to connect with external tools (e.g., Jenkins) for automating builds, tests, and deployments.
Use Cases
- Set Up a Jenkins Integration: Navigate to CI/CD → Integrations → + Add, enter “Jenkins” as the name, add the Jenkins server URL, and provide credentials (API token, username, secret key).
- Check Pipelines: Click Pipelines, select Jenkins, and view existing Jenkins jobs or runs for better tracking.
- Monitor Builds: As Jenkins triggers automated builds/tests, the system continuously updates and displays the run statuses for real-time monitoring.
The following actions are available in the CI/CD Core module:
The CI/CD Core module links your system with external DevOps pipelines. By setting up an integration (e.g., Jenkins), you can authenticate and manage your continuous integration/deployment processes directly from within the system. If your organization uses other CI/CD platforms, our system can integrate with those—just provide the required credentials and endpoints.
2. CMDB (Configuration Management Database)
The CMDB module provides a centralized view of configuration items (instances) grouped by project. It allows teams to manage, search, and organize technical targets and environments that are used across security, CI/CD, and operational workflows.
CMDB is project-aware: all instances are created and viewed within the context of a selected project.
Layout Overview
The CMDB screen is divided into two main areas:
Settings by project
Displays a horizontal list of available projects. Selecting a project updates the visible configuration items (instances) below.
A search field allows quick filtering of projects by name.
Instances
Displays configuration items (targets) associated with the selected project.
Includes:
-
Search field to find instances by name
-
+ Add button to create a new instance
-
Table view for managing existing instances
If no instances exist for the selected project, the system shows “No data to display.”
Instances Table
Each row in the Instances table represents a configuration item (CI) or target.
Columns:
Target – Name or identifier of the configuration item
Actions – Edit or manage the instance
The table updates dynamically based on the selected project.
Adding an Instance
To create a new configuration item:
-
Select a project from Settings by project.
-
In the Instances section, click + Add.
-
Enter the required instance details (target name and related configuration).
-
Click Save.
The new instance will appear in the table under the selected project.
Searching Instances
Use the Search field in the Instances section to quickly locate configuration items by name.
Search is applied only within the currently selected project.
Project-Based Scope
-
Instances belong to a single project.
-
Switching projects immediately updates the Instances list.
-
Each project maintains its own isolated CMDB scope.
This ensures clear separation between environments, applications, or customers.
3. Pipelines
Use the Pipelines page to connect your external CI/CD systems (like Jenkins) and view build runs alongside your security reports.
Use Cases
- Accessing Pipelines
Navigate to CI/CD → Pipelines from the left menu. Select an existing integration (e.g., Jenkins) from the Automation dropdown to manage builds and workflows. - Tracking Runs
Once your integration is set up, build runs or jobs from your external CI system (e.g., Jenkins) will appear in Runs, displaying execution history, statuses, and timestamps. - Future Expansions
If integrating another CI/CD platform (e.g., GitLab CI, Travis CI), simply provide the API keys and URLs to extend platform compatibility and manage builds seamlessly.
Automation
Through this section, you can manage and select integrations that you’ve configured for your product—enabling streamlined automation and efficient control over connected systems.
-
Automation dropdown: lists all CI/CD integrations you’ve set up.
-
Select Jenkins (or another tool) to start pulling in build data.
Runs
Once an integration is selected, this table populates with your pipeline executions:
Name ⇅: the identifier of each pipeline or job.
Status: success, failure, in-progress, etc.
Start / Finish Timestamps: when each run began and ended.
Duration: total build time.
If you haven’t run any builds yet, you’ll see:
No data to display
In the provided screenshots, no runs are currently displayed (“No data to display”), but in a real scenario, you’d see a list of pipeline executions, their status, timestamps, and other relevant data.
Getting Started
- Configure your CI/CD server (e.g. Jenkins) with its API endpoint and access token in Integrations.
- Select that integration from the Automation dropdown on this page.
- Trigger a build in Jenkins (or your chosen system).
- Refresh the Pipelines → Runs table here—your new build appears with full details.
Future Expansions
To integrate additional platforms (GitLab CI, Travis CI, etc.), simply add their API credentials under Integrations. They’ll then appear in the same Automation dropdown for seamless management.
4. Integrations
The CI/CD (Continuous Integration / Continuous Deployment Management System) is designed to streamline the process of integrating, deploying, and managing automated pipelines.
Use Cases
-
Accessing Integrations
Navigate to CI/CD → Integrations from the left-hand menu to view a list of configured integrations (e.g., Jenkins). -
Adding or Editing an Integration
Click + Add to create a new integration or select the Edit (pencil) icon to modify an existing one. Enter the name/label, URLs, and credentials (API tokens, usernames, secret keys), then click Save to apply changes. -
Why Integrations Matter
The system uses valid credentials to authenticate with your CI/CD tool (e.g., Jenkins), enabling automated pipeline triggers and monitoring. Incorrect credentials or URLs will prevent successful integration.
Important: Integrations with unsupported CI/CD tools will not work. Ensure that only pre-approved and compatible systems are configured.
1. Accessing Integrations
In the left‐hand menu, expand CI/CD and click Integrations.
A list of configured integrations appears (e.g., “Jenkins”).
2. Adding or Editing an Integration
Click + Add (if visible) to create a new integration, or click the Edit (pencil) icon on an existing one.
- Name / Label: Provide a friendly name for the integration (e.g., “Jenkins”).
- URLs: Add one or more URLs and corresponding keys (e.g., apiUrl: https://...).
- Credentials: Input tokens, usernames, secret keys, or other authentication data required by your CI/CD tool.
Click Save to store your changes.
3. Why Integrations Matter
The system can authenticate with your CI/CD tool (e.g., Jenkins) and trigger or monitor pipelines/jobs by entering valid credentials.
Invalid credentials or URLs will prevent successful integration.
Key Points to Remember
- Only pre-approved integrations work – attempting to connect unsupported systems will result in errors.
- Correct credentials are required for successful integration.
- Deployment pipelines appear automatically after integration with a CI/CD tool.
- New integrations can be added based on business needs, but require prior discussion and approval.
Finance
Finance: Overview
The Finance section is used to configure blockchain-related financial parameters and enforce wallet-level restrictions across supported networks. It consists of two main tabs: Configurations and Wallet blacklist.
Finance → Configurations
The Configurations tab allows administrators to define sweep configurations per blockchain network and currency. These configurations determine how much balance can be handled or swept for a given network–currency pair.
At the top of the page, the system displays the total number of configured entries. Each configuration is shown in a table with the following columns:
- Network
The blockchain network where the configuration applies, such as Polygon or Ethereum. - Currency
The asset associated with the network, for example USDT, POL, or USDC. - Amount
The configured amount for the selected network and currency. - Actions
Edit and delete icons allowing administrators to modify or remove the configuration. - To create a new configuration, click + Add in the top-right corner. This opens the Add sweep side panel.
- In the Add sweep form, the following fields must be completed:
- Network
Select the blockchain network from the list. - Currency
Select the currency associated with the chosen network. - Amount
Enter the numeric amount to be configured.
Click Save to store the configuration. Once saved, the new entry appears immediately in the configurations table.
Finance → Wallet blacklist
The Wallet blacklist tab is used to block specific wallet addresses from participating in financial operations within the system.
At the top of the page, the system displays the total number of blacklisted wallets. If no entries exist, an empty state with “No data to display” is shown.
The blacklist table contains the following columns:
- Wallet id
The unique identifier or address of the blocked wallet. - Address
The wallet address itself. - Name
An optional descriptive label for easier identification. - Network
The blockchain network the wallet belongs to. - Actions
Edit and delete controls for managing blacklist entries.
To add a wallet to the blacklist, click + Add. This opens the Create wallets blacklist side panel.
In the creation form, provide:
Wallet id
Enter the wallet identifier or address to be blocked.
Click Save to add the wallet to the blacklist. Once saved, the wallet appears in the table and is treated as restricted by the system.
Purpose and Usage
The Finance module centralizes blockchain financial controls by allowing administrators to define sweep configurations per network and currency, while also enforcing wallet-level restrictions through the blacklist. This ensures controlled asset handling and protection against unauthorized or risky wallet activity.
Client Area
1. Client Area: Overview
The Client Area module provides a centralized place to register, configure, and manage every “front door” your customers use—whether that’s a CRM-powered personal dashboard, a white-labeled website, an online store, or any other custom endpoint. Each Client Area record captures metadata such as its name, type (e.g. “Personal Account,” “Web Shop,” “Mobile App”), URL, API credentials, and owner.
Integrated vs. Custom
Integrated accounts are personal dashboards created and hosted by us, fully embedded in the CRM.
Custom accounts let organizations link their own external properties (e.g. a third-party ecommerce site) via API so they can surface and manage data directly from the CRM.
By storing these endpoints in one place, you can:
-
Automate provisioning of new portals via our REST API.
-
Route support requests to the correct site or application.
-
Aggregate usage metrics across multiple client-facing channels.
-
Enforce consistent branding and access control across all customer touchpoints.
This data is used both by personal accounts that we have created and integrated into the CRM, as well as custom accounts. For example, if a user has their own account for a specific purpose and only needs the CRM, they can use this module to store and access information via API, utilizing it in their account.
The module includes the following sections:
-
Translations: Translations of elements used in your product.
-
Texts: Translations of texts used in your product. This and the previous section are useful for managing multilingual content.
-
Templates: Templates used in your product, e.g., for sending emails to clients.
-
Banners: Banners used in your product, e.g., for posting on websites.
-
Documents: Documents posted on your website, e.g., licenses.
-
Configurations: General settings of the Client Area module.
2. Client Area: Use Cases
Use Case #1: Onboarding a New Customer Portal
When a client launches a new branded dashboard, add a Client Area record (e.g. “Acme Client Portal”) with its URL and API credentials. Assign it to the client’s account so the portal can immediately read/write CRM data (tickets, orders, analytics) without any manual integration steps.
Use Case #2: Linking Multiple Storefronts
A merchant selling on Shopify and WooCommerce wants unified reporting. Create two Client Area entries (“Acme Shopify,” “Acme WooCommerce”) under the same owner. Both portals then push orders and customer interactions into the same client profile, giving your support and analytics teams a single source of truth.
Use Case #3: Configuring SSO Endpoints
Your organization supports SAML-based SSO for both web and mobile apps. In Client Area, register “Acme Web SSO” and “Acme Mobile SSO,” store their assertion consumer URLs and certificate fingerprints, and generate OAuth keys. Users signing in on either channel seamlessly authenticate against the CRM’s identity provider.
Use Case #4: Driving Embedded Analytics Dashboards
You’ve built a React widget that visualizes user engagement metrics. In Client Area, provision “Acme Analytics Embed,” supply its API token to the widget, and embed it in the client’s site. The dashboard pulls real-time KPIs (login rates, monthly spend) directly from the CRM without exposing any other data.
Use Case #5: Automated Support Routing
Your support org uses separate desks for “Web Support” and “Mobile Support.” Create Client Area entries for each app, tag them with their respective Desks, and set up your ticket form to include the Client Area identifier. Incoming requests automatically flow into the correct queue based on which portal the user submitted from.
3. How to Configure Client Area
The Client Area module lets you tailor how customers interact with your system—controlling everything from account settings and security policies to verification workflows and supported languages. This guide walks you step-by-step through every subsection of Configurations, with deep dives on each field, optional API hooks, and best-practice tips.
Basic configuration of the Client Area module is done through the Configurations section.
It includes the following subsections:
- General
- Documents
- Verification Levels
- Languages
General Section
To start configuring, go to Configurations > General tab across the top. You will see two blocks: Clients and Security.
In the Clients block, you can configure:
- Number of accounts: Enter the maximum number of accounts a single customer can have.
- Activate account right after creation: Enable this to allow clients to activate their accounts immediately after creation.
- Demo account: Enable this to provide clients with a demo account (e.g., with virtual assets).
- Personal manager: Enable this to assign a personal manager to the client.
- Exchange with Two-Factor Authentication (TFA): Require additional identity verification before any exchange.
- Withdrawal with TFA: Require additional identity verification before any withdrawal.
All these settings can also be managed via API, as many of them are specifically designed for integration and external use. You have full control over the configuration—use it as needed for your specific purposes.
In the Security block, you can configure:
- Session time minutes: Define how many minutes of inactivity will trigger automatic logout. If left blank, the default is 60 minutes.
- Refresh session time minutes: Define how often the session should be refreshed when the user is active. Normally twice the Session time minutes value.
Adjust timeouts to balance usability (longer sessions) against security (shorter sessions).
Click Save when finished.
Documents Section
Configure verification documents required from your customers during login, verification, or other business purposes (e.g., some documents may be needed for identity verification, while others for approvals or compliance).
In the Verification Documents block, select the checkboxes next to the required documents:
- Passport or ID
- Bank card (front)
- Bank card (back)
- Source of funds
Use Case Examples:
KYC Level 1: just Passport or ID
KYC Level 2: add Bank card, Source of funds
Verification Levels Section
This section manages verification and includes the following blocks:
- Account Configurations
- Verification Levels (e.g., email, phone, biometrics)
- Statuses
Account Configurations block:
Open account right after sign up: Check this if you want to open accounts automatically for new customers.
Required level to create account: Select a level from the drop-down list. Values are pulled from the Verification Levels section.
Required status to create account: Select a status from the drop-down list. Values are pulled from the Statuses section.
Click Save to apply changes.
To add a new verification level:
To add a new status:
To edit a status:
- Click the Edit icon in the corresponding row.
- You can change Text, but not Label of the status.
To delete a status: Click the Delete icon in the corresponding row.
Note: You cannot delete the default status.
Languages Section
The Languages section is designed to manage the languages that are used in your product.
It includes two blocks:
- Available Languages: All languages available.
- Active Languages: Languages that are used.
To add a language from the list of available languages to the list of active languages:
- In the Available Languages block, select the checkbox next to the language you want to add.
- To make it easier to find the language you need, use the Search field. Start typing the name of the language, for example, German or Japanese.
- Click Save to apply the changes.
Note: The language will appear in the list of active languages, but will not yet be available for selection in your product. Before adding, it is recommended to translate items into that language. Refer to the [How to Manage Translations] and [How to Manage Texts] for more information.
When you have all the necessary texts and elements translated:
- Go back to Languages.
- In the Active Languages list, check the box next to the language for which you have added translations.
- Click Save.
The Configurations section in Client Area empowers you to enforce policies, customize verification flows, and provide a truly localized experience—all on a per-project basis or globally via API. Regularly review these settings to adapt to evolving compliance requirements, new markets, or product enhancements. Once you’ve dialed in your ideal configuration, your customers will enjoy a seamless, secure, and fully branded journey through your CRM.
4. How to Manage Translations
The Translations module is your single source of truth for every short text element in the Client Area—buttons, labels, tooltips, error messages, and more. By centralizing all keys and their localized values here, you ensure consistency across the entire UI and make it easy to keep every language up to date.
To translate short elements (e.g., buttons), go to Client Area > Translations. You will see a list of all currently available items. The Text column will show in which language they are available.
To add a translation of an element:
1. Open the Translations table
Go to Client Area > Translations. You’ll see a paginated list of all keys (labels) and their current localized text.
2. Locate the entry you want to update
Scroll or use the search bar (see next section) to find the exact label.
3. Click the ✏️ Edit icon in the Actions column. This opens the Edit translation drawer on the right.
4. Select your target language
At the top of the drawer, you’ll see buttons for each Active locale (pulled from your Languages configuration). Click the one you need to update—for example, Es for Spanish.
5. Clone translations from
To copy all existing text from another language into your current locale (without translating), open the “Select” dropdown, pick the source language (e.g. English), and click Clone. This instantly duplicates those fields as-is.
6. Translating flow
To programmatically generate translations, click Translate in the drawer header, then choose your provider (OpenAI, etc.) from the Integration dropdown. The system will pull translated strings and populate every field.
Tip: Cloning and translating are independent—feel free to clone first and then auto-translate, or translate first and use cloning to reset individual entries.
7. Save your changes
Hit Save at the bottom of the drawer. A success toast confirms the update—and the table immediately reflects your new string.
To easily search for an element:
Type in the Search field at the top of the Translations page.
It filters by Label (the key) or by any snippet of Text in any language.
Clear the search box (✕) to return to the full list.
Note: Adding custom elements is intended for development purposes only. The translation object label should be added to the code by developers. Otherwise, if you add a label just with this functionality, it will not be displayed anywhere on the page.
To add a custom element:
Important: Before using this feature, your developers must have wired the new key into the front-end code. Otherwise the UI won’t reference it, and your translations won’t appear anywhere.
1. Click the + Add button in the top-right.
2. Define your Label: Enter a unique identifier that your code will reference (e.g. checkout.confirmButton).
3. Choose one or more Languages: Check the locales you want to initialize. Only Active languages appear here.
4. Enter your Text for each: For each selected language tab, fill in the string.
5. Save: Clicking Save creates the new row. Now developers can pull that key into the UI.
You can also delete current items using the Delete icon. Before deletion, make sure you are no longer use the item in your product.
Best Practices
Consistent Label Naming: Use a predictable case style (camelCase or snake_case) across all keys.
Complete Every Locale: When adding or editing, fill in all active languages to avoid fallbacks or missing copy.
Leverage “Show All”: Always expand and scan every locale before saving to catch any stale or missing translations.
Coordinate with Development: New keys must be added to the codebase first—coordinate with your engineers to avoid orphan labels.
Clean Up Periodically: Remove unused or obsolete keys to keep the list lean and maintainable.
By following these steps and best practices, you can ensure that every button, message, and tooltip in your Client Area is accurately translated—and that your users enjoy a fully localized, consistent experience.
5. How to Manage Texts
The Texts section is where you handle longer content blocks—like notification bodies, modal descriptions, or legal disclaimers—that may require multiple fields (Title, Description, custom Properties) per language.
Edit an existing text
- To translate lengthy elements (e.g., notifications), navigate to Client Area > Texts. You will find a list of all the available texts in the system.
- Click the ✏️ Edit icon on the card you want to modify.
- Select your target language in the drawer’s Language selector
- Clone translations from
To copy all existing text from another language into your current locale (without translating), open the “Select” dropdown, pick the source language (e.g. English), and click Clone. This instantly duplicates those fields as-is. - Translating flow
To programmatically generate translations, click Translate in the drawer header, then choose your provider (OpenAI, etc.) from the Integration dropdown. The system will pull translated strings and populate every field. - Update fields:
Title: A concise headline or name for this text block.
Description: Rich-text body (you can format, insert links, tables, etc.).
Properties: Any custom JSON nodes or metadata your UI may consume. - Save your changes. The card will immediately reflect the updated Title/Description for that language
Tip: Cloning and translating are independent—feel free to clone first and then auto-translate, or translate first and use cloning to reset individual entries.
Search for a text
Filter by label or content: Type part of a Unique label, Title, or Description into the Search… field above the cards to narrow down the list.
Add a new text and its translations
Developer note: Before end users can see this text in the UI, your front-end code must reference the new Unique label.
1. Click on the Add Text button in the upper right corner.
2. Define the Unique label
Enter a machine-friendly identifier (e.g. deposit.termsNotice) and toggle Locked if you want to prevent accidental deletion.
3. Configure Properties (optional)
If your UI reads structured metadata, fill in any JSON nodes here.
4. Select Language and Fill Content
Click the language tabs (En, Es, Ru, Pl) to switch between locales.
For each, enter Title and Description.
5. Save to add the new card to the grid
By default, new texts are created as Locked—they cannot be deleted. To unlock a text:
- Go to the text editing tab.
- Uncheck the Locked checkbox.
- Click Save.
To delete text
Make sure it is not locked.
Click the 🗑️ Delete icon on the unlocked card and confirm the prompt.
Best Practices & Tips
- Consistent Labeling
Group related texts under a common prefix (e.g.notification.email.*,modal.confirmation.*) for easier searching and organization. - Lock Critical Texts
Keep frequently used or legal-critical messages locked to avoid accidental deletion. - Use Clone for Speed
Cloning from your default locale saves time and ensures you don’t forget fields. - Review AI Translations
Always proof AI-generated translations for tone, context, and placeholders. - Coordinate with Developers
Ensure any new labels are wired into your UI code—otherwise, the text won’t show up even though it exists here.
With these steps and tips, you can keep your long-form UI content fully localized, well-organized, and under strict change control—ensuring a consistent experience across all languages and regions.
6. How to Manage Templates
The Templates section lets you create, organize, and maintain reusable communication assets—email bodies, PDF agreements, push notifications, etc.—that you send to your clients. All template content (Title, Description, Properties) can be localized for any active language in your system.
You can perform the following actions with templates:
- Add
- Search
- Edit
- Delete
To add a template:
1. Click the Add button in the upper right-hand corner.
2. Fill in the form in the drawer:
-Unique label: a machine-friendly identifier (e.g. user.welcomeEmail).
-Active: toggle on if you want this template immediately available for sending.
-Properties: (optional) populate any JSON nodes your UI or API needs.
-Language tabs (En, Es, Ru, Pl): switch between locales and enter:
- Title: short summary or subject line (e.g. “Welcome to Our Service!”).
- Description: full template body (supports rich text, links, placeholders).
You can do this for all languages you have set in Configurations.
3. Save to create the template. It now appears as a card in your grid, marked “Active” if you toggled it on.
To search for a template:
Filter the list by typing part of the Unique label or Title into the Search… field above the grid.
Results update in real time, making it easy to find specific templates among many.
To edit a template:
1. Click the ✏️ Edit icon on the template card.
2. Modify any fields in the drawer—except the Unique label (locked). You can:
-Toggle Active on/off.
-Update Properties JSON.
-Switch languages and edit Title or Description.
-Use Clone to copy from the default locale, or Translate for AI-assisted localization.
3. Click Save to apply the changes.
To delete a template:
1. Ensure the template’s Active toggle is off (via Edit).
2. Click the 🗑️ Delete icon on the card.
3. Confirm deletion in the prompt. The template is permanently removed.
Note: You can only delete templates that are not active.
Best Practices & Tips
-
Consistent Naming: Group similar templates under a shared prefix (e.g.
invoice.*,reminder.*,passwordReset.*). -
Active vs. Inactive: Deactivate (don’t delete) templates you no longer use to preserve history while preventing accidental sends.
-
Localize Early: Add translations as you create the English version to ensure coverage for all target markets.
-
Use Properties Sparingly: Store only metadata your front-end or automation jobs require; keep JSON lean.
-
Version Control: Though you can’t version inside the UI, consider appending timestamps or version numbers to your Unique labels for major overhauls (e.g.
welcome_v2).
By following these steps and guidelines, you’ll maintain a clean, searchable library of communication templates—fully localized and ready for automated or manual dispatch.
7. How to Manage Banners
To add a new banner:
- At the top of the page, click the language tab (English, Bulgarian, Spanish, etc.) to switch to the version of your site you’re editing (e.g., “English” is highlighted when active).
- Drag the image or click to view the images on your computer in the block with the appropriate resolution. The available resolutions are:
1444 to 1920 px
1024 to 1444 px
640 to 1024 px
375 to 640 px - Upload images for all resolutions.
If you need alt-text or contextual notes:
- Click the + Add description button in the top-right corner.
- A description field appears under each banner slot—enter your text (e.g., “Homepage hero for summer campaign”).
- Descriptions are per‐language, so switch tabs to localize.
- Activate the entire set by checking the Active toggle in the upper-left.
- Deactivate by unchecking it—this hides all banners for that language until you’re ready to go live.
To update one resolution:
-
Hover over the banner slot and click Delete (🗑️) in its top-right.
-
Upload a new image into the now-empty drop zone.
You can delete any single slot independently without touching the others.
Best Practices & Tips
-
Consistent Styling: Use a single design template cropped to each resolution, rather than entirely different visuals—this preserves brand style across devices.
-
Optimize File Size: Compress images to balance quality and load speed (aim for ≤ 150 KB per banner).
-
Test Viewports: After uploading, preview in different browser widths to confirm the correct banner is served.
-
Language Checks: Always switch tabs and proof your descriptions and any embedded text on the banners themselves.
-
Version Control: When replacing assets, keep old files archived locally in case you need to roll back.
By following these steps, you’ll maintain a responsive, localized banner library that adapts beautifully across devices and languages.
8. How to Manage Documents
The Documents section lets you store and control downloadable files on your site—PDFs, licenses, whitepapers, etc. You can add, search, edit, and delete documents from a single table interface.
You can perform the following actions with documents:
- Add
- Search
- Edit
- Delete
To add a document:
- Open the Add Panel
Click the + Add button in the upper-right corner of the Documents page. - Fill in the General Info
Name: Enter a unique identifier (e.g. “License Agreement 2025”).
Active: Check this box if you want the document immediately available on your site. - Provide the File
Paste the Link: If your file is hosted externally, paste its full URL (must begin withhttp://orhttps://).
Attach a File: Drag a PDF into the drop zone or click to browse your computer. Only .pdf is accepted. - Save
Click Save to upload and register the document in the list.
Tip: Use clear, consistent naming (e.g.
Terms-of-Service-2025.pdf) so it’s easy to find later.
To search for a document:
Quick Filter: Start typing any part of the document’s Name in the Search… field at the top.
This instantly narrows the table to matching entries.
To edit a document:
- Open the Edit Panel
Click the Edit (✎) icon in the Actions column next to the document you want to update. - Make Your Changes
Rename: Update the Name field as needed.
Swap File: Paste a new link or drag in a new PDF.
Active Toggle: Enable or disable visibility on your site.
Description/Content: Use the rich-text editor under Name to add or modify any explanatory text. - Click Save to apply your edits. The table will refresh showing the updated link or status.
Version Control: When uploading a new PDF version, consider appending a date or version number to the file name so users and developers can track changes (e.g.
Product-Guide-v2.pdf).
To delete a document:
- Ensure Inactive: You cannot accidentally delete a file still marked Active—first uncheck the Active box in the Edit panel and save.
- Remove: Click the Delete (🗑️) icon next to the document. Confirm the prompt to permanently remove it from the system.
Warning: Deleted documents cannot be recovered from the UI. Always keep a local backup if you might need to restore it later.
Best Practices & Tips
-
File Size & Performance: Keep PDFs under 5 MB when possible. Large files can slow page load and frustrate users.
-
Consistent Naming: Adopt a clear naming scheme:
<Category>-<Year>-<Version>.pdf(e.g.,Privacy-Policy-2025-v1.pdf). -
Clear Descriptions: Use the rich-text Description field to summarize the content or add important notes (e.g., “Supplier contract—effective Feb 2025”).
-
Audit Regularly: Periodically review your Documents list to remove outdated or superseded files—this avoids confusion and broken links.
-
Access Control: Only users with appropriate permissions should be able to add or delete documents. Coordinate with your development or admin team if needed.
By following these steps and best practices, you’ll maintain a tidy, up-to-date library of downloadable content that’s easy for both admins and end-users to navigate.
Settings
1. Settings: Overview
The Settings module is your CRM’s central control panel for defining how the system behaves, who can access it, and what your users see. It’s divided into three main areas—Configurations, Translations, and Texts—each of which governs a distinct layer of functionality or content. By adjusting these settings, you ensure your CRM adheres to your organization’s security policies, workflow rules, and brand voice.
Within Configurations, you’ll set the groundwork for system operations: lock down access with IP whitelists, define session timeouts and multi-factor login options, and model your business processes through custom statuses, client types, and multi-step verification levels. You also manage which languages are available to your users and how the CRM categorizes and verifies different classes of clients and requests, ensuring both compliance and tailored user experiences.
The Translations and Texts sections let you master your user-facing copy. Translations handles short UI elements—buttons, labels, and messages—while Texts covers longer notifications, legal disclaimers, and rich-text content. Together, they provide a complete workflow for adding, editing, searching, and locking multilingual content, so you can roll out a fully localized, on-brand interface across every module.
It includes the following sections:
Configurations:
- Configuring security and authentication;
- Configuring the statuses used in the Clients and Requests modules;
- Configuring the languages used in the system.
Translations: Translation of the elements used in the system.
Texts: Translation of texts used in the system.
2. How to Configure Security and Authentication
A robust security and authentication setup is fundamental to protecting sensitive customer data and ensuring that only authorized personnel can access your CRM. In the Settings > Configurations > General tab, you’ll define who can reach your system (via IP restrictions) and how users prove their identity (via session policies and multi-factor checks). Properly configuring these options helps you meet compliance requirements, reduce the risk of unauthorized access, and tailor the login experience to your organization’s security posture.
Use Cases
-
Office-Only Access
Limit CRM access to your corporate network by whitelisting office IP ranges, preventing external login attempts from unknown locations. -
High-Security Environments
Require both password and biometric authentication (WebAuthn) for administrators or finance teams to meet stringent internal policies or regulatory frameworks. -
Adaptive Session Management
Enforce shorter session timeouts for contractors or guest users, while allowing longer idle periods for full-time staff—striking a balance between security and productivity. -
Automated Bot Prevention
Enable invisible reCAPTCHA on login screens to block scripted attacks without interrupting the legitimate user experience.
The General tab under Settings > Configurations is where you define your system’s core access and login policies. Here you’ll find two sections:
-
Security: Restrict which IP addresses can access the CRM.
-
Authentication: Control session duration, password-attempt limits, and multi-factor requirements.
Below is a detailed, step-by-step guide—complete with screenshots—on how to locate and configure each option.
Navigating to the General Configuration
Click the ⚙️ Settings icon in the sidebar.
Select Configurations.
Ensure the General tab (next to “Statuses” and “Languages”) is active.
Security: IP Whitelisting
Click “+ New IP”.
Enter a valid IP address (IPv4 or IPv6). Invalid entries highlight in red.
Press Enter to confirm the IP. Repeat steps to add more IPs.
Remove an IP by hovering and clicking ×.
Click Save to save the list.
Note: IP addresses are usually expressed in dotted decimal notation as four numbers separated by dots, e.g., 172.16.255.2, or as a set of 16-bit hexadecimals separated by colons, e.g., 2001:0000:130F:0000:0000:09C0:876A:130B If the field turns red, you have entered an invalid IP address.
Authentication: Session & Login Policies
The Authentication section allows you to set logon and usage rules, including limited session times and additional logon checks.
To configure authentication:
- Fill in the following fields:
Session time minutes: Enter how many minutes after login the user is automatically unlogged from the system when idle. If the field is left blank, the default value of 60 minutes will be applied.
Login attempts: Enter the number of times the user can enter an incorrect password before being temporarily locked out (for 2 minutes). The default is 3. - Check one of the options (or leave them all blank):
Internal login or WebAuthn: If you want the user to use a choice of password or WebAuthn (biometric data) to log in.
Internal login and WebAuthn: If you want the user to use both a password and biometrics for additional security to log in.
Google TFA: If you want the user to use two-factor authentication through Google for additional security.
Phone TFA: If you want the user to use two-factor authentication via phone number for additional security.
Get more information about authentication types in Wifox Business Core Solution [here]. - Check the box next to Recaptcha on login to use reCAPTCHA. We use reCAPTCHA v3, which means users will not notice this additional check.
- Click Save to save your settings.
Note: If you select one of the options, the others will be automatically disabled. Uncheck the selected box to enable other authentication options.
By leveraging IP whitelisting and advanced authentication controls, you can significantly bolster your CRM’s defenses against unauthorized access and automated attacks. Regularly revisit these settings—especially after network changes or user-role updates—to maintain an optimal balance between security and usability.
3. How to Configure Statuses
Effective status management lets you tailor client and request lifecycles to your business processes, ensuring clear visibility of progress and automating downstream actions. In Settings > Configurations > Statuses, you’ll find two panels—Client status and Request status—that govern how records appear and transition within the Clients and Requests modules, respectively.
Use Cases
-
Customized Pipelines: Define stages like “Lead,” “Prospect,” and “Customer” for clients, or “New,” “In Review,” and “Completed” for requests, matching your organization’s terminology.
-
Default Routing: Set a default status (e.g., “Active” for clients) so that all new records start in a predictable state, reducing manual setup.
-
Visual Prioritization: Assign distinct colors to statuses (red for high-priority, gray for archived) to surface critical items at a glance.
Accessing the Statuses Configuration
To configure statuses, go to Configurations > Statuses tab at the top. A tab with two sections will open:
- Client status (left): In this section, you can manage the statuses you select for clients in the Clients module.
- Request status (right): In this section, you can manage the statuses that you select for clients in the Requests module.
Adding a New Status
Editing an Existing Status
- Click the ✏️Edit icon next to the appropriate status.
- In the Edit status sidebar, you can update:
Name (label remains read-only)
Color - Click Save to apply the changes.
Setting a Default Status
Only one status per panel can be default. New records automatically receive this status.
- Hover over the status you want as default.
- Click Make as default.
- The “Default” badge will move to this status.
Deleting a Status
Important: You cannot delete a status marked as default or one currently in use by existing records.
- Ensure the status is not the default (see “Make as default” above to change defaults).
- Click the 🗑️ Delete icon next to the status.
- Confirm the deletion when prompted.
By thoughtfully defining client and request statuses—complete with unique labels, colors, and defaults—you create a transparent, enforceable workflow that scales with your business. Regularly review and prune unused statuses to keep your system lean, and leverage status-driven automation (notifications, reports, transition rules) to streamline daily operations.
4. How to Manage Languages and Translate CRM
Supporting multiple languages in your CRM ensures that users across regions can work in their preferred tongue and that customer‐facing elements display correctly. In Settings > Configurations > Languages, you control which languages are available for translation and which appear in the top‐level language selector. These settings work in concert with the Translations and Texts modules to provide a fully localized experience.
Use Cases
-
Multi-Regional Teams: Let support agents in Germany, Argentina, and Japan use the CRM in their local language.
-
Global Customer Portals: Ensure customer-facing emails, buttons, and notifications render in the end user’s language.
-
Phased Roll-Outs: Activate a new language only once all required labels, UI elements, and text blocks have been translated.
Languages and translations are managed in CRM through three sections:
- Languages
- Translations
- Texts
Accessing the Languages Configuration
To translate CRM into another language:
Navigate to ⚙️ Settings in the sidebar, then select Configurations.
Click the Languages tab at the top.
You will see two blocks:
- Available Languages (to the left): All languages available in our system.
- Active Languages (to the right): Languages that are used in your CRM.
Adding a Language to Active List
To add a language from the list of available languages to the list of active languages:
In the Available languages panel, scroll or use the Search field to find your target language (e.g., “German,” “Japanese”).
Check the box next to the language you wish to add. A flag or code (e.g., “Ar” for Argentine Spanish) appears to the right.
Click Save at the bottom to apply the changes.
Note: The language will appear in the list of active languages, but will not yet be available for selection in the new menu. Before adding, it is recommended to translate CRM items into that language. Refer to the [How to Manage Translations] and [How to Manage Texts] for more information.
Enabling a Language for Users
When you have all the necessary texts and CRM elements translated:
- Go back to Languages.
- In the Active languages panel, check the box next to the language you’ve translated content for.
- (Optional) If you’d like this language to be the default for new users, click Make as default next to it.
- Click Save again.
It will now appear in the top menu and be available for selection by all users.
By managing Available vs. Active languages, you control the rollout of new translations and prevent incomplete or partially-translated elements from going live. Always activate a language only after verifying that all UI labels (Translations module) and longer texts (Texts module) have been properly localized. This phased approach ensures a seamless, professional multilingual experience for both your team and your customers.
5. How to Manage Translations
Short UI elements—like button labels, menu items, and field names—are handled in Settings > Translations. This section lets you review, edit, and add translations for all “labels” (internal identifiers) used throughout the CRM. Keeping these up to date ensures that every small piece of text in the interface is fully localized.
Why Use Translations?
-
Consistent UI: Make sure every button or menu item appears correctly in each active language.
-
Rapid Updates: Quickly fix typos or change wording without redeploying code.
-
Custom Elements: Add new labels (for custom development) and translate them for your users.
Viewing & Searching Existing Translations
Go to ⚙️ Settings → Translations.
You’ll see a table with two main columns:
Label: the internal key (e.g., totalLeads).
Text: the currently translated string, along with language badges (En, Bg, etc.).
Editing a Translation
Click the Edit icon on the right of the row you want to update.
In the panel that appears:
Label (read-only) shows which key you’re editing.
Languages badges indicate which target languages have entries.
Text field: enter or update the translated string for the selected language.
Clone translations from
To copy all existing text from another language into your current locale (without translating), open the “Select” dropdown, pick the source language (e.g. English), and click Clone. This instantly duplicates those fields as-is.
Translating flow
To programmatically generate translations, click Translate in the drawer header, then choose your provider (OpenAI, etc.) from the Integration dropdown. The system will pull translated strings and populate every field.
Tip: Cloning and translating are independent—feel free to clone first and then auto-translate, or translate first and use cloning to reset individual entries.
Click Save to apply the changes.
To easily search for elements, use the Search field at the top to find a specific item. Typing part of a label filters the list in real time.
Note: Adding custom elements is intended for development purposes only. The translation object label should be added to the code by developers. Otherwise, if you add a label just with this functionality, it will not be displayed anywhere on the page.
Cloning & Translating with the Widget
To speed up localization, you can bulk-copy all strings from an existing language and even drive translations for specific integrations right from a single button:
Open the translation drawer:
Go to Settings → Translations, click the ✏️ Edit icon on any row.
The side-panel shows the Label, language badges, and a Text field.
Clone translations from another language:
Click Clone translation from beneath the language badges.
In the Clone from modal, select the source language (e.g. English → Spanish).
Click Clone to populate the panel with every string from that language.
Tweak any entries as needed, then hit Save to commit all at once.
Use the unified “Translate” button:
Translate opens the modal with a top-level dropdown labeled Integration—but this actually lists your configured translation engines (e.g. OpenAI, Google Translate, DeepL).
Select the engine you want (e.g. “OpenAI”).
Click Translate to pull in its suggested strings for your current locale.
As before, adjust any text in the drawer and press Save to store them.
Adding a New Translation
To add a custom element:
- Click the +Add Translation button in the upper right corner.
- In the Add translation panel:
Label: enter a unique key (e.g.,newButtonLabel).
Languages: check each language you want to provide.
Text: fill in the translation for each selected language. - Clone translations from
To copy all existing text from another language into your current locale (without translating), open the “Select” dropdown, pick the source language (e.g. English), and click Clone. This instantly duplicates those fields as-is. - Translating flow
To programmatically generate translations, click Translate in the drawer header, then choose your provider (OpenAI, etc.) from the Integration dropdown. The system will pull translated strings and populate every field. - Click Save. The new label now appears in the table, ready to be referenced in code.
Deleting a Translation
Click the Delete (trash) icon on the row you wish to remove.
Confirm the deletion in the prompt.
You can also delete current items using the Delete icon. It is not recommended to delete items already defined in the system.
Best Practices & Conclusion
-
Batch your changes: When rolling out a new feature or language, edit multiple translations at once to maintain consistency.
-
Coordinate with developers: Ensure that any custom labels added here are actually referenced in the codebase.
-
Review periodically: As UI evolves, legacy labels may become obsolete—clean them up to keep the table manageable.
By centrally managing your short-text translations, you guarantee that every button, tooltip, and menu option in your CRM remains clear, accurate, and localized for all users.
6. How to Manage Texts
Long, structured content—such as notifications, email bodies, tooltips, and rich messages—is managed under Settings > Texts. This module lets you centrally edit, clone, and auto-translate entire text objects (often JSON trees) across any active language. By using it you ensure that every notification, onboarding message, or rich UI copy is consistent and localized without touching code.
Why Manage Texts Here?
-
Complex Structures: Handle nested content (titles, subtitles, descriptions) in one place.
-
Rich Formatting: Preserve HTML or Markdown within descriptions.
-
AI-Powered Translation: Leverage built-in “Translate” for bulk localization.
-
Version Control: Lock critical texts to prevent accidental deletion.
Viewing & Searching Texts
Editing & Translating an Existing Text
To add a translation to any of these texts:
- Click the Edit (pencil) icon on the text card you want to update.
- In the right-hand panel:
Unique label (read-only) identifies the object.
Locked checkbox prevents deletion; leave checked for core messages.
Properties view shows the JSON structure (nodes you can select to edit).
Language tabs let you switch between existing translations. - Clone translations from
To copy all existing text from another language into your current locale (without translating), open the “Select” dropdown, pick the source language (e.g. English), and click Clone. This instantly duplicates those fields as-is. - Translating flow
To programmatically generate translations, click Translate in the drawer header, then choose your provider (OpenAI, etc.) from the Integration dropdown. The system will pull translated strings and populate every field. - Manually tweak any node in the JSON tree as needed.
- Click Save to apply changes.
To search for a text: Start typing its label in the Search field.
Tip: Cloning and translating are independent—feel free to clone first and then auto-translate, or translate first and use cloning to reset individual entries.
Adding a New Text
To add a new text and its translations:
- Click on the +Add Text button in the upper right corner.
- Fill out the Unique label and check or uncheck Locked.
- Populate the Properties JSON structure by selecting nodes and entering content for each (e.g., title, description).
- Switch to your target language tab, then either Clone or Translate into it.
- Add a plain-text Title and Description at the bottom for summary display.
- Click Save—your new text appears as a card.
Unlocking & Deleting Texts
By default, new texts are created as Locked—they cannot be deleted. To unlock a text:
- Go to the text editing tab.
- Uncheck the Locked checkbox.
- Click Save.
To delete text:
- Make sure it is not locked. Back on the main Texts page, click the Delete (trash) icon on the unlocked card.
- Click the Delete icon next to the corresponding text.
- Confirm deletion.
Warning: Locked texts cannot be removed. Only unlock when you’re certain the text is obsolete.
Best Practices & Conclusion
-
Lock critical system messages to avoid accidental removal.
-
Review auto-translations for tone and accuracy.
-
Audit periodically to prune unused texts and trim JSON nodes.
-
Coordinate with your dev team: ensure labels here map to code references.
By centralizing rich-text management, your CRM stays cohesive, fully localized, and easy to update—without code deployments or scattered copy files.
7. Clients Types in Configurations
Clients Types define different types of clients within the system. By default, there are two standard client types: Personal and Business. However, the system allows creating custom client types to suit specific needs.
When adding or editing a client, the Type field determines which category they belong to. Once a client type is assigned, it cannot be changed later.
This is defined by your business requirements, not by the system itself. For example, if in your process a client is verified at Level X with Status Y, you configure it here. Once set, the entire system uses these properties to automate verification workflows, control access, and ensure compliance based on your specific criteria.
Use Cases
- Flexibility
Organizations can define custom client categories (e.g., “Investor,” “VIP,” “Test”) to align with their specific business needs. - Enhanced Onboarding
Different client types may require varying verification thresholds—for example, Business accounts might need stricter verification than Personal accounts. - Compliance & Security
By defining Verification Level and Status, organizations ensure clients meet KYC and other regulatory requirements. - Automation
The system automatically marks clients as “Verified” or “Not verified”, streamlining processes and reducing manual verification tasks.
Where to Find Clients Types
Adding or Deleting a Client Type
- Add a New Client Type
Click + Add in the Clients types panel.
Provide a Name (e.g., “Test,” etc.) and an internal Label if prompted.
After saving, the new type appears in the list. - Delete an Existing Client Type
Click the trash bin icon next to the client type you want to remove.
Confirm the deletion in the pop‐up (“Are you sure?”).
Important: A client type can only be deleted if no clients exist with that type and verification level.
Selecting a Client Type When Creating or Editing a Client
- Create or Edit a Client
Go to Clients and click Add (or Edit on an existing client). - Choose the Type
In the General tab (Personal details section), find the Type dropdown.
You’ll see your available client types (e.g., “Business,” “Personal,” “Test”). - Save
The chosen type is now assigned to that client.
Clients Configurations: Verification Rules
To the right of the Clients Types list you’ll find the Clients configurations panel, where you control exactly when a given client type is considered “Verified.” It exposes two dropdowns:
-
Consider client is verified level
-
Consider client is verified status
Consider client is verified level
What it is:
A dropdown that lets you choose which verification flow to monitor. Typical options include:
-
email -
phone -
identity
Pick the verification “type” your business cares about for this client category—e.g. if you select email, the system will watch the client’s email-verification record.
Consider client is verified status
What it is:
Once you’ve chosen a level, this second dropdown appears, listing only the statuses defined for that level. Common statuses:
-
init -
pending -
completed -
rejected
Pick the “threshold” status at which the client should flip to Verified. For instance, choosing pending means:
“As soon as the client’s email verification moves into pending, mark them Verified.”
Defining Levels & Statuses (Configuration → Verification Levels)
These dropdown options aren’t hard-coded—they come from your Configurations → Verification Levels setup. There you:
-
Add/Edit a level (e.g. “Verify Email Address,” “Verify Phone Number,” etc.).
-
Define the Statuses each level can assume (
init,pending,completed,rejected, …).
Once a level exists there, it shows up here for selection.
If you set “Consider client is verified status = pending,” then once the client’s status is pending (at the specified level), the system marks them as Verified.
How It Works in Practice
A Verification Level might have multiple statuses (e.g., init, pending, rejected).
Imagine you’ve set, for Personal customers:
Verified level = email
Verified status = pending
Then:
A new client signs up → their Email verification starts at init → the header reads Not verified.
They click the link in the welcome email → their email status flips to pending → the header immediately updates to Verified.
If you configure “Consider client is verified level = email” and “Consider client is verified status = pending,” any client with Verification Level = email and Verification Status = pending will show up as Verified in the interface.
Real‐Time Verification Indicators in the Client Profile
Not Verified / Verified Labels:
In the Edit client screen (see screenshots), you’ll notice a red “Not verified” or green “Verified” label at the top.
These labels change dynamically based on the verification rules you set in Clients configurations.
If the client’s Verification Level is “email” and Verification Status is “init,” they might appear Not verified (red label).
Changing the status to “pending” (assuming your rules say “pending” = verified) makes the label turn Verified (green).
“Consider client is verified level” and “Consider client is verified status” define the threshold at which a client is deemed Verified.
These rules tie into the Verification Levels (e.g., email, phone) and Statuses (e.g., init, pending, approved).
Real‐Time Indicators: Clients meeting the configured criteria display a green “Verified” badge; otherwise, they remain “Not verified.”
By combining custom client types with verification configurations, you can tailor the onboarding and validation process to match your organization’s unique requirements, ensuring a streamlined and compliant client management workflow.
8. Configurations: Verification levels
In Configurations, Verification Levels play a key role in managing the client verification process. Each client type (e.g., Personal or Business) can have its own set of verification levels, which are linked to different verification statuses. These levels determine how a client progresses through authentication, ensuring compliance with KYC (Know Your Customer) requirements.
Use Cases
-
Multi-Step KYC
Financial institutions can define verification levels such as “Email,” “Phone,” “Identity”, with statuses progressing from init to approved for enhanced security.
-
Business vs. Personal Clients
Verification processes can be tailored—business accounts may require additional documents and higher verification levels than personal accounts.
-
Automation & Compliance
The system can automatically update a client’s “verified” status when they reach a specific level/status threshold (e.g., “email/pending” or “identity/approved”), ensuring compliance without manual intervention.
Accessing Verification Levels
To manage your verification flows, first switch to the Verification Levels tab in Configurations:
Creating or Editing a Verification Level
1. Add a New Level
Click the + Add button above the left panel.
In the Add verification level modal that appears:
Type: Choose the client type this level applies to (Business, Personal, Test, etc.).
Name: Enter the human-readable name displayed in the UI (e.g., Email, Phone, Identity).
Properties: (Optional) Map any custom JSON nodes or metadata for this flow.
Language & Translations: Use the language buttons, Clone, or Translate to localize.
Click Save. Your new level immediately shows up in the list on the left.
2. Edit an Existing Level
Hover over any level in the list and click its pencil icon.
Modify its Name, Properties, or Translations as needed.
Click Save.
Warning: If a verification level is already in use by some clients, you cannot delete it—only edit.
Defining Statuses for Each Verification Level
Every verification level drives one or more Statuses (e.g., Init → Pending → Completed/Rejected). You configure these in the right-hand panel:
1. Statuses Panel (Right Side)
With a level selected on the left, the Statuses panel on the right shows all statuses defined for that flow.
Typical statuses include:
Init: No verification started.
Pending: Verification in progress.
Completed: Verification passed.
Rejected: Verification failed.
Each verification level can have its own set of statuses.
2. Add or Edit Status
Click + Add in the top-right of the Statuses panel.
In the Add status modal:
Name (User-facing name): e.g., Pending.
Properties: (Optional) Attach any JSON metadata nodes.
Click Save. The new status appears in the list.
3. Edit or Delete a Status
Edit: Hover over a status and click its pencil icon to rename or remap properties.
Delete: Click the trash bin—only enabled if no clients are currently in that status.
How Verification Levels and Statuses Appear in Clients
1. Client Type Dependency
If you create a verification level for “Personal,” only Personal clients will see that level.
Similarly, levels for “Business” apply only to Business clients.
2. Edit a Client
a. Navigate to the Clients List
In the main sidebar, click Clients to open the clients table.
b. Open the Edit Form
Find the client you want to change, then click the pencil (Edit) icon at the end of its row.
c. Locate Verification Fields
In the General section of the edit drawer you’ll see two new dropdowns under Affiliation (or wherever your form layout places them):
Verification level
Verification status
Dropdown options are exactly the levels and statuses you configured in Configurations → Verification Levels.
Only the levels matching this client’s Type appear.
Once a level is chosen, its associated statuses populate the Verification status dropdown.
3. Cannot Delete In-Use Items
If any client is currently assigned a given level or status, the trash-bin icon for that item in Configurations → Verification Levels will be disabled.
You may rename or reconfigure it, but full deletion is blocked to avoid orphaning existing client records.
Key Points to Remember
- Client Type Binding: Each verification level is tied to a specific client type (Personal or Business, etc.).
- Multiple Statuses per Level: You can define as many statuses as needed to reflect each step (e.g., init, pending, completed).
- No Deletion If In Use: Levels or statuses assigned to real clients can’t be removed.
- Properties & Language Fields: Allows storing custom data or translations for each level/status, enabling localized or extended flows.
Verification Levels in Configurations enable you to create structured, multi-step KYC (Know Your Customer) processes for each client type. By pairing these levels with custom statuses, you can tailor how a client progresses from “Init” to “Pending” to “Completed,” ensuring each user meets the compliance and verification standards required for their account.
9. Configurations: Verification Documents
In Configurations, the Verification Documents section allows administrators to define the required documents for client verification. These documents serve as proof of identity, financial information, or residency, ensuring compliance with KYC (Know Your Customer) policies.
With this function, businesses can:
- Set mandatory and optional verification documents for different client types.
- Modify document requirements dynamically as business policies evolve.
- Ensure compliance by enforcing document submission before account activation.
Use Cases
- Enforcing KYC Compliance
Clients must submit documents (e.g., Passport, Utility Bill) before account activation by selecting required documents in Configurations → Documents, ensuring compliance with regulatory policies. - Updating Requirements by Client Type
Enable Source of Funds for business clients in Configurations → Documents, applying the new requirement to future verifications while existing clients remain unaffected unless manually updated. - Reviewing & Approving Client Documents
Admins verify pending client documents by navigating to Clients → Profile → Documents, reviewing submissions, and approving or rejecting them, ensuring clients meet verification requirements before proceeding.
Accessing Verification Documents
To manage which documents clients must upload during verification, open the Documents tab in the Configurations area:
- Click Configurations in the sidebar (⚙️ icon).
- Along the top, select Documents.
Selecting Required Verification Documents
Inside the Documents panel you’ll see a checklist of all available verification document types:
- Typical options include:
Passport or ID
Bank card (front)
Bank card (back)
Source of funds
Utility bill
Driver license - Click Save.
Tip: To require a document, check its box. A blue checkmark means clients must upload that document. Unchecked items become optional (or hidden).
Editing a Client’s Verification Documents
Once you’ve defined which documents are required, they automatically surface in every matching client’s profile.
There you’ll see one upload area for each required document. Clients or admins can drag-and-drop or browse to attach files. Uploaded items remain linked to the client record for audit or review.
Adding or Removing Required Documents
Adding a New Required Document:
- Go to Configurations → Documents.
- Check the box next to the new document type (e.g., Bank card).
- Click Save and watch for the “Successfully Updated” message.
- New verifications now require that document.
Once added, the new document will be required for all future client verifications. Clients who have already completed verification will not be affected unless an administrator updates their profile manually.
Removing a Required Document
- Go to Configurations → Documents.
- Uncheck the box next to the document you no longer need (e.g., Bank card (back)).
- Click Save.
- Future verifications will not prompt for that document—though existing uploads stay accessible.
Once removed, that document will no longer be required for new verifications. However, previously uploaded documents will still be available for reference in client profiles.
Key Points to Remember
- Flexibility in Requirements – Administrators can adjust document requirements at any time.
- Client-Specific Settings – Different client types may have different document verification requirements.
- Real-Time Updates – Any modification in document settings is applied instantly to new and existing clients.
- API Integration – Documents can also be managed and uploaded via API for automated verification workflows.
By properly managing Verification Documents, businesses can ensure a secure, compliant, and efficient verification process tailored to their needs.
10. Clients Custom Fields
The Clients custom fields section allows administrators to define additional, customizable data fields that appear on client profiles across the system. These fields let you extend the standard client model with business-specific attributes without changing core logic.
Custom fields are useful for capturing extra information such as internal classifications, preferences, tags, or any domain-specific data required by your workflows.
This section is located under Settings → Configurations → Clients custom fields.
What You Can Do
Once created, custom fields appear:
on the Client profile view
in client edit forms
consistently across all modules that display client details
Custom Fields List
The main table displays all configured client custom fields with the following information:
- Field name – The label shown to users on client profiles
- Type – The input type used to capture data:
Input – Free-text field
Select – Single-choice dropdown
Multi-select – Multiple-choice selector - Options – For Select and Multi-select fields, the list of available values
- Actions
✏️ Edit – Modify the field configuration
🗑️ Delete – Remove the custom field
Display behavior
Field Label is shown exactly as entered (including capitalization).
Field Name does not affect how values are displayed to users.
Field order in the list defines the order shown on client profiles.
Adding a Client Custom Field
To create a new custom field:
Validation rules
Name is mandatory.
Label is mandatory (auto-filled if not edited).
Type is mandatory.
Select and Multi-select fields require at least one option.
Fields cannot be saved if required values are missing.
The new field becomes immediately available on client profiles.
Editing or Deleting Fields
Edit – Click the pencil icon to update the field name, type, or options.
Changes made during editing are applied immediately after saving.
Delete – Click the trash icon to permanently remove the field.
Deleting a custom field removes it from all client profiles. Existing values stored in that field will no longer be accessible.
Ordering custom fields
Custom fields can be reordered using drag & drop in the list.
The defined order controls how fields appear on client profiles and edit forms.
For Developers
1. How to Connect to the WBCS API
We provide documentation with examples of API requests, which can be found [here]. The requests are categorized by the modules they are used for, including working with Core Banking, Client Area, Clients, and others.
To authenticate most requests, you will need an identification token (an API authorization key for Wi CRM).
To generate an identification token:
1. Navigate to Security > Identification Tokens.
2. In the upper right corner, click the +Add button.
3. Enter a Name for the token.
4. From the drop-down list, select Role. The selected role will determine which CRM modules will be accessible when using this token. You can read more about setting up roles [here].
5. If necessary, set an expiration date for the token. If no expiration date is specified, the token will remain valid indefinitely.
6. Optionally, specify a Whitelist: a list of IP addresses for which the token will be valid. If no whitelist is provided, the token will be valid for any IP address that has the token.
7. Click on the Generate token button.
Important: The identification token is displayed only once—immediately after clicking the Generate token button. Be sure to copy and store it securely, as it cannot be viewed again. Do not share this token with anyone, and make sure you don’t lose it.
Created tokens can be modified by adding or removing IP addresses from the whitelist. Other parameters of the token cannot be edited.
Tokens can also be deleted, but once deleted, they cannot be restored.
Buckets Leads Status API
The Buckets Leads Status API allows authorized systems to retrieve lead data for a given bucket and affiliate, using emails and/or client IDs, with optional filtering, pagination, and flexible response structure.
These endpoints are read-only and implemented as POST to support bulk lookups.
📍 Base path
/api/public
🔐 Authentication
Method: Token-based via Authorization header
Authorization: <API_TOKEN>
-
No Bearer prefix
-
Token must be passed as-is
Required permission:
👉 Buckets: View Own
If authentication fails:
401 Unauthorized
{
"message": "Access with the provided credentials is incorrect. CODE: X-0005",
"statusCode": 401
}
⚙️ Common behavior
-
Method: POST
-
Format: JSON
-
Client type: Server-to-server
-
Supports pagination via
limitandoffset
📦 Endpoint: Leads by bucket & affiliate
POST /buckets/{bucketId}/{affiliateID}/leads
🧠 Description
Returns lead data for clients identified by:
-
emails
-
client IDs
-
or both
Includes validation:
-
Bucket existence
-
Bucket ownership by affiliate
📌 Path parameters
-
bucketId— bucket identifier -
affiliateID— affiliate identifier
📥 Request headers
-
Content-Type: application/json
-
Authorization:
<API_TOKEN>
📤 Request body
{
"emails": ["user1@example.com"],
"ids": ["69ce524d741e8f2238329fff"],
"keyBy": "email",
"filters": {
"createdDate": ["1676172330450", "1776172330450"]
},
"limit": 100,
"offset": 0
}
🧩 Fields
-
emails— array of emails (optional) -
ids— array of client IDs (optional) -
keyBy—"email"(default) or"id" -
filters.createdDate— optional created date range (epoch ms strings) -
limit— number of records to return (default: 100) -
offset— number of records to skip (default: 0)
⚠️ Notes
-
If both
emailsandidsare empty → returns data based on filters only -
keyBy = "id":-
uses client
_idas key -
falls back to email if
_idis missing
-
-
Pagination is applied after filtering
✅ Successful response
200 OK
Response is an object keyed by email or id (based on keyBy).
{
"user1@example.com": {
"id": "69ce524d741e8f2238329fff",
"email": "user1@example.com",
"affiliateID": "1234567890",
"status": "active",
"createdDate": "2021-01-01T00:00:00.000Z",
"ftd": "2021-01-01T00:00:00.000Z"
}
}
❌ Errors
400 Bad Request
-
Bucket with corresponding affiliateID doesn't exist
-
Provided bucketId does not belong to the provided affiliateID
-
Invalid or missing token
-
Missing required permissions
🧩 Endpoint: Leads by bucket, affiliate & source
POST /buckets/{bucketId}/{affiliateID}/leads/{sourceId}
🧠 Description
Same as previous endpoint, with an additional source validation step.
Used for source-level access control.
📌 Path parameters
-
bucketId— bucket identifier -
affiliateID— affiliate identifier -
sourceId— source identifier
📤 Request body
Same as previous endpoint.
⚠️ Source validation behavior
-
If
sourceIdis provided → system checks that bucket has a source assigned -
If validation fails → request is rejected
✅ Successful response
Same structure as previous endpoint.
❌ Errors
400 Bad Request
All previous errors, plus:
-
Provided sourceId does not belong to bucket
Same as previous endpoint.
🔧 Example requests
Without sourceId
curl -X POST "(CRM origin)/api/public/buckets/<bucketId>/<affiliateID>/leads" \
-H "Content-Type: application/json" \
-H "Authorization: <API_TOKEN>" \
-d '{
"emails": ["user1@example.com"],
"ids": ["69ce524d741e8f2238329fff"],
"limit": 50,
"offset": 0
}'
With sourceId
curl -X POST "(CRM origin)/api/public/buckets/<bucketId>/<affiliateID>/leads/<sourceId>" \
-H "Content-Type: application/json" \
-H "Authorization: <API_TOKEN>" \
-d '{
"filters": {
"createdDate": ["1676172330450", "1776172330450"]
}
}'
Traders Room — Sign Up API
The Sign Up API allows external systems to register new clients in the platform.
It supports:
-
Creating a new user
-
Passing marketing / affiliate data
-
Passing business / routing configuration
-
Optional email notification
-
Optional instant login via autologin link
🎯 Use Cases
-
Partner platforms
-
Affiliate systems
-
Landing pages / funnels
-
External onboarding flows
🌐 Endpoint
POST /tradersroom/api/auth/signup
🔐 Authentication
All external requests must include an API key.
Header
x-api-key: <your-api-key>
⚙️ Request Format
Headers
| Header | Required | Value |
|---|---|---|
| Content-Type | ✅ | application/json |
| x-api-key | ✅ | Provided by platform |
| Origin | ❌ | Your domain |
📥 Request Body
Required Fields
{
"email": "user@example.com",
"phone": "+1234567890",
"firstName": "Jane"
}
📊 Full Field Reference
🧑 Basic Information
| Field | Type | Required | Description |
|---|---|---|---|
| string | ✅ | User email | |
| phone | string | ✅ | Phone number |
| firstName | string | ✅ | First name |
| middleName | string | ❌ | Middle name |
| lastName | string | ❌ | Last name |
| gender | string | ❌ | Gender |
| dateOfBirth | string | ❌ | Date of birth (ISO format) |
| nationality | string | ❌ | Nationality |
| passport | string | ❌ | Passport |
📞 Contact Information
| Field | Type | Required | Description |
|---|---|---|---|
| additionalPhone | string | ❌ | Secondary phone |
📢 Affiliate & Marketing
| Field | Type | Required | Description |
|---|---|---|---|
| affiliateID | string | ❌ | Affiliate identifier |
| subID | string | ❌ | Affiliate sub-id |
| campaignId | string | ❌ | Campaign identifier |
| sourceId | string | ❌ | Traffic source |
| meta | string | ❌ | Additional metadata |
| externalId | string | ❌ | External system user ID |
🏢 Business / Routing Configuration
| Field | Type | Required | Description |
|---|---|---|---|
| project | string | ❌ | Project identifier |
| desk | string | ❌ | Desk identifier |
| manager | string | ❌ | Manager (id / email / name) |
| status | string | ❌ | Client status |
| state | string | ❌ | Client state (active, live, etc.) |
| type | string | ❌ | Client type |
| companyFeeGroup | string | ❌ | Fee group |
| processed | boolean | ❌ | Used in custom flows |
🛡️ Verification & Permissions
| Field | Type | Required | Description |
|---|---|---|---|
| verificationLevel | string | ❌ | Verification level |
| verificationStatus | string | ❌ | Verification status |
| allowToCreateAsset | boolean | ❌ | Allow asset creation |
| agreements | array | ❌ | Signed agreements |
⚙️ Traders Room Options
| Field | Type | Required | Description |
|---|---|---|---|
| sendEmail | boolean | ❌ | Send registration email |
📦 Nested Objects
billing
{
"billing": {
"country": "US",
"region": "NY",
"city": "New York",
"postcode": "10001",
"address": "Wall Street 1"
}
}
| Field | Type |
|---|---|
| country | string |
| region | string |
| city | string |
| postcode | string |
| address | string |
agreements
{
"agreements": [
{
"label": "Terms and Conditions",
"ip": "127.0.0.1",
"signedAt": "2026-01-01T12:00:00Z"
}
]
}
| Field | Type | Description |
|---|---|---|
| label | string | Agreement name |
| ip | string | Signing IP |
| signedAt | string | ISO date |
📤 Responses
✅ Success — With Autologin
{
"id": "user-uuid",
"url": "https://your-domain/autologin/uuid/"
}
-
URL allows instant login
-
Valid for a short time only
✅ Success — Without Autologin
{
"id": "user-uuid"
}
❌ Error Responses
400 — Invalid Request
{
"message": "Email, phone and first name are required",
"providerStatus": 400
}
401 — Unauthorized
{
"message": "Invalid secret key",
"providerStatus": 401
}
500 — Server Error
{
"message": "Internal server error",
"providerStatus": 500
}
📡 Example Requests
Basic Registration
curl -X POST "https://your-domain/tradersroom/api/auth/signup" \
-H "Content-Type: application/json" \
-H "x-api-key: YOUR_API_KEY" \
-d '{
"email": "user@example.com",
"phone": "+1234567890",
"firstName": "Jane"
}'
Full Example
curl -X POST "https://your-domain/tradersroom/api/auth/signup" \
-H "Content-Type: application/json" \
-H "x-api-key: YOUR_API_KEY" \
-d '{
"email": "user@example.com",
"phone": "+1234567890",
"firstName": "Jane",
"lastName": "Doe",
"affiliateID": "AFF-123",
"subID": "SUB-1",
"campaignId": "CMP-456",
"sourceId": "facebook_ads",
"project": "default",
"desk": "sales",
"sendEmail": true
}'
⚠️ Important Notes
-
Each request creates a new user
-
Email should be unique
-
Autologin link is temporary
-
Store returned
idin your system -
API key must be kept secure
-
Some system fields are automatically managed and cannot be overridden
📊 Recommended Integration Flow
-
Collect user data
-
Call Sign Up API
-
Handle response:
-
If
urlexists → redirect user -
Otherwise → show success message
-
-
Store user ID
Logs
We use Elasticsearch for logging. We log all create, update, and delete operations; however, view operations are not logged. Logging is implemented in both resolvers and open API methods.
Two Types of Logs
The system maintains two distinct logging mechanisms:
-
Operational Logs (CRUD Logs) – Track create, update, delete operations in CRM modules.
-
Client Activity Logs – Track all client and manager activity related to a specific client across CRM, Tradersroom, and Terminal.
The sections below describe both mechanisms.
List of fields:
- Created - the date when the log was created.
- Action - the type of operation being logged. The actions we track include "create," "update," "updateMany," and "delete."
- Description - this field is used for providing additional details in specific cases where the standard information may not be sufficient. For example, in transaction webhooks, the description might include the current transaction status, such as "Sending transaction to Huntli," or detail a specific error, such as "Error while trying to send transaction to Huntli."
- Client - shows the name of the client who performed an action in the system.
- Employee - shows the name of the employee who performed an action in the system or performed a specific action on their assigned client.
- API - indicates that the action was performed by a third-party service. The column shows the identification token used to perform the action.
- Business model - refers to a distinct, independent model within our CRM, such as "Projects," "Settings," or "Client Area." A business model can also include submodules.
- Sub model - specific model that belongs to a business model. For example, "Texts" is a sub model that belongs to the "Settings" business model.
- Description - provides a short explanation of the log to add context. E.g., Client opened the withdrawal modal, Client clicked the notifications button, etc.
- Type - shows the log origin and status. The origin can be internal or external. The status is shown in brackets and defines whether it is an info log or an error log. Info logs provide general informational messages, while error logs describe failed operations.
- Error - is a stringified field containing the error message. It is used in the "catch" block of a "try-catch" construction, with a Sub type of "error."
Filters
Use filters to narrow log entries by module, operation, source, and time.
-
Client – Shows logs related to the selected client.
-
Employee – Displays logs related to the selected employee.
-
Business model – Top-level system module (e.g. Desks, Projects, Clients, Businesses).
-
Sub model – Sub-section within the selected business model (e.g.Accounts, Wallets, Banks, Cards, or Currencies, and others).
-
Action – Operation type: get, create, update, updateMany, webhook, delete, clone.
-
Type – Log origin: internal (resolvers/system) or external (Open API, webhooks).
-
Created date – Date range when the log was generated.
The Client and Employee filters are also available as buttons above the table for quick access.
Select one or more criteria and click Save to apply filters. Multiple filters can be combined to quickly isolate relevant logs for debugging, audits, or incident analysis.
Client Activity Logs (Sessions Tab)
Client Activity Logs provide a unified audit trail of all activity related to a specific client.
Unlike Operational Logs (CRUD), Client Activity Logs include:
-
Client actions (CRM / Tradersroom / Terminal)
-
Manager actions performed on that client
-
Navigation and UI events
-
Trading terminal activity
-
Finance flows
-
Support interactions
These logs are displayed in: /clients/edit/{clientId}/sessions
Example: /clients/edit/69732d9afe88d5e6ca56e366/sessions
Data Storage Model
Client Activity Logs are stored in a centralized activity log model with the following structure:
-
clientId
-
actorType (client | manager | system)
-
actorId (optional for client)
-
actorName (for manager display)
-
sourceApp (crm | tradersroom | terminal)
-
eventName (machine-readable)
-
message (human-readable)
-
metadata (JSON object)
-
createdAt (timestamp)
Sessions Table (UI)
The Sessions tab displays:
-
Date/time (default sorting: DESC)
-
Actor type (Client / Manager)
-
Actor (Manager name + ID or “Client”)
-
Source app (CRM / Tradersroom / Terminal)
-
Event type
-
Event details
-
Expandable metadata (JSON)
Table supports:
-
Server-side pagination
-
Sorting by Date
-
Filtering by:
-
Actor type
-
Source app
-
Event type
-
Logged Client Events
The system logs (minimum):
Authentication:
-
Client registered
-
Client logged in
-
Client requested password reset
-
Client restored password
-
Client changed language
-
Client entered route X
-
Client opened modal/drawer X
-
Client opened Notifications dropdown
-
Client attempted PWA install (result logged)
Transactions:
-
Client submitted deposit
-
Client submitted withdrawal
-
Client fulfilled withdrawal
-
Client filtered transactions
-
Client paginated transactions
-
Client opened transaction details
-
Client declined transaction
Documents:
-
Client fulfilled declaration
-
Client printed form
-
Client downloaded document
Tickets:
-
Client created ticket
-
Client messaged in ticket
-
Client closed ticket
Profile: Client edited profile (log changed fields only, not sensitive values)
Search: Client searched trading ideas/calendar
Trading Terminal
All terminal operations must be logged, including:
-
Order creation
-
Order modification
-
Order cancellation
-
Order execution
-
Symbol changes
-
Indicator changes
-
Chart timeframe changes
-
Widget operations
-
Position lifecycle
-
Filters and instrument selection
Full coverage is mandatory.
Logged Manager Events on Client
All manager actions related to the client must be logged, including:
-
Opened client card
-
Opened client in new tab
-
Edited client data (with safe diff)
-
Created related entity (ticket, note, action, etc.)
-
Updated related entity
-
Bulk operations affecting the client
Each manager event includes:
-
managerId
-
managerName
-
clientId
-
action type
-
target entity (type + id)
-
before/after diff (without sensitive data)
Security & Privacy Rules
-
No passwords, tokens, or full payment data are logged.
-
For profile edits, only changed field names are logged.
-
Access to Sessions tab is role-based.
Difference Between Operational Logs and Client Activity Logs
| Operational Logs | Client Activity Logs |
|---|---|
| CRUD only | Full behavioral audit |
| Internal system focus | Client-centric |
| Not client-viewable | Shown in Sessions tab |
| No UI navigation logging | Includes UI and terminal activity |
Authentication Types in WBCS
1. WebAuthn
WebAuthn is a method of identity verification that utilizes the security features of the device the user logs into the CRM with. Examples of such features include:
- Face ID
- Fingerprint
- Password
- PIN
Note: Verification using biometrics is preferred due to its higher security level.
In Configurations, you can choose between two options for authentication:
- Internal login and WebAuthn – adds another layer of protection by requiring both methods.
- Internal login or WebAuthn – allows the user to choose their preferred method.
How it works:
- The first time you log in after enabling WebAuthn in Configurations, you will need to enter your login and password.
- A Register WebAuthn button will appear. Click on it.
- Read the information in the window and click Register.
- The WebAuthn key will be created automatically by your browser's or PC’s internal functionality. Follow the steps by clicking Next when prompted.
- Enter your PIN, attach your fingerprint, or provide any other form of authentication installed on your device.
- For all future logins, the system will request this proof of identity. If you choose Internal login or WebAuthn, providing it is optional. If you choose Internal login and WebAuthn, it is mandatory.
You can view and edit the WebAuthn data for each employee in the Edit employee section.
2. Google TFA
Google TFA (Two-Factor Authentication) is a method of identity verification using an external application that generates a code. We recommend using Google Authenticator for this purpose.
How it works:
- The first time you log in after enabling Google TFA in Configurations, enter your login and password.
- A QR code will appear. Scan it with Google Authenticator or another authentication application.
- You will also be shown a secret code. Copy and save it in a safe place, as it may be needed to regain access to your authenticator in case your phone is lost or damaged.
- Click Next.
- Fields will appear where you need to enter the code generated by Google Authenticator (or another authentication app).
In future logins, the CRM will also ask for the generated code. This code changes every minute.
3. Phone TFA
Phone TFA (Two-Factor Authentication) is a method of identity verification using your phone number, which will receive a code for authorization.
How it works:
- The first time you log in after enabling Phone TFA in Configurations, enter your login and password.
- Enter your phone number, including the country code.
- Click Confirm.
- A code will be sent to your phone. Enter it in the appropriate fields.
In future logins, you will no longer need to enter your phone number; the code will be sent automatically to the registered number.
Google TFA and Phone TFA data for each employee can be viewed and edited in the Edit employee tab if necessary.
Calendar
Calendar Overview
The Calendar allows users to schedule and manage events efficiently. It supports different event types, reminders, and notifications to ensure users never miss important actions.
With this feature, users can:
- Create and manage events for specific dates and times.
- Set notifications to receive reminders before an event.
- Schedule client-related calls directly within the system.
- Use different views such as daily, weekly, or monthly for better planning.
Use Cases
Scheduling Client Calls
Create a Call event linked to a client with a reminder. The event appears in the calendar and the client’s profile, allowing sales managers to efficiently manage follow-up calls.
Setting Personal Reminders
Create a Reminder event with a notification. The system sends alerts before the task is due, helping users stay on top of internal tasks.
Managing Weekly Team Meetings
Add a weekly Reminder event for recurring team meetings. The calendar tracks these meetings, ensuring consistency and better team coordination.
Accessing the Calendar
To open the calendar, navigate to the Calendar section in the system. The default view displays a monthly layout, but users can switch between daily, weekly, and monthly views for better organization.
Creating an Event
To schedule an event, select a date on the calendar. A form will open where users can enter the event details.
Steps to Create an Event:
- Click on the desired date.
- Select the event type from the available options (e.g., Call, Reminder).
- Choose the date and time for the event.
- Enter a description for better context.
- If applicable, select the client associated with the event.
- Set a notification reminder (e.g., 15 minutes, 30 minutes, 1 hour, or 24 hours before the event).
- Click Save to confirm the event.
Once saved, the event will be visible on the calendar and stored in the system.
Managing Event Types
There are two primary event types:
- Call – This event is directly linked to a client. Users can select a client, specify a meeting time, and add relevant details.
- Reminder – This is a personal reminder that is not linked to a client. It can be used for any general task.
Users can choose the appropriate event type when creating an event.
Setting Event Notifications
Notifications can be configured to remind users about upcoming events. Options include reminders at different intervals:
15 minutes before
30 minutes before
1 hour before
24 hours before
Note: Notifications appear in the Notifications panel to alert users in time.
Viewing and Editing Events
After creating an event, users can:
- View it in the calendar on the selected date.
- Click on it to edit details or reschedule.
- Change the reminder time if needed.
Any modifications will be updated in real time across the system.
Managing Events from Client Profiles
Events, especially calls, can also be managed directly from the Clients section. Users can:
- Open a client’s profile.
- Navigate to the Actions tab.
- Create a Call event from there by clicking +Add in the top-right corner.
- Once saved, the event will automatically appear in the calendar.
Key Points to Remember
- Different event types ensure flexibility for scheduling client-related or personal reminders.
- Notifications help keep track of upcoming events.
- Direct integration with Clients allows efficient planning for calls and meetings.
- Multiple calendar views help users organize their schedules efficiently.
By effectively using the Calendar, users can streamline their workflow, improve scheduling efficiency, and stay on top of important tasks.
Notification Center
Notifications: Overview
The Notifications panel (bell icon, top-right) collects alerts from across the CRM—events, assignments, imports and more—so you never miss an important action.
1. Event Reminders
Whenever you schedule a Call or Reminder in the Calendar, you choose one or more lead-time reminders:
| Reminder Option | When it Fires |
|---|---|
| At time of event | Exactly at the scheduled start (e.g. “Your Call with John Doe is starting now.”) |
| 15 minutes before | 15 minutes prior (e.g. “Your Call with John Doe starts in 15 min.”) |
| 30 minutes before | 30 minutes prior |
| 1 hour before | 1 hour prior |
| 24 hours before | 1 day prior |
Notification text includes both the client name/ID and the exact event time, e.g.:
“📞 Call with client at 3:00 PM starts in 15 min.”
2. System & Integration Notifications:
Data imports/exports
Success: “✅ Clients imported successfully — 828 records.”
Failure: “❌ Import failed” with a link to download error details.
3. Viewing & Managing Notifications:
Open the Inbox: Click 🔔 in the header to slide out your Notifications panel.
Read vs. Unread
- Unread items are highlighted.
- Clicking an item marks it as read and (when applicable) jumps you to the related record.
Persistent History: Notifications remain until you clear them—giving you a running log of all alerts.
Identity & Access
1. Identity & Access: General
The Identity & Access section controls how users and systems authenticate and access the platform.
The General page defines core security and authentication rules for the entire system.
Here you can:
-
Restrict access by IP whitelist
-
Set session duration and login attempt limits
-
Configure authentication methods:
Internal loginWebAuthn
Combined login modes
-
Enable multi-factor authentication (MFA)
-
Enable phone-based TFA
-
Require reCAPTCHA on login
These settings apply globally and help enforce your organization’s security policies.
2. Identity & Access: API Tokens
Identification tokens provide a secure, programmatic way to authenticate and authorize external applications or scripts when interacting with Wifox’s API. By generating a token tied to a specific role and (optionally) limiting it to certain IP addresses, you can grant granular access without exposing user passwords.
Use Cases
- Server-to-Server API Calls: Create a token named
BackendAutomationwith the Role “CB Accounts & Transactions” so a nightly batch job can fetch balances and generate reports. - Third-Party Integration: If you connect an external fraud-detection service, generate a token limited to Clients, Actions, and Logs modules, then whitelist only the IP range where that vendor’s servers reside.
- Temporary Scripts or Tests: Use a short-lived token (set an expiration date for 24 hours later) when testing new endpoints via Postman. Once the tests complete, let it expire automatically.
- Mobile or Webhooks: When a webhook receiver needs to fetch client data, create a token named
WebhookListenerwith the minimal Role (e.g., read-only “Clients” + “KYC Documents”) and restrict it to your webhook server’s IP.
Where to Find Identification Tokens
Identification Tokens List View
Once you land on the Identification Tokens page, you’ll see a table with these columns:
| Column | Description |
|---|---|
| Token | The token’s name (a unique identifier you assigned). Clicking it will open the edit panel. |
| Permissions | A list of modules and API scopes this token can access (e.g., Clients, CB Assets, Projects, etc.). |
| Whitelisted IPs | 0–many IP addresses or CIDR ranges from which the token is valid. Blank means no IP restriction. |
| Expired Date | (Optional) If set, the token will stop working after this date—use the calendar icon to pick a date. |
- Permissions lists each module (e.g., “Clients,” “CB Wallets,” “Projects,” “Desks,” etc.) that the token can access. If there are more than a few scopes, the table will show “+X Show all” to reveal the rest.
- Whitelisted IPs can be individual IPv4/IPv6 addresses or CIDR ranges (e.g.,
192.168.31.0/24). The token will only be accepted when the request originates from one of these allowed IPs. - Expired Date is blank if no expiration was set. Otherwise, tokens stop working once the date passes.
Click the token name itself (e.g., NewIdentForTest) to open the Edit Identification Token drawer.
Creating a New Identification Token
To generate a brand-new token, click the + Add button in the top-right corner of the list view. This opens the Add Identification Token drawer:
- Name:
Enter a clear, descriptive name for your token (e.g.,MyIntegrationService,ReportingScript,PostmanUser, etc.).
The name must be unique among all existing tokens. - Role:
Select the Role that determines which modules and API endpoints the token can access.
A Role is defined in Settings → Roles and groups permissions for specific modules (e.g., “Read-only Clients,” “Full CB Access,” “Analytics Only”).
When you choose a Role from this dropdown, all modules and scopes assigned to that Role will be inherited automatically. - Expired Date (Optional):
Click the calendar icon to set an expiration date (DD/MM/YYYY).
Once the date is reached, the token becomes invalid—useful for short-lived integrations or security best practices. - Whitelist (Range of IPs):
If you want to restrict token usage to particular IP addresses, click + New IP to add one or more entries.
You can enter a single address (e.g.,203.0.113.45) or a subnet (e.g.,192.168.1.0/24).
If your integration only runs from your office or a known server, adding IP restrictions prevents the token from working elsewhere. - Generate Token:
Once you’ve filled in Name, Role, (optional) Expired Date, and (optional) Whitelisted IPs, click Generate token.
The system will display a newly created alphanumeric token string (e.g.,AbCdEfGhIjKlMnOpQrStUvWxYz1234567890).
Be sure to copy and store this token value immediately—this is the only time it’s shown in full.
After generation, the token will appear in the list view with its associated permissions and settings.
Editing an Existing Identification Token
To modify an existing token’s properties (e.g., add/remove an IP restriction, update the expiration date, or change its Role), follow these steps:
- Click the Token Name in the list (or click the ✏️ pencil icon under “Actions”).
- The Edit Identification Token drawer slides out from the right.
- Adjust any of these fields:
Name (if you want to rename it)
Role (select a different Role to alter the token’s permissions)
Expired Date (change or clear the date)
Whitelist (click + New IP to add more addresses, or click the 🗑️ icon next to an IP to remove it) - Save your changes.
The token’s underlying string does not change unless you explicitly delete and recreate the token—a Role or date change does not regenerate the secret value.
After saving, the updated permissions, IP whitelist, or expiration date take effect immediately.
Deleting an Identification Token
If you no longer need a token or suspect it has been compromised, you can permanently remove it:
- Locate the Token in the list view.
- Click the 🗑️ Delete icon in the “Actions” column for that row.
- A confirmation pop-up appears:
Are you sure? This action cannot be undone. [Cancel] [Delete] - Click Delete to proceed.
The token is removed instantly—any application using that token string will receive authentication errors going forward.
Warning: Deleted tokens cannot be recovered. If an external system still relies on that token, you’ll need to generate a brand new one and update your integration.
Integrations Module
1. Integrations: Overview
The Integrations module is where you manage all third-party and internal service connections (e.g. AI providers, telephony platforms, payment gateways). Use it to configure credentials, set endpoints, and control which integrations are active per project.
Navigating to Integrations
List View Layout
Filter & Search Bar (top row):
Type ▾: Opens a dropdown of all integration categories (e.g. Telephony, AI, Payments).
Search…: Live-filters cards by name, URL, or credential key.
Integration Cards:
Each card shows the integration’s icon and name.
On hover, two icons appear in its top-right corner:
✏️ Edit – Opens the configuration drawer.
🔗 Copy Link – Copies a shareable deep link to this integration.
Adding a New Integration
- Click + Add (upper-right corner)
- In the “Add integration” drawer (right side):
Project: Dropdown of your Projects—limits which data context this integration can act on.
Type: Select from predefined types (e.g. Telephony, AI, Webhook, Payment). - URL(s):
Click + Add to reveal a blank URL field.
Paste or type each endpoint (you can add multiple URLs). - Credentials:
Click + Add to add a new key/value row.
Enter the credential name (e.g.apiKey,secretKey) and its value.
Use the trash icon at right to remove any you no longer need. - Save: The drawer slides closed and your new integration appears as a card.
Editing an Existing Integration
- Click ✏️ Edit on any integration card.
- In the “Edit integration” drawer:
You can reassign Project, change Type, update URLs, or add/remove Credentials exactly as you did on add.
Fields that have been saved are read-only until you click into them. - Save to persist your changes.
Filtering & Finding
Type Filter: Click the Type dropdown above the cards. Select one or more categories to instantly narrow the list.
Search Box: Enter any substring (integration name, URL fragment, or credential key). Cards filter in real time as you type.
Lifecycle & Best Practices
2. Integrations: Telephony
The Integrations module supports telephony providers such as CommPeak, CrocoCalls, Voiso, Imperitel, MomVoip, Sancom, and other SIP-based platforms. Once configured, employees can place outbound calls directly from the Clients module.
Steps to Configure
Assign Employee Numbers:
In the Edit integration drawer, scroll down to the Employees section.
From the first dropdown, select the employee who should be able to make calls.
In the field to the right, enter their assigned phone number.
Click the + button to save the mapping.
Repeat for additional employees if needed.
Save:
Click Save at the bottom-right of the drawer.
The integration now knows which employees are linked to which phone numbers.
Role Permissions
Before calling works, ensure the employee’s role includes the “Call” right:
-
Go to Roles ➔ Edit Role.
-
Under the Clients section, enable the checkbox Call.
-
Save the role configuration.
Without this permission, the Call action will not be available in the Clients module.
Making a Call
-
Go to the Clients module.
-
Search for and select the desired client record.
-
Open the Actions dropdown.
-
Click Call.
-
In the pop-up, confirm the telephony provider and click Call.
-
A SIP call will be initiated, and you’ll be connected to the client’s phone number.
Notes & Best Practices
Each employee must have a valid phone number mapped in the integration before they can place calls.
Calls are logged in the client’s drawer under Actions, ensuring traceability.
Always verify permissions when onboarding new team members.
3. Integrations: AI
The AI Integrations section is used to connect external artificial intelligence providers (such as OpenAI) to the platform. These integrations enable AI-powered features like automation, analysis, and content generation within selected projects.
What You Can Configure
-
Project scope – define which project can use the AI integration
-
API endpoints – add one or more provider URLs
-
Credentials – securely store API keys or secret tokens
-
Status control – activate or deactivate the integration at any time
Common Use Cases
-
AI-driven text generation and processing
-
Automated workflows using external AI services
-
Internal tools powered by large language models
-
Smart assistants or background AI tasks
How It Works
Each AI integration is configured as a separate card. Once active, it becomes available only to the projects it is assigned to. Credentials and endpoints can be updated without affecting other integrations.