Сlients
- 1. Clients: Overview
- 2. Clients: Use Cases
- 3. How to Create a Client
- 4. How to Edit a Client
- 5. How to Reassign a Client
- 6. How to Filter and Search Clients
- 7. How to Deactivate a Client
- 8. How to Import Clients
- 9. How to Export Clients
- 10. How to Customize Columns
- 11. Managing Favourite Clients
- 12. Clients Duplicates
- 13. How to Send Messages to Clients
- 14. AI Voice Filters
1. Clients: Overview
The Clients module is designed to grant access to all clients stored within the CRM, based on your access permissions. Depending on your role, you can view clients linked to specific desks or projects.
You can assign a client to a project, and then optionally assign them to a desk and manager. The manager must be assigned to the project and desk to which the client is assigned.
Key features:
1) Scoped Visibility
Clients belong to one Project (required) and optionally one Desk.
You only see clients in Projects/Desks you’re assigned to.
2) List View & Search
Columns: Name, Contact, Status, Manager, Project, Desk, Dates.
Sort by any column; Search by name, email, company; Filter by Project, Desk, Manager, date range, or custom tags.
3) Ownership & Routing
Assign a Manager (must be in the same Project/Desk) to drive notifications and accountability.
Reassign Desk or Manager as clients progress through workflows.
4) Client Detail Page
General Info, Assignments, Status toggle, Meta tags.
Activity Feed: Actions, Requests, Notes.
Related Records: Tickets, transactions, integrations.
5) Bulk & Import
CSV/XLSX import with field mapping.
Mass actions: reassign, retag, status changes, batch emails.
6) Audit & Integrations
Full change history for compliance.
API & webhook support for automated workflows.
This module keeps every client record organized, secure, and visible only to the right teams.
The following actions are available in the Clients module:
-
Creation: Adding new clients and filling in personal, billing and affiliation information.
-
Editing: Modifying existing client information, adding new details, including actions and requests, and uploading client documents.
-
Reassigning: Reassigning multiple clients to projects and desks.
-
Deactivation: Disabling client accounts while retaining their information in the system.
- Managing Favourite Clients
- Clients Duplicates
- «Send a Message» Action
2. Clients: Use Cases
#1 Onboarding New Markets
Scenario: You’re expanding into Europe and Latin America.
Solution: Create Projects “WBCS – EU” and “WBCS – LATAM.” Onboard new clients into the appropriate project, then assign them to a local Desk (e.g., “Berlin Sales,” “São Paulo Support”) and manager. This keeps regional data strictly segmented.
#2 Tiered Support Levels
Scenario: You offer Basic, Premium, and Enterprise support plans.
Solution: In your main Project, set up Desks “Basic Support,” “Premium Support,” and “Enterprise Success.” Assign each incoming client to the desk matching their plan, plus a dedicated account manager. This ensures SLAs and workflows are customized per tier.
#3 Multi-Brand Account Management
Scenario: Your company runs several brands under one umbrella.
Solution: Use separate Projects for each brand (e.g., “Acme Retail,” “Acme Wholesale”). If a client buys from both, assign them to each project as needed, with desk and manager assignments per brand. They appear in both lists but stay logically partitioned.
#4 Cross-Functional Handoff
Scenario: A prospect moves from Sales to Implementation to Support.
Solution: Keep the client in a single Project but reassign their Desk and Manager at each stage: “Sales Desk” → “Implementation Desk” → “Support Desk.” All history stays on one record, but only the current team sees them.
#5 Bulk Import & Segmentation
Scenario: You’ve run a marketing campaign and collected 1,000 new leads.
Solution: Use the API or import tool to upload all leads into your “Marketing Campaign” Project. Then apply a meta-tag (via the Additional/Meta picker) or assign them to “Campaign Desk.” From there, route them in bulk to regional sales desks through filters or automation.
3. How to Create a Client
Use the Clients module to add key contacts or corporate accounts into Wifox. Depending on your business model, you can onboard Business clients via a guided wizard (including company details, ultimate-beneficial-owner, and additional contacts), or quickly spin up Personal client profiles in one screen. By following these steps—and matching the “Step #” callouts in your UI—you’ll ensure every client is correctly profiled, assigned to the right Projects & Desks, and ready for your team to engage.
Client profiles are automatically created when they register on your site.
1. Open the Clients Module
In the left sidebar, click Clients.
You’ll arrive at a table showing all existing clients, with columns for:
- ID – The database record ID.
- UID – System-generated unique client identifier (auto-increment).
- Full name
- Phone number
- Type
- Country
- Comments
- Desk
- Status
- Actions (Edit, Send a message, Change project)
Note: When you open a client’s detail drawer (by clicking their email or the ✏️ Edit icon), the header shows the client’s Name • UID (e.g. Alex N• UID: C00004P), so you always have both their display name and unique identifier at a glance.
2. Launch the “Add Client” Menu
In the top-right corner of the Clients list, click + Add.
3. Choose Client Type
From the dropdown, select either Business client or Personal client.
Create a Business Client
Step 1 — Add Company Information:
Company name: Enter the legal entity name as registered.
Company ID: Your internal reference or system code.
Company VAT: VAT/tax registration number.
Established: Use the date picker to record the incorporation date.
Country: Choose from the list.
City, Address, Postal code: Fill in the billing address fields.
Company logo (optional): Drag-and-drop or browse for an image file.
When all fields are complete, click Next →.
Step 2 — Add Director (UBO)
Note: Toggling the Allow checkbox at the top of the “Add director (UBO)” form will expand the Credentials fields below (email, password), letting you edit or enter those values for the UBO.
2.1 Assign an Existing Client as Director
Select the “Assign Director from the existing clients” card – it will be highlighted in green.
In the Client ▼ dropdown, start typing the name or email of an existing client. A filtered list appears; click the one you want.
(Optional) Click View & Edit Info to review or change that client’s personal details in a pop-over.
Once selected, the Personal, Affiliation, and Credentials panels below will auto-populate.
If you need to override or complete any fields (e.g. add an email or password), check the Allow box at the top of the form, then edit those fields directly.
2.2 Create a New Client as Director
Click the Create a new client for director card on the right.
A blank Personal panel appears below (just like when adding a personal client).
Fill in First name, Last name, Email, Password, and any other required fields.
Complete the Affiliation panel by choosing the company’s Project and Desk for this director.
Click Save (bottom-left) to create that client and set them as your UBO.
When you’ve picked or created the UBO, use the Next → button (top-right) to proceed to adding additional members.
Step 3 — Add Members
In the Clients panel, search or scroll to find additional client contacts.
Click each name to move them into the Members panel.
For each member, toggle between RO (read-only) and RW (read-write), or click the trash icon to remove.
Click Next → to finalize.
Create a Personal Client
Once you’ve chosen Personal client, the full “Add client” form appears on a single page. It’s organized into 7 panels:
Personal (Step 1)
- Type: Pre-set to Personal and cannot be changed.
- First name: Enter the client’s given name.
- Last name: Enter the client’s family name.
- Phone number: Primary contact number.
- Additional phone number: Secondary contact number (optional).
- Date Of Birth: Use the date-picker to select.
- External ID: Any external reference or CRM ID.
- Passport: Passport or government ID number.
- Nationality: Country of citizenship.
- Gender: Select one of the options: Male, Female, Other.
Billing (Step 2)
- Country: Dropdown to select the billing country.
- Region: Free-form region/state field.
- City: Billing city.
- Address: Street address.
- Postcode: ZIP or postal code.
Affiliation (Step 3)
- Project: Assign this client to a Project.
- Desk (Optional): Restrict to one of the project’s Desks.
- Manager: Select the internal user who “owns” this client.
- Company fee group: Drop-down of predefined fee tiers.
- AffiliateID: ID for tracking source or partner.
- CampaignID: ID for tracking which marketing campaign brought the client.
- SourceID: ID for tracking where the client came from.
- SubID: Additional tracking ID for more detailed attribution.
- Verification level: KYC level (e.g. Email, Video, In-person).
- Verification status: Current status (Pending, Approved, Rejected).
Automatic Processed Status
If both Desk and Manager are assigned when creating the client, the system will automatically set:
processed = true
This behavior is enforced globally across the CRM.
You do not need to manually manage the processed flag.
If Desk or Manager are not assigned, the client will remain unprocessed until both are set.
Credentials (Step 4)
Email: Client’s login address (required).
Password:
✨ Sparkle icon – auto-generate a secure password.
👁️ Eye icon – toggle show/hide.
Custom Fields (Step 5)
To add custom fields, go to Settings → Configurations → Client Custom Fields, then add the required fields.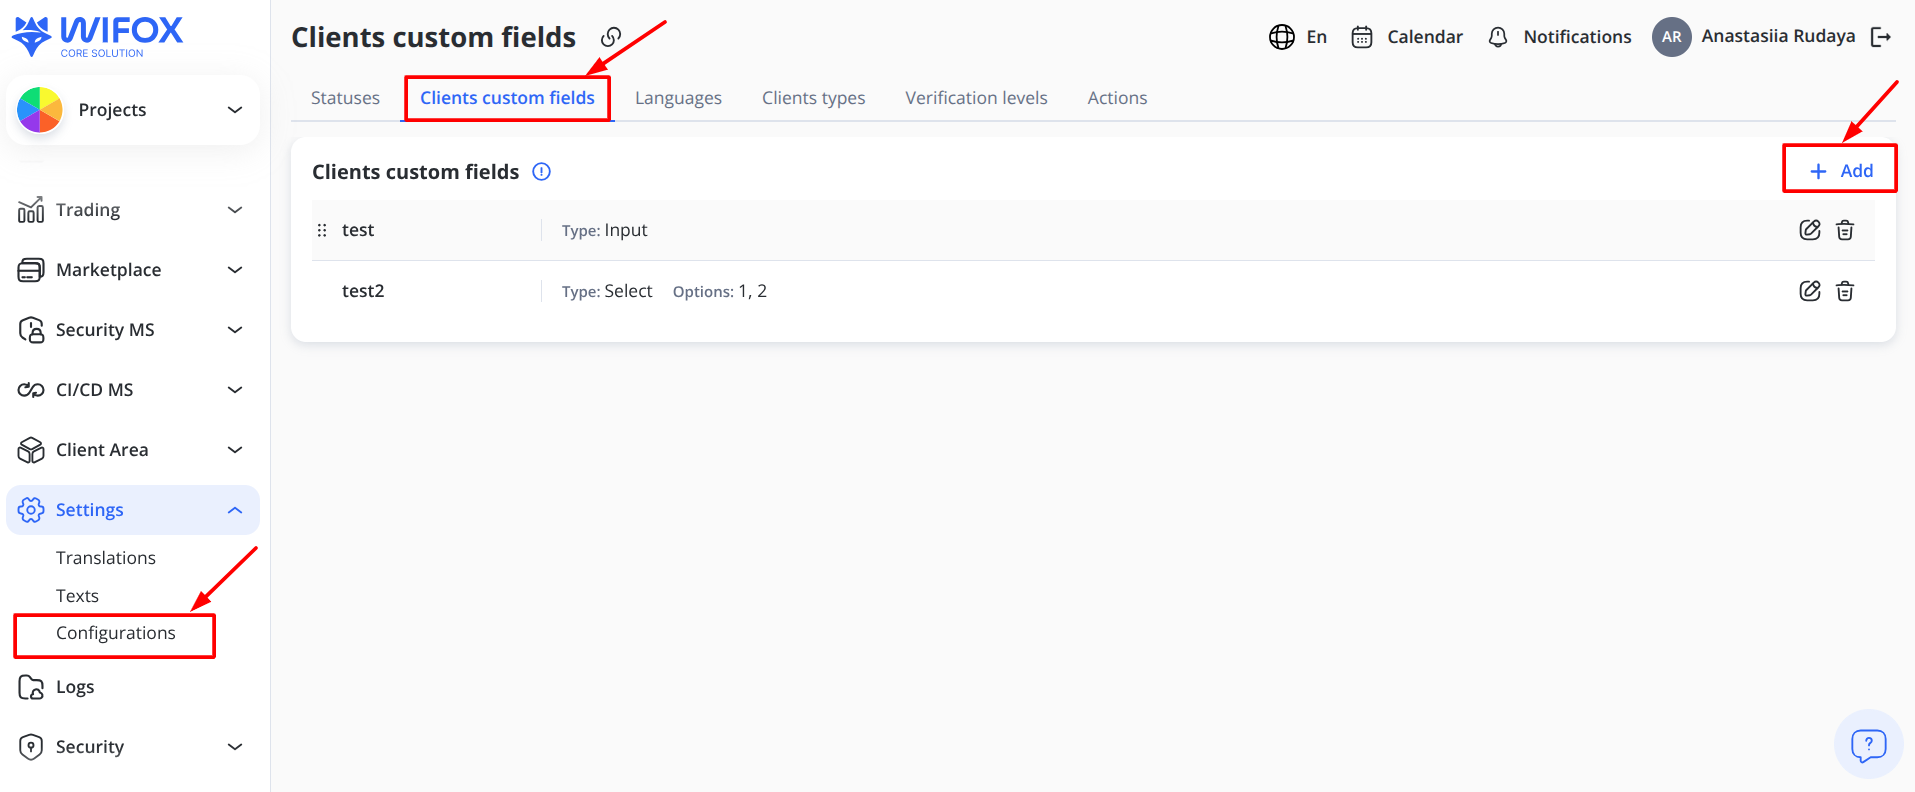 Two-Factor Authentication (2FA) (Step6)
Displays any preconfigured methods (Email, Google, Phone). You cannot add here, but you can review them.
Get more information about authentication types in Wifox Business Core Solution [here]
Description (Step 7): Free-form notes about this client.
To enable asset creation for the client, select Create Asset at the top of the screen.
Save Your New Client (Step 8): When all required fields are filled in, click Save (top-right). You’ll return to the Clients list, where your new personal client now appears.
Note: You cannot change the type of the client and/or the client’s email after saving their information.
You can view all clients in the Clients tab. To get full information about the client, click on the client’s email in the Email column.
A drawer will open on the right with information about the client.
By following this detailed workflow, you’ll ensure that every corporate or personal client is fully onboarded with accurate data, the correct project and desk affiliations, and the right team members assigned. Properly configured client records empower your desks to manage relationships, track compliance (KYC/AML), and deliver seamless service across your organization.
4. How to Edit a Client
Once a client exists in Wifox, you can fine-tune their profile, track interactions, upload documents, and manage accounts—all from the Edit window. Follow these numbered steps to ensure nothing is overlooked.
After creating a client, the Edit window will open automatically.
In the Edit window, you can:
- Edit the client’s information entered during the creation stage (except Type and Project). This also includes reassigning clients to another desk or status.
- Add or edit Actions: comments, notes, and other relevant information within the CRM.
- Add or edit Requests: for instance, support tickets, call requests, etc.
- Upload Documents: passport or ID, and bank card (front and back).
- Check the client’s Transactions.
- Add or edit the client’s Accounts and linked Assets (including currency and balance).
Note: Information about the client’s Requests, Transactions, and Accounts is pulled automatically from the relevant modules.
1. Open the Client’s Record
In the Clients list, locate the row for the client you want to edit.
Locate your client:
Use the Search… box at the top of the Clients list to type any part of their Email, Full name, or ID. (Instant filtering, partial matches allowed.)
Or click Filter ► Desk, Project, or Created date to narrow by scope.
Pro Tip: Bookmark heavy-use filters (e.g. “All Personal clients in Acme Project”) via the URL link icon next to the page title.
Enter Edit mode:
Click the pencil icon in the Actions column for that row.
To create an Action without entering Edit mode, click the Add action icon located next to the pencil icon in the same Actions column.
The right-hand drawer slides out, pre‐loaded on the General tab.
Quick Create Action from Clients List
You can create an action directly from the Clients table without opening the client record.
In the Clients list:
Locate the client row.
In the Actions column, click the Add action icon (next to the Edit icon).
The Action creation drawer opens.
The selected client is automatically prefilled.
Complete the required fields and click Save or Save and create new.
This shortcut allows agents to log calls, notes, or comments without navigating into the client profile first.
Location in the Row Actions
The Add action icon is displayed directly in the row’s visible action buttons, immediately after the Edit (pencil) icon.
It is no longer located inside the ⋮ (More options) dropdown.
Permission note
The Add action icon is visible only to roles with permission to create Actions.
Users without this permission will not see the icon.
At the top of the client’s detail view you’ll see these tabs:
-
General: Core profile fields you can edit
-
Actions: Log calls, notes & follow-ups
-
Documents: KYC uploads (IDs, bank cards, proof of funds)
-
Requests: Client-generated tickets and ad hoc data requests
-
Transactions: All ledger entries for this client (read-only)
-
Accounts: Create/manage asset or bank accounts linked to this client
-
Agreements: View signed contracts, NDAs, service agreements
-
Logs: Complete audit trail of every field change with user/timestamp details
Pro Tip: Press Ctrl + F inside the drawer to quickly find any field or label.
General Tab
1. Balance (Read-Only Financial Summary)
If Core Banking is enabled in your environment, the client’s total balance is displayed at the top of the client card.
Location:
Visible in the Client View drawer
Displayed in the header section of the Client View and Client Edit screens
Field label: Balance
Type: Numeric (float)
Editable: No (read-only)
The Balance represents the client’s total aggregated amount across all linked assets.
Important:
-
The value is automatically retrieved from the Core Banking microservice.
-
The CRM does not calculate this amount locally within the client module.
-
If Core Banking is unavailable, the Balance field will not be displayed at all.
-
This field is informational only and cannot be modified manually.
Use case: Agents can instantly see the client’s financial standing without switching to the Accounts or Assets tabs.
2. Personal
Type:
Personal clients have first/last names, DOB, risk fields.
Business clients use the 3-step wizard (company profile + UBO + members).
Status: Default or any custom statuses you’ve configured (e.g. “VIP”, “High-Risk”).
When creating a new Client status in Settings → Configurations → Statuses, make sure to define the Order field.
The Order value determines how statuses are displayed in dropdowns and lists. Statuses are sorted in ascending order based on this value.If the Order field is not set, the status may appear in an unexpected position in the interface.
Name & Contact:
First name, Last name: Displayed on statements, emails, and internal lists.
Phone number (required) & Additional phone number (optional): Used for SMS alerts or 2FA.
Date of Birth:
Opens a date picker; used for age verification.
Example: You might block accounts under age 18.
External ID: Your own CRM or partner reference number (e.g. “Zendesk User #1234”).
Passport: Enter passport number if you collect it for KYC.
Nationality: Impacts tax or compliance rules.
Risk level: Your internal scale (e.g. Low, Medium, High)—drives transaction limits.
AML Screening: Free-form field to paste screening summary or pass/fail status.
Warning: Changing Type from Business→Personal is not allowed after initial creation.
3. Billing:
Country: Dropdown list of ISO country codes.
Region: State/province field (free text).
City, Address, Postcode: Standard postal fields.
Use case: Some payment rails require exact match between billing address and card on file.
4. Affiliation
Controls where the client “lives” in your operational hierarchy:
-
Project: Required for scoping data and routing workflows.
-
Desk: Optional sub-group within a Project (e.g. “LOAN desk” vs “ONBOARDING desk”).
-
Manager: The internal employee accountable for this client.
-
Company fee group: Assigns tiered pricing or service-level agreements.
-
AffiliateID: Partner or campaign code for revenue sharing.
- Sub ID: Optional secondary tracking or sub‑campaign identifier.
-
Verification level: KYC method requested (Email, Video, In-person).
-
Verification status: Init, Pending, Approved, Rejected.
Example: Jane Doe is in Project = “Acme USA,” Desk = “Sales,” Manager = “Bob.”
Automatic Processed Status Update
The system automatically manages the internal processed flag based on assignment logic.
If both Desk and Manager are assigned to a client during editing, and the client was previously unprocessed, the system will automatically set: processed = true
This behavior applies globally across the CRM and is not limited to affiliate hub processing.
Important:
- The system only promotes
processedfrom false → true.- It does not automatically revert
processedback to false if Desk or Manager are later removed.- No manual action is required from the user.
This ensures consistent client lifecycle behavior across all CRM entry points (manual edit, bulk edit, import, API, etc.).
5. Credentials
Email: Login ID (read-only here).
Password: Must meet complexity: ≥8 chars, uppercase, lowercase, digit, special char.
✨ Sparkle auto-generates a random secure password.
👁️ Eye toggles show/hide.
Tip: Rotate client passwords quarterly by clicking ✨ and emailing the new credentials.
6. Additional
A JSON-style tree picker for arbitrarily structured metadata:
Click the + to append a new key/value.
Rearrange, filter, or delete entries.
Multi-Select Display Behavior
For multi-select custom fields:
-
Selected values are displayed as individual chips inside the field.
-
If the number of selected values exceeds the available field width, the interface collapses the overflow into a “+N more” indicator.
-
Clicking the field expands the dropdown, where all selected values are visible and can be removed.
This keeps the interface compact while preserving full visibility when editing.
Use cases:
Store third-party IDs (e.g. “StripeCustomerID”:“cus_ABC123”).
Attach ad-hoc flags (e.g. “VIP: true”).
7. Two-Factor Authentication (2FA)
Displays any methods already set up (Email, SMS, TOTP).
Hover on a non-default method to reveal Make default or Delete.
Note: You cannot add 2FA methods here—clients configure those on first login.
8. Description: Supports long-form text (up to 2000 characters). Good for case notes or behavioral observations.
9. State & Create asset & Save
State dropdown (top-right) toggles among Active, Deactivated, Suspended.
Deactivated preserves the record but blocks login/assignment.
Suspended can be used for temporary holds pending review.
Create asset
Located in the top‐right header of the General tab, immediately to the right of the State dropdown. When checked, this option auto-provisions a new asset ledger entry for the client as soon as you hit Save.
If changes are not saved, check field validation limits (e.g. text length) and required fields.
Actions Tab
Log every meaningful interaction:
Click + Add (upper right in the Actions block header).
Fast “Create Action” from Client Card
Managers can quickly create an Action directly from the client card without leaving their workflow.
Location
Inside the Client card:/clients/view/{clientId}/client
In the Actions block header (above the table), a + Add button is available.
Permissions
The + Add button is visible only to roles that have permission to create Actions.
If the role does not have create permission, the button is not displayed.
Behavior
Clicking + Add:
Opens the Action creation interface (drawer or modal, depending on system configuration)
The current client is automatically prefilled
The client field is locked and cannot be changed
On Save
The action is created
The modal/drawer closes
The Actions table refreshes automatically
The new record appears without a full page reload
On Cancel:
The modal/drawer closes
No changes are saved
This allows managers to log calls, notes, or reminders instantly while reviewing the client profile.
Type:
- Note: Internal memos (
“Called compliance – waiting docs.”) - Call: Schedule a follow-up call—requires an Action date.
- Comment: Public-facing remarks (e.g. “Client agreed to terms”).
- Manager dropdown: Who’s responsible for follow-up.
- Text box: Detail your note/call/comment.
- Save or Save and create new.
Action Type: “Completed by Default” Behavior
Some Action Types can be configured to be automatically marked as completed upon creation.
For example, a Comment may be logically completed immediately and does not require further follow-up.
Configuration
This behavior is controlled at the Action Type level.
Location: Settings → Actions/settings/actions
Each Action Type includes a checkbox:
Completed by default
If enabled:
All new actions of this type will be marked as Completed automatically when created.
The Completed checkbox will appear pre-selected in the Action creation form.
The user may manually uncheck it before saving.
If disabled: The Completed field behaves according to the standard default (unchecked).
How It Works
When creating a new Action:
-
The system reads the selected Action Type.
-
If
Completed by defaultis enabled for that type: The Completed checkbox is automatically checked. -
If the Action Type is changed during creation: The Completed state updates dynamically based on the new type.
This behavior applies consistently across all Action creation entry points:
-
Client card → Actions tab
-
Clients list → Create Action icon
-
/actions/add -
Global calendar
-
Employee calendar
Important Notes
The default state is derived from the Action Type configuration, not hardcoded in the UI.
Users can override the Completed checkbox manually before saving.
Existing Action Types default to not completed by default unless configured otherwise.
Save and create new
In addition to the standard Save button, the Action drawer includes a Save and create new option.
Button behavior:
Save:
Saves the action
Closes the drawer (default behavior)
Save and create new:
Saves the action
Keeps the drawer open
Resets the form for creating a new action
Preserves the selected Client and Manager
Clears Type, Subtype (if applicable), and Text fields
Resets validation state
This feature allows agents to quickly create multiple consecutive actions without reopening the drawer.
Example use case: An agent logs several follow-up calls or notes in sequence for the same client.
Actions Table Structure and Metadata
The Actions table inside the Client view drawer displays extended lifecycle and audit metadata for each action.
Column Structure
The table contains the following columns in this exact order:
-
Date
-
Type
-
Subtype
-
Message
-
Comment on closing
-
Created at
-
Updated at
-
Creator
-
Responsible
The column order is fixed and must not be rearranged.
If older layouts displayed a different sequence, the table has been updated to follow this standardized structure.
Sorting
Sorting is available for the following columns:
-
Date
-
Created at
-
Updated at
Sorting behavior:
Clicking the column header toggles between ascending and descending order.
Sorting behavior matches other CRM tables.
Sorting does not interfere with pagination.
Sorting does not affect action creation or editing.
Horizontal Scrolling
Because of the increased number of columns, horizontal scrolling is enabled for the Actions table.
Behavior:
The table scrolls horizontally within its container.
The Client drawer layout does not overflow or break.
All columns remain accessible regardless of screen width.
The exact scrollbar behavior (always visible vs overflow-based) follows the approved UI design pattern.
Filtering by Message and Comment on Closing
The Actions module supports advanced text-based filtering by both the main action message and the closing resolution comment.
This allows managers to quickly locate specific interactions using keywords or phrases.
Available Text Filters
Two independent text filters are available inside the Filters panel:
Description (Message)
Filters actions by the main action text content.
Operator: Contains
Comment on closing (Resolution)
Filters actions by the closing comment entered when marking the action as completed.
Operator: Contains
Both filters:
- Support partial text matching
- Are case-insensitive
- Can be combined with other filters (Project, Creator, Responsible, Dates, etc.)
- Work together or independently
How to Use
-
Open the Actions module.
-
Click Filters.
-
Enter text into:
Description field (for action body)
Comment on closing field (for resolution text) - Click Apply.
The system returns all matching actions.
Filter Chips Display
When applied, text filters appear as chips above the table, for example:
Project | Default
Comment on closing contains | client confirmed
These chips can be individually removed without resetting other filters.
Important Notes
Created at and Updated at are system-generated timestamps.
These fields cannot be manually edited.
Editing an action automatically updates the Updated at value.
The Creator field shows the user who created the action.
The Responsible field reflects the assigned manager for follow-up.
Pagination continues to function normally for clients with many actions.
Editing Action Type and Subtype
Users with Edit Action permissions (or the action creator) can modify the action’s Type and Subtype if needed.
This is useful in cases where an incorrect subtype was initially selected (for example, choosing the wrong call category).
To change it:
-
Open the action from the Actions tab.
-
Click Edit.
-
Select a different Type or Subtype from the dropdown.
-
Click Save.
All changes are recorded in the Logs tab for audit purposes.
Documents Tab
Upload or replace verification documents by dragging or browsing to add images for:
-
Bank card (front) (Step #1) & (back) (Step #2): Required for payments.
-
Passport or ID (Step #3): Government-issued photo ID.
-
Source of funds (Step #4): e.g. Pay slip PDF, bank statement.
-
Drag-and-drop or click to browse; valid formats
.jpg,.jpeg,.png.
Auto-save on upload; look for the thumbnail preview to confirm success.
Requests Tab
1. Click +Add in the top-right.
2. Fill in:
Name: Short title (“Upload proof of address”).
Time range: When you need it completed.
Type: e.g. Document Request, Support Ticket.
Description: Full instructions or context.
Additional information: Use the JSON tree for structured data.
Attach files: PDFs, screenshots.
Save .
Note: New requests will appear in this list with status and creation date.
Conversations: Image Upload (Paste & Drag-and-Drop)
The Requests → Messages conversation supports direct image attachments via clipboard paste and drag-and-drop.
This functionality is available in:
CRM → Client → Requests → Messages
Trading Area → Support → Tickets chat
Paste Image from Clipboard (Ctrl + V)
Users can paste an image directly into the message composer.
When pressing Ctrl + V:
-
The system detects image data in the clipboard.
-
The image is converted into a temporary file.
-
A preview appears inside the composer before sending.
Composer Preview
The preview includes:
-
Thumbnail image
-
Remove (×) button
-
Upload progress indicator (spinner or progress bar)
The user may remove the image before sending.
Drag & Drop Image
Users can drag an image file into the conversation area.
Drag Behavior
-
When dragging over the chat container, a drop overlay appears.
-
Only image files are accepted.
-
On drop, the image is attached to the composer with preview.
-
Overlay disappears after drop or drag leave.
The overlay does not permanently block scrolling and is only visible during active drag.
Sending Behavior
The system supports:
-
Image only
-
Text only (existing behavior)
-
Text + image in the same message
After sending:
-
The message bubble displays the image as a thumbnail.
-
Clicking the thumbnail opens a full-size preview modal.
-
The message appears immediately in the conversation history.
Validation Rules
Allowed formats:
-
image/png
-
image/jpeg
-
image/webp (if enabled)
Rejected:
-
Non-image files
-
Unsupported MIME types
-
Files exceeding the maximum allowed size (configured, e.g., 5–10MB)
If validation fails:
-
A user-friendly error message is shown.
-
The image is not attached.
-
The user may try again.
Upload Handling
Upload follows the same storage logic used for existing attachments.
Process:
-
File uploads to storage service.
-
System receives file URL / identifier.
-
Message entity stores attachment data.
Both CRM Requests and Trading Tickets use the same attachment model and rendering logic.
Security & Safety
-
Images are rendered safely (no inline HTML injection).
-
Only validated MIME types are accepted.
-
Images open in secure modal using controlled storage URLs.
-
External storage must be domain-controlled.
Transactions Tab
Read-only ledger of every monetary event for this client: Deposits, withdrawals, fees, adjustments.
Columns include Date, Type, Amount, Currency, Balance.
Pro Tip: Filter by date or type to investigate anomalies.
Accounts Tab
1. Click + Add in the top-right.
Provision new asset wallets or bank links:
Type: e.g. fiat, crypto, e-wallet.
External ID: Bank account number or integration reference.
Platform: Which service (e.g. Stripe, Utip, Binance).
Save.
Each account row shows Status (Active/Inactive), UID, Owner, Created.
Assets Tab
The Assets tab displays all asset entries (wallets, balances, or positions) associated with a specific client.
This tab is available to users whose role has the Assets → View permission enabled in the Roles module.
Use this tab to review, track, or verify every asset currently held by the client.
Each entry includes key information such as:
-
Asset type (e.g. fiat, crypto, tokenized balance)
-
Currency and amount
-
Linked account ID
-
Status (Active / Inactive)
-
Date created and last update
To enable the tab for a user role:
-
Go to Roles → Edit Role.
-
Expand the Clients section.
-
Check the box Assets → View (and Edit if required).
-
Save changes.
Once enabled, the Assets tab becomes visible in the client’s Edit view.
At the top-right of the General tab, next to the State dropdown, you’ll see a checkbox Create asset.
When checked, this option automatically creates a default asset record for the client upon saving, if none exists yet.
This ensures every new client has at least one corresponding asset entry linked to their profile.
-
View detailed balances and currency allocations
-
Adjust statuses or link assets to new accounts (if “Edit” permission is enabled)
-
Export asset data for reconciliation or reporting
Orders Tab
The Orders tab displays all trading orders associated with the selected client.
It supports:
-
Filtering (All / Open / Closed)
-
Column customization
-
Sorting
-
Inline editing (if permitted)
-
Real-time PnL updates
-
Order closing
Order Entry Price Editing and PnL Recalculation
When editing an existing order’s Entry Price, the system immediately recalculates:
-
Displayed PnL
-
Used margin (if applicable)
-
Settlement value on close
The updated entry price becomes the new authoritative reference for all future calculations.
Close Order Settlement Logic
When closing an edited order:
The system calculates settlement using:
-
Updated entry price
-
Actual close price at close time
-
Volume
-
Contract size
-
Direction
Settlement formula: FinalPnL = (ClosePrice - UpdatedEntryPrice) × ContractSize × Volume
For Sell: FinalPnL = (UpdatedEntryPrice - ClosePrice) × ContractSize × Volume
Wallet credit/debit must equal: FinalPnL - Commission - Swap
The credited amount must match the PnL shown in the UI at close moment.
Agreements Tab
Lists PDF or link to signed service agreements, NDAs, or other legal documents.
Read-only; to upload or modify agreements, use the Agreements module in the sidebar.
Logs Tab
The ultimate audit resource:
Every field change is logged with User, Timestamp, Old value, New value.
Search within logs by keyword or date.
Use case: Prove who deactivated a client or changed their fee group for compliance audits.
Final Save & Exit
Wherever you make edits, look for a Save button and confirm it turns green.
Closing the drawer (× in top-left) will prompt you if you have unsaved changes.
After a major batch update, run a filter to verify that all expected changes appear in the list view.
By following this comprehensive guide, you’ll ensure every client record is complete, traceable, and compliant with your organization’s policies—and you’ll maximize the power of Wifox’s modular CRM to keep your data accurate and your teams aligned.
5. How to Reassign a Client
The “Reassign” action lets you bulk‐update key client attributes—Desk, Manager, and Status—all at once. This is useful when, for example, you need to move several clients to a different desk or change their status en masse.
Use Cases
- Transferring Clients to a New Desk
Move multiple clients to a different desk after team restructuring by selecting them in the Clients tab, choosing the new desk from the dropdown, and saving the changes. - Updating Client Status in Bulk
Change the status of several clients from "Pending" to "Active" after onboarding by selecting all relevant clients, updating their status in the dropdown, and applying the changes. - Reassigning Clients to a New Manager
Reassign a portfolio of clients to a new manager by selecting the clients under the previous manager, choosing the new manager, and saving the reassignment.
To quickly reassign the clients:
All selected clients must be in the same project before you can reassign them (e.g., you can’t reassign a group of clients if some belong to Project A and others to Project B).
If you need to work with a different project, switch projects in the left‐hand menu first.
1. Check the box next to the client’s email to select one or more clients:
Individually: Click the checkbox next to each client’s email.
Page-wide: Use the very top-left checkbox to select all clients on the current page.
A green selection bar appears at the bottom showing the exact number of selected clients (e.g., “15 clients selected”). This counter updates in real time as you select or deselect items.
Extended Selection Behavior
You can select multiple clients by holding the left mouse button and dragging across checkboxes while scrolling. The system maintains stable selection during scrolling and does not require the cursor to remain strictly over the checkbox hit area.
The number of selected clients is displayed in the selection bar at the bottom of the page.
2. Click on the Reassign button. After selecting the clients you wish to update, click the Reassign button at the bottom bar.
3. Select a new desk and/or status from the drop-down list.
A “Reassign” panel (or modal) opens.
-
Desk → select the new desk for these clients.
-
Manager → choose the internal user who will now own them.
-
Status → set their account state (e.g. Active, Pending, Suspended).
(All three fields are optional—you can update just one or all three.)
Update the Status.
4. Click Save to apply the changes. Once you’ve set the desired Desk, Manager, and/or Status, click Save.
All selected clients are immediately updated with your new settings.
5. Page‐by‐Page Selection
“Select All” only applies to the current visible page.
If you have multiple pages of clients to reassign, repeat the selection and reassign steps on each page as needed.
Troubleshooting & Tips
-
Mixed-project error: If you select clients from different projects, you’ll see an error. Simply switch to the correct project and retry.
-
Pro Tip: After selecting, press Esc to collapse the drawer if you need to adjust your selection without losing your place.
-
Audit: All Reassign actions are logged in the Logs tab of each client record for compliance.
Bulk Edit Clients
The Bulk Edit action allows you to update selected client fields (Aff ID, Source ID, Campaign ID, Country) for multiple clients at once.
Bulk Edit is available only when at least one client is selected.
How to use Bulk Edit
-
Select one or more clients using checkboxes.
-
Click Bulk Edit in the bottom action bar.
-
A drawer opens with editable fields.
Field Logic
-
All fields are disabled by default.
-
Each field has a “Leave existing” checkbox (checked by default).
-
If “Leave existing” remains checked → the field will NOT be updated.
-
If you uncheck it → the field becomes active and can be edited.
-
Only enabled fields will be updated for selected clients.
Submit Rules
-
Submit is disabled if no fields are enabled.
-
Only activated fields are applied.
-
Existing data will not be overwritten unless explicitly enabled.
6. How to Filter and Search Clients
Efficiently managing your client base requires both pinpoint searches and flexible filtering. In the Clients tab, the built-in Search field lets you instantly find individual records by ID, name, email or phone, while the Filter panel enables you to segment your list by attributes like creation date, action timeline, manager assignment, or verification status. By combining these two tools, you can rapidly locate a single client or drill down into custom cohorts—whether you’re handling onboarding, compliance reviews, or performance reporting.
You can search for clients in two ways:
- Search input: Using their full name, email, or phone number (by '_id', 'firstName', 'lastName', 'email', 'phone').
- Filtering: Using broader parameters, such as the creation date.
Use Cases
-
Quickly Finding a Specific Client: Enter a client’s email or partial address (e.g., “gmail”) in the Search field for instant results.
-
Filtering Clients by Creation Date: Use the Created Date filter to select a date range and review recently onboarded clients.
-
Viewing Clients by Manager Assignment: Apply the Manager filter to display clients managed by a specific employee.
-
Identifying Unverified Clients: Use the Verification Status filter to show only unverified clients for compliance checks.
To find a client using the Search input
The Search input is located above the client table and is always visible.
Type the client's email or name in the Search field at the top of the Clients tab.
Type any of:
- Full or partial email (e.g. “gmail”)
- First name or last name
- Phone number
- Internal _id value
Results filter instantly as you type.
Special Characters in Search
The Search field treats all entered characters as literal text.
Special characters such as ?, %, _, *, +, -, (, ), @, and # are not interpreted as wildcards or regular expression symbols.
For example:
Searching for Anna? will return only clients whose name literally contains Anna?.
This ensures consistent and predictable filtering behavior across all environments.
Search Placement & Behavior
The Search input is permanently displayed above the client table, next to the table controls.
It is independent from Fast Filters and always visible without opening any panels.
Search operates across predefined client fields, including:
-
_id
-
firstName
-
lastName
-
email
-
phone
Search:
-
Filters results instantly as you type
-
Resets pagination to the first page
-
Can be combined with any structured Fast Filters
-
Does not modify or become part of saved Fast Filter views
Saved Fast Filter configurations do not store search terms.
Search input operates separately and does not affect saved filter presets.
To find clients using Fast Filters
In the Clients module, both Personal and Business client lists support the Fast Filters panel. It allows you to segment and review clients using structured filtering criteria without opening additional windows.
Fast Filters panel overview
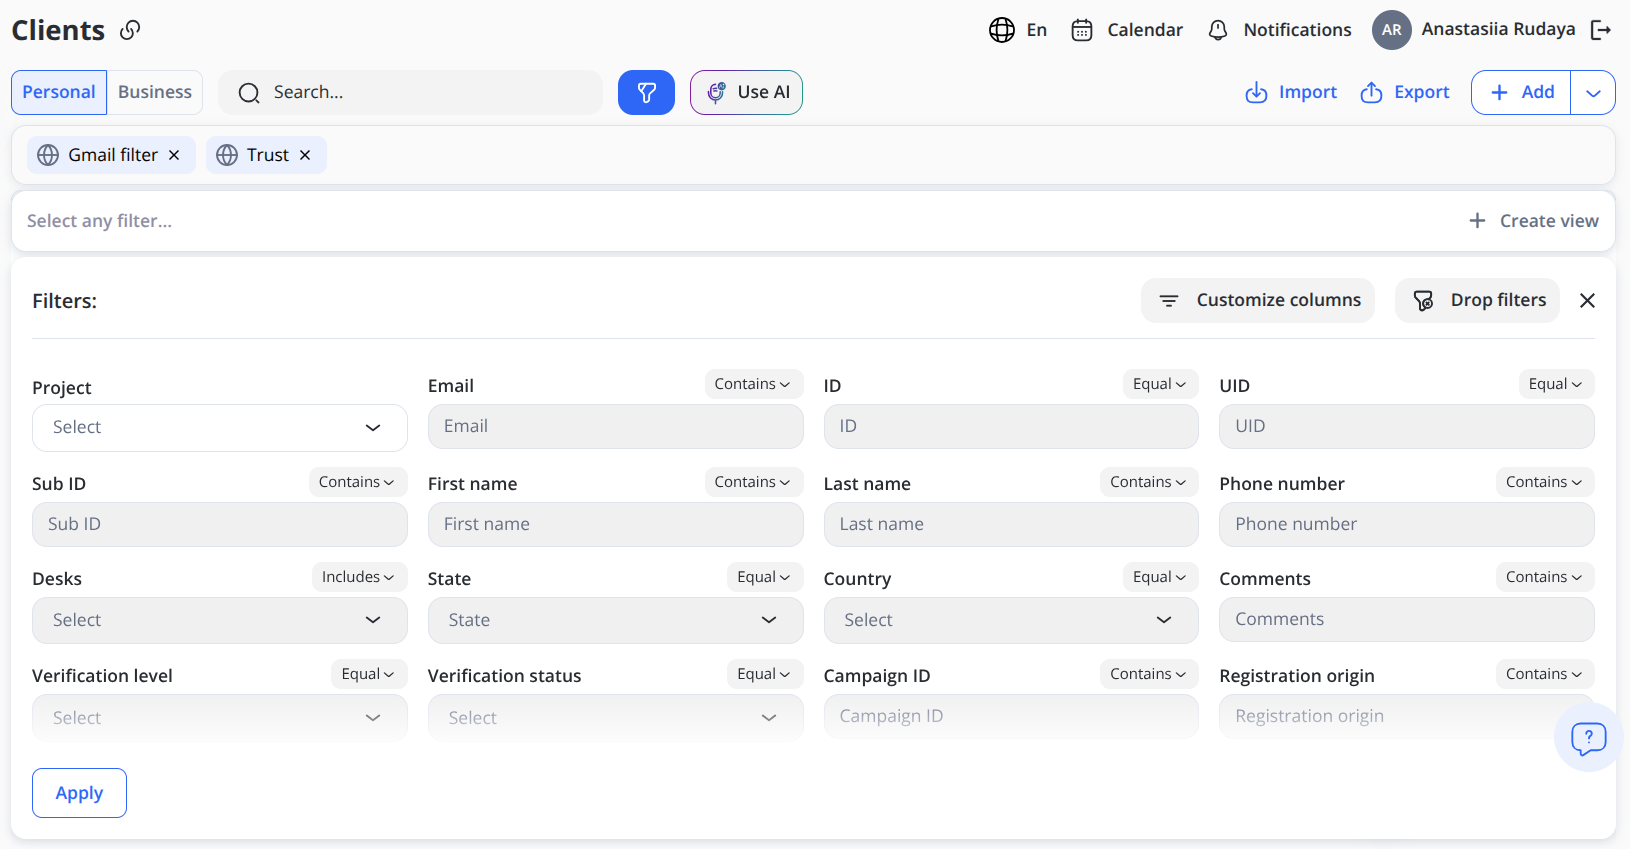
The Fast Filters section is displayed directly below the main toolbar and includes the following elements:
-
Personal / Business tabs – switch between personal and business client lists.
-
Total counter – shows the total number of clients currently displayed.
-
Filter dropdowns – pre-set structured fields that let you narrow results by key attributes (e.g., country, verification status, manager, date ranges, etc.).
-
Apply button – executes the selected filters and updates the table view.
-
Drop filters – clears all active filters at once.
-
Create view – saves the current set of applied filters and layout preferences for later use.
-
Customize columns – adjusts which data columns are visible in the client list.
The “Actions exist” column can be enabled or disabled via Customize columns. Filtering by “Has actions” works even if the column is hidden.
How to use Fast Filters
-
Select whether you want to view Personal or Business clients.
-
Use one or more dropdown filters to refine the results. Common options include:
Country – filters by the client’s country of registration or residence.Project – displays clients associated with the selected project.
Manager – displays clients assigned to a specific manager.
Verification level – filters by KYC tier (Email, Video, In-person, etc.).
Verification status – displays only Pending, Approved, or Rejected clients.
Created date – select a specific date range using the calendar picker.
Last login date – filter clients by their most recent login within a selected date range.
Last action date – filter clients by the date of their most recent completed action.
Future action date – filter clients by scheduled upcoming actions within a selected date range.
The list of available filters is updated regularly.

Please note: When using the date-related filters, you can select a ready-made period. The system will automatically apply the selected range, such as Today, Last 7 days, This week, or This month, and others. Manual date selection is also available.
-
Click Apply to confirm your selection.
-
To remove all active filters, click Drop filters.
-
If you frequently use a specific combination of filters, click Create view to save it for quick access.
Filtering by Actions Presence
The Clients module also supports filtering based on whether a client has any Actions created in the system.
Has actions – Boolean filter
This filter allows you to segment clients based on the existence of at least one related Action record.
Options:
- Has actions → Shows only clients with one or more Actions
- No actions → Shows only clients with zero Actions
This filter works together with all other structured filters and can be combined with Manager, Status, Country, date ranges, and timeline filters.
How it works
The filter is powered by a persistent system flag stored on the Client record (isActionsExist).
The value updates automatically:
- When the first Action is created for a client → the flag becomes true
- When the last remaining Action is deleted → the flag becomes false
This ensures:
- Instant filtering performance
- No recalculation on each table load
- Accurate and reliable results
Visual Indicator in the Table
The Clients table includes a column:
Actions exist
Displayed as:
✅ – Client has one or more Actions
❌ – Client has no Actions
The column supports sorting and works independently of whether it is visible.
Removing a Single Fast Filter
Active fast filters appear as tags below the main toolbar.
You can remove a single filter in two ways:
-
Click the × icon directly on the filter tag in the toolbar.
-
Open the Other filters popover and click the × icon next to the specific filter.
Removing a filter updates the results immediately without affecting other active filters.
Special Characters in Filters
All text-based filters (First Name, Last Name, Email, Comments, External ID, Phone, etc.) treat special characters as literal values.
Filters using “Contains”, “Starts with”, or “Ends with” do not interpret special characters as pattern operators.Example:
Filtering by First Name → Contains →John?will return records where the first name literally includesJohn?.Fast Filters provide immediate visual feedback: as you select criteria, the list refreshes dynamically, the list refreshes dynamically, ensuring that both personal and business client segments can be reviewed with minimal navigation.
Other Filters Popover
When multiple fast filters are applied, they are grouped inside the Other filters dropdown.
This popover:
-
Displays all active fast filters in one compact view
-
Shows the number of applied filters (e.g., Other filters (3))
-
Allows quick removal of individual filters
-
Keeps the toolbar clean and organized
The Other filters view is now available across all modules that support Fast Filters (Clients, Actions, Transactions, etc.), ensuring consistent filtering behavior throughout the platform.
Putting It All Together
- Enter a search term in the top Search input (optional).
- Set one or more structured filters in the Fast Filters panel (optional).
- Click Apply in the Filters panel.
- You’ll see only the clients that meet all your selected criteria.
- If needed, drop filters to broaden the list again.
This approach lets you combine search and filter parameters for maximum flexibility—whether you need a quick lookup by email or a detailed query spanning dates, desks, managers, or verification statuses.
Filtering by Action Timeline
In addition to registration and login dates, the Clients module supports operational timeline filtering:
- Last action date – shows clients whose most recent completed action falls within the selected date range.
- Future action date – shows clients with scheduled upcoming actions within the selected date range.
Both filters use an inclusive date range picker (From / To) and can be combined with other filters such as Manager, Status, Country, or Verification status.
These filters help business users manage follow-ups, monitor overdue activities, and plan upcoming workload.
7. How to Deactivate a Client
Sometimes you need to remove a client from active workflows—whether they’ve closed their account, gone dormant, or require review—while still retaining their history for auditing and reporting. Deactivating a client keeps their record in the system (visible to authorized employees) but prevents any new assignments to projects, desks, or tasks. You can reactivate them at any time, and every state change is fully tracked in the Logs.
To deactivate a client:
- Open the Clients Module (In the left-hand nav, click Clients to load the client list)
- Find Your Client ( You can scroll, or use the Search… box / Filter drawer to locate them quickly.)
Open the Edit Drawer:
In the client’s row, click the ✏️ Edit icon under the Actions column.
This opens the Edit Client drawer on the right.
Ensure You’re on the “General” Tab: Along the top of the drawer, click General if it isn’t already active.
Locate the “State” Control: In the top-right corner of the General pane, you’ll see a dropdown labeled State.
Open the State Dropdown: Click the current value (e.g. “Active”) to expand the list of options.
Select “Deactivated”: From the dropdown, choose Deactivated.
Active → client can log in / be assigned.
Deactivated → client remains viewable but cannot be assigned to new work.
Suspended → (optional) locks the client out temporarily without full deactivation.
Save Your Changes:Click Save (top-right of the drawer).
A brief spinner may appear, then the drawer refreshes showing State: Deactivated.
Verify Deactivation: Back in the Clients list, the client’s State column will now read “Deactivated.”
They will no longer appear in assignment dropdowns, but their history remains for reporting and audit.
Pro Tip:
You can reactivate at any time by repeating these steps and selecting Active.
Use the Logs tab to see when and who changed the client’s state.
8. How to Import Clients
The Import feature simplifies the process of adding or updating large volumes of client data. By uploading a properly formatted CSV file, users can seamlessly onboard new clients or update existing records. The system supports default values for missing fields and ensures data consistency by validating unique identifiers like email addresses. This functionality is ideal for businesses looking to streamline client onboarding, manage bulk updates efficiently, and maintain up-to-date client records without manual entry.
Use Cases
-
Onboarding New Clients
Import a formatted CSV file to upload multiple client records at once, with default values automatically filling in missing data for streamlined onboarding. -
Bulk Updating Client Data
Import updated client details (e.g., email address changes) by re-uploading an edited CSV file. The system automatically updates existing records based on unique identifiers. -
Partner Data Onboarding
Import CSV files submitted by partners or affiliates, with missing fields auto-filled by default values, ensuring fast and consistent onboarding.
Detailed Steps
After a successful client import, you’ll see a table with the following columns populated for each record*:
|
ID |
First Name |
Last Name |
Gender |
|
Project |
Desk |
Phone Number |
Processed |
Created |
Status |
Type |
|---|---|---|---|---|---|---|---|---|---|---|---|
|
68BAD8C0406F594EAC3FC6FD |
Jacob |
Foster |
Male |
66524609caa3558DD8F8DA65 |
67A346AD8092C651C919337E |
+1-310-688-0141 |
True |
2025-09-05T12:34:08Z |
Active |
Personal |
|
|
68C2C3F47E938586807425D0 |
Amelia |
Reed |
Female |
66524609caa3558DD8F8DA65 |
67A346AD8092C651C919337E |
+1-415-920-3355 |
True |
2025-09-11T12:43:32Z |
Active |
Personal |
|
|
68BE9D8095201E97FDDB1DEF |
Lucas |
Wong |
Male |
66524609caa3558DD8F8DA65 |
67A346AD8092C651C919337E |
+44-20-7019-5580 |
True |
2025-09-08T09:10:24Z |
Active |
Personal |
* Other available (not shown) columns in the dataset:processedDate, billing.city, billing.postcode, Billing address, Date Of Birth, Verification level, Comments, State, First transaction date, Meta, Company fee group, allowToCreateAsset, Last login date, lifestyle.smoking, lifestyle.drinking, lifestyle.hasChildren, lifestyle.wantsChildren, lifestyle.lookingFor, lifestyle.relationshipStatus, lifestyle.interests.0–3, height, educationLevel, religion, Last password change date, Created at, Updated at, UID, External ID, Additional phone, AffiliateID, billing.region, Passport, agreements.*, bio, Registration IP, tradingGroups.0, Registration origin.
File Format: CSV Only – Ensure the file is saved in CSV format before uploading.
Column Descriptions:
The import file supports multiple value formats for selected fields, making it easier to prepare files without searching for internal IDs.
- ID (Required): A unique identifier for each client (system-generated – do not modify).
- firstName (Required): Client's first name.
- lastName (Optional): Client's last name.
- email (Required): Client's email address (must be unique).
- state (Optional): Indicates whether the client is active.
- type (Optional): The type of client account.
- created (Optional): The date and time when the client account was created.
- billing.country (Optional): The client’s country used for billing address details. Supported values: full country name, ISO2 code, or ISO3 code.
- project (Optional): The project associated with the client. Supported values: project _id, name, or key.
- desk (Optional): The desk assigned to the client. Supported values: desk _id, name, or label.
- manager (Optional): An assigned manager to the client. Supported values: _id, name, or email.
- status (Optional): Current client status. Supported values: status label or supported field format.
Note: Only firstName and email are mandatory; all other fields will be assigned default values if not provided.
1. Click “Import”:
Navigate to Clients in the left-hand menu.
In the top-right of the Clients list, click the Import button.
2. Review the Import Requirements:
A modal titled “Wants to import clients?” will overlay the screen.
File format must be CSV only—no Excel, Word, or plain-text files.
User limit: up to 5 000 records per file; larger files are rejected.
Security restrictions: the CSV must contain no macros, scripts, or executables.
Formatting requirements: columns must match the system’s schema (see the file format documentation link in the modal).
Scroll within the modal to read every bullet point and confirm your file complies.
3. Attach Your CSV File:
Click the Attach file button at the bottom of the modal.
In your file picker, locate and select the prepared CSV.
The modal will display your file name once attached—double-check it’s the correct file.
Hit Upload to begin processing.
4. Wait for the Import to Complete:
After confirming, the system will show a brief “Processing…” status.
Do not refresh or close the browser; you can navigate elsewhere in the app while it runs.
Larger files (thousands of rows) may take a minute or two—be patient.
5. Check the Notification:
Once complete, open the Notifications bell icon in the header.
Look for messages like “Client(s) imported successfully — 828 clients were imported”.
If errors occurred, you’ll receive an “Import failed” alert with a link to download error details—fix your CSV and retry.
The notification confirms that your clients have been imported successfully.
Troubleshooting & Best Practices
- Row-level errors: Download the error report (if offered) to see which lines failed.
- Incremental updates: To update existing clients, include their
IDoremail. Fields you omit will remain unchanged. - Split large imports: If you exceed 5 000 rows, break into multiple files by alphabetical or date chunks.
- Validate locally: Run a quick script or spreadsheet validation on your CSV to catch formatting issues before upload.
The Import tool empowers you to manage client records at scale—with minimal clicks and zero manual typing. Once your CSV is validated, you’ll have new or updated client profiles in seconds, freeing your team to focus on high-value work (onboarding calls, KYC checks, relationship building). If you need further details on field mappings or sample templates, see the file format documentation linked in the import modal.
9. How to Export Clients
The Export feature offers a simple and efficient way to manage and retrieve large volumes of client data. With just a few clicks, you can export client records in a CSV format for offline analysis, reporting, backups, or seamless data migration. The export functionality is designed to support both complete data exports and customized exports by applying filters based on your business needs. This flexibility ensures that you can access the exact data you need for various operational purposes—whether it's regular backups, analyzing client trends, or preparing data for integration with other systems.
Use Cases
-
Regular Data Backup
Export all client records in CSV format regularly for secure offline storage, ensuring compliance and quick recovery in case of system issues. -
Custom Data Analysis
Export filtered data (e.g., by date range, verification status) for offline analysis and tailored reporting. -
Data Migration to Other Systems
Export client records for seamless migration or integration with other platforms, preserving client information structure.
1. Filter (Optional)
If you wish to export only a subset of clients, first use the Filter button at the top.
-
If you only need a specific segment of your clients—such as those created in the last month or those with “Pending” verification—click Filter at the top of the Clients page.
-
In the Filters panel, set your criteria (e.g. date range, State, Manager, Verification status) then click Save.
-
The main client list will refresh to show only matching records.
2. Click “Export”
With your filtered list displayed (or with no filters if you want every client), click the Export button in the top-right corner.
The button is located immediately to the left of the Add dropdown and updates based on your current filter context.
3. Download the CSV
Once you click Export, the system begins packaging the CSV. For very large datasets (thousands of rows), this may take a few seconds.
You can continue working in the app; the export runs in the background.
Note: A CSV file (containing whichever records match your filters) will download to your computer.
4. Download & Verify
Shortly thereafter, a download will be triggered automatically. Depending on your browser, it may appear in your downloads bar or folder as clients_export_<timestamp>.csv.
Open the CSV in your preferred spreadsheet tool (Excel, Google Sheets, etc.) to confirm that:
- The number of rows matches the count shown on-screen (check the “Total:” indicator at top-left).
- All required fields (Email, ID, First Name, etc.) are present and correctly populated.
5. Handle Multiple Pages (if needed)
If your Clients list spans multiple pages and you did not filter first, the export will include all records across pages automatically—so there’s no need to navigate page by page.
However, if you used page-level selections (checkboxes) instead of filters, be sure to use filters or confirm that “Select All” applies to every page before exporting.
Tips & Best Practices
-
Consistent Naming: Prepend your export files with a date (e.g.,
clients_2025-05-07.csv) for clear versioning. -
Field Selection: If you only need certain columns, consider requesting a custom export template from your admin settings (if available) or post-process the CSV in Excel to remove extraneous fields.
-
Security: Treat exported CSVs as sensitive data. Store them in secure, access-controlled locations and purge outdated backups per your data retention policy.
-
Automation: For recurring exports, explore scheduled reporting tools or APIs (if supported) to automate this process and avoid manual steps.
By following these detailed steps, you can confidently export any slice of your client data—full or filtered—ensuring you always have the right information on hand for your operational, analytical, or compliance needs.
10. How to Customize Columns
The Columns customization allows you to customize the order and visibility of columns. This helps you focus on specific data fields (e.g., ID, Country, Type) that are most relevant to you.
Why Customize Columns?
-
Focus on Essentials
Hide fields you rarely use (e.g. “External ID” or “Registration IP”) so your eye lands on high-priority data like Email, Phone number, or Verification status. -
Boost Readability
Reducing visual noise speeds up scanning and reduces mistakes when you’re sorting or reviewing long lists. -
Tailor Your Workflow
Move “Desk” next to “Manager,” or “State” right after “Type”—whatever sequence best matches your daily tasks.
Use Cases
Action-Based Date Columns
The Clients table includes action-driven date columns that help managers track recent activity and upcoming follow-ups directly from the client list.
Last action date:
Displays the date and time of the most recent completed Action associated with the client.
Only Actions marked as Completed are considered.
If a client has no completed Actions, the column remains empty.
Future action date:
Displays the date and time of the nearest Action that is not completed.
The date is shown even if it is already in the past, as long as the Action remains in Not completed status.
This allows managers to quickly identify overdue follow-ups directly from the Clients table.
Both columns:
Are independent from the “Actions exist” indicator column, which only reflects the presence of at least one Action
Can be shown or hidden via column customization
Support sorting
Are calculated automatically based on the client’s Actions
Duplicate Detection Date Column
In addition to action-driven dates, the Clients table also supports visibility of duplicate detection activity.
Last duplicate date:
Displays the date and time when the client was most recently detected as a duplicate during registration or system validation.
If the client has never been flagged as a duplicate, the column remains empty.
Behavior:
The value updates automatically each time a duplicate detection event occurs for the client.
Non-duplicate registrations do not modify this field.
This column:
Can be shown or hidden via column customization
Supports sorting (ascending / descending)
Uses the same date-time format as other CRM date columns
Is available in Customize columns
This allows managers to quickly identify recently flagged duplicates and monitor data quality trends directly from the Clients table.
Actions Exist Indicator Column
The Clients table includes a boolean activity indicator column:
Actions exist
This column shows whether the client has at least one Action created in the system.
Display:
✅ – Client has one or more Actions
❌ – Client has no Actions
Behavior:
The value updates automatically:
- When the first Action is created → indicator becomes ✅
- When the last remaining Action is deleted → indicator becomes ❌
The value is stored persistently on the Client record and does not require recalculation on each table load.
This column:
- Can be shown or hidden via column customization
- Supports sorting (clients with actions first or last)
- Works independently of visibility — filtering by “Has actions” remains functional even if the column is hidden
This allows managers to instantly distinguish active clients from those with no recorded operational activity.
How It Works
1. Access the Columns Panel:
Click Columns in the top toolbar of the Clients page.
A slide-out panel titled Customize columns appears on the right.
2. Show/Hide Columns Using Toggles:
Each available column is listed with an On/Off toggle.
On (green) = column will display in the table.
Off (grey) = column is hidden.
Tip: Required/system fields (like Email or ID) may be non-toggleable or locked in the list.
3. Reorder Columns:
Look for the “drag” handle (⋮⋮) on the left of each toggle row.
Click-and-hold that handle to drag the field up or down in the list—this sets its left-to-right position in your table.
Note: You can often click and drag this handle to rearrange the order in which columns appear in the Clients table.
4. Save Your Changes:
After adjusting the toggles (and reordering if needed), remember that some columns are unable to move because of their fixed position in the table (these columns are marked accordingly).
Note: Once you’ve made your changes, click the Save button at the bottom of the panel. This ensures your customized layout is applied.
5. Instant Table Update: The panel slides away and your Clients table immediately refreshes to match your selections.
Pro Tips
-
Personal vs. Global Views
If your workspace supports it, save your column layout as a personal default without affecting colleagues’ views. -
Revert to Defaults
If you ever need to reset, simply open Columns again and click Reset (if available) or turn all toggles back on then rearrange. -
Combine with Filters
For maximum efficiency, first apply a filter (e.g. show only “Pending” clients), then customize columns to focus on the data fields most relevant to that subset.
Customizing your columns transforms the Clients table from a static report into a dynamic dashboard tailored to your role. By hiding distractions, promoting key fields, and arranging columns in your ideal sequence, you’ll navigate your client data faster, make fewer errors, and stay focused on what matters most. Experiment with different layouts and use cases—you’ll likely find that a small tweak in column settings leads to big gains in productivity.
11. Managing Favourite Clients
Managing Favourite Clients lets you quickly bookmark important clients. Once added, those clients appear in a separate, moveable panel for instant access—even after you log back in. This is especially useful for managers or teams who frequently interact with certain clients and don’t want to lose track of them.
Use Cases
- Quick Access to Key Clients
Bookmark high-priority clients for instant access via a moveable panel. Favorites stay saved across sessions for seamless follow-ups. - Managing Active Projects
Track ongoing projects by marking relevant clients as favorites. Reposition the panel for easy project monitoring. - Prioritizing Client Follow-Ups
Keep urgent cases visible for quick support resolution. Remove clients from favorites after resolving issues. - Campaign Client Grouping
Temporarily group clients for marketing campaigns.
Warning: Close All will permanently delete favourites—save details first.
How It Works
1. Mark Clients as Favourites:
Locate the bookmark icon in the first (leftmost) column of any client row.
Click the icon to toggle it on—turning it blue/filled indicates that client is now a favourite.
You can favourite as many clients as needed; each click adds another to your list.
Tip: You can also keyboard-navigate to focus on the bookmark icon and hit Enter to toggle.
2. Open the Favourites Panel:
As soon as you mark two or more clients, a compact Favourites panel slides into view. It hovers over the table and shows:
-
Header with a “Favourites:” label
-
Count bubble indicating how many clients are bookmarked
-
List area with each favourite’s name, email (grayed if truncated), and status badge
This panel displays a list (or tiles) of your favorite clients, including status (e.g., Active, Defaults) and essential details like email addresses.
3. Interact with Favourites
Switch between List and Grid Views:
At the top of the panel, three icons let you toggle layouts:
☰ List View: Vertical list with compact rows
⧉ Grid View: Horizontal cards for visual scanning
⎘ Focus View: Enlarged single-card focus
Click an icon to instantly switch.
View Full Client Details:
Click a client’s name in the panel to open their Client Drawer on the right side of the screen.
The drawer shows all profile fields, actions, documents, and logs—no need to hunt back in the main table.
Remove an Individual Favourite:
Hover over a favourite in the panel: an “X” remove icon appears.
Click X to un-favourite that client; the panel and count update immediately.
Reposition Panel: Drag the panel anywhere on your screen to keep it accessible and out of the way. Use the grid icon or layout switchers (seen at the top of the panel) to change how favorites are displayed.
4. Click “X” to Clear All Favourites:
Click the panel’s top-right “X” (close button)—this does not remove a single favourite but triggers a Clear All prompt.
In the confirmation dialog, click Close All to un-favourite every client.
Warning: Ensure you have saved any important client details elsewhere before proceeding.
5. Login Persistence:
Your favourite selections are saved to your user profile:
Session-independent: Log out or close your browser; favourites reappear when you next log in.
Cross-device: Sign in on another machine, and your Favourites panel will sync up.
Conclusion
Harnessing Favourites transforms your Clients page into a personalized dashboard:
- Speed: One-click access to VIPs and urgent cases
- Clarity: Separate, moveable panel keeps your focus
- Flexibility: List/grid layouts and persistence across sessions
Bookmark once—benefit every day. Your most important clients are now always just a click away.
12. Clients Duplicates
The Duplicates action identifies cases where a client registers more than once, typically using the same email or other key data. This can happen if a client forgets they already have an account or signs up again via different marketing campaigns.
Use Cases
-
Tracking Re-Registrations
View duplicate entries to understand why a client signed up multiple times, whether due to forgotten credentials or different marketing campaigns. -
Maintaining Complete Client Records
Ensure all client sign-ups are accurately tracked and linked to a primary record, preserving a full registration history. -
Identifying Duplicate Accounts
Only clients with multiple registrations will appear in the Duplicates section, allowing for efficient detection and resolution.
How It Works
1. Automatic Detection
As soon as a new registration matches an existing email (or another unique identifier), the system flags it as a duplicate behind the scenes—no manual setup required.
2. Duplicates Icon
In the main Clients table, any row with flagged duplicates displays the Duplicates icon in the Actions column:
Note: Clicking this icon opens a page showing all known duplicate accounts associated with that primary record.
3. Details
Clicking the icon takes you to a dedicated Duplicates screen for that primary client. Here you’ll see all associated accounts lined up side by side, with:
| Callout | Field | Description |
|---|---|---|
| 1 | The duplicated email address. | |
| 2 | Description | Key metadata (e.g., affiliateID, deskLabel, projectKey) to distinguish each record. |
| 3 | Created | Timestamp of when each duplicate account was first created. |
Next Steps: Resolving Duplicates
- Audit Each Record: Click into individual client profiles to compare personal details, activity logs, and transaction history.
- Merge or Deactivate:
Merge: Consolidate contacts, balances, and documents into the primary profile.
Deactivate: If merging isn’t appropriate, deactivate the extra accounts to prevent confusion. - Monitor Over Time: Periodically revisit the Duplicates view to catch new re-registrations and ensure ongoing data hygiene.
Conclusion
By leveraging the Duplicates feature, you can:
-
Keep your client database clean and reliable
-
Preserve a comprehensive history of every registration
-
Prevent fragmented support or billing records
Regular use of this tool ensures that every client interaction is tied back to a single canonical profile—boosting data accuracy and operational efficiency.
13. How to Send Messages to Clients
«Send a message» allows you to send a private message from the system directly to a client. The client receives a notification (e.g., via their online cabinet or any integrated notifications system), letting them know you’ve sent them a message.
Messages and notifications can be integrated into the client’s environment via API, so clients see your messages in their portal or other integrated system.
Why Use “Send a Message”?
Key Use Cases
Prerequisites:
User Permissions: Ensure your role includes the Send a private message permission.
API Integration (Optional): For client-portal notifications, configure the “outgoing message” endpoint in your integration settings.
How It Works
1. Locate the Client:
Navigate to the Clients page in the CRM sidebar.
Scroll or use the search bar to find the client you wish to message.
In that client’s row, hover toward the far-right Actions column until you see the three-dot icon.
Click the three-dot icon to open the actions menu, then choose Send a message.
2. Compose Your Message:
A slide-out panel or modal appears on the right side of the screen.
Click inside the text field at the top of this panel (it may display a placeholder like “Type your message…”).
Enter your message—this can be free-form text, variables (e.g. {{firstName}}), or templates if configured.
3. Send and Notify:
Once your message is ready, click the green Send button at the bottom of the panel.
You’ll see a brief loading indicator, then a success toast confirming delivery.
Behind the scenes:
- The message is sent via your CRM’s messaging API.
- If your system is integrated, the client receives an in-portal notification (or email/mobile push) notifying them of your message.
- All messages are logged in the client’s activity history, attributed to your user account for auditing.
Note: The client is notified (only if this is integrated via API with your business) that a manager or staff member has sent them a message.
The message is attributed to the currently logged‐in user.
4. Verify Delivery & History:
After sending, you can re-open the panel any time to review sent messages in that session.
For a full conversation history, open the client’s Details or Activity Log drawer—your message will appear there with timestamp and sender metadata.
5. Permissions & Error Handling:
The Send a private message action only appears for users granted the appropriate permission. If you don’t see it, request access from your CRM administrator.
If sending fails (e.g., API error or network issue), an error toast will appear. You can retry by clicking Send again once the issue is resolved.
Tip: Keep messages concise and track all important communications in the client’s activity log for full transparency and a complete audit trail.
Best Practices
The Send a Message action streamlines secure, auditable, and integrated client communication—all from within the CRM. By leveraging API integration, it delivers your messages straight into the client’s environment, ensuring high visibility and engagement without switching contexts or tools. Use it to accelerate support, compliance workflows, and proactive outreach, while maintaining full control over permissions and logging.
14. AI Voice Filters
The Clients module includes an AI-powered voice assistant that allows you to filter and search client data using natural language voice commands. This feature provides a faster, hands-free way to explore and narrow down client lists without manually configuring filters.
What the AI voice assistant does
- The AI voice assistant interprets spoken requests and automatically applies the corresponding filters to the Clients list.
- Enables natural language filtering
- Works in real time on the Clients list
- Applies only read-only actions (no data changes)
- The assistant interacts exclusively with existing client data and does not create, edit, or delete records.
How to access the AI voice assistant
You can open the AI voice assistant in two ways:
Option 1: From the Clients toolbar
-
Open the Clients module.
-
Click Use AI in the top toolbar.
-
The AI assistant panel opens on the right side of the screen.
-
Click Start recording and speak your request.
Option 2: From the Help panel
-
Click Need help? in the bottom-right corner of the screen.
-
In the Get help with system panel, switch to AI agent (voice filters).
-
Click Start recording to begin using voice commands.
Both entry points provide the same voice filtering functionality.
Example voice commands
You can use natural phrases such as:
“Show active users”
“Emails ending in gmail.com”
“Clients from Germany”
“Unverified clients”
“Clients managed by John”
The system automatically converts your request into filters and applies them to the Clients list.
Scope and permissions
The AI voice assistant respects all existing access permissions.
You will only see clients from Projects and Desks you are assigned to.
Filters are applied within the same visibility rules as manual filtering.
Limitations
The AI assistant can only filter and search data.
It cannot:
Modify client records
Create new clients
Delete or deactivate clients
Voice filtering complements, but does not replace, standard manual filters.
When to use AI voice filters
Quickly narrowing large client lists
Hands-free searching during reviews or audits
Faster exploration without configuring multiple filters
This feature enhances usability while maintaining full data security and access control.