**Warning**: The role's name can not be edited once it is created.
**1. Open the Roles Module** In the left-hand navigation bar, click **Roles** to load the Roles list. Click the **Add** button (green “**+ Add**”) in the top-right corner of the Roles tab. Then select the Employee role from the dropdown list in the table header. **2. Configure the New Role** When you click **Add**, the **Add role** interface appears, divided into three main sections:| Section | Purpose |
|---|---|
| **Modules** | Lists every module (Projects, Desks, Employees, Affiliate Hub, Roles, Logs, Clients, Actions, Requests, Settings, Client area, etc.) for which you can grant rights. |
| **View Rights** | Checkboxes to grant “View own” or “View all” permissions on each module/sub-module. |
| **Manage Rights** | Checkboxes to grant “Create/Edit,” “Manage own/all,” or “Delete” permissions on each. |
**Note:** Some modules are hierarchically linked. If you grant view rights to a parent module (e.g., Projects), Wifox will automatically select required view rights on linked modules (Desks, Employees). Manage rights must be set explicitly.
You then have three options: 1. Select a template for the role. (RECOMMENDED) 2. Set all rights (including **Security** rights) available to the role. (NOT RECOMMENDED) 3. Manually configure a role. (NOT RECOMMENDED) ##### To Select a Template For the Role: 1\. Click the **Select template** dropdown at the top of the Add role form. 2\. Choose Your Template You will see following templates:| *Template* | *View* | *Manage* |
| ***Agent*** | Own Projects *(only those to which the employee assigned)* Own Desks Employees *(only those that relate to Own Projects)* Own Clients Requests *(only those that relate to Own Clients)* Configurations Company fees Statuses | Own Clients |
| ***Desk manager*** | *All from **Agent** list* + All Clients | Own Projects Own Desks All Clients Requests |
| ***Project admin*** | *All from **Desk manager** list* + All Desks | *All from **Desk manager** list* + Employees |
**Note**: You cannot change the configuration of a role template.
3\. Apply & Save Once selected, the form will auto-tick the appropriate checkboxes for view/manage rights. **Note:** Template configurations are locked—you cannot alter individual permissions afterward. Click **Save** to finalize your new Role. ##### How to Create an Affiliate Role To create a new Affiliate role, follow the next steps: 1. In the left-hand navigation bar, click Roles to load the Roles list. 2. Click the + Add button in the top-right corner of the Roles tab. [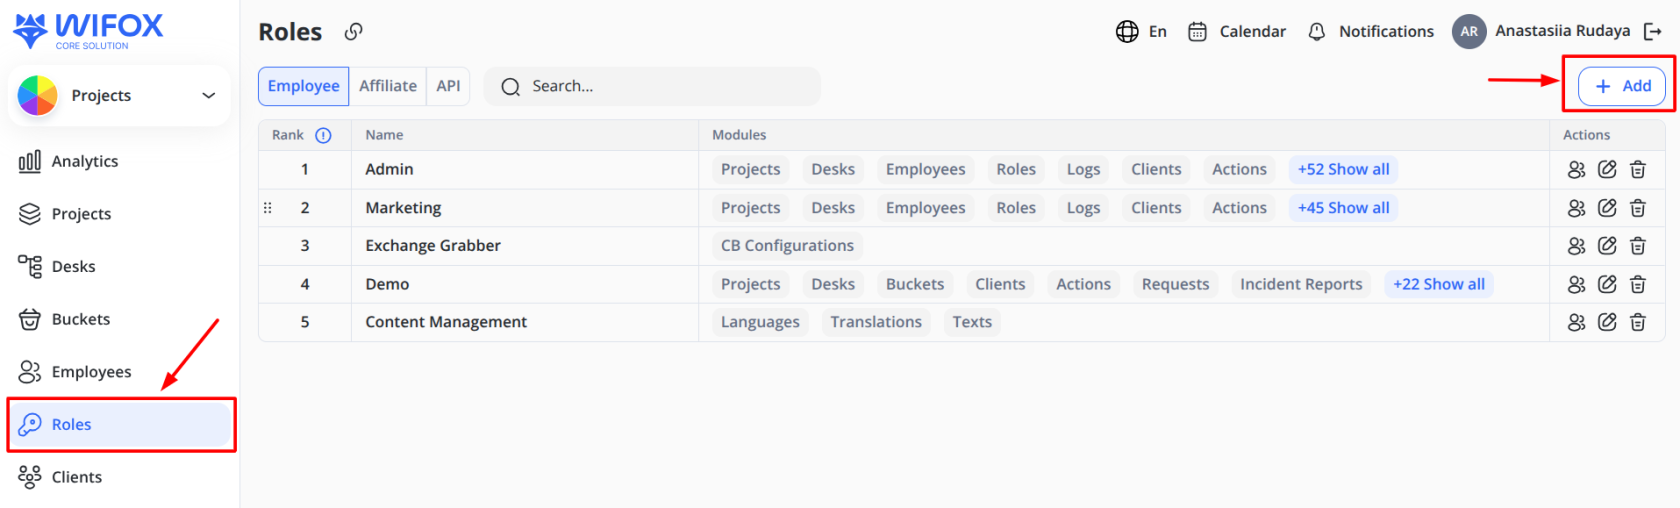](https://wiki.wi.services/uploads/images/gallery/2026-05/add-role-affiliate.png) 3\. Select the Affiliate role from the dropdown list in the tab header. 4\. Configure permissions. [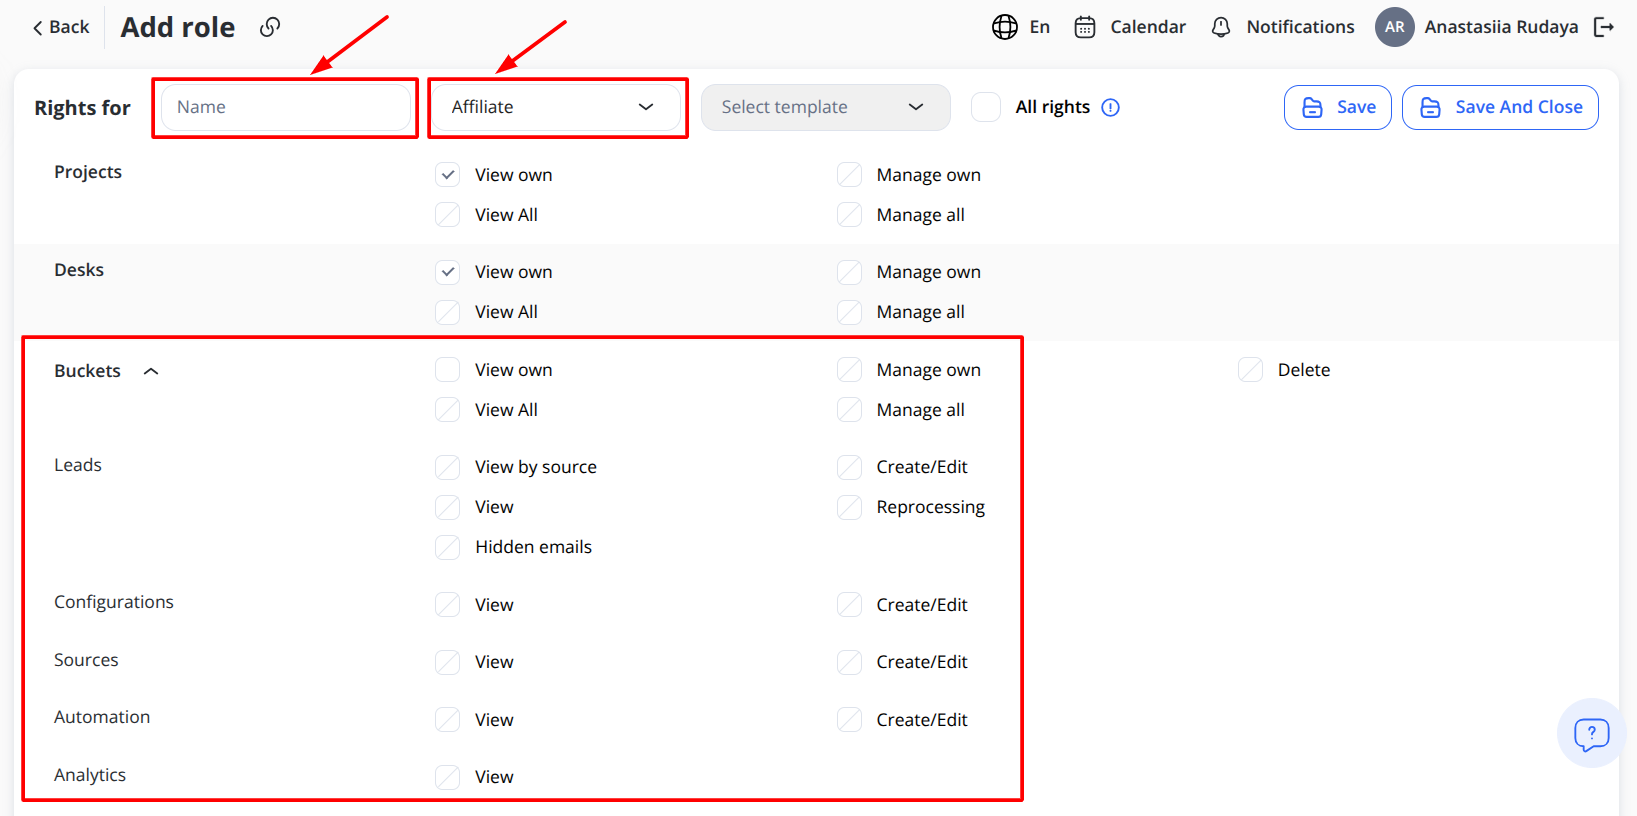](https://wiki.wi.services/uploads/images/gallery/2026-05/configure-rights-for-affiliate-role.png) If you need to add a Root Affiliate who will manage the affiliate hub and control its performance, set View permissions for Leads, Sources, Configurations, and Analytics to give access to full hub information. Otherwise, the Root Affiliate will act like a webmaster and will not be able to manage the affiliate hub. If you need to limit an Affiliate’s access to a specific source, enable View by Source. This allows the Affiliate to work only with the assigned source and be added as a webmaster to manage it. Also, access to lead emails can be hidden. To do this, select Hidden emails in the Leads block when configuring permissions. To save the settings, click Save if you plan to continue working with this module, or Save and Close if you have finished configuring it. ##### Important Rules **The following rules apply for manually configuring roles:** 1. Some modules are linked to others and cannot exist without them. For example, you cannot select viewing rights for **Projects** without **Desks** and **Employees**. In such cases, the viewing rights for the linked modules are selected automatically. More about Wifox Business Core Solution modules and their relationships [\[here\]](https://wiki.wi.services/books/wisrm/page/13-wicrm-modules-and-their-relationship) 2. Managing rights are **not** automatically selected. **Grant All Rights (Not Recommended)** Checking **All rights** grants every available permission—including all view, manage, import/export, and security settings. **Pros:** Quickest way to give “super-user” access. **Cons:** Violates the principle of least privilege. Risks accidental data exposure or operations. > **Use only** for very limited “super-admin” roles when absolutely necessary. **Configure Manually (Not Recommended)** For full control, you can tick each module’s view/manage checkboxes one by one. ##### How it Works In the **Modules** column, expand each section (e.g., Clients, Requests) to see sub-modules. In the **View rights** column, select “View own” and/or “View all.” In the **Manage rights** column, select “Create/Edit,” “Manage own/all,” and/or “Delete.” ##### Important Rules **Module dependencies:** Granting view rights on child modules (like Desks) **automatically** selects required parent rights (e.g., Projects, Employees). **Manage rights are always manual:** You must explicitly grant “Manage own/all,” “Create/Edit,” and “Delete” per module. > **Tip:** Only use manual configuration when you have very specific permission needs that templates cannot cover. For most scenarios, **selecting a template** offers the best balance of speed, clarity, and security. Use **All rights** sparingly, and reserve **manual configuration** for advanced use cases where fine-grained control is essential.