Roles
- 1. Roles: Overview
- 2. Roles: Use Cases
- 3. How to Create a Role
- 4. How to View Users Assigned to the Role
- 5. How to Search for a Role
- 6. How to Edit a Role
- 7. How to Delete a Role
- 8. Roles Ranking
1. Roles: Overview
The Roles module is the heart of your access-control framework in Wifox Business Core Solution. It defines who can do what—from viewing sensitive client data to performing high-impact administrative tasks. By grouping discrete system capabilities (like “view client profiles,” “edit KYC information,” or “export transaction logs”) into named Roles, you create reusable permission sets that can be assigned to any number of employees. This approach ensures consistency, enforces the principle of least privilege, and dramatically simplifies onboarding, auditing, and ongoing security management.
Core Concepts
1) Role Definition
Name & Description: Each Role carries a clear, descriptive name and summary so that even non-technical stakeholders immediately understand its purpose (e.g., “Support Agent,” “Compliance Reviewer,” or “System Administrator”).
Permission Toggles: Inside the Role editor, every discrete action or data-view permission is surfaced as an on/off switch. Permissions are grouped by feature area (Clients, Requests, Transactions, Logs, Settings, etc.), making it easy to see at a glance which modules a Role can touch.
2) Assignment to Users
Employee Profiles: Roles are granted on each Employee’s record. You can assign multiple Roles to a single person, allowing their effective permissions to be the union of all their Roles.
Dynamic Updates: When you edit a Role’s permissions, those changes immediately cascade down to every assigned user—no need to manually reconfigure each individual.
3) Hierarchy & Inheritance
While Wifox doesn’t enforce a strict parent/child Role hierarchy, you can achieve the same effect by cloning an existing Role (via the “duplicate” action) and then adding or removing specific permissions. This makes it easy to build “junior” and “senior” versions of any Role without starting from scratch each time.
4) Audit & Compliance
Built-in Reporting: You can export your entire Role list—complete with names, descriptions, and permission flags—to maintain an external audit record or to cross-check against organizational policies.
Change History: Every time a Role is edited, Wifox logs the timestamp and the user who made the change. This immutable audit trail ensures you can track how permissions have evolved over time.
Typical Workflow
Onboarding a New Team:
Review your organizational chart and identify distinct functional groups (e.g., Support, Finance, Compliance).
For each group, decide which modules and actions they need. Create a new Role (or clone a similar one), toggle the appropriate permissions, and save.
Assign the Role to all relevant employees in bulk via the Employee directory.
Responding to a Security Incident:
If you discover that a Role grants excessive access, simply open the Role editor, turn off the problematic permissions, and publish. Changes take effect immediately, locking down vulnerable areas without touching individual employee settings.
Regular Access Reviews:
Quarterly or semi-annually, export your Roles and compare them against your company’s security policies.
Identify any unused or overly permissive Roles, and either retire them or tighten their scope.
The following actions are available in the Roles module:
2. Roles: Use Cases
Use Case #1: Delegating Support vs. Administrative Tasks
Create two Roles—“Support Agent” with permissions limited to viewing and updating Requests and Actions, and “System Administrator” with full permissions across Projects, Settings, and Users. Assign Support Agents to day-to-day ticket handling without risking data-model or configuration changes, while Administrators maintain overall system health.
Use Case #2: Segregating Financial Controls
Define a “Finance Manager” Role that can view and export Transactions, manage Accounts, and adjust Company Fees but cannot modify client personal data or system Settings. Meanwhile, assign a “Compliance Auditor” Role read-only access to Transactions, Logs, and Agreements. This separation of duties ensures that financial workflows remain secure and auditable.
Use Case #3: Enabling Analytics Access
Create a “System Analyst” Role with view all permissions on Projects, Desks, Clients, and sub-modules (Actions, Requests) but manage own on none. Analysts can generate cross-project reports and dashboards without altering any records, preserving data integrity while granting broad visibility.
Use Case #4: Scoped Project Administration
For regional teams, define “Project Admin – EU” and “Project Admin – US” Roles that grant full CRUD and manage-all permissions—but only on their respective Projects and Desks. This lets local managers configure workflows and users within their region without touching other areas of the business.
Use Case #5: Time-Bound Elevated Access
When contractors or temporary staff need extra privileges—for instance, to perform a data migration—clone the “System Administrator” Role into “Temp Migration Admin” but set an expiration date on the token used to authenticate that Role. After the project completes, remove or let the token expire to automatically revoke access.
3. How to Create a Role
Creating a custom Role in Wifox Business Core Solution lets you precisely control which modules and actions your employees can access. Below is a fully expanded walkthrough, including all settings, options, and caveats.
There are 2 types of roles you can create inside the system:
-
Employee is a standard internal user role for team members (Support, Agent, Manager, Sales, etc.) who use the system for daily operations and require access to modules and permissions based on their responsibilities.
-
Affiliate is a limited role type for external or partner users who work only with assigned affiliate hubs and manage leads without access to other system modules.
How to Create an Employee Role
To create a new Employee role, follow the next steps:
Warning: The role's name can not be edited once it is created.
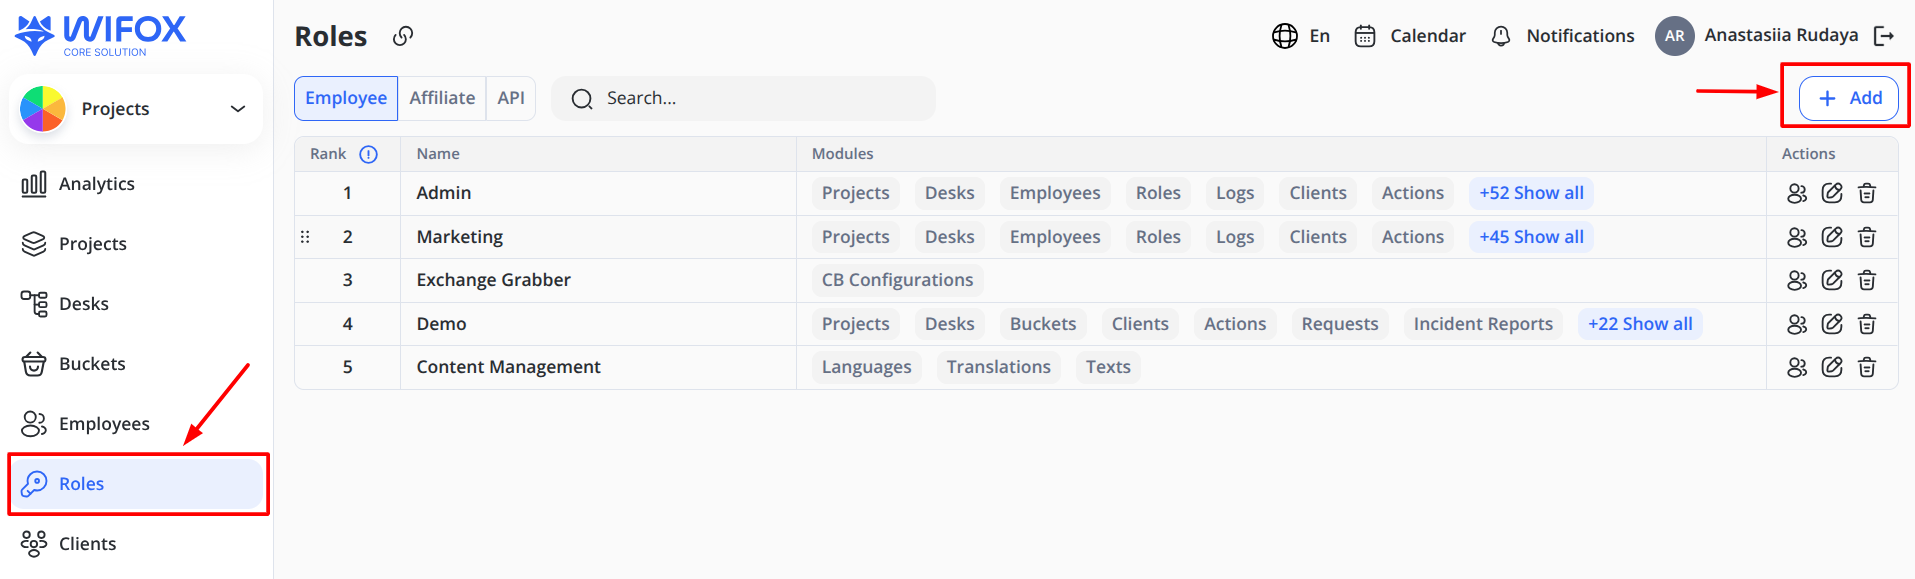
1. Open the Roles Module
In the left-hand navigation bar, click Roles to load the Roles list.
Click the Add button (green “+ Add”) in the top-right corner of the Roles tab. Then select the Employee role from the dropdown list in the table header.
2. Configure the New Role
When you click Add, the Add role interface appears, divided into three main sections:
| Section | Purpose |
|---|---|
| Modules | Lists every module (Projects, Desks, Employees, Affiliate Hub, Roles, Logs, Clients, Actions, Requests, Settings, Client area, etc.) for which you can grant rights. |
| View Rights | Checkboxes to grant “View own” or “View all” permissions on each module/sub-module. |
| Manage Rights | Checkboxes to grant “Create/Edit,” “Manage own/all,” or “Delete” permissions on each. |
Note: Some modules are hierarchically linked. If you grant view rights to a parent module (e.g., Projects), Wifox will automatically select required view rights on linked modules (Desks, Employees). Manage rights must be set explicitly.
You then have three options:
-
Select a template for the role. (RECOMMENDED)
-
Set all rights (including Security rights) available to the role. (NOT RECOMMENDED)
-
Manually configure a role. (NOT RECOMMENDED)
To Select a Template For the Role:
1. Click the Select template dropdown at the top of the Add role form.
2. Choose Your Template
You will see following templates:
|
Template |
View | Manage |
| Agent |
Own Projects (only those to which the employee assigned) Own Desks Employees (only those that relate to Own Projects) Own Clients Requests (only those that relate to Own Clients) Configurations Company fees Statuses |
Own Clients |
| Desk manager |
All from Agent list + All Clients |
Own Projects Own Desks All Clients Requests |
| Project admin |
All from Desk manager list +
All Desks |
All from Desk manager list + Employees |
Note: You cannot change the configuration of a role template.
3. Apply & Save
Once selected, the form will auto-tick the appropriate checkboxes for view/manage rights.
Note: Template configurations are locked—you cannot alter individual permissions afterward.
Click Save to finalize your new Role.
How to Create an Affiliate Role
To create a new Affiliate role, follow the next steps:
3. Select the Affiliate role from the dropdown list in the tab header.
4. Configure permissions.
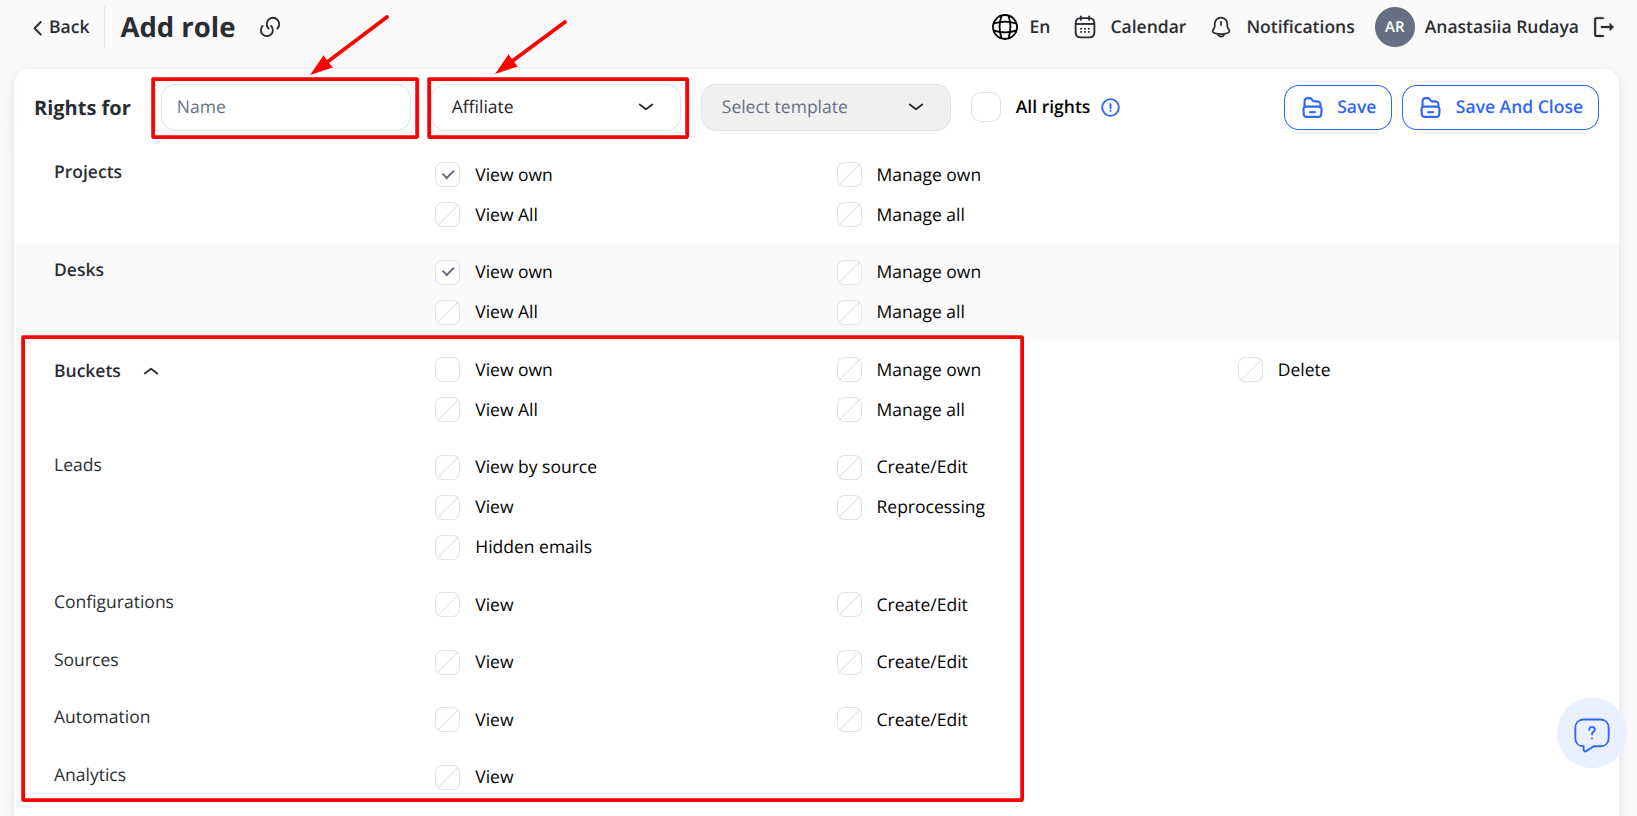
If you need to add a Root Affiliate who will manage the affiliate hub and control its performance, set View permissions for Leads, Sources, Configurations, and Analytics to give access to full hub information. Otherwise, the Root Affiliate will act like a webmaster and will not be able to manage the affiliate hub.
If you need to limit an Affiliate’s access to a specific source, enable View by Source. This allows the Affiliate to work only with the assigned source and be added as a webmaster to manage it. Also, access to lead emails can be hidden. To do this, select Hidden emails in the Leads block when configuring permissions.
To save the settings, click Save if you plan to continue working with this module, or Save and Close if you have finished configuring it.
Important Rules
The following rules apply for manually configuring roles:
- Some modules are linked to others and cannot exist without them. For example, you cannot select viewing rights for Projects without Desks and Employees. In such cases, the viewing rights for the linked modules are selected automatically. More about Wifox Business Core Solution modules and their relationships [here]
- Managing rights are not automatically selected.
Grant All Rights (Not Recommended)
Checking All rights grants every available permission—including all view, manage, import/export, and security settings.
Pros:
Quickest way to give “super-user” access.
Cons:
Violates the principle of least privilege.
Risks accidental data exposure or operations.
Use only for very limited “super-admin” roles when absolutely necessary.
Configure Manually (Not Recommended)
For full control, you can tick each module’s view/manage checkboxes one by one.
How it Works
In the Modules column, expand each section (e.g., Clients, Requests) to see sub-modules.
In the View rights column, select “View own” and/or “View all.”
In the Manage rights column, select “Create/Edit,” “Manage own/all,” and/or “Delete.”
Important Rules
Module dependencies: Granting view rights on child modules (like Desks) automatically selects required parent rights (e.g., Projects, Employees).
Manage rights are always manual: You must explicitly grant “Manage own/all,” “Create/Edit,” and “Delete” per module.
Tip: Only use manual configuration when you have very specific permission needs that templates cannot cover.
For most scenarios, selecting a template offers the best balance of speed, clarity, and security. Use All rights sparingly, and reserve manual configuration for advanced use cases where fine-grained control is essential.
4. How to View Users Assigned to the Role
Before assigning permissions or troubleshooting access issues, it’s crucial to know exactly who holds each role in your system. Viewing assigned users helps you audit permissions, ensure the right team members have access, and quickly spot any misconfigurations.
You can view all created roles in the list under the Roles tab. Here, you can also check modules it has rights for.
Step-by-Step Guide
1. Open the Roles Module
From the main navigation menu, click Roles.
You’ll see a table of every role you’ve created, along with its name and the modules it governs.
2. Find the Role You Want to Inspect
Use the search box at the top to filter by role name, or scroll through the list until you see the target role.
3. Click the “Assigned Users” Icon
In the Actions column on the far right of that role’s row, click the user-group icon (often depicted as two silhouettes).
This opens a slide-out panel on the right side of the screen.
4. Review the Members Panel
At the top is a search field—type a name or email to quickly locate a specific employee.
Below, you’ll see each employee’s name and login email who has that role.
5. Close the Panel
When you’re done, click the “X” in the panel’s header to return to the full Roles list.
Note: Assigning employees to roles is performed through the Employees module. You can find instructions on how to do this [here].
Regularly checking which users hold which roles is a best practice for maintaining security and operational clarity. It ensures that only authorized personnel retain critical permissions, helps you spot and fix assignment errors, and confirms that your team always has the right access to do their jobs.
5. How to Search for a Role
When your organization has many custom roles, finding the exact one you need can be cumbersome. The search functionality in the Roles module lets you instantly locate any role by name or partial keyword—saving time and reducing errors when assigning permissions or auditing access.
Step-by-Step Instructions
2. Activate the Search Field
At the top of the Roles list, locate the Search… input box.
Click inside the box to place your cursor there.
3. Enter Your Search Term
Type all or part of the role name you’re looking for (e.g., admin).
The table updates in real time, filtering to show only roles that contain your keyword.
4. Review Matched Results
Confirm the role appears in the filtered list along with its rank and associated modules.
If too many results appear, refine your search by typing a longer or more specific term.
5. Clear or Modify Your Search
To reset the list and view all roles again, clear the text from the Search field (e.g., click the “×” inside the field or press Backspace until it’s empty).
Enter a new keyword to perform another lookup.
Using the search box in the Roles module is the fastest way to pinpoint any role by name—whether you’re verifying permissions, preparing to edit a template, or simply auditing who has what access. Efficient searching helps maintain security hygiene and keeps your permission structure well-organized.
6. How to Edit a Role
Over time, your organization’s needs may evolve: you might need to grant additional permissions to an existing role or tighten access in response to security changes. The Edit Role function lets you fine-tune an existing role’s permissions—adding or removing rights, switching templates, or even upgrading someone’s capabilities—without having to recreate the role from scratch.
Step-by-Step Process
1. Open the Roles Module
From the main navigation menu, select Roles.
You’ll see the full list of roles along with their current modules and access scopes.
2. Locate the Role to Edit
Scroll or search to find the role you wish to modify.
Each row shows the summary of the modules it can access.
3. Launch the Edit Dialog
In that role’s Actions column, click the Edit (pencil) icon.
The Edit Role panel appears, displaying the role’s configuration fields.
4. Review the Role Name and Template
Template dropdown lets you reassign a different predefined template (e.g., Agent, Desk manager, Project admin). Changing the template will replace the permission matrix with the template’s defaults.
5. Adjust “All rights” Toggle (Optional)
Enabling All rights immediately grants every possible permission across all modules. This is rarely recommended—use only for super-admin or audit roles.
6. Modify View Permissions
In the View column, you’ll see each module (Projects, Desks, Clients, etc.) along the left.
Click checkboxes to grant or revoke “View own” (only records they own) and “View all” (every record) rights.
For nested modules (e.g., under Clients: Export, Import), expand the section to expose sub-permissions.
7. Modify Manage Permissions
In the Manage column, toggle “Manage own” and “Manage all” to allow editing, creating, or deleting records.
Some modules also offer special rights such as “Send a private message” under Clients.
8. Add or Remove Specific Actions
Beyond the view/manage dichotomy, certain modules include granular options:
- Under Employees, you might toggle “Create/Edit” vs. “Delete.”
- Under Settings, you can enable or disable access to languages or verification levels.
9. Save or Cancel Changes
Once you’ve made your adjustments, click Save to apply them immediately.
To abandon your edits, click the back arrow or Cancel—no changes will be saved.
Here, you can delete permissions set during the role creation stage or add new ones. You can also set or change a template for the role.
Note: For roles created or edited based on templates, you can only change the templates later, but not edit the permissions manually.
The Edit Role feature lets you keep your permission structures up-to-date as your team grows and business processes change. By carefully balancing view and manage permissions—optionally leveraging templates for common job functions—you maintain tight security controls while empowering employees with exactly the access they need.
Permission Enforcement Across Modules
Role permissions are not cosmetic or UI-based restrictions.
They are enforced at the backend level and determine which records are returned by the system.
For modules that depend on hierarchical access control (such as Clients, Leads, Orders, Requests, etc.), visibility rules are evaluated using the combination of:
-
Project permissions (View own / View all)
-
Desk permissions (View own / View all)
-
Client permissions (View own / View all)
Records are returned only if they pass all applicable permission checks.
This means:
-
If a role has Project → View own, only records from assigned projects are accessible.
-
If a role has Desk → View own, only records from assigned desks are accessible.
-
If a role has Client → View own, only records where the manager is assigned to the client are accessible.
Modules do not rely on frontend hiding.
Permissions are enforced server-side and define the actual data scope.
7. How to Delete a Role
When a role is no longer needed—perhaps because you’ve reorganized teams or replaced it with a more accurate permission set—you can permanently remove it from your system. Deleting a role is irreversible, so it’s important to ensure that no active employees rely on it before you proceed.
Warning: You cannot restore deleted roles.
Step-by-Step Guide
1. Verify Role Assignment
Before attempting deletion, confirm that the role isn’t currently assigned to any users. If it is, you’ll need to reassign those employees to another appropriate role first—otherwise, the system will prevent deletion.
2. Locate the Role
In the Roles list, scroll (or use the search bar) to find the role you want to delete.
3. Click the Delete Icon
In that role’s Actions column, click the trash-can icon. This immediately triggers a confirmation prompt.
4. Confirm Deletion
A small pop-up asks, “Are you sure?”
Click Delete to permanently remove the role, or Cancel to abort the operation.
Note: You cannot delete a role if it is assigned to anyone.
Deleting unused or outdated roles helps keep your permission structure clean and reduces administrative overhead. By following the steps above—and ensuring no employees remain tied to the role—you can safely remove roles you no longer need, keeping your security model lean and accurate.
8. Roles Ranking
Roles are arranged by rank to control who can create or assign roles at different privilege levels. A user can only manage (create/edit/assign) roles with a rank equal to or below their own. Higher‐ranking roles appear at the top of the list (with lower rank numbers, such as 1), while lower‐ranking roles appear below.
Use Cases
- Role-Based Access Control
A user can only manage (create/edit/assign) roles with a rank equal to or below their own, preventing unauthorized privilege escalation and ensuring secure role management. - Secure Role Visibility
Users can only see roles at or below their rank when creating or managing employees, eliminating confusion and maintaining appropriate permission levels. - Efficient Role Management
Admins can drag and drop roles to adjust the hierarchy, ensuring role privileges align with organizational needs and simplifying role administration.
1. Viewing the Roles Table
When you click Roles in the left-hand nav, the main pane displays every role in a table sorted by “Rank” (highest privilege at the top).
Rank: A number in the first column (1 = highest privilege), automatically assigned by order.
Modules: A list of module-tags showing what each role can access (e.g. Projects, Desks, Clients). Only the first few tags appear, with a “+X Show all” link to expand.
Actions Icons
To the right, under Actions, there are three icons:
- 👥 Users: View/assign employees who hold this role
- ✎ Edit: Open the Edit-role panel to adjust permissions or template
- 🗑️ Delete: Permanently remove the role
2. Editing a Role
Click the ✎ pencil icon under Actions for the role you want to change.
The Edit role drawer appears, listing every module with View/Manage checkboxes (e.g., View own, View all, Manage own, Manage all).
Check or uncheck permissions as needed, then click Save.
3. Changing Role Rank (Drag‐and‐Drop)
Why? Drag-and-drop lets you reorder the hierarchy of roles—higher in the list = higher privilege.
3.1. Locate the Drag Handle
Look at the very left edge of the Rank column (the first column).
You’ll see a small vertical “pill” of dots (⋮⋮) next to each role’s row.
Hovering over it changes your cursor to a “move” icon.
3.2. Move the Role Up/Down
Click & Hold the dotted handle on the role you want to move.
Drag the entire row up to give it a higher priority (lower rank number), or down for lower.
Release to drop it into its new slot.
The role’s Rank automatically updates to reflect its new position. For example, if you move a role above another that had a lower rank number, the dragged role now has a higher privilege (lower rank number).
3.3. Effect on Visibility
Security safeguard: If you drag a role above your own rank, you will no longer see it in any Role dropdowns when assigning to employees or tokens.
Prevents privilege escalation: A rank-4 user can’t promote themselves (or others) to rank 3 or higher.
Additional Visibility Restriction
Users cannot see another employee’s assigned role if that role has a higher rank than their own.
In employee lists and role-related views, higher-ranking roles are hidden from users with lower rank.
This ensures:
-
Sensitive privilege levels are not exposed
-
Hierarchical boundaries are preserved
-
Users cannot infer or interact with roles above their authority
4. Assigning Roles to Employees or Tokens
After ranking roles appropriately, you’ll assign them—but you’ll only ever see roles at or below your own rank.
4.1. Add Employee
In the left-hand nav, click Employees.
In the top-right of the Employees table, click + Add.
In the Add employee drawer, locate the Role dropdown under General.
Only roles whose rank is at or below your rank appear.
4.2. Create Identification Token
In the left-hand nav, expand Security and click Identification tokens.
Click + Add at the top right of the Tokens table.
In the Add identification token drawer, find the Role dropdown.
Again, only roles at or below your rank are listed—higher-rank roles are hidden.
For instance, if your user is rank 4, you’ll only see rank 4, 5, 6… roles listed—rank 3 or above won’t appear.
Why Role Ranking Matters
- Security: Prevents unauthorized privilege escalation (e.g., a mid‐level user granting themselves “super admin” powers).
- Project Scope: Ensures a manager who only oversees one project can’t create or assign roles that exceed their scope.
- Consistency: Keeps the system organized, with each user limited to assigning roles matching their authority level.
Example Scenario
1. Admin Role at Rank 4
The “admin” user sees and can assign roles at rank 4, 5, 6, etc.
2. QATestRole at Rank 5
Admin at rank 4 can't drag roles above it's own rank order(4).
This ensures Admin doesn’t accidentally (or intentionally) grant privileges beyond their own.
Role ranking also impacts access to configuration features. Users can only modify system-level settings, including action subtype ordering, if both their permissions and rank allow it.
In short, Role Ranking is a fundamental security feature. It keeps your platform's environment safe by ensuring users can only create, assign, or manage roles at or below their rank, preventing privilege escalation and maintaining clear permission boundaries across the platform.