Projects
- 1. Projects: Overview
- 2. Projects: Use Cases
- 3. How to Create a Project
- 4. How to Edit a Project
- 5. How to Delete a Project
1. Projects: Overview
The Projects module is the foundational container in Wifox Business Core Solution. Every record you create under Projects represents a discrete business unit—whether that’s a corporate office, a website, a geographic region, or a product line. Projects isolate data (Desks, Clients, Employees, financials, support tickets, etc.) so that each team only sees the records relevant to their scope of work.
Default Project
Upon first login, you’ll see a Default project (with one default Desk). Use this for testing or small-scale operations.
Unlimited Projects
Create as many Projects as your organization needs—each with its own:
- Desks (structural units)
- Clients (customer records)
- Employees (system users)
- Sub-modules (Affiliate Hub, Actions, Requests, Core Banking, etc.)
Access Control
All permissions (view own/all, manage own/all) are scoped at the Project level and inherited by underlying Desks, Clients, and sub-modules. Without at least one active Project, no other CRM functions can be used.
The following actions are available in the Projects module:
2. Projects: Use Cases
Use Case #1: Managing Different Websites
Projects can be used to manage different websites. For each website, you create a separate project, ensuring that only the managers and employees responsible for that specific site can see and interact with the customers associated with it. This setup helps to keep customer data segmented and relevant to the specific team.
Use Case #2: Managing Operations Across Different Countries
Projects can be utilized to manage operations in different countries. For each country in which your company operates, create a separate project (e.g., United States, Germany, Canada). This ensures that employees and managers of the respective offices only see and work with clients from their region, allowing for localized management and compliance with regional regulations.
Use Case #3: Managing Multiple Business Units
Projects can be used to separate different lines of business within your company. For example, if your company offers consulting services (business #1) and real estate (business #2), you can create two distinct projects. Each project operates in isolation, ensuring that employees from one business line do not have access to the clients and data of the other, maintaining confidentiality and focus.
Use Case #4: Feature Pilot & QA Environment
Spin up a “Staging” Project mirroring your production setup. QA engineers can safely test new features, import/export data, or preview integrations without impacting live operations.
Use Case #5: Integration Sandboxes
Stand up a Project solely for API integrations or partner onboarding. Provide external teams with API tokens scoped to this Project, ensuring any test calls cannot affect your real data.
3. How to Create a Project
Projects are the foundational containers in Wifox Business Core Solution (WBCS)—each one encapsulates its own Desks, Clients, Employees, and data. By creating a Project, you define an isolated workspace where your team can operate without risk of cross–project data exposure. Follow the steps below to set up a new Project correctly and have it ready for desks, clients, users, and workflows.
1. Open the Projects Module in the sidebar
In the left-hand sidebar, click “Projects” to show your current list of projects.
2. Start a New Project
Click the “+ Add” button in the top-right corner of the Projects screen. This opens the “Add Project” form.
3. Complete the General Section
General
This section defines the core identity and basic settings of the Project. All fields here apply system-wide and are required to uniquely identify the Project.
This section captures the core identity of your project. Fill in:
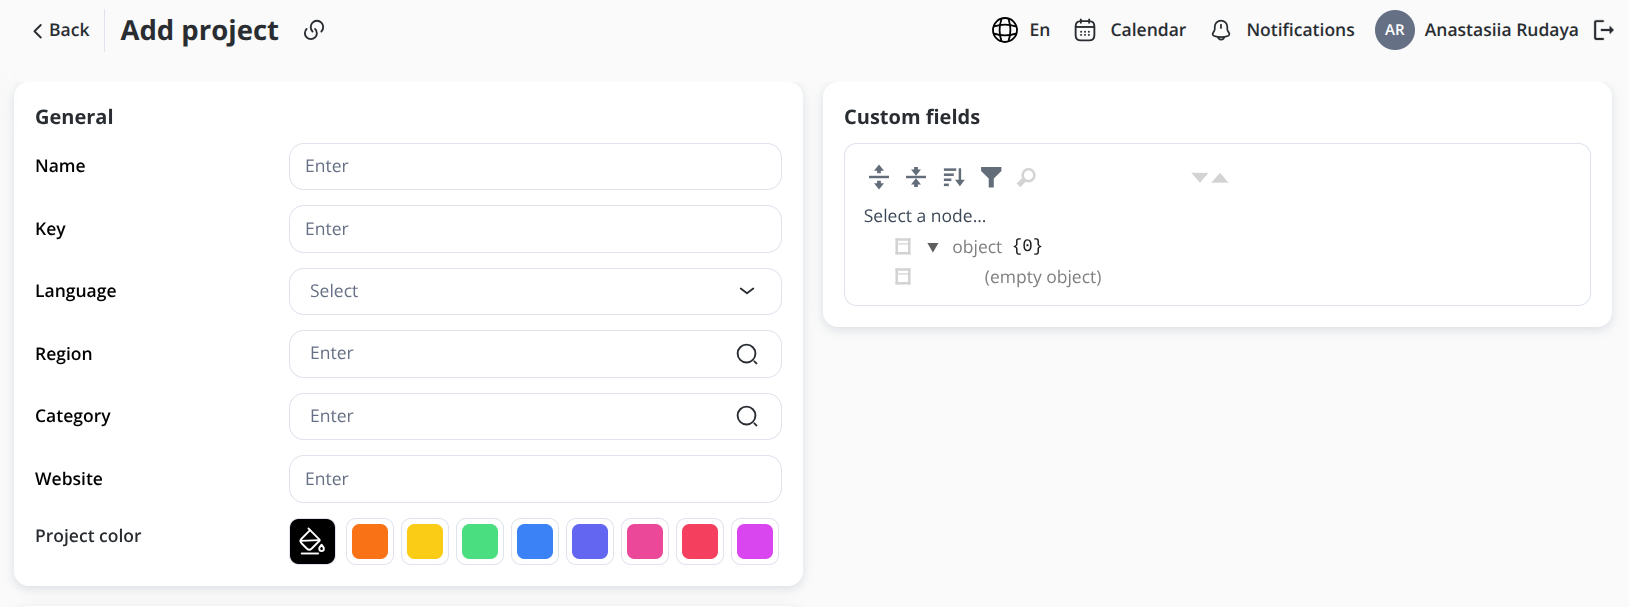
Name
What it is: The human-readable name of the Project.
Usage: Displayed across the platform in lists, selectors, and headers.
Key
What it is: A unique internal identifier for the Project.
Usage: Used internally and in integrations.
Constraints: Must be unique.
Language
What it is: The default language of the Project.
Effect: Sets the primary UI language context for this Project.
Website
What it is: Optional Project-related website URL.
Purpose: Reference link associated with the Project.
Region
What it is: The geographical region linked to the Project.
Usage: Used to filter Projects by location (UK, Asia, North America, or any custom region defined by the client).
Category
What it is: The category assigned to the Project.
Usage: Used to filter Projects easily by purpose, product line, or any other business need defined by the client (e.g., Consulting service, Personal project, Brokerage, etc.)
Project color
What it is: A visual color identifier selected from predefined swatches.
Effect: Used across the UI to visually distinguish the Project.
4. Custom fields
Custom fields allow you to attach structured, schema-based metadata to a Project.
How it works:
Select a predefined schema node from the tree.
The selected object defines additional key–value data stored with the Project.
Custom fields are optional and depend on your system configuration.
Purpose:
Extend Project data without changing core fields.
Support custom integrations, reporting, or automation logic.
Avoid describing specific schemas or usage unless documented elsewhere.
5. Use as organization unit
This optional setting allows a Project to function as a legal or organizational entity.
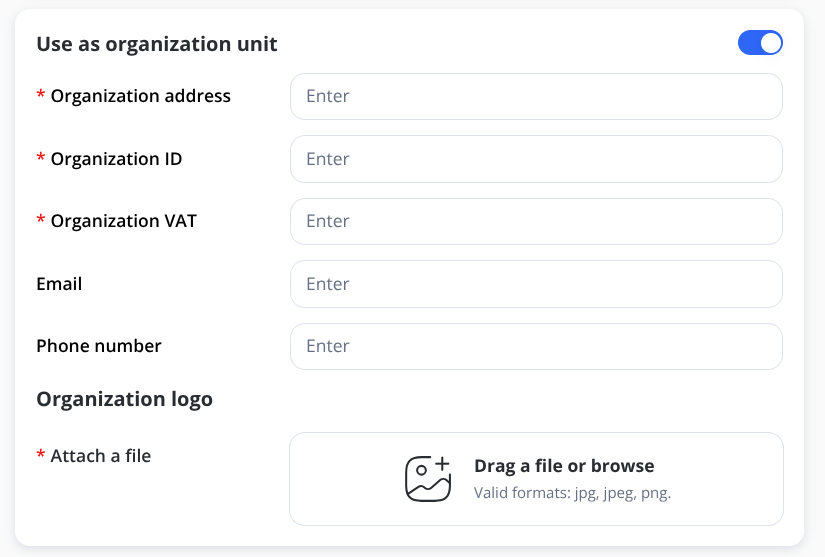
Toggle behavior:
When disabled, organization-specific fields are hidden.
When enabled, the Project requires additional organization details.
Required fields (when enabled):
Organization address *
Organization ID *
Organization VAT *
Optional fields:
Email
Phone number
Organization logo
Organization logo
Upload a logo file associated with this organizational unit.
Supported formats: JPG, JPEG, PNG.
Use case: Enable this option when the Project represents a company, branch, or legal unit that requires identification details.
6. Save
Final step: After completing all required fields, click Save to create the Project.
You’ve successfully created a new Project in Wifox Business Core Solution. Next steps include: assigning Desks to define your organizational structure, adding Employees and Clients with appropriate Roles, and configuring workflows. With your Project in place, you can leverage WBCS’s full feature set—structured, secure, and scalable—for optimal business management.
4. How to Edit a Project
Once a Project has been created, you can update its settings and manage its members from the Edit Project page. Follow the steps below to keep your Projects up to date or to delete one when it’s no longer needed.
1. Open the Projects List
In the left-hand navigation menu, click Projects to display all existing projects as cards.
2. Enter Edit Mode
Locate the card for the Project you wish to change. Click the Edit (✏️) icon in the top-right corner of that card. This opens the Edit Project form pre-populated with the current settings.
3. Update General Settings
In the General section, you can modify the core Project attributes:
Name: Update the Project’s display name.
Key: Read-only after creation and cannot be changed.
Language: Change the default language for the Project.
Website: Update or add the associated Project URL.
Project color: Select a new color from the available swatches to visually distinguish the Project in the UI.
4. Use as organization unit
This toggle determines whether the Project also functions as an organizational entity.
When disabled, organization-specific fields are hidden.
When enabled, additional legal and contact information becomes available and may be required.
This setting is optional and depends on how your organization structures Projects.
5. Custom fields
Custom fields allow you to view or update structured, schema-based metadata attached to the Project.
Select a schema node to view or modify associated data.
Available fields depend on your system configuration.
Custom fields extend Project data without changing core settings.
6. Manage Project Membership
The Members panel on the right shows all users currently assigned to the Project.
Add a member: Click + Add member to assign an existing user to the Project.
Search members: Use the search field to filter members by name or email. To add a new user to this list, go to the Employees tab.
Remove a member: Click the trash icon next to a member to revoke their access to the Project.
Changes are applied immediately after saving.
7. Apply Your Changes
Once you’ve made all necessary edits:
Click Save in the bottom-left corner.
The form will close, and you’ll return to the Projects list with all updates applied immediately.
5. How to Delete a Project
Warning:
You cannot delete the system’s Default Project—its trash icon is disabled.
Once deleted, a Project and all of its associated data (desks, affiliate hubs, clients, requests, agreements, etc.) are permanently removed. This action cannot be undone.
Before you begin, make sure:
You have the manageAll or manageOwn right on the Projects module.
There are no active desks or clients left under this project. You must first delete or reassign all desks → affiliate hubs → clients.
Note: you can delete the project’s member only after you’ve deleted them from the desk they have been assigned to. Read more about Desks here.
Prerequisite Checks
You must
Remove all desks: In each Desk’s actions menu (⋯), click Delete Desk once its affiliate hubs are empty.
Reassign or delete affiliate hubs: In the Affiliate Hub module, remove any affiliate hubs tied to this project.
Archive or delete clients: In the Clients list filtered by this project, archive or move every client out.
This prevents orphaned records and ensures a clean project deletion.
Deleting the Project
1. Locate the Project Card
Scroll through your Projects grid or use the Search… input to quickly find it by name.
2. Open the Project Actions
On that project’s card, two icons appear in the top-right when you hover:
✏️ Edit (to change settings)
🗑️ Delete (trash can)
3. Click the 🗑️ Delete Icon
If the icon is greyed out, you’re either on the Default Project or there are still desks/clients attached.
Otherwise, the confirmation dialog opens.
4. Review the Confirmation Prompt
Read the warning carefully.
Click Confirm Delete to proceed.
5. Post-Deletion Cleanup
The project will vanish from your list immediately.
Any scheduled automations, notifications, or integrations scoped to this project will no longer trigger.
If you have dashboards or saved filters referencing this project, update or remove them.