**Important**: The Project, Manager, and Label fields are locked once the affiliate hub is created to preserve your routing logic and API integrations.
5\. Save Your Changes After making your updates, click **Save** at the bottom of the sidebar. You will see a confirmation toast (“Affiliate Hub Successfully Updated”) and your edits will immediately take effect. By regularly reviewing and updating affiliate hub settings, you ensure your client acquisition workflows stay aligned with evolving marketing strategies and operational needs. # 5. How to Search for an Affiliate Hub When you have many affiliate hubs, the **Search** box helps you quickly locate the one you need by filtering the list in real-time. 1. **Locate the Search field:** At the top of the Affiliate Hub page, you’ll see a search input with a magnifying-glass icon. 2. **Type any part of the affiliate hub’s label or name:** As you enter text, the displayed affiliate hub cards will instantly narrow down to those whose **Label** or **Name** contains your query. 3. **Select your Affiliate Hub:** Click the matching affiliate hub card to drill in, or use its kebab menu to edit, delete, or view sources. > **Tip:** You can search on partial words—e.g. typing “Test” will match both “SecondTest” and “TestAffiliateHub.” ##### Next Steps & Tips 1. **Client Re-routing:** If you’ve changed the affiliate or toggled Active off, verify that any automated assignments or desk mappings still behave as expected. 2. **Audit Logs:** Check your system’s audit trail to confirm who made the change and when—useful for compliance and troubleshooting. 3. **Communicate Changes:** Let your team know if you’ve renamed an affiliate hub or updated its affiliate ID so reporting dashboards and integrations remain in sync. # 6. How to Configure Affiliate Hub The **Configurations** tab within each affiliate hub lets you manage two key entities for tracking and routing leads: 1. **Postbacks** – callback URLs for registration and first-trade events 2. **Snippets** – embeddable code to drive new sign-ups The **Postbacks** entity allows you or your partners to control and track user traffic and activity within our CRM system. Once a user registers in our CRM, a request is sent to the configured postback URL. Similarly, when the user completes their first transaction, a request is also sent to the configured postback URL. You can add postback URLs for two types of activity: 1. **FTD (First Time Deposit)** 2. **Registration** ##### **To add a new postback**: Postbacks let you notify external systems whenever a user registers or makes their very first transaction (FTD). You configure them for each affiliate hub on the **Configurations** tab: 1. **Open Your Affiliate Hub’s Configurations:** In the left nav, click **Affiliate Hub**, select the affiliate hub you want, then choose the **Configurations** tab at the top. 2. **Enable the Postbacks Panel:** Flip the toggle at the top of the **Postbacks** card to “on” if it isn’t already. 3. **Enter the Callback URL:** In the **Postback URL** field, type the full HTTPS endpoint your system will expose. Use mustache placeholders (`{{…}}`) to inject dynamic client data. Only these tokens are allowed: Hover the ℹ️ icon next to **Fields** to view the complete, supported placeholder list. Any other token (e.g. `{{phone}}`) will fail frontend validation (red warning) and be passed through as literal text if it somehow reaches the backend. **Select the Trigger Event:** From the dropdown to the right of the URL, pick **Registration** (fires on every new signup) or **FTD** (fires once at first transaction). **Add the Postback:** Click the green **➕** button to insert your URL+event into the active list. **Confirm & Save:** You can immediately click away or hit the affiliate hub’s **Save** button. A *“Success! Affiliate hub configuration successfully updated”* toast appears once your new postback is accepted. ##### **Editing or Disabling** **Edit** any existing entry by clicking its ✏️ icon, updating the URL or event type, then saving. **Disable** temporarily by flipping the entry’s toggle switch off—no removal needed. The **Snippet** entity provides customizable code that you can insert into your website or social media page to attract clients to the platform. You can configure the code in various formats through Settings > Texts > Code Snippets. ##### **To get a snippet:** Snippets are blocks you can embed on websites or ads to route new leads directly into this affiliate hub. Click **Copy** to save the code to your clipboard. Once highlighted, click **Copy** to grab the snippet text. You can also get a snippet from the main Affiliate Hub page. To do that: 1. Navigate to the **Affiliate Hubs** tab. 2. Click on the **Show snippet** icon near the specific affiliate hub. 3. A drawer with the snippet will appear.**Tip:** All changes take effect immediately for new leads. Existing leads retain their original source/postback assignments unless you manually update them. By carefully configuring your **Sources**, **Postbacks**, and **Snippets**, you ensure accurate lead attribution and seamless integration with external systems
# 7. How to Automate Affiliate Hubs Automating your affiliate hubs lets you route incoming clients to the right desks without manual intervention, ensuring timely follow-up, consistent SLA adherence, and clear ownership. You can choose a simple “all leads go here” approach, or build sophisticated rules based on the time of day or the source channel. The **Automation** section allows you to set up automated client assignment to relevant desks. To begin, **enable automation**: 1\. **Open the Automation tab** within your affiliate hub. 2\. **Toggle on** **Active automation** so it turns blue. [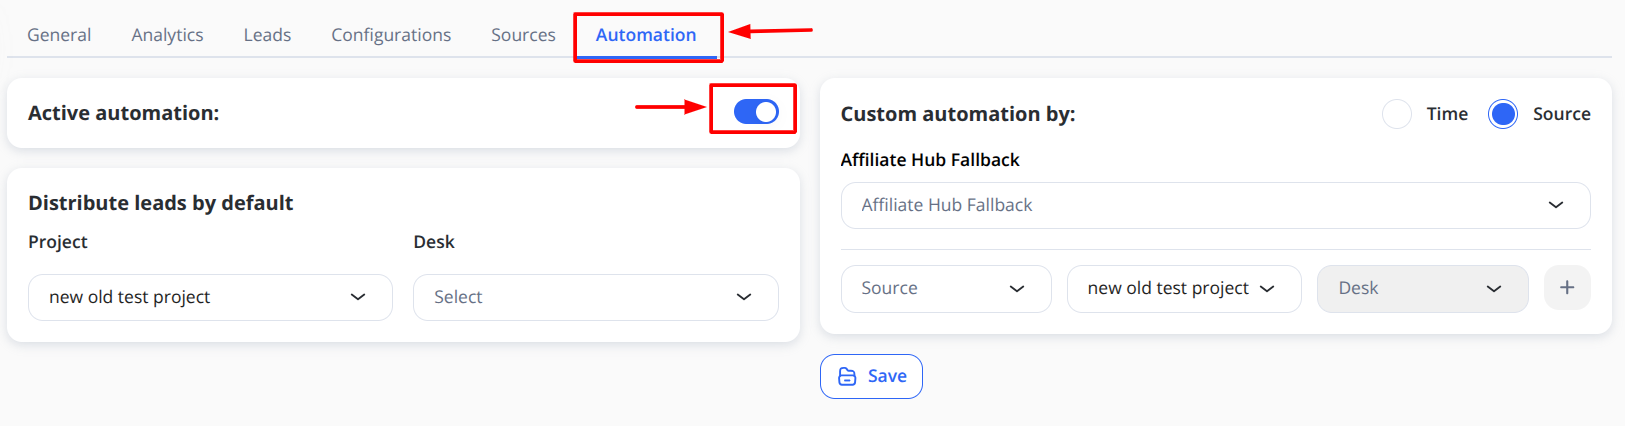](https://wiki.wi.services/uploads/images/gallery/2026-05/affiliate-hub-automation.png) > **Tip:** Flip this switch off any time to pause automation and fall back to manual desk assignments.Note: To disable automation, click the toggle again. If disabled, you will need to assign clients to desks manually. Instructions on manual assignment can be found [\[here\]](https://wiki.wi.services/books/wifox-business-core-solution-wbcs/page/9-how-to-manually-assign-leads-to-desks).
**To automatically assign all new clients to one desk** (with no conditions): 1\. In **Distribute leads by Default→** Select Project and Desk from the dropdown. 2\. Click **Save** to apply changes. *All new leads will now land on that desk, straight out of the box.* **To set up custom automation**: Use time-based rules when, for example, you have different support teams on different shifts. 1\. Under **Custom automation by**, choose one of the options, **Time** or **Source**.Note: You can choose automation based on either time or source, but not both simultaneously.
For custom automation **by time**: 1\. Select the **Affiliate Hub Fallback** desk from the drop-down list. Clients that do not match within the specified time periods will be assigned here. 2\. Set the **Start time** and **End time** to specify the time period. Then select the **Project** and **Desk** for that period from the drop-down list and click the plus icon (**+**).Note: Time periods may overlap if entered that way (e.g., 8:00–14:00 and 6:00–16:00). In such cases, the first matching period in the list will be selected.
3\. You can add an unlimited number of time periods to separate clients. A new line for adding a period will appear once you have added the previous one. 4\. You can **edit** or **delete** all created periods by clicking the relevant icons. For custom automation **by source**: Route based on where the lead came from (e.g., “Twitter” vs. “Affiliate A”). 1\. Select the **Affiliate Hub Fallback desk from the drop-down list. Clients that do not match within the specified sources will be assigned here. 2\. Select the **Source**, Project, and **Desk** from the drop-down lists. Then click the plus icon (**+**). 3\. You can add as many sources as you have set up in [Configurations](https://wiki.wi.services/books/wifox-business-core-solution-wbcs/page/6-how-to-configure-affiliate-hub). A new line for adding a source will appear once you have added the previous one. 4\. You can **edit** or **delete** all created sources by clicking the relevant icons. 5\. Once your default desk, time windows, or source mappings are in place, click **Save** at the bottom of the panel. All new leads into this affiliate hub will immediately flow according to your rules. By leveraging affiliate hub automation: **Reduce manual work**—no more one-by-one desk assignments. **Enforce SLAs**—ensure leads always land with the right team at the right time. **Adapt on the fly**—update time windows or source mappings in seconds. Automated routing keeps your pipeline moving smoothly, so your teams can focus on closing rather than chasing down new leads. # 8. How to Search and Filter Leads The **Leads** section lets you see every client captured by this affiliate hub—complete with their email, ID, affiliate/source, registration date, FTD date, status, and more. When you have hundreds or thousands of leads, the **Search** and **Filter** tools help you zero in on exactly the records you need in seconds. ##### **To search for a lead**: 1\. Go to the Leads tab of your affiliate hub. 2\. Click into the **Search…** field at the top. 3\. Type any part of the lead’s email address (e.g. `john.doe`, `@gmail.com`, etc.). 4\. The list will dynamically filter as you type, showing only matching leads. > **Pro tip:** Partial queries work too—entering `hotmail` will instantly display all Hotmail addresses. ##### **To filter leads**: While Search matches text, **Filters** let you narrow down by date ranges and source IDs. 1\. Click the **Filter** button on the left side of the toolbar. 2\. In the right-hand drawer, set one or more criteria: **Created date** (when the lead registered) **Source ID** (the marketing channel tag) **First transaction date** (FTD date range) **3. Remove** any filter field by hovering over it and clicking the **×**. 4\. Click **Save** to apply—your table updates to show only leads matching **all** selected criteria. ##### **Conclusion** By combining **Search** for quick text matches with **Filter** for precise date or source slices, you can: Rapidly locate individual leads (e.g., to troubleshoot or review). Segment your data by campaign or conversion period. Export just the subset you need for reporting or follow-up. These tools keep your lead management efficient, accurate, and scalable—no matter how many clients flow through your affiliate hubs. # 9. How to Manually Assign Leads to Desks While the **Automation** section streamlines lead distribution, you can always take direct control by manually assigning individual or multiple leads to any desk. This is useful for special cases or overrides. **To manually assign leads to desks**: 1\. Navigate to the **Leads** tab of the affiliate hub where you want to manage assignments. 2\. Find the lead you want to assign. 3\. Click the **Assign** icon at the end of that lead’s row. If the icon is **gray** and unclickable, that lead has already been assigned (either manually or via automation). 4\. In the right-hand drawer, choose the **Desk** from the drop-down list. 5\. Click **Save** to apply. The lead’s **Status** column will update to reflect the new desk assignment.Note: You can assign a lead to the desk through the Affiliate Hub module only once. To reassign a client, use the [Clients module](https://wiki.wi.services/books/wifox-business-core-solution-wbcs/page/54-how-to-reassign-a-client).
# 10. How to Work With Affiliate Hub Dashboard **Employees** and **Affiliates** can access analytics only when the relevant permission is enabled in their Role. To grant access, first define whether the user can view all Affiliate Hubs or only their own Affiliate Hub, then enable the View checkbox in the Analytics block. The analytics data displayed in the system will vary depending on the selected access level. [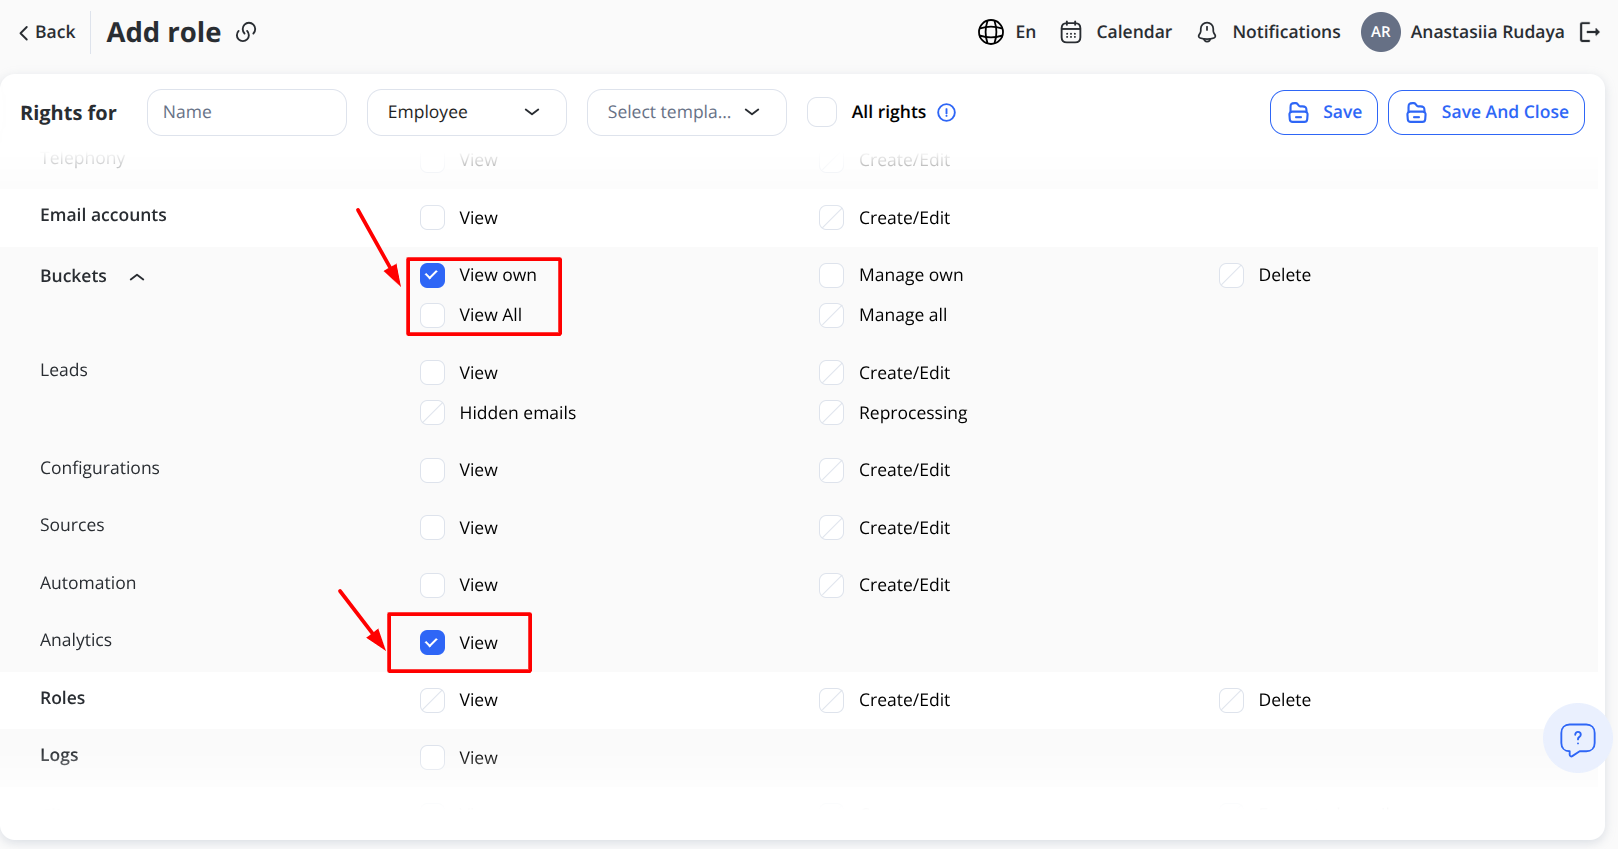](https://wiki.wi.services/uploads/images/gallery/2026-05/analytics-affiliate-hub-upd.png) The dashboard primarily displays the number of leads who have signed up. In this section, you’ll see the total **FDV leads** and the total **signed-up leads**. [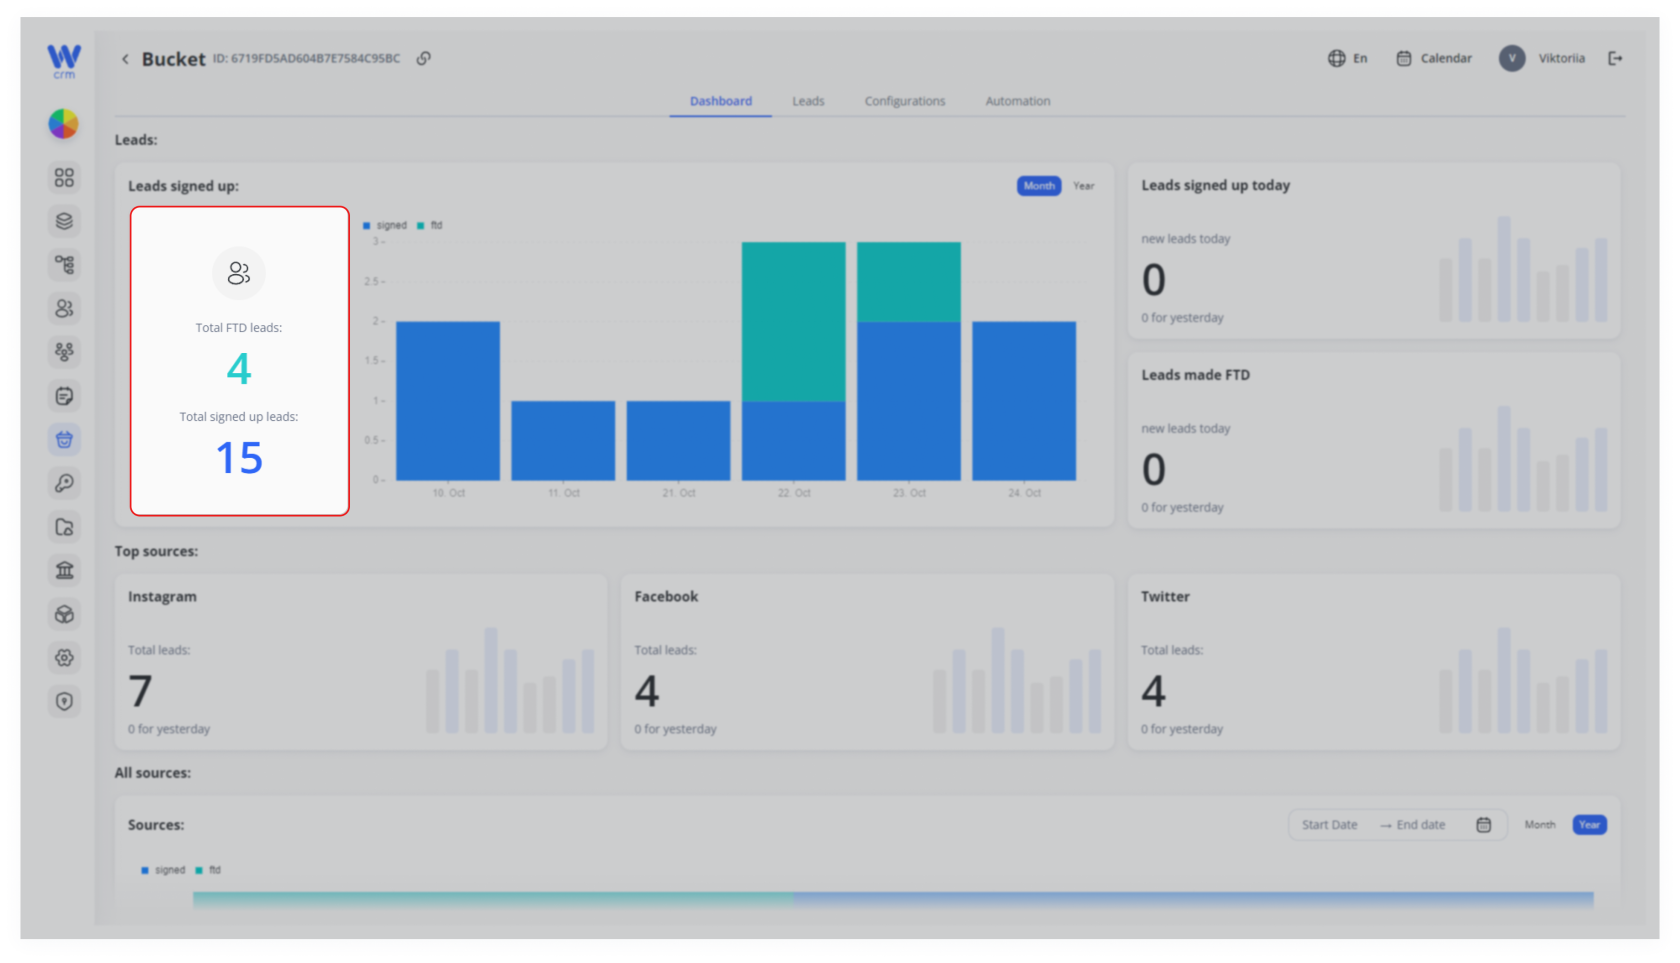](https://wiki.wi.services/uploads/images/gallery/2024-11/image33.png) This information is also presented on the chart on the right. In the upper-right corner, you can select **Month** or **Year** to adjust the lead distribution view on the graph. [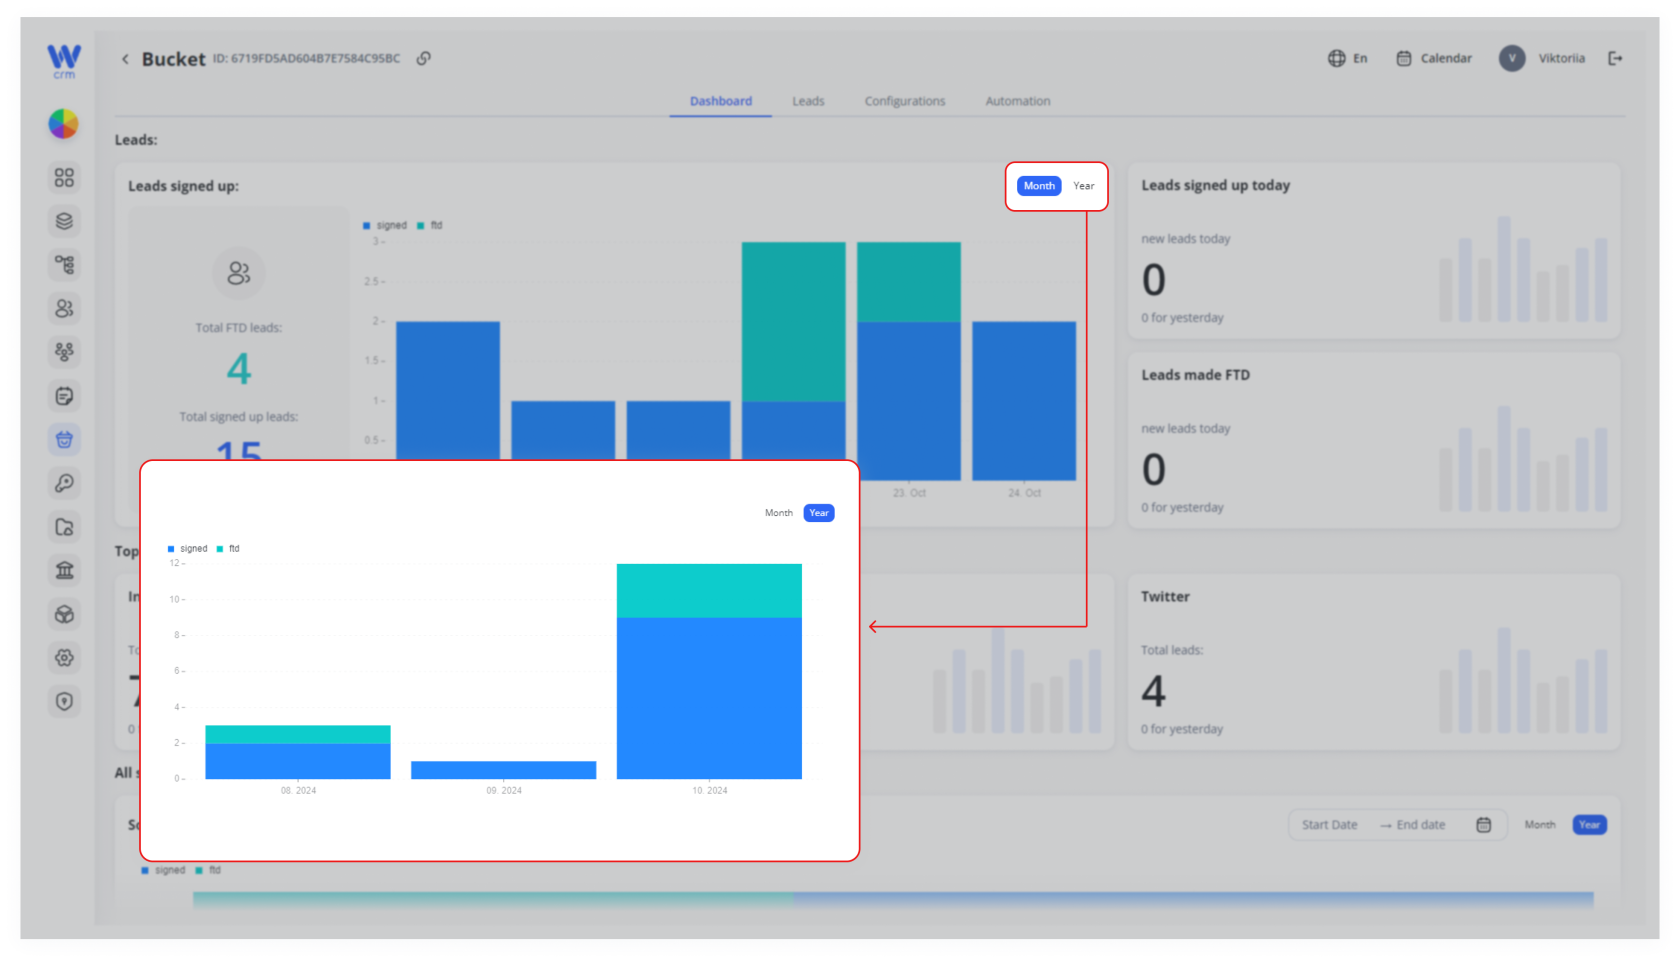](https://wiki.wi.services/uploads/images/gallery/2024-11/image34.png) If you hover your mouse over a specific column, you can view how many leads came in for the selected month/year. [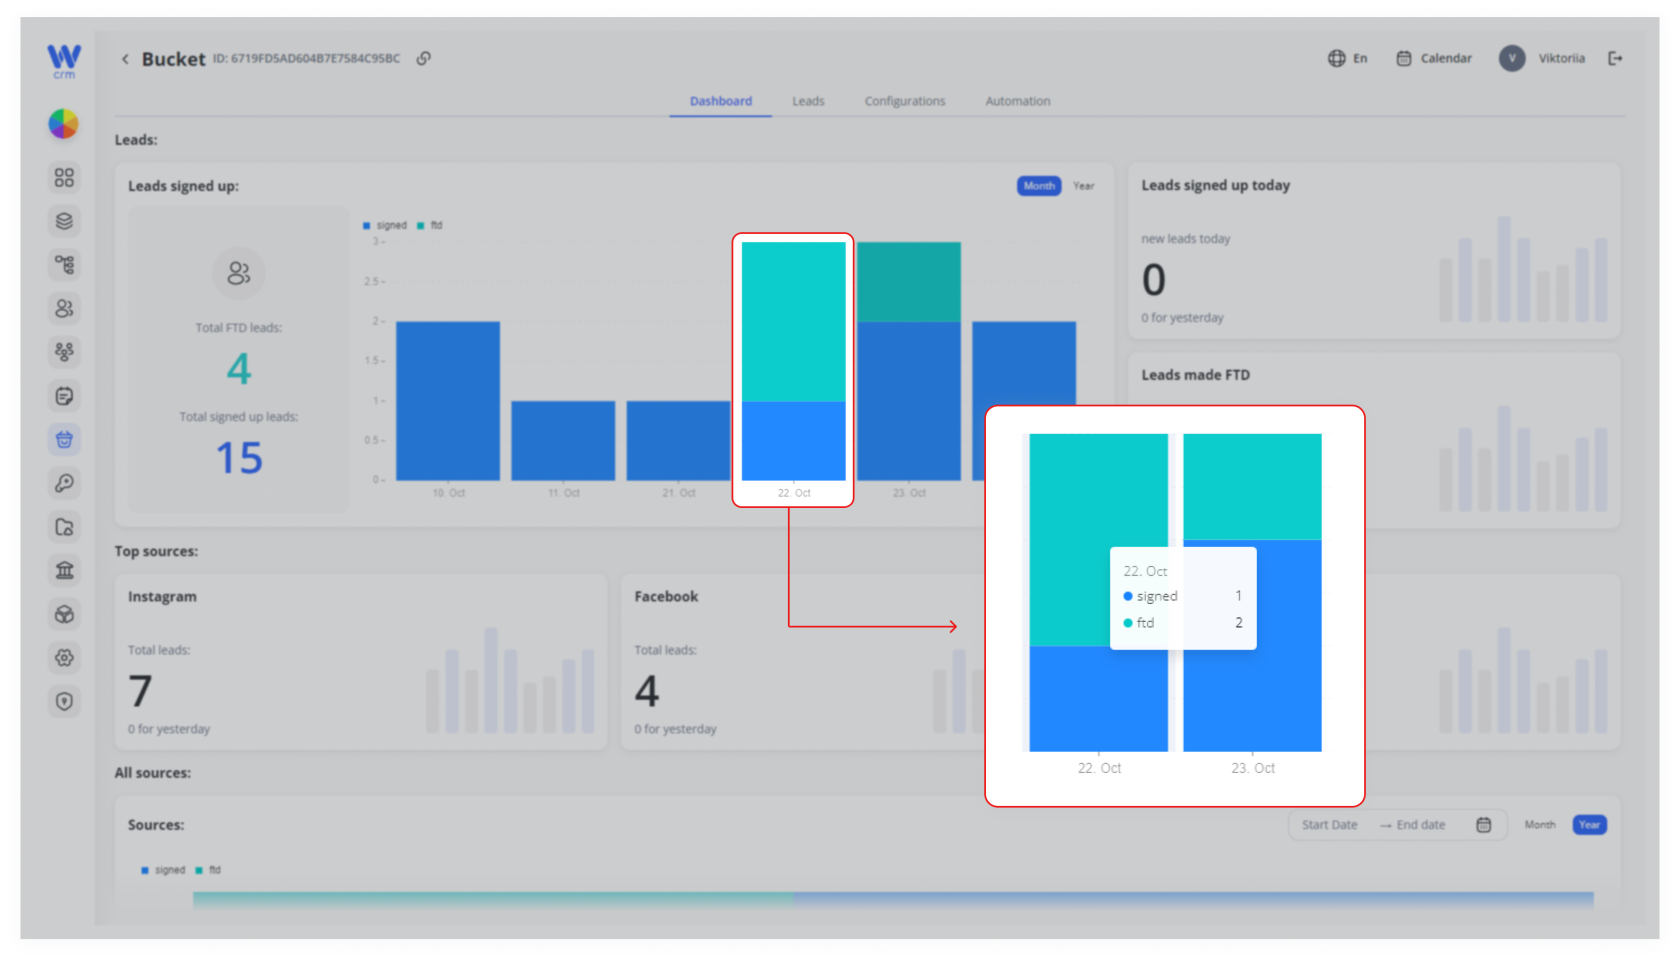](https://wiki.wi.services/uploads/images/gallery/2024-11/image35.png) You can also display only FTD or only signed up leads. [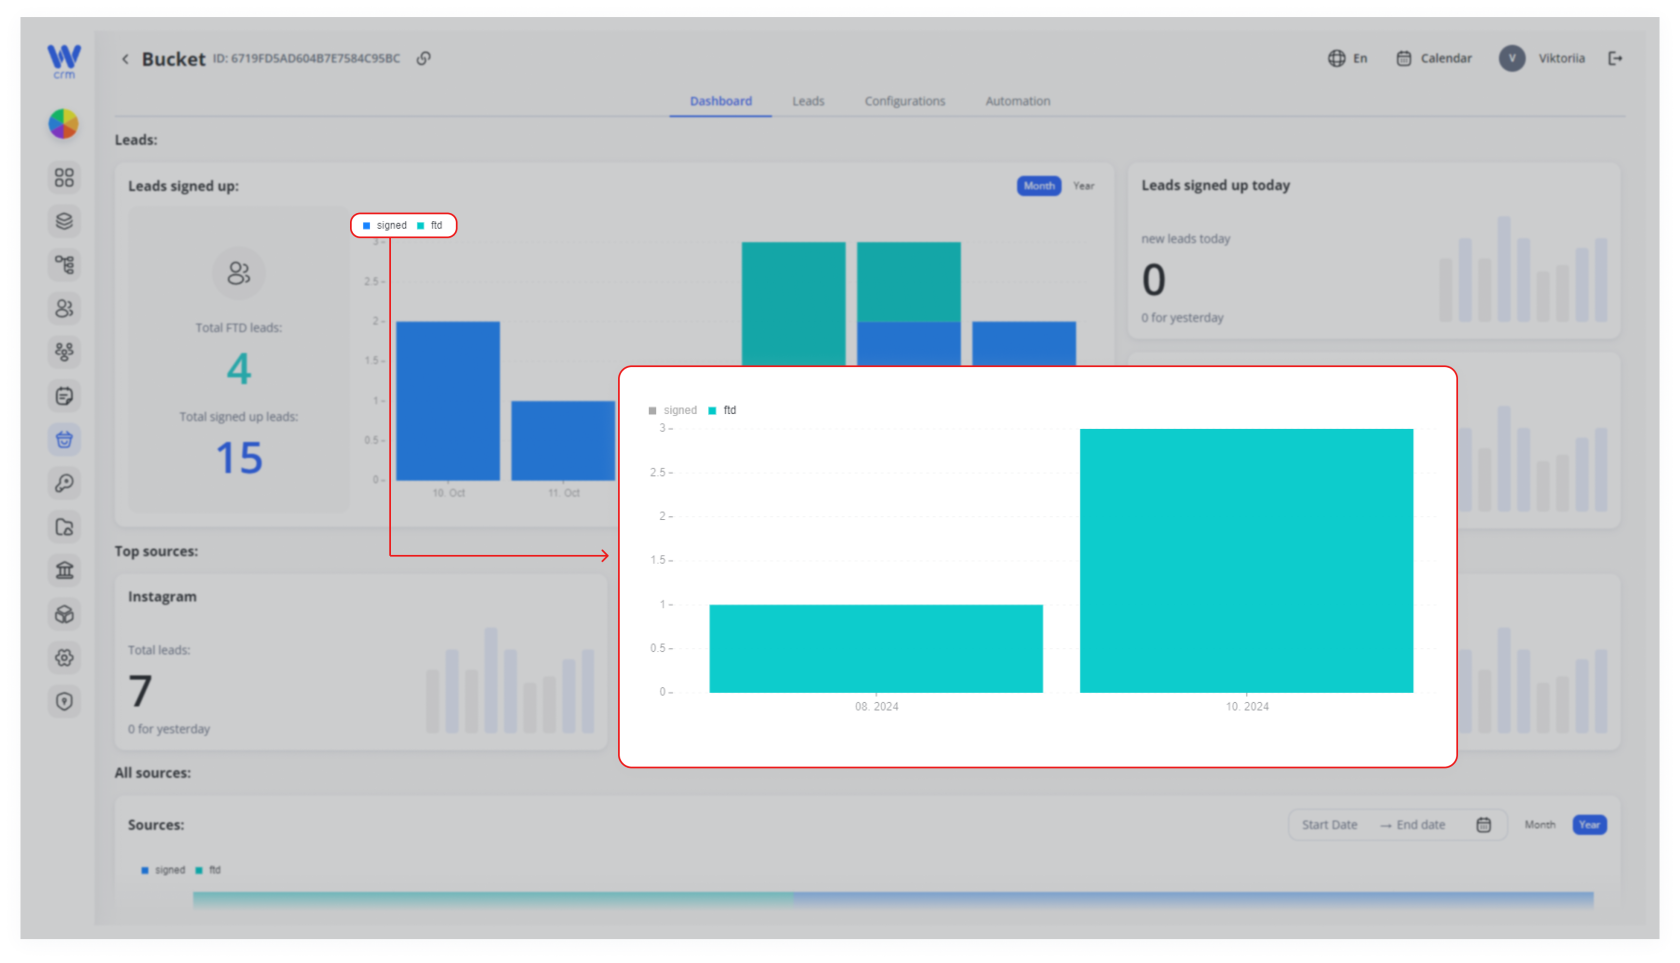](https://wiki.wi.services/uploads/images/gallery/2024-11/image36.png) The section on the right displays the number of **FTD** and **signed-up leads** for today and yesterday. [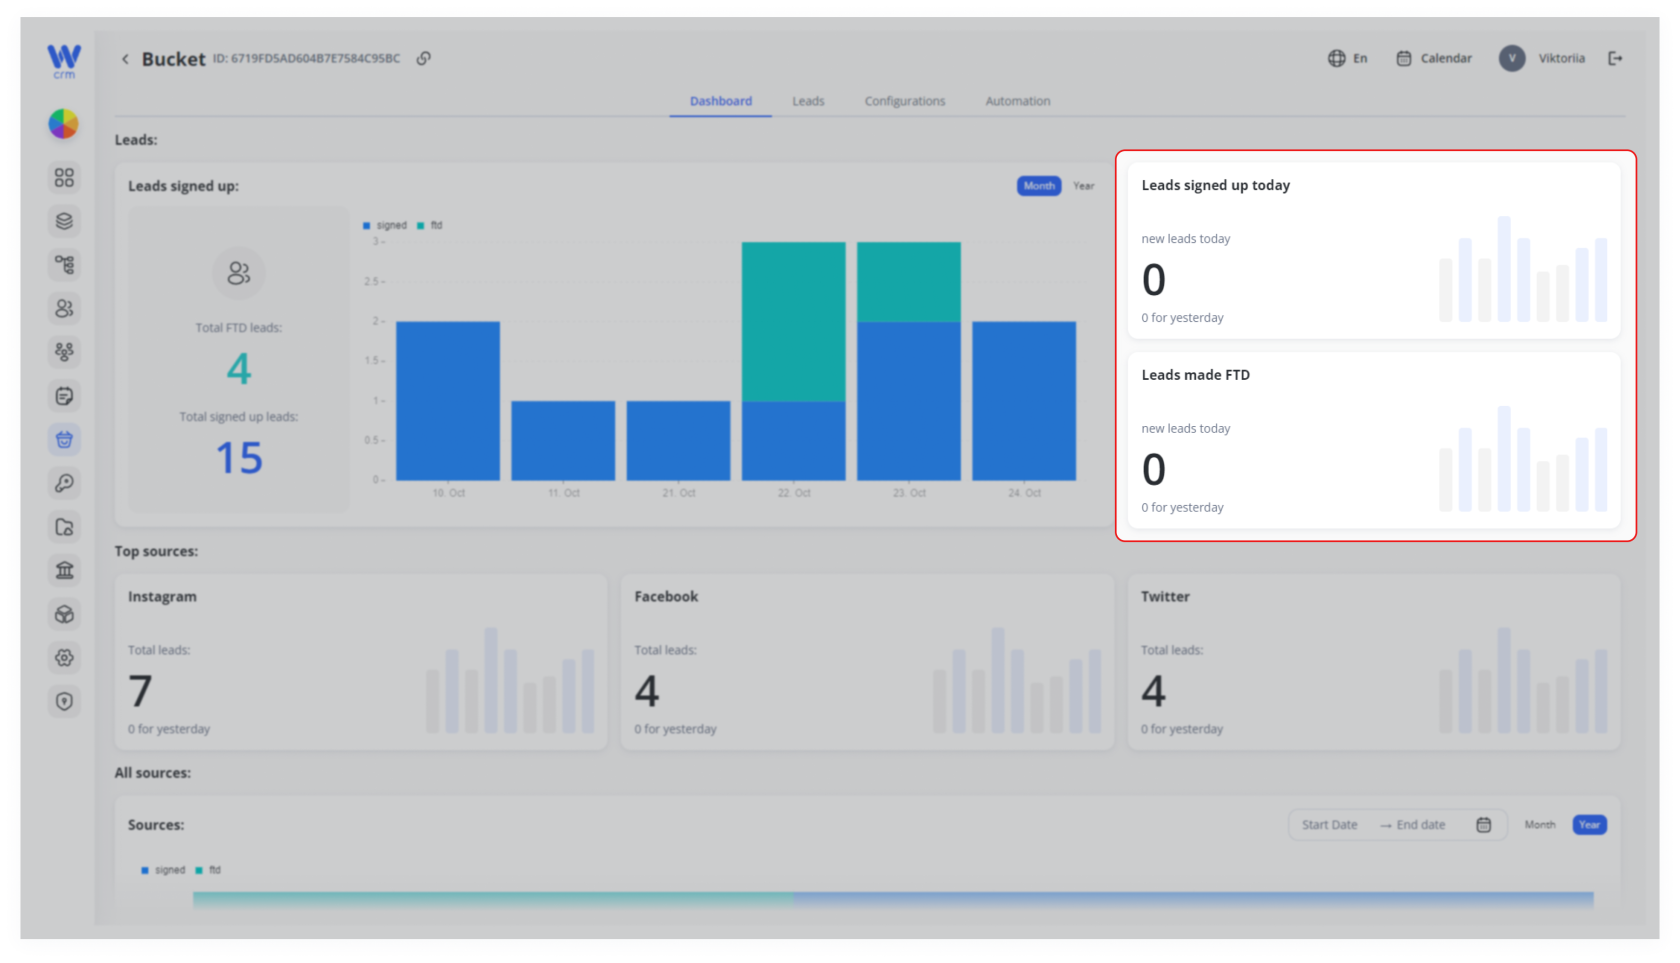](https://wiki.wi.services/uploads/images/gallery/2024-11/image37.png) And in the blocks below, you can see the top sources where your leads are coming from. [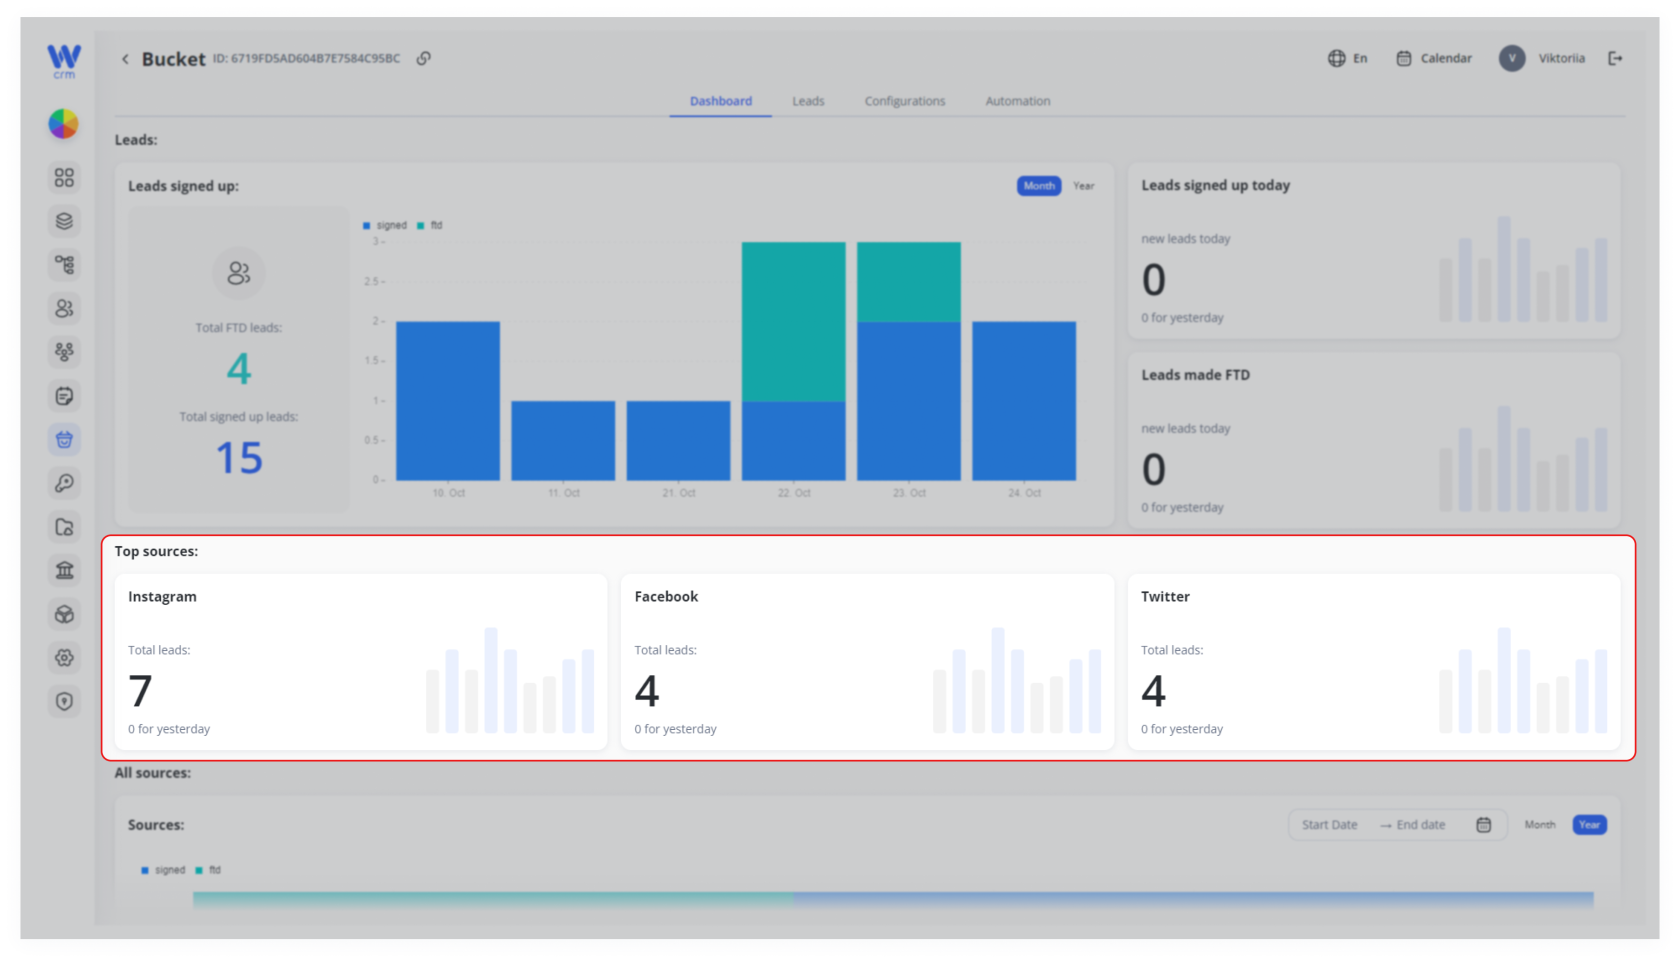](https://wiki.wi.services/uploads/images/gallery/2024-11/image38.png) To see more detailed analytics by source, scroll down the page. The **All sources** block with information about leads from each source will be displayed. In this block, you can: Choose which data to include in the chart: **Month** or **Year**. [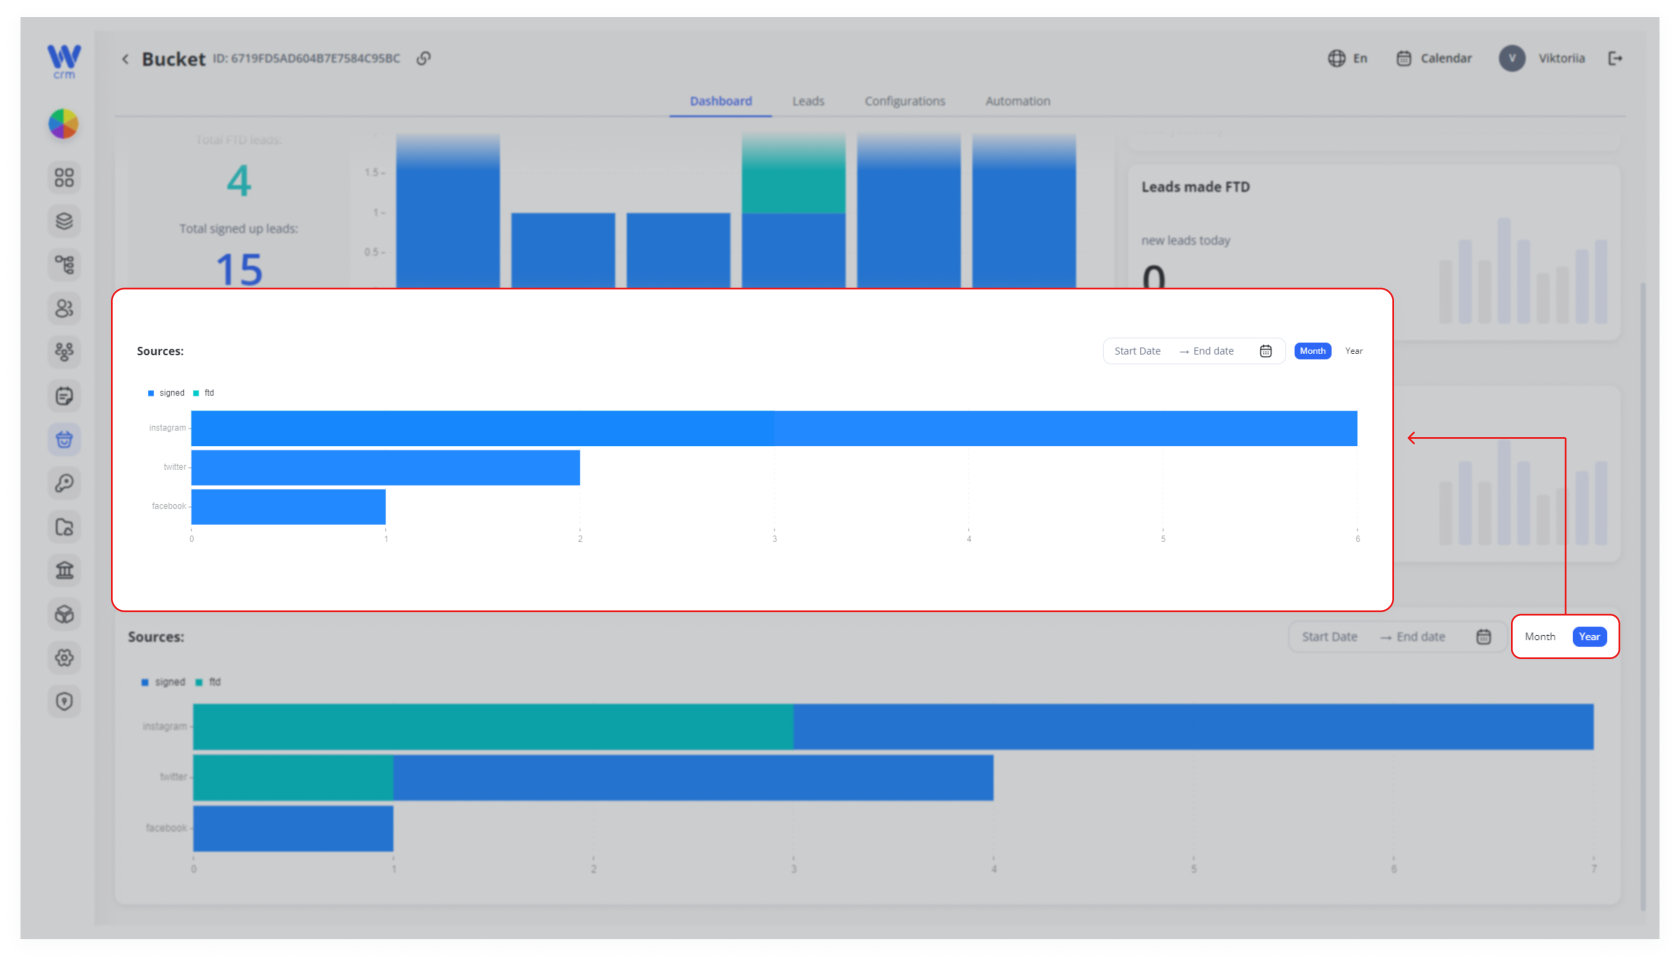](https://wiki.wi.services/uploads/images/gallery/2024-11/image41.png) Customize the time period for which you are viewing the data. [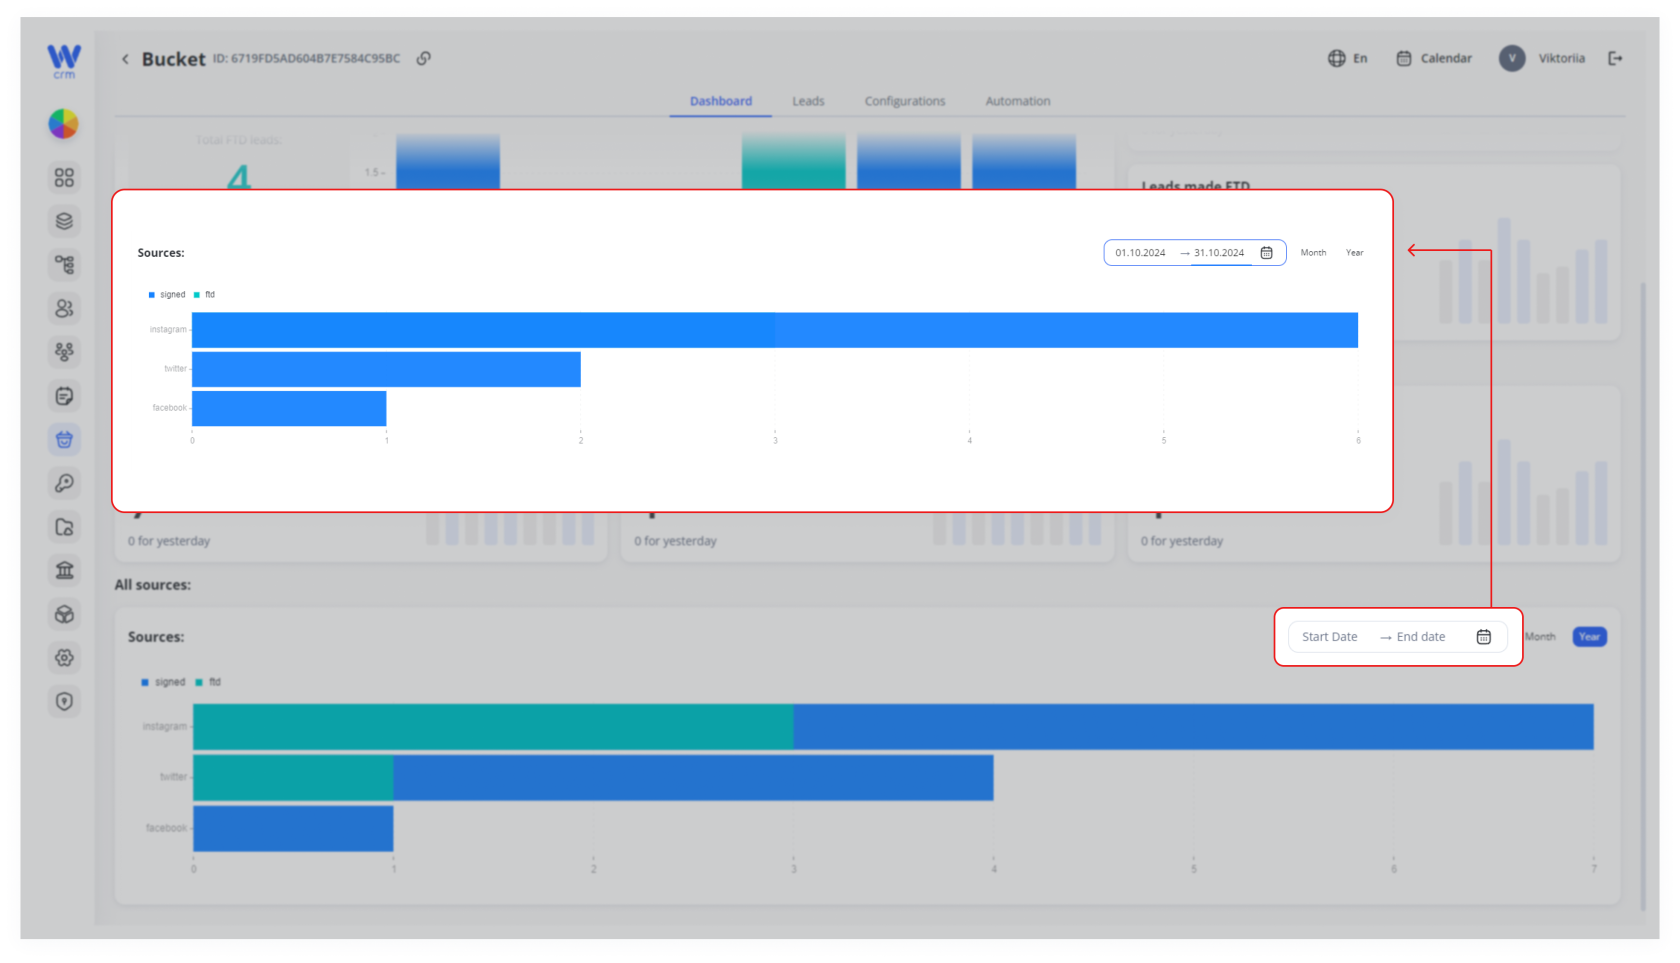](https://wiki.wi.services/uploads/images/gallery/2024-11/image42.png) Display data for signed up leads only or FTD leads only. [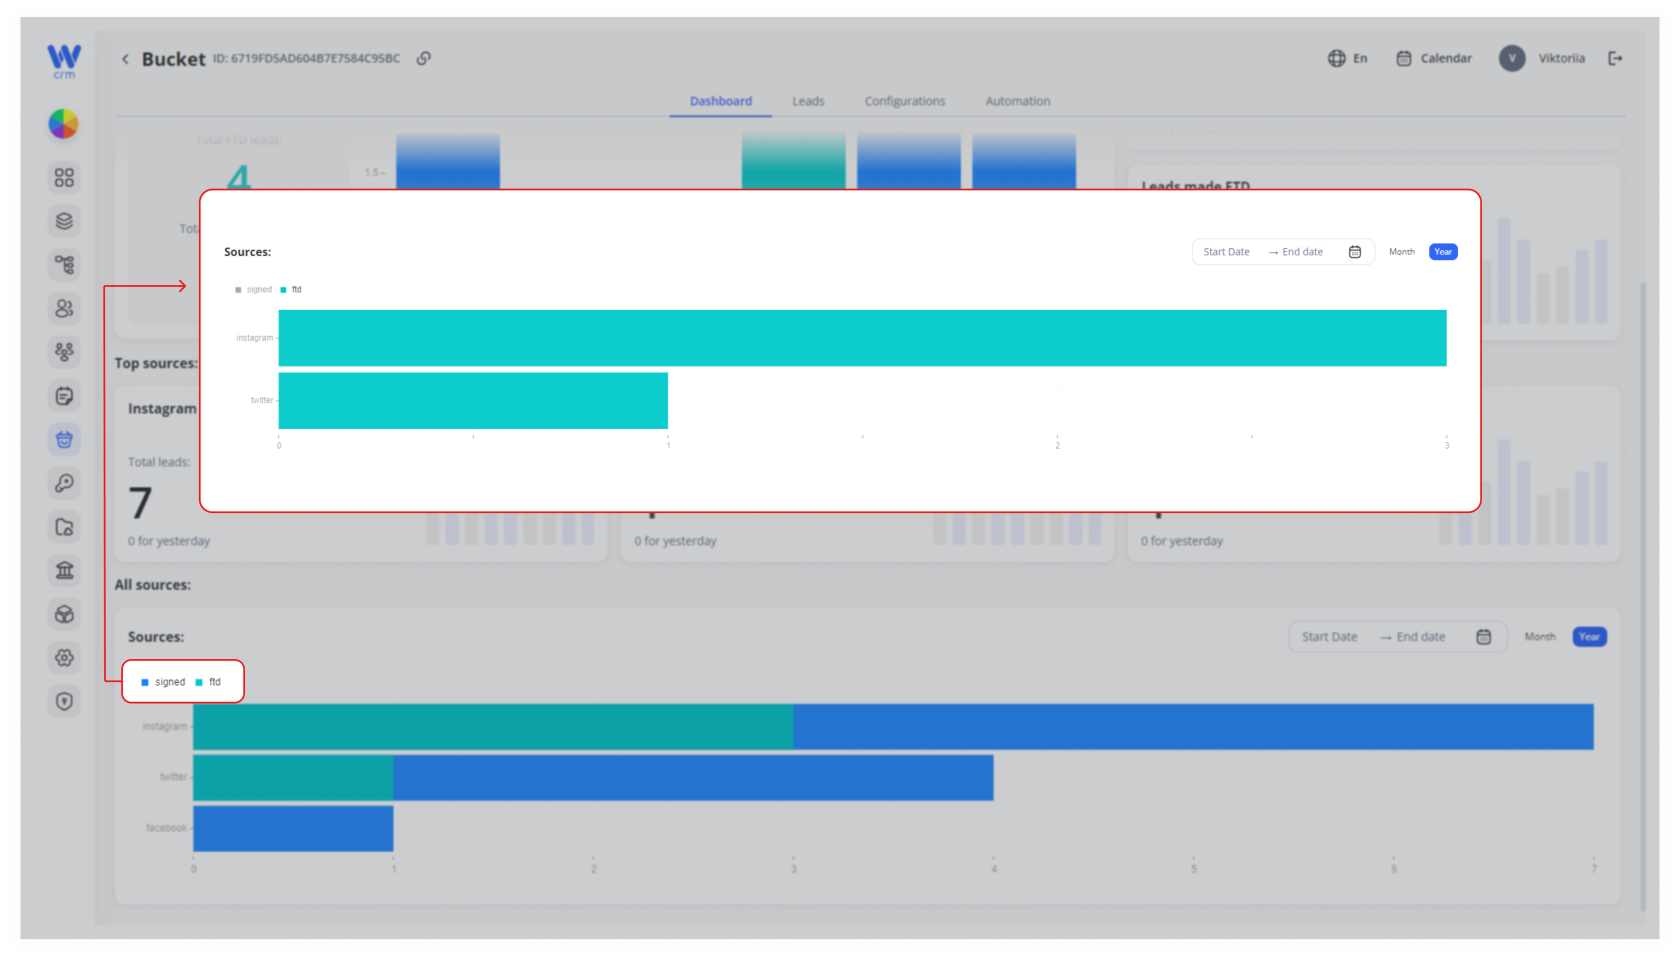](https://wiki.wi.services/uploads/images/gallery/2024-11/image43.png) Also, when you hover over a specific bar, the number of leads from that source for the selected period will appear. [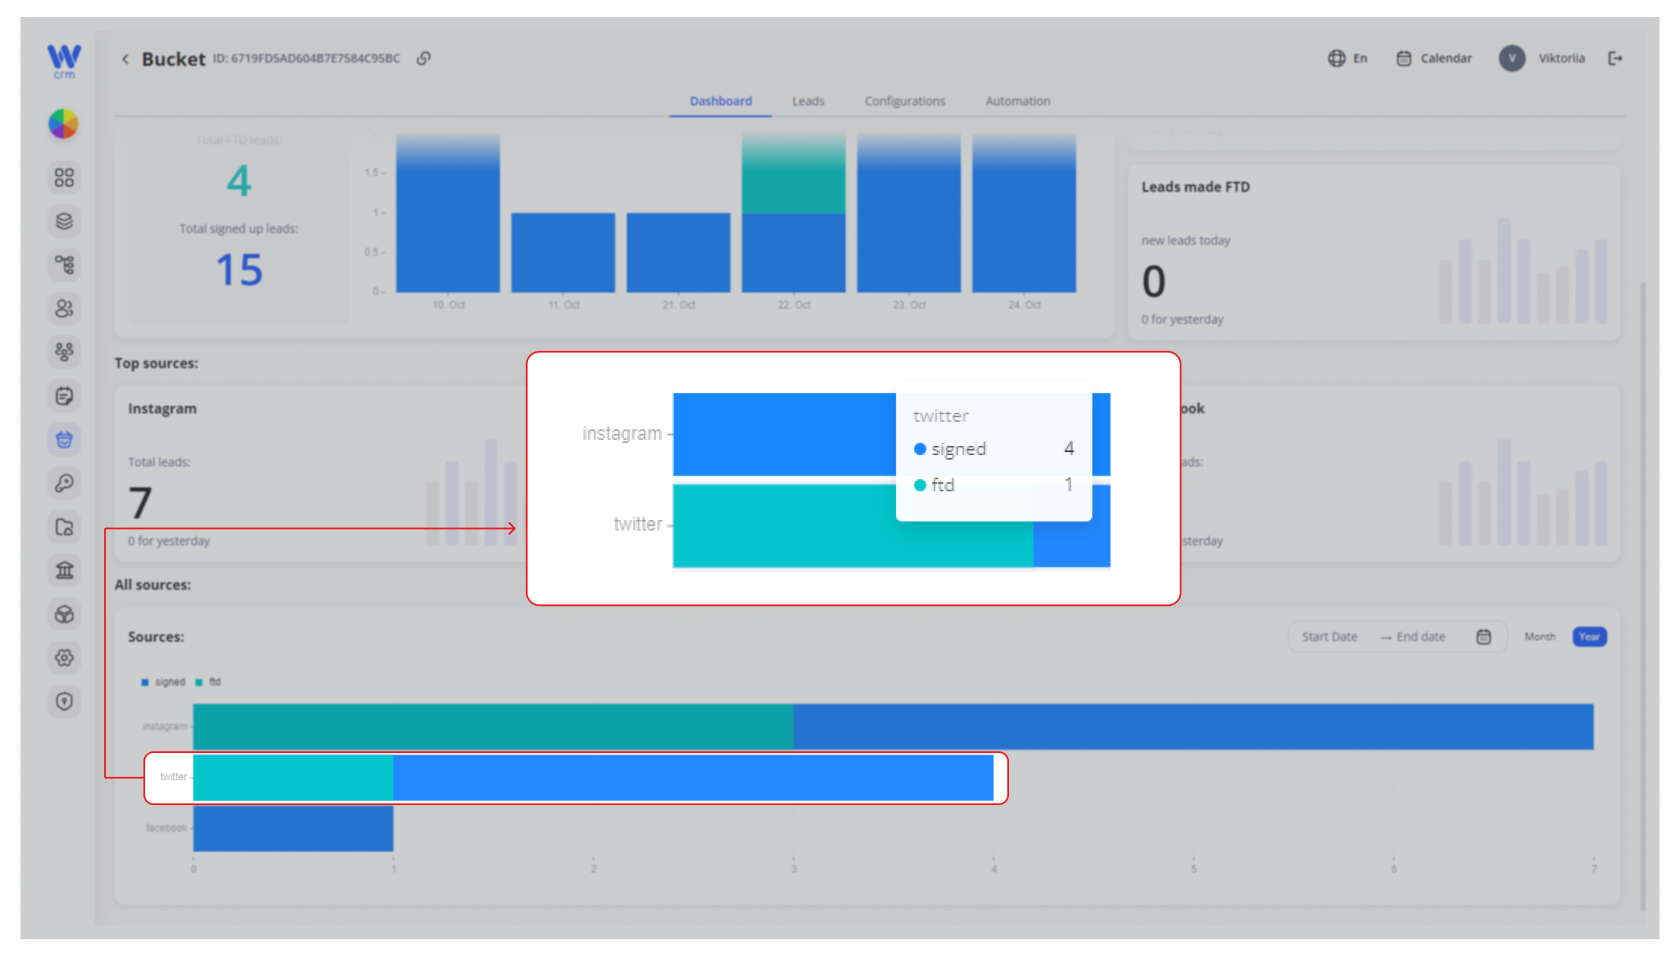](https://wiki.wi.services/uploads/images/gallery/2024-11/image44.png) # 11. How to Delete an Affiliate Hub When an affiliate hub is no longer needed, you can permanently remove it. **Be careful**—deleted affiliate hubs and all their configuration (sources, postbacks, snippets, automation rules, and leads) cannot be recovered. **To delete an affiliate hub**: 1. **Open the affiliate hub’s menu:** In the **Affiliate Hub** list, hover over the affiliate hub you wish to delete and click the **three-dot (•••)** menu in its top-right corner. 2. **Select “Delete”:** From the menu, click **Delete**. 3. **Confirm deletion:** A confirmation dialog will appear. Confirm that you want to delete the affiliate hub. Once deleted, it cannot be restored.**Warning:** Deletion is permanent. Make sure you no longer need any data or configurations associated with this affiliate hub before proceeding.
# 12. Managing Leads in an Affiliate Hub Once an affiliate hub is created and connected to a project, it becomes an active entry point for incoming leads. Managing leads inside an affiliate hub allows you to monitor registrations, track processing status, identify duplicates, and ensure proper routing into your CRM. This section explains how leads behave inside an affiliate hub and how to work with them efficiently. ##### What Is a Lead in an Affiliate Hub? A lead in an affiliate hub represents a new client registration that entered the system through a specific acquisition channel (e.g., affiliate, campaign, API, landing page). Each lead is automatically: 1. Linked to a specific Project 2. Assigned to a Manager 3. Tagged with the Affiliate Hub label 4. Tracked using the Affiliate ID (if configured) Affiliate hubs act as controlled intake queues before clients become fully processed CRM records. ##### Viewing Leads in an Affiliate Hub To view leads: 1. Go to Affiliate Hub in the left sidebar. 2. Click on the desired affiliate hub from the list. 3. Open the **Leads** tab (or Leads section inside the affiliate hub view). You will see a table containing: 1. Client name / email 2. Registration date 3. Processing status 4. Duplicate status (if applicable) 5. Project and manager 6. Source tracking details The table supports sorting and filtering (depending on system configuration). ##### Leads Table: Full Name Column, Sorting, and Name Filters To improve usability and allow faster identification of leads, the Leads table includes a dedicated **Full name** column with sorting and filtering capabilities. **Full Name Column** A new column titled **Full name** is displayed in the Leads table. **Column position:** Immediately after the **ID** column. **Value format:** `<firstName> <lastName>` Behavior: 1. If both first and last name exist → displayed as “FirstName LastName”. 2. If only first name exists → displayed as “FirstName”. 3. If only last name exists → displayed as “LastName”. 4. If both are missing → the cell remains empty. The column uses the same first and last name fields already stored for the lead. No additional data sources are introduced. **Sorting by Full Name** The **Full name** column supports sorting. Sorting behavior: Follows the standard table sorting mechanism (ASC / DESC). Sorting priority: Primary: first name Secondary: last name Sorting integrates with: 1. Pagination 2. Existing filters 3. Other active sorting parameters No custom sorting logic is introduced outside of the established table architecture. **Filtering by First and Last Name** Two separate filters are available in the Leads filter set: **First Name Filter** Filters leads by **first name only**. Uses the same string matching logic applied elsewhere in the system (contains / startsWith / exact — depending on system convention). **Last Name Filter** Filters leads by **last name only**. Uses the same matching behavior as the First Name filter. **Combined Filtering** Both filters can be used together. Behavior: Filters apply using **AND logic**. Example: First name = “John” Last name = “Smith” → Returns only leads matching both criteria. The filters work correctly with: Pagination Sorting Other active filters The “Only unassigned leads” toggle **Performance and Stability** The addition of the Full name column: 1. Does not modify existing columns 2. Does not affect lead processing, assignment, or reprocessing flows 3. Does not introduce UI regressions 4. Uses the existing table rendering, filtering, and sorting mechanisms ##### Lead Statuses Leads inside an affiliate hub typically move through defined processing states: **New** The lead has entered the system but has not yet been processed. **Processed** The lead has successfully passed validation and has been created or merged as a client. **Duplicate** The system detected an existing client matching duplicate detection rules. **Rejected / Invalid** The lead did not meet validation criteria. Status is automatically assigned by the system during processing. ##### Duplicate Handling in Affiliate Hubs If a lead is detected as a duplicate: 1. The system links it to the existing client record. 2. The client’s **Last duplicate date** field is updated automatically. 3. The lead status reflects Duplicate. This ensures: 1. No duplicate CRM records are created. 2. Duplicate activity is traceable over time. 3. Managers can monitor data quality trends. Duplicate detection logic is system-driven and cannot be manually overridden inside the affiliate hub view. ##### Reprocessing Leads In certain cases (e.g., configuration changes or temporary API errors), you may need to reprocess a lead. If the system allows reprocessing: 1. Select the lead from the list. 2. Click the action menu (three-dot menu). 3. Choose **Reprocess**. Reprocessing will: 1. Re-run duplicate checks 2. Re-apply routing logic 3. Attempt client creation again Note: Reprocessing does not bypass duplicate detection rules. ##### Filtering and Searching Leads Within the affiliate hub Leads view, you can typically: 1. Search by email, ID, or name 2. Filter by registration date 3. Filter by status (New, Processed, Duplicate) 4. Filter by manager or project (if supported) This helps you: 1. Monitor daily acquisition flow 2. Identify spikes in duplicate registrations 3. Prioritize unresolved or failed leads 4. Analyze campaign-level performance ##### Only Unassigned Leads (Fast Toggle) To quickly focus on leads that are not yet assigned to a manager, use the **Only unassigned leads** toggle located above the leads table. **How it works** 1. **Disabled (default)** — Displays all leads in the selected affiliate hub. 2. **Enabled** — Displays only leads that do not have an assigned manager. The definition of “unassigned” follows the system’s backend assignment logic and uses the same criteria as the existing routing model. **Location** The toggle is placed: 1. Above the leads table 2. Next to the Search field 3. Outside of the Filters drawer This control is designed for fast operational access and is not part of advanced filtering. **Hub-Level Persistence** The state of quick toggles is automatically saved for each affiliate hub separately. Only FTD (Fast Toggle) To quickly focus on converted leads, use the **Only FTD** toggle located above the leads table. **How it works** Disabled (default) — Displays all leads in the selected affiliate hub. Enabled — Displays only leads that meet the system definition of FTD (First Time Deposit). The toggle reuses the existing FTD flag and business logic already used in CRM and analytics. No separate FTD calculation is introduced. **Combined Behavior with Other Toggles** The Only FTD toggle works independently from the Only unassigned leads toggle. If both are enabled: The system displays only leads that are: FTD AND Unassigned Standard filter intersection logic applies. ##### How Leads Become Clients When a lead is successfully processed: 1. A client record is created in the Clients module 2. The client inherits: Project Manager Affiliate hub label Affiliate ID (if configured) 3. Action timeline tracking begins 4. The client becomes visible in all CRM modules After processing, the lead remains part of the affiliate hub history for audit and reporting purposes. ##### FTD Detection and First Transaction Date The system determines FTD (First Time Deposit) status based on the client’s transaction history. **How FTD Is Calculated** A lead becomes marked as FTD when: 1. The associated client completes their first successful deposit transaction. 2. The transaction status is completed/approved. 3. The transaction meets the system’s deposit criteria (as defined in the Core Banking module). The system reuses the same FTD logic used in Analytics and CRM reporting. No separate FTD calculation is introduced at the affiliate hub level. **First Transaction Date** When a client completes their first valid deposit: 1. The FTD column in the Leads table is populated with the date and time of that first transaction. 2. This value reflects the earliest completed deposit in the client’s transaction history. > **Important:** > > If a client already existed in the system before entering the affiliate hub and had prior transactions: > The FTD date will reflect the true first transaction in the system. > It will not be recalculated based on affiliate hub registration date. **Known Update Requirement** If the First Transaction Date is not appearing correctly: Possible causes may include: 1. Transaction was not marked as completed. 2. Deposit type does not match FTD criteria. 3. Historical transaction exists but was not indexed. 4. Data sync delay between Core Banking and CRM modules. FTD status and first transaction date are always derived from the Transactions module, not manually editable in the Affiliate Hub view. ##### Operational Best Practices Review New leads daily Monitor Duplicate leads weekly Investigate abnormal duplicate spikes Keep Affiliate IDs accurate for tracking Deactivate unused affiliate hubs to prevent routing errors Regular affiliate hub monitoring ensures: 1. Clean client data 2. Accurate marketing attribution 3. Proper onboarding routing 4. Reduced compliance risks > **Important Notes** > > Editing an affiliate hub does not retroactively change already processed leads. > Duplicate logic is centralized and cannot be modified at the affiliate hub level. > Affiliate hubs control routing at intake stage only; client lifecycle management happens in the Clients module. > Deactivating an affiliate hub prevents new leads from entering but does not remove historical data. # 13. Configuration of Sources within Affiliate Hub Sources define where leads come from, allowing you to track and analyze acquisition channels. The **Sources** list tags each lead with its origin (e.g., “Twitter,” “Facebook,” etc.). To add a new source to the existing affiliate hub, do the following: 1. Open the **Sources** tab within your affiliate hub 2. Click **+ New Source** in the upper right corner 3. Enter the source name **(e.g. Instagram)** 4. Add **Tags** to make source filtering more convenient in the future 5. Fill out the **Description** field to provide a brief overview of the lead source or its key details 6. Click **Save** 7. Add as many sources as needed by repeating steps 2–6 In the **Sources** tab, you can assign a webmaster to track leads from a specific source (e.g., only Facebook or only Instagram). You should add them first in the **Roles** module as a role you defined for this type of user (e.g., Affiliate Webmaster), and then grant them the **View by Sources** permission. Role permissions can be adjusted as needed. To designate a webmaster, click **Assign** in the **Affiliate** column and select a person from the drop-down list. One webmaster can be assigned to several sources if needed. To remove a source, hover over the source tag and click **Delete** (🗑️) icon in the **Actions** column.